
- 1关于资金调拨系统的设计方法论_资金上收下拨流程设计结果新道云
- 2Python解析json数据并保存为csv文件
- 3使用博图V15和KEPServerEX6软件进行OPC Server读取PLC数据仿真(对PLC数据采集和边缘计算程序测试的准备)_kepware读取opc数据
- 4idea 本地暂存临时改动代码_idea暂存本地代码
- 5《Python自然语言处理》第五章练习题答案_python中文自然语言处理基础与实战课后练习
- 6SQLSERVER2000SP4新特性概述_sql server 2000 sp4变化
- 7数据结构——堆(C++)_堆 c++
- 8大数据培训面试Flink八股文分享
- 9业务安全 –业务逻辑漏洞_业务逻辑漏洞实战
- 10连接mysql数据库出现The last packet sent successfully to the server was 0 milliseconds ago.问题解决方案
ubuntu20.04安装+ros-noetic安装+内网穿透frp
赞
踩
内网穿透的参考链接:如何优雅地访问远程主机?SSH与frp内网穿透配置教程
ubuntu20.04安装
选择镜像网站:
https://mirrors.tuna.tsinghua.edu.cn/
- 1
下载20.04的iso
在vmware中创建新的虚拟机
自定义->下一步
 找自己的影响文件的下载目录
下一步:
设置用户名密码,个性化的全名
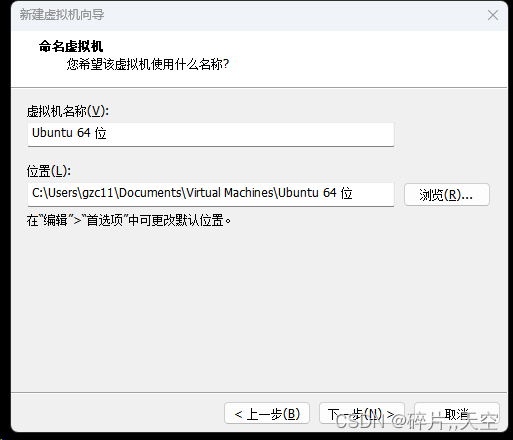 设置名称和存放位置:
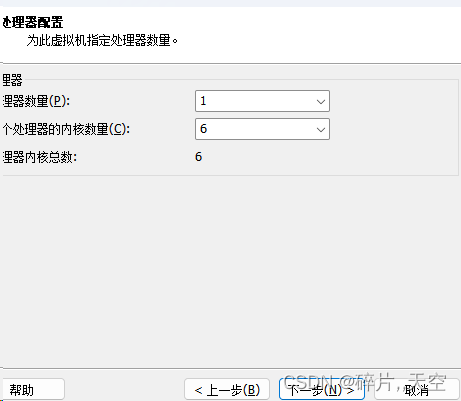 下一步,再下一步,按照有推荐一直下一步,到这里:
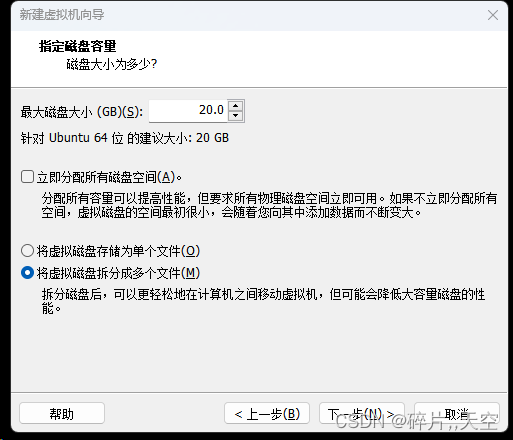 内存设置最好在120G左右(为后续做slam留足空间),放在机械硬盘里面就可以,再下一步
最后完成。
创建好以后可以移出各种外设,包括打印机,软盘,DVD,DVD2等等
安装ros-noetic
首先先修改源的位置,为了git clone的更快
 点开以后在这里:
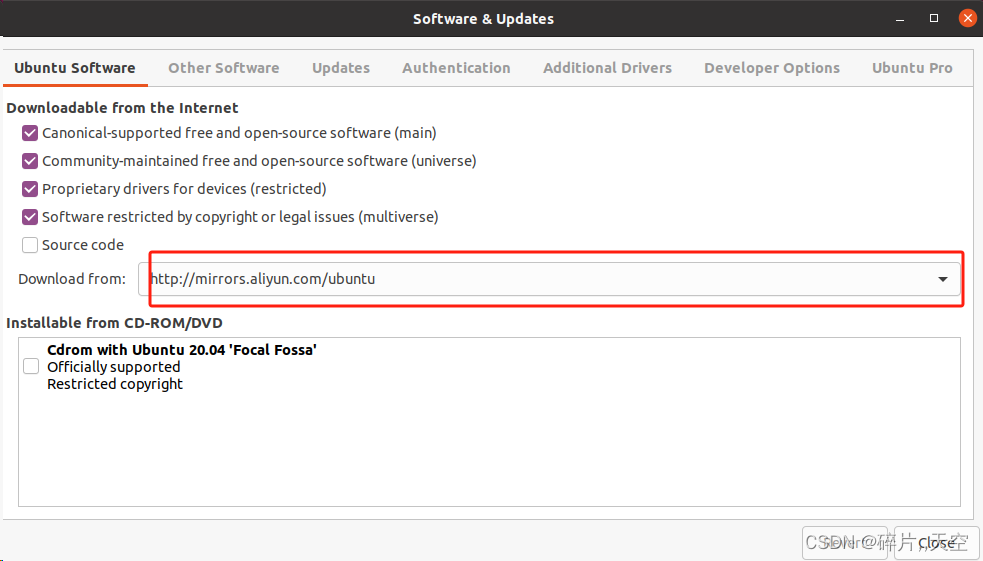 在这里选择other,选择阿里云的镜像网站就可以了
安装各种必要的插件
在终端中依次输入:
# 为 apt 添加ROS软件源
sudo sh -c '. /etc/lsb-release && echo "deb http://mirrors.ustc.edu.cn/ros/ubuntu/ `lsb_release -cs` main" > /etc/apt/sources.list.d/ros-latest.list'

# 为ROS软件源添加密钥
sudo apt-key adv --keyserver 'hkp://keyserver.ubuntu.com:80' --recv-key C1CF6E31E6BADE8868B172B4F42ED6FBAB17C654

# 更新一下软件源,把ros-noetic的包添加进去
sudo apt update

# 安装ros-noetic
sudo apt install ros-noetic-desktop-full


# 安装ros-noetic的各种插件
sudo apt install python3-roslaunch python3-rostopic python3-rosnode python3-catkin python3-catkin-tools python3-wstool python3-vcstool

# 下面两条安装gtsam
# 安装gtsam的网站:https://gtsam.org/get_started/
sudo add-apt-repository ppa:borglab/gtsam-release-4.0

# not necessary since Bionic
sudo apt update
sudo apt install libgtsam-dev libgtsam-unstable-dev

# 这个指令可有可没有
git config --global core.editor vim

# 配置pip
sudo apt install python3-pip

- 1
- 2
- 3
- 4
- 5
- 6
- 7
- 8
- 9
- 10
- 11
- 12
- 13
- 14
- 15
- 16
- 17
- 18
- 19
- 20
- 21
- 22
- 23
- 24
- 25
- 26
- 27
- 28
- 29
最后可以安装zsh
安装zsh的过程:
sudo apt install zsh
sudo apt install git
git clone https://github.com/ohmyzsh/ohmyzsh.git
# 找到oh-my-zsh/tools
# 进入该目录,找到setup.sh
# 运行:
sh ./setup.sh
- 1
- 2
- 3
- 4
- 5
- 6
- 7
就结束
同时,将
source /opt/ros/noetic/setup.sh
- 1
指令放在~/.bashrc文件的最末尾
如果使用zsh,则将:
source /opt/ros/noetic/setup.zsh
- 1
上述指令放在~/.zshrc文件中
检查一下,在.zshrc文件中应该有这几个部分
source /opt/ros/noetic/setup.zsh
source /home/gzc/livox_driver_ws/devel/setup.zsh
# 这里是为了和bashrc文件中的环境一样
export PATH=~/.local/bin:$PATH
# 如果有小车的话,需要有小车的ip
export ROS_MASTER_URL=http://localhost:11311
- 1
- 2
- 3
- 4
- 5
- 6
键盘控制小车运动的功能包:teleop_twist_keyboard(只知道名字,还未实践)
rosrun teleop_twist_keyboard teleop_twist_keyboard.py
- 1
安装vscode
网站:https://code.visualstudio.com/
下载:
下载好之后,放进Ubuntu中,双击点开,安装
安装简体中文插件
安装C++插件
创建一个c++文件:1.cpp
随后运行,选择/usr/bin/gcc目录下的c++
ctrl+shift+p唤醒命令窗口
内网穿透连接实验室主机
本机:笔记本电脑
远程机:实验室的虚拟机
服务器:阿里云默认linux服务器
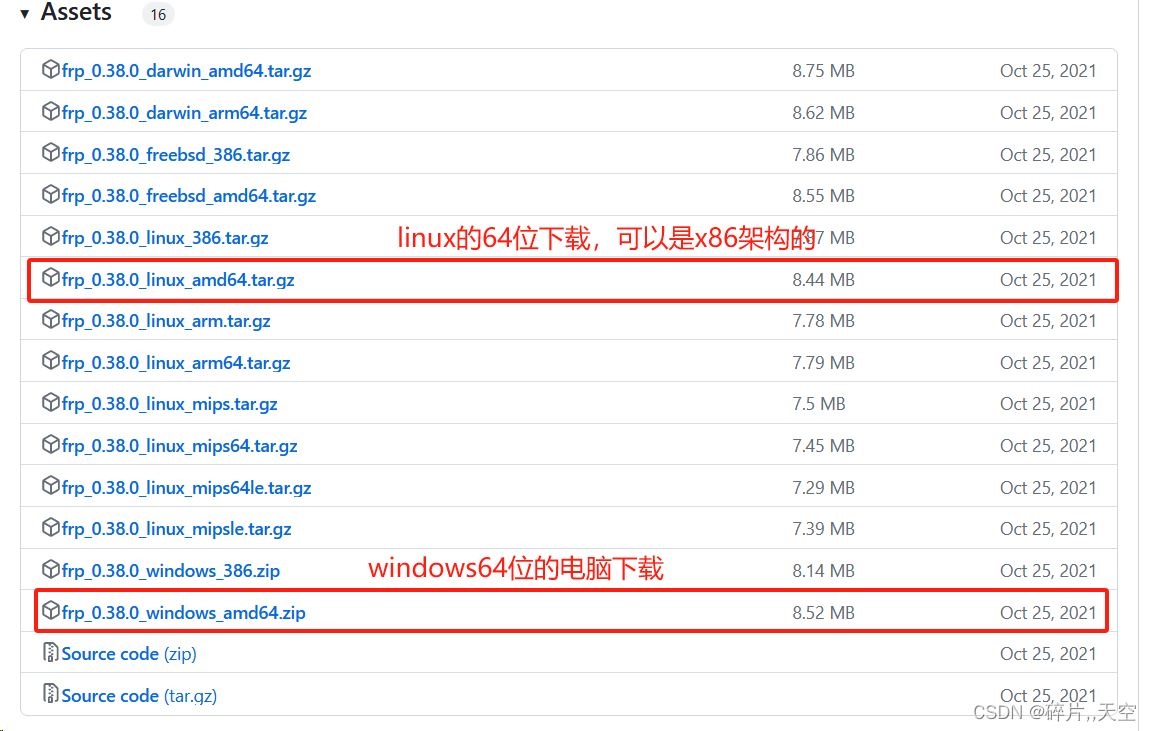
注册一个阿里云的服务器,在github上下载0.38.0的frp的代码,网址:
https://github.com/fatedier/frp/releases?page=3
 先开放服务器端linux的端口号,配置如下:
 下载好以后,进行文件的修改:
linux中:编辑/etc/hosts文件,在文件末尾加上
ssh-server + 公网地址
- 1
在windows中,编辑文件C:\Windows\System32\drivers\etc\hosts文件,在文件末尾加上
ssh-server + 公网地址
- 1
随后,本机(现在操纵的笔记本电脑)ssh到服务器端,即:
ssh root@ssh-server
- 1
实验室的虚拟机,也ssh到服务器端,由此,通道已经打通;
配置frpc和frps文件
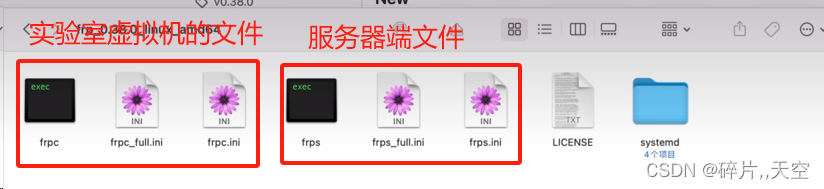 frps.ini文件不需要修改
frpc.ini文件需要修改:
[common]
# 这里的ip地址要改成服务器的ip地址,端口号不变
server_addr = xx.xx.xx.xx
server_port = 7000

[ssh]
type = tcp
local_ip = 127.0.0.1
local_port = 22
remote_port = 6000
- 1
- 2
- 3
- 4
- 5
- 6
- 7
- 8
- 9
- 10
运行
在服务器端:
找到frps可执行文件在的位置,进入到那个目录,使用以下指令:
cd frps
./frps -c ./frps.ini
- 1
- 2
如果frps没有执行权限,则在frps的目录下,使用:
chmod +x frps
- 1
运行成功后:
 客户端(实验室的虚拟机):
cd frpc
./frpc -c ./frpc.ini
- 1
- 2
运行成功配图:

配置成功,现在就可以使用vscode远程登陆主机了,运行指令:
ssh -p 6000 gzc@ssh-server
- 1
输入实验室虚拟机的密码即可登录
完成自动化部署
使用service插件
在服务器端,将下面的代码放在lib/systemd/system/frps.service中
[Unit]
Description=Frp Server Service
After=network.target

[Service]
Type=simple
# 这里修改为服务器的主机名
User=root
Restart=on-failure
RestartSec=5s
# 这里修改路径为安装frps可执行文件以及frps.ini文件的路径
ExecStart=/usr/bin/frps -c /etc/frp/frps.ini
LimitNOFILE=1048576

[Install]
WantedBy=multi-user.target
- 1
- 2
- 3
- 4
- 5
- 6
- 7
- 8
- 9
- 10
- 11
- 12
- 13
- 14
- 15
- 16
使用下面的指令:
systemctl daemon-reload
systemctl enable frps
systemctl start frps
systemctl status frps
- 1
- 2
- 3
- 4
使用上述指令后,就得到了下面的提示:

看到active(running) 就代表启动成功了
在客户端,与服务器端的修改是一样的,不过要使用frpc.service(客户端的)文件
免密登录
需求:本机(笔记本)可以远程访问服务器,免密登录,且免密登录实验室的虚拟机
linux的免密登录
本机的配置:(windows)
首先,在设置 -> 添加可选功能 ->openssh的服务端安装好(用外网)
找到C:\Users\gzc目录下,使用cmd命令:
sshkey-keygen
- 1
现在单机.ssh文件夹,可以找到id_rsa.pub公钥
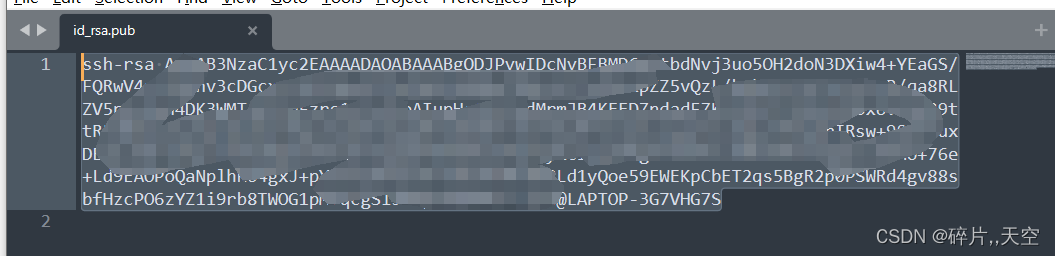 复制这个公钥,进入虚拟机,在虚拟机的~/.ssh文件夹中,输入以下命令:
# 添加authorized_keys文件
sudo vim authorized_keys
- 1
- 2
将复制的公钥放在这个文件中,保存,这样就配好了ssh的免密登录(实验室的虚拟机)
公网上的服务器与实验室的虚拟机是一样的配置
windows上的免密登录
如果我现在想要用笔记本登录实验室的windows主机,这样就复杂一些:
将上面复制的公钥粘贴在C:\Users\gzc11 \ .ssh\authorized_keys这个文件中,同时,要设置一下:
C:\ProgramData\ssh文件夹中的配置:
修改的部分在第34,38,51行,同时,将最后两行注释掉了
# This is the sshd server system-wide configuration file.  See
# sshd_config(5) for more information.

# The strategy used for options in the default sshd_config shipped with
# OpenSSH is to specify options with their default value where
# possible, but leave them commented.  Uncommented options override the
# default value.

#Port 22
#AddressFamily any
#ListenAddress 0.0.0.0
#ListenAddress ::

#HostKey __PROGRAMDATA__/ssh/ssh_host_rsa_key
#HostKey __PROGRAMDATA__/ssh/ssh_host_dsa_key
#HostKey __PROGRAMDATA__/ssh/ssh_host_ecdsa_key
#HostKey __PROGRAMDATA__/ssh/ssh_host_ed25519_key

# Ciphers and keying
#RekeyLimit default none

# Logging
#SyslogFacility AUTH
#LogLevel INFO

# Authentication:

#LoginGraceTime 2m
#PermitRootLogin prohibit-password
#StrictModes yes
#MaxAuthTries 6
#MaxSessions 10

PubkeyAuthentication yes

# The default is to check both .ssh/authorized_keys and .ssh/authorized_keys2
# but this is overridden so installations will only check .ssh/authorized_keys
AuthorizedKeysFile	.ssh/authorized_keys

#AuthorizedPrincipalsFile none

# For this to work you will also need host keys in %programData%/ssh/ssh_known_hosts
#HostbasedAuthentication no
# Change to yes if you don't trust ~/.ssh/known_hosts for
# HostbasedAuthentication
#IgnoreUserKnownHosts no
# Don't read the user's ~/.rhosts and ~/.shosts files
#IgnoreRhosts yes

# To disable tunneled clear text passwords, change to no here!
PasswordAuthentication yes
#PermitEmptyPasswords no

#AllowAgentForwarding yes
#AllowTcpForwarding yes
#GatewayPorts no
#PermitTTY yes
#PrintMotd yes
#PrintLastLog yes
#TCPKeepAlive yes
#UseLogin no
#PermitUserEnvironment no
#ClientAliveInterval 0
#ClientAliveCountMax 3
#UseDNS no
#PidFile /var/run/sshd.pid
#MaxStartups 10:30:100
#PermitTunnel no
#ChrootDirectory none
#VersionAddendum none

# no default banner path
#Banner none

# override default of no subsystems
Subsystem	sftp	sftp-server.exe

# Example of overriding settings on a per-user basis
#Match User anoncvs
#	AllowTcpForwarding no
#	PermitTTY no
#	ForceCommand cvs server

# Match Group administrators
#        AuthorizedKeysFile __PROGRAMDATA__/ssh/administrators_authorized_keys
- 1
- 2
- 3
- 4
- 5
- 6
- 7
- 8
- 9
- 10
- 11
- 12
- 13
- 14
- 15
- 16
- 17
- 18
- 19
- 20
- 21
- 22
- 23
- 24
- 25
- 26
- 27
- 28
- 29
- 30
- 31
- 32
- 33
- 34
- 35
- 36
- 37
- 38
- 39
- 40
- 41
- 42
- 43
- 44
- 45
- 46
- 47
- 48
- 49
- 50
- 51
- 52
- 53
- 54
- 55
- 56
- 57
- 58
- 59
- 60
- 61
- 62
- 63
- 64
- 65
- 66
- 67
- 68
- 69
- 70
- 71
- 72
- 73
- 74
- 75
- 76
- 77
- 78
- 79
- 80
- 81
- 82
- 83
- 84
- 85
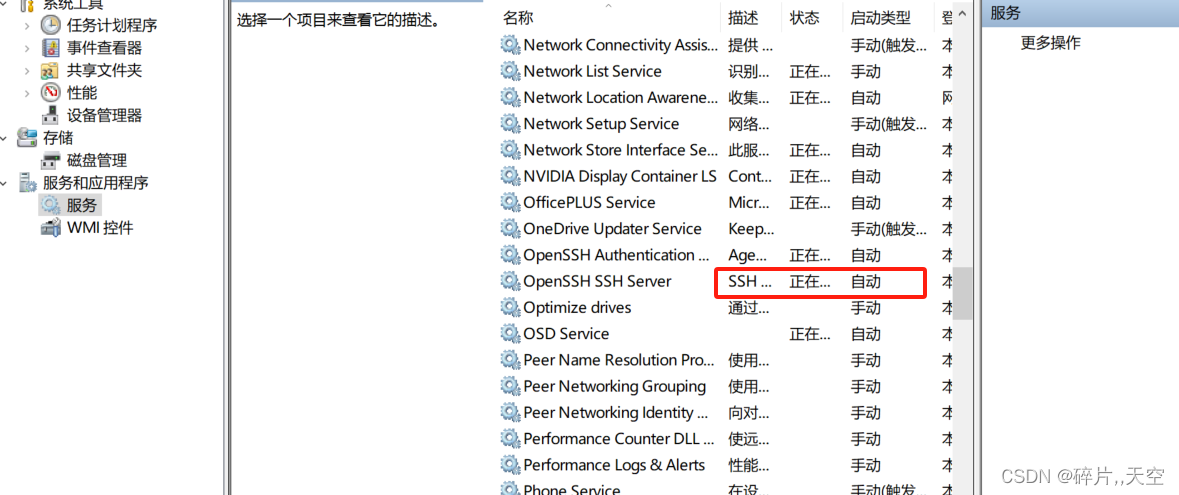
第三步:重启ssh服务
找到计算机管理界面->服务,找到openssh-Server,重启一下即可
内网穿透参考链接:如何优雅地访问远程主机?SSH与frp内网穿透配置教程

