
- 1PYQT5 004 多窗口_pyqt5多窗口
- 2数据猿·金猿榜丨2017中国智能语音领域最具潜力创业公司
- 3Python:djanjo之csrf防跨站攻击_python @csrf_exempt
- 4CSP 复赛爆零指南
- 5LLM - 大模型评估指标之 ROUGE_rouge 大模型
- 6一图读懂开源协议_一张经典图,开源协议比较
- 7git安装与配置_git下载安装
- 8关于在Vscode安装clangd的教程(分别在linux和windows)[很详细,很细节,很全!]【Windows端:缺少 language enginee的解决方法】_windows clangd
- 9基于B/S财务管理系统设计与实现【Java毕业设计·安装调试代码讲解·文档报告】_java资产管理系统b/s
- 102019计算机保研经验记录:南开软院、武大、信工所、南大软院、哈工深_北京信工优营名单
Android4.0 G-Sensor工作流程_gsensor reset
赞
踩
http://blog.csdn.net/myarrow/article/details/9044689
1. 简介
在了解Sensor工作流程以前,一直以为其事件是通过Event Hub来进行输送的,可是研究完Android4.0代码之后,才发现自己错了。
其主要框架如下图所示:
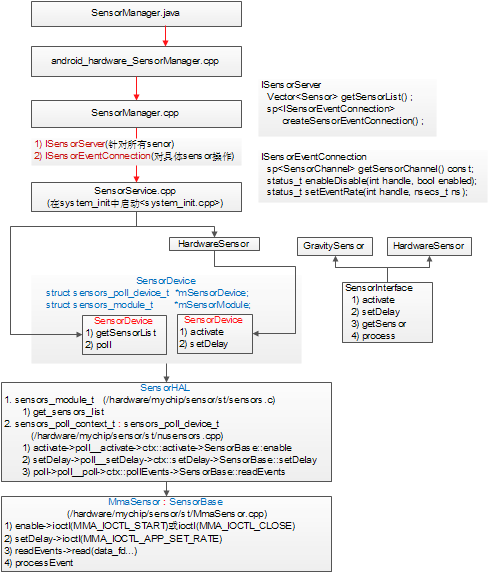
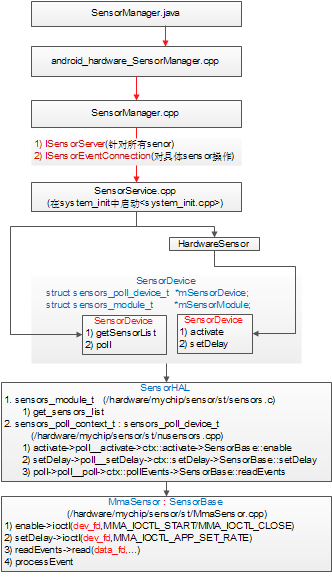
2.功能模块
2.1 SensorManager.java
与下层接口功能:
1) 在SensorManager函数中
(1) 调用native sensors_module_init初始化sensor list,即实例化native中的SensorManager
(2) 创建SensorThread线程
2) 在类SensorThread中
(1) 调用native sensors_create_queue创建队列
(2) 在线程中dead loop地调用native sensors_data_poll以从队列sQueue中获取事件(float[] values = new float[3];)
(3) 收到事件之后,报告sensor event给所有注册且关心此事件的listener
与上层的接口功能:
1) 在onPause时取消listener注册
2) 在onResume时注册listener
3) 把收到的事件报告给注册的listener
2.2 android_hardware_SensorManager.cpp
实现SensorManager.java中的native函数,它主要调用SenrsorManager.cpp和SensorEventQueue.cpp中的类来完成相关的工作。
2.3 SensorManager.cpp
- class SensorManager :
- public ASensorManager,
- public Singleton<SensorManager>
- {
- public:
- SensorManager(); //调用assertStateLocked
- ~SensorManager();
- //调用assertStateLocked,并返回mSensorList
- ssize_t getSensorList(Sensor const* const** list) const;
- // 返回mSensorList中第一个类型与type一致的sensor
- Sensor const* getDefaultSensor(int type);
- // 调用mSensorServer->createSensorEventConnection创建一个连接(ISensorEventConnection)
- // 并用此连接做为参数创建一个SensorEventQueue对象并返回
- sp<SensorEventQueue> createEventQueue();
- private:
- // DeathRecipient interface
- void sensorManagerDied();
- // 调用getService获取SensorService客户端并保存在mSensorServer中
- // 调用mSensorServer->getSensorList获取sensor列表,并保存在mSensors和mSensorList中
- status_t assertStateLocked() const;
- private:
- mutable Mutex mLock;
- mutable sp<ISensorServer> mSensorServer; // SensorService客户端
- mutable Sensor const** mSensorList; // sensor列表
- mutable Vector<Sensor> mSensors; // sensor列表
- mutable sp<IBinder::DeathRecipient> mDeathObserver;
- }
- class ISensorEventConnection : public IInterface
- {
- public:
- DECLARE_META_INTERFACE(SensorEventConnection);
- virtual sp<SensorChannel> getSensorChannel() const = 0;
- virtual status_t enableDisable(int handle, bool enabled) = 0;
- virtual status_t setEventRate(int handle, nsecs_t ns) = 0;
- };
2.4 SensorService.cpp
SensorService作为一个轻量级的system service,它运行于SystemServer内,即在system_init<system_init.cpp>调用SensorService::instantiate();
SensorService主要功能如下:
1) SensorService::instantiate创建实例对象,并增加到ServiceManager中,且创建并启动线程,并执行threadLoop
2) threadLoop从sensor驱动获取原始数据,然后通过SensorEventConnection把事件发送给客户端
3) BnSensorServer的成员函数负责让客户端获取sensor列表和创建SensorEventConnection
SensorService与客户端的接口定义如下:
- class ISensorServer : public IInterface
- {
- public:
- DECLARE_META_INTERFACE(SensorServer);
- virtual Vector<Sensor> getSensorList() = 0;
- virtual sp<ISensorEventConnection> createSensorEventConnection() = 0;
- };
SensorService定义如下:
- class SensorService :
- public BinderService<SensorService>, //创建SensorService对象,并增加到ServiceManager中
- public BnSensorServer, // 申明了SensorService与客户端(SensorManager)间的binder接口
- protected Thread // 线程辅助类,调用run创建并启动线程,然后在线程主函数内回调threadLoop函数,
- // 所以在使用它时,做一个派生,并根据需要重写threadLoop即可
- {
- friend class BinderService<SensorService>;
- static const nsecs_t MINIMUM_EVENTS_PERIOD = 1000000; // 1000 Hz
- SensorService();
- virtual ~SensorService();
- /*
- 在addService时,第一次构建sp强引用对象时,会调用onFirstRef函数
- 实现功能如下:
- 1) 获取SensorDevice实例
- 2) 调用SensorDevice.getSensorList获取sensor_t列表
- 3) 根据硬件sensor_t创建HardwareSensor,然后加入mSensorList(Sensor)
- 和mSensorMap(HardwareSensor)中
- 4) 根据硬件sensor_t创建对应的senosr(如GravitySensor),
- 然后加入mVirtualSensorList和mSensorList中
- 5) mUserSensorList = mSensorList;
- 6) run("SensorService", PRIORITY_URGENT_DISPLAY);运行线程,并执行threadLoop
- */
- virtual void onFirstRef();
- // Thread interface
- /*
- 1) 调用SensorDevice.poll获取sensors_event_t事件
- 2) 获取已经激活的sensor列表mActiveVirtualSensors
- 3) 对每一个事件,执行SensorFusion.process
- 4) 对每一个事件,执行HardwareSensor.process(事件无变化,直接copy)
- 5) 调用SensorService::SensorEventConnection::sendEvents,把事件发
- 送给所有的listener
- */
- virtual bool threadLoop();
- // ISensorServer interface
- // 返回mUserSensorList
- virtual Vector<Sensor> getSensorList();
- // 实例化SensorEventConnection并返回
- virtual sp<ISensorEventConnection> createSensorEventConnection();
- virtual status_t dump(int fd, const Vector<String16>& args);
- //====================================================================
- //============== SensorEventConnection start ========================
- class SensorEventConnection : public BnSensorEventConnection {
- virtual ~SensorEventConnection();
- virtual void onFirstRef();
- // 返回mChannel
- virtual sp<SensorChannel> getSensorChannel() const;
- // 调用SensorService::enable或SensorService::disable
- virtual status_t enableDisable(int handle, bool enabled);
- // 调用SensorService::setEventRate
- virtual status_t setEventRate(int handle, nsecs_t ns);
- sp<SensorService> const mService; // 保存当前SensorService实例
- sp<SensorChannel> const mChannel; // SensorChannel实例
- mutable Mutex mConnectionLock;
- // protected by SensorService::mLock
- SortedVector<int> mSensorInfo;
- public:
- /*
- 1) 把当前service保存在mService中
- 2) 创建SensorChannel实例,并保存在mChannel中
- (在SensorChannel::SensorChannel中创建pipe,并把收和发都设置非阻塞)
- */
- SensorEventConnection(const sp<SensorService>& service);
- // 调用连接中的mChannel->write (SensorChannel::write),把符合条件的事件写入pipe
- status_t sendEvents(sensors_event_t const* buffer, size_t count,
- sensors_event_t* scratch = NULL);
- bool hasSensor(int32_t handle) const; //检查handle是否在mSensorInfo中
- bool hasAnySensor() const; //检查mSensorInfo中是否有sensor
- bool addSensor(int32_t handle); //把handle增加到mSensorInfo列表中
- bool removeSensor(int32_t handle); //把handle从mSensorInfo中删除
- };
- //============== SensorEventConnection end ========================
- //====================================================================
- class SensorRecord {
- SortedVector< wp<SensorEventConnection> > mConnections;
- public:
- SensorRecord(const sp<SensorEventConnection>& connection);
- bool addConnection(const sp<SensorEventConnection>& connection);
- bool removeConnection(const wp<SensorEventConnection>& connection);
- size_t getNumConnections() const { return mConnections.size(); }
- };
- SortedVector< wp<SensorEventConnection> > getActiveConnections() const;
- DefaultKeyedVector<int, SensorInterface*> getActiveVirtualSensors() const;
- String8 getSensorName(int handle) const;
- void recordLastValue(sensors_event_t const * buffer, size_t count);
- static void sortEventBuffer(sensors_event_t* buffer, size_t count);
- void registerSensor(SensorInterface* sensor);
- void registerVirtualSensor(SensorInterface* sensor);
- // constants
- Vector<Sensor> mSensorList; // Sensor列表
- Vector<Sensor> mUserSensorList; //与mSensorList一样
- DefaultKeyedVector<int, SensorInterface*> mSensorMap; //其成员为HardwareSensor
- Vector<SensorInterface *> mVirtualSensorList; //其成员为HardwareSensor
- status_t mInitCheck;
- // protected by mLock
- mutable Mutex mLock;
- DefaultKeyedVector<int, SensorRecord*> mActiveSensors; //成员为SensorRecord
- DefaultKeyedVector<int, SensorInterface*> mActiveVirtualSensors; //成员为HardwareSensor
- SortedVector< wp<SensorEventConnection> > mActiveConnections;
- // The size of this vector is constant, only the items are mutable
- KeyedVector<int32_t, sensors_event_t> mLastEventSeen;
- public:
- static char const* getServiceName() { return "sensorservice"; }
- void cleanupConnection(SensorEventConnection* connection);
- /*
- 1) 调用HardwareSensor::activate,即SensorDevice::activate
- 2) 然后创建SensorRecord并增加到列表mActiveSensors
- 3) 把此HardwareSensor增加到连接的mSensorInfo
- 4) 把此连接增加到mActiveConnections中
- */
- status_t enable(const sp<SensorEventConnection>& connection, int handle);
- /*
- 1) 把此sensor从连接的mSensorInfo中删除
- 2) 把此连接从mActiveConnections中删除
- 3) 调用HardwareSensor::activate,即SensorDevice::activate
- */
- status_t disable(const sp<SensorEventConnection>& connection, int handle);
- /*
- 1)调用HardwareSensor::setDelay,即SensorDevice::setDelay
- */
- status_t setEventRate(const sp<SensorEventConnection>& connection, int handle, nsecs_t ns);
- }
2.5 SensorDevice.cpp
SensorDevice封装了对SensorHAL层代码的调用,主要包含以下功能:
1) 获取sensor列表(getSensorList)
2) 获取sensor事件(poll)
3) Enable或Disable sensor (activate)
4) 设置delay时间
- class SensorDevice : public Singleton<SensorDevice> {
- friend class Singleton<SensorDevice>;
- struct sensors_poll_device_t* mSensorDevice; // sensor设备
- struct sensors_module_t* mSensorModule;
- mutable Mutex mLock; // protect mActivationCount[].rates
- // fixed-size array after construction
- struct Info {
- Info() : delay(0) { }
- KeyedVector<void*, nsecs_t> rates;
- nsecs_t delay;
- status_t setDelayForIdent(void* ident, int64_t ns);
- nsecs_t selectDelay();
- };
- DefaultKeyedVector<int, Info> mActivationCount;
- /*
- 1) 调用hw_get_module(SENSORS_HARDWARE_MODULE_ID,..)获取sensors_module_t,
- 并保存在mSensorModule中
- 2) 调用mSensorModule->common->methods->open,以返回sensors_poll_device_t,
- 并保存在mSensorDevice中
- 3) 调用mSensorModule->get_sensors_list所有可访问的sensor_t
- 4) 调用mSensorDevice->activate激活所有的sensor
- */
- SensorDevice();
- public:
- // 调用mSensorModule->get_sensors_list实现
- ssize_t getSensorList(sensor_t const** list);
- status_t initCheck() const;
- // 调用mSensorDevice->poll实现
- ssize_t poll(sensors_event_t* buffer, size_t count);
- // 调用mSensorDevice->activate实现
- status_t activate(void* ident, int handle, int enabled);
- // 调用mSensorDevice->setDelay实现
- status_t setDelay(void* ident, int handle, int64_t ns);
- void dump(String8& result, char* buffer, size_t SIZE);
- };
2.6 Sensor HAL
定义:/hardware/libhardware/include/hardware/sensors.h
实现:/hardware/mychip/sensor/st/sensors.c
2.6.1 struct sensors_poll_device_t 定义
- struct sensors_poll_device_t {
- struct hw_device_t common;
- // Activate/deactivate one sensor.
- int (*activate)(struct sensors_poll_device_t *dev,
- int handle, int enabled);
- // Set the delay between sensor events in nanoseconds for a given sensor.
- int (*setDelay)(struct sensors_poll_device_t *dev,
- int handle, int64_t ns);
- // Returns an array of sensor data.
- int (*poll)(struct sensors_poll_device_t *dev,
- sensors_event_t* data, int count);
- };
2.6.2 struct sensors_module_t 定义
- struct sensors_module_t {
- struct hw_module_t common;
- /**
- * Enumerate all available sensors. The list is returned in "list".
- * @return number of sensors in the list
- */
- int (*get_sensors_list)(struct sensors_module_t* module,
- struct sensor_t const** list);
- };
2.6.3 struct sensor_t 定义
- struct sensor_t {
- /* name of this sensors */
- const char* name;
- /* vendor of the hardware part */
- const char* vendor;
- /* version of the hardware part + driver. The value of this field
- * must increase when the driver is updated in a way that changes the
- * output of this sensor. This is important for fused sensors when the
- * fusion algorithm is updated.
- */
- int version;
- /* handle that identifies this sensors. This handle is used to activate
- * and deactivate this sensor. The value of the handle must be 8 bits
- * in this version of the API.
- */
- int handle;
- /* this sensor's type. */
- int type;
- /* maximaum range of this sensor's value in SI units */
- float maxRange;
- /* smallest difference between two values reported by this sensor */
- float resolution;
- /* rough estimate of this sensor's power consumption in mA */
- float power;
- /* minimum delay allowed between events in microseconds. A value of zero
- * means that this sensor doesn't report events at a constant rate, but
- * rather only when a new data is available */
- int32_t minDelay;
- /* reserved fields, must be zero */
- void* reserved[8];
- };
2.6.4 struct sensors_event_t 定义
- typedef struct {
- union {
- float v[3];
- struct {
- float x;
- float y;
- float z;
- };
- struct {
- float azimuth;
- float pitch;
- float roll;
- };
- };
- int8_t status;
- uint8_t reserved[3];
- } sensors_vec_t;
- /**
- * Union of the various types of sensor data
- * that can be returned.
- */
- typedef struct sensors_event_t {
- /* must be sizeof(struct sensors_event_t) */
- int32_t version;
- /* sensor identifier */
- int32_t sensor;
- /* sensor type */
- int32_t type;
- /* reserved */
- int32_t reserved0;
- /* time is in nanosecond */
- int64_t timestamp;
- union {
- float data[16];
- /* acceleration values are in meter per second per second (m/s^2) */
- sensors_vec_t acceleration;
- /* magnetic vector values are in micro-Tesla (uT) */
- sensors_vec_t magnetic;
- /* orientation values are in degrees */
- sensors_vec_t orientation;
- /* gyroscope values are in rad/s */
- sensors_vec_t gyro;
- /* temperature is in degrees centigrade (Celsius) */
- float temperature;
- /* distance in centimeters */
- float distance;
- /* light in SI lux units */
- float light;
- /* pressure in hectopascal (hPa) */
- float pressure;
- /* relative humidity in percent */
- float relative_humidity;
- };
- uint32_t reserved1[4];
- } sensors_event_t;
2.6.5 struct sensors_module_t 实现
- #include <hardware/sensors.h>
- #include "nusensors.h"
- /*
- * the AK8973 has a 8-bit ADC but the firmware seems to average 16 samples,
- * or at least makes its calibration on 12-bits values. This increases the
- * resolution by 4 bits.
- */
- static const struct sensor_t sSensorList[] = {
- { "MMA8452Q 3-axis Accelerometer",
- "Freescale Semiconductor",
- 1, SENSORS_HANDLE_BASE+ID_A,
- SENSOR_TYPE_ACCELEROMETER, 4.0f*9.81f, (4.0f*9.81f)/256.0f, 0.2f, 0, { } },
- { "AK8975 3-axis Magnetic field sensor",
- "Asahi Kasei",
- 1, SENSORS_HANDLE_BASE+ID_M,
- SENSOR_TYPE_MAGNETIC_FIELD, 2000.0f, 1.0f/16.0f, 6.8f, 0, { } },
- { "AK8975 Orientation sensor",
- "Asahi Kasei",
- 1, SENSORS_HANDLE_BASE+ID_O,
- SENSOR_TYPE_ORIENTATION, 360.0f, 1.0f, 7.0f, 0, { } },
- { "ST 3-axis Gyroscope sensor",
- "STMicroelectronics",
- 1, SENSORS_HANDLE_BASE+ID_GY,
- SENSOR_TYPE_GYROSCOPE, RANGE_GYRO, CONVERT_GYRO, 6.1f, 1190, { } },
- { "AL3006Proximity sensor",
- "Dyna Image Corporation",
- 1, SENSORS_HANDLE_BASE+ID_P,
- SENSOR_TYPE_PROXIMITY,
- PROXIMITY_THRESHOLD_CM, PROXIMITY_THRESHOLD_CM,
- 0.5f, 0, { } },
- { "AL3006 light sensor",
- "Dyna Image Corporation",
- 1, SENSORS_HANDLE_BASE+ID_L,
- SENSOR_TYPE_LIGHT, 10240.0f, 1.0f, 0.5f, 0, { } },
- };
- static int open_sensors(const struct hw_module_t* module, const char* name,
- struct hw_device_t** device);
- static int sensors__get_sensors_list(struct sensors_module_t* module,
- struct sensor_t const** list)
- {
- *list = sSensorList;
- return ARRAY_SIZE(sSensorList);
- }
- static struct hw_module_methods_t sensors_module_methods = {
- .open = open_sensors
- };
- const struct sensors_module_t HAL_MODULE_INFO_SYM = {
- .common = {
- .tag = HARDWARE_MODULE_TAG,
- .version_major = 1,
- .version_minor = 0,
- .id = SENSORS_HARDWARE_MODULE_ID,
- .name = "MMA8451Q & AK8973A & gyro Sensors Module",
- .author = "The Android Project",
- .methods = &sensors_module_methods,
- },
- .get_sensors_list = sensors__get_sensors_list
- };
- static int open_sensors(const struct hw_module_t* module, const char* name,
- struct hw_device_t** device)
- {
- return init_nusensors(module, device); //待后面讲解
- }
2.6.6 struct sensors_poll_device_t 实现
实现代码位于:/hardware/mychip/sensor/st/nusensors.cpp
从上面的代码中可以看出,当调用init_nusensors时,它将返回sensors_poll_device_t,然后就可以调用sensors_poll_device_t 的以下方法进行相关操作:
1) activate
2) setDelay
3) poll
6.1) struct sensors_poll_context_t 定义
- struct sensors_poll_context_t {
- struct sensors_poll_device_t device; // must be first
- sensors_poll_context_t();
- ~sensors_poll_context_t();
- int activate(int handle, int enabled);
- int setDelay(int handle, int64_t ns);
- int pollEvents(sensors_event_t* data, int count);
- private:
- enum {
- light = 0,
- proximity = 1,
- mma = 2,
- akm = 3,
- gyro = 4,
- numSensorDrivers,
- numFds,
- };
- static const size_t wake = numFds - 1;
- static const char WAKE_MESSAGE = 'W';
- struct pollfd mPollFds[numFds];
- int mWritePipeFd;
- SensorBase* mSensors[numSensorDrivers];
- int handleToDriver(int handle) const {
- switch (handle) {
- case ID_A:
- return mma;
- case ID_M:
- case ID_O:
- return akm;
- case ID_P:
- return proximity;
- case ID_L:
- return light;
- case ID_GY:
- return gyro;
- }
- return -EINVAL;
- }
- }
6.2) init_nusensors 实现
- int init_nusensors(hw_module_t const* module, hw_device_t** device)
- {
- int status = -EINVAL;
- sensors_poll_context_t *dev = new sensors_poll_context_t();
- memset(&dev->device, 0, sizeof(sensors_poll_device_t));
- dev->device.common.tag = HARDWARE_DEVICE_TAG;
- dev->device.common.version = 0;
- dev->device.common.module = const_cast<hw_module_t*>(module);
- dev->device.common.close = poll__close;
- dev->device.activate = poll__activate;
- dev->device.setDelay = poll__setDelay;
- dev->device.poll = poll__poll;
- *device = &dev->device.common;
- status = 0;
- return status;
- }
由以上代码可见,sensors_poll_device_t的activate、setDelay和poll的实现函数分别为:
(1) poll__activate
(2) poll__setDelay
(3) poll__poll
下面讲解以上三个关键函数的实现
6.3) struct sensors_poll_context_t 的实现
- sensors_poll_context_t::sensors_poll_context_t()
- {
- mSensors[light] = new LightSensor();
- mPollFds[light].fd = mSensors[light]->getFd();
- mPollFds[light].events = POLLIN;
- mPollFds[light].revents = 0;
- mSensors[proximity] = new ProximitySensor();
- mPollFds[proximity].fd = mSensors[proximity]->getFd();
- mPollFds[proximity].events = POLLIN;
- mPollFds[proximity].revents = 0;
- mSensors[mma] = new MmaSensor(); //下面MmmaSensor为例进行分析
- mPollFds[mma].fd = mSensors[mma]->getFd();
- mPollFds[mma].events = POLLIN;
- mPollFds[mma].revents = 0;
- mSensors[akm] = new AkmSensor();
- mPollFds[akm].fd = mSensors[akm]->getFd();
- mPollFds[akm].events = POLLIN;
- mPollFds[akm].revents = 0;
- mSensors[gyro] = new GyroSensor();
- mPollFds[gyro].fd = mSensors[gyro]->getFd();
- mPollFds[gyro].events = POLLIN;
- mPollFds[gyro].revents = 0;
- int wakeFds[2];
- int result = pipe(wakeFds);
- LOGE_IF(result<0, "error creating wake pipe (%s)", strerror(errno));
- fcntl(wakeFds[0], F_SETFL, O_NONBLOCK);
- fcntl(wakeFds[1], F_SETFL, O_NONBLOCK);
- mWritePipeFd = wakeFds[1];
- mPollFds[wake].fd = wakeFds[0];
- mPollFds[wake].events = POLLIN;
- mPollFds[wake].revents = 0;
- }
- sensors_poll_context_t::~sensors_poll_context_t() {
- for (int i=0 ; i<numSensorDrivers ; i++) {
- delete mSensors[i];
- }
- close(mPollFds[wake].fd);
- close(mWritePipeFd);
- }
- int sensors_poll_context_t::activate(int handle, int enabled) {
- int index = handleToDriver(handle);
- if (index < 0) return index;
- int err = mSensors[index]->enable(handle, enabled);
- if (enabled && !err) {
- const char wakeMessage(WAKE_MESSAGE);
- int result = write(mWritePipeFd, &wakeMessage, 1);
- LOGE_IF(result<0, "error sending wake message (%s)", strerror(errno));
- }
- return err;
- }
- int sensors_poll_context_t::setDelay(int handle, int64_t ns) {
- int index = handleToDriver(handle);
- if (index < 0) return index;
- return mSensors[index]->setDelay(handle, ns);
- }
- int sensors_poll_context_t::pollEvents(sensors_event_t* data, int count)
- {
- int nbEvents = 0;
- int n = 0;
- do {
- // see if we have some leftover from the last poll()
- for (int i=0 ; count && i<numSensorDrivers ; i++) {
- SensorBase* const sensor(mSensors[i]);
- if ((mPollFds[i].revents & POLLIN) || (sensor->hasPendingEvents())) {
- int nb = sensor->readEvents(data, count); // num of evens received.
- D("nb = %d.", nb);
- if (nb < count) {
- // no more data for this sensor
- mPollFds[i].revents = 0;
- }
- count -= nb;
- nbEvents += nb;
- data += nb;
- }
- }
- if (count) {
- // we still have some room, so try to see if we can get
- // some events immediately or just wait if we don't have
- // anything to return
- n = poll(mPollFds, numFds, nbEvents ? 0 : -1);
- if (n<0) {
- LOGE("poll() failed (%s)", strerror(errno));
- return -errno;
- }
- if (mPollFds[wake].revents & POLLIN) {
- char msg;
- int result = read(mPollFds[wake].fd, &msg, 1);
- LOGE_IF(result<0, "error reading from wake pipe (%s)", strerror(errno));
- LOGE_IF(msg != WAKE_MESSAGE, "unknown message on wake queue (0x%02x)", int(msg));
- mPollFds[wake].revents = 0;
- }
- }
- // if we have events and space, go read them
- } while (n && count);
- return nbEvents;
- }
- /*****************************************************************************/
- static int poll__close(struct hw_device_t *dev)
- {
- sensors_poll_context_t *ctx = (sensors_poll_context_t *)dev;
- if (ctx) {
- delete ctx;
- }
- return 0;
- }
- static int poll__activate(struct sensors_poll_device_t *dev,
- int handle, int enabled) {
- sensors_poll_context_t *ctx = (sensors_poll_context_t *)dev;
- return ctx->activate(handle, enabled);
- }
- static int poll__setDelay(struct sensors_poll_device_t *dev,
- int handle, int64_t ns) {
- sensors_poll_context_t *ctx = (sensors_poll_context_t *)dev;
- return ctx->setDelay(handle, ns);
- }
- static int poll__poll(struct sensors_poll_device_t *dev,
- sensors_event_t* data, int count) {
- sensors_poll_context_t *ctx = (sensors_poll_context_t *)dev;
- return ctx->pollEvents(data, count);
- }
下面MmaSensor为例进行分析。
2.7 MmaSensor.cpp
1) SensorBase的实现(SensorBase.cpp)
- class SensorBase {
- protected:
- const char* dev_name; // "/dev/mma8452_daemon"
- const char* data_name; // "gsensor"
- int dev_fd; // 打开设备"/dev/mma8452_daemon"的fd
- // 打开事件"/dev/input/eventx"的fd,其驱动的名字为"gsensor"
- int data_fd;
- // 打开与"gsensor"对应的事件"/dev/input/eventx"
- static int openInput(const char* inputName);
- //通过clock_gettime获取当前时间
- static int64_t getTimestamp();
- static int64_t timevalToNano(timeval const& t) {
- return t.tv_sec*1000000000LL + t.tv_usec*1000;
- }
- int open_device(); //打开设备"dev/mma8452_daemon"
- int close_device(); //关闭设备"dev/mma8452_daemon"
- public:
- // 调用openInput
- SensorBase(
- const char* dev_name,
- const char* data_name);
- virtual ~SensorBase();
- virtual int readEvents(sensors_event_t* data, int count) = 0;
- virtual bool hasPendingEvents() const;
- virtual int getFd() const; //返回data_fd
- virtual int setDelay(int32_t handle, int64_t ns);
- virtual int enable(int32_t handle, int enabled) = 0;
- };
2) MmaSensor的实现
- class MmaSensor : public SensorBase {
- public:
- /*
- 1) 设置dev_name为 "/dev/mma8452_daemon"
- 2) 设置data_name为 "gsensor"
- 3) open设备 "/dev/mma8452_daemon"
- */
- MmaSensor();
- virtual ~MmaSensor();
- enum {
- Accelerometer = 0,
- numSensors
- };
- // 调用ioctl(MMA_IOCTL_APP_SET_RATE)
- virtual int setDelay(int32_t handle, int64_t ns);
- /*
- 1) Activate: ioctl(MMA_IOCTL_START)
- 2) Deactivate: ioctl(MMA_IOCTL_CLOSE)
- */
- virtual int enable(int32_t handle, int enabled);
- /*
- 1) 从data_fd read input_event
- 2) 调用processEvent对事件进行处理
- 3) 把事件通过data返回
- */
- virtual int readEvents(sensors_event_t* data, int count);
- void processEvent(int code, int value);
- private:
- int update_delay();
- uint32_t mEnabled;
- uint32_t mPendingMask;
- InputEventCircularReader mInputReader;
- sensors_event_t mPendingEvents[numSensors];
- uint64_t mDelays[numSensors];
- };

