
热门标签
热门文章
- 1用表头设置控制表格内列的排序和显示隐藏
- 2《产品经理面试攻略》PART 12:产品总监职业生涯访谈_课程产品总监 面谈
- 3多路开关模式的switch语句_c语言十个开关
- 4MD5和base64加密_base64 md5
- 5RabbitMq性能优化的几项方案_rabbitmq性能调优
- 6QRadioButton样式设置(渐变)_qradiobutton美化
- 7微信授权登录,authorize不执行;uniapp 获取用户信息权限失败;无法通过wx.getUserInfo与<button open-type=“getUserInfo“/>获取用户个人信息
- 8基于Matlab实现决策树算法(附上多个案例源码)_matlab 决策树
- 9从源码角度剖析 Spring 如何管理 mybatis 事务的?_spring容器如何管理mybatis的
- 102024 年机器学习、人工智能与数据领域展望
当前位置: article > 正文
2023-10-19安装Android Studio(AS)教程_running android emulator hypervisor driver install
作者:运维做开发 | 2024-06-19 21:50:14
赞
踩
running android emulator hypervisor driver installer
可以参考b站视频教程,非常详细(除了gradle换源)。着急的同学可以看我以下的文字教程:
1、去AS官网下载安装包,我的版本是Android Studio Giraffe | 2022.3.1
2、按照流程安装,记得改安装位置
3、我安装的时候最后报错,可能是网络问题,就是说Intel® HAXM和Android Emulator hypervisor driver安装失败,我搜了教程手动安装的
Running Intel® HAXM installer
Intel® HAXM installation failed. To install Intel® HAXM follow the instructions found at: https://github.com/intel/haxm/wiki/Installation-Instructions-on-Windows
Running Android Emulator hypervisor driver installer
Android Emulator hypervisor driver installation failed. To install Android Emulator hypervisor driver follow the instructions found at: https://github.com/google/android-emulator-hypervisor-driver
Creating Android virtual device
Android virtual device Pixel_3a_API_34_extension_level_7_x86_64 was successfully created
- 1
- 2
- 3
- 4
- 5
- 6
4、新建项目
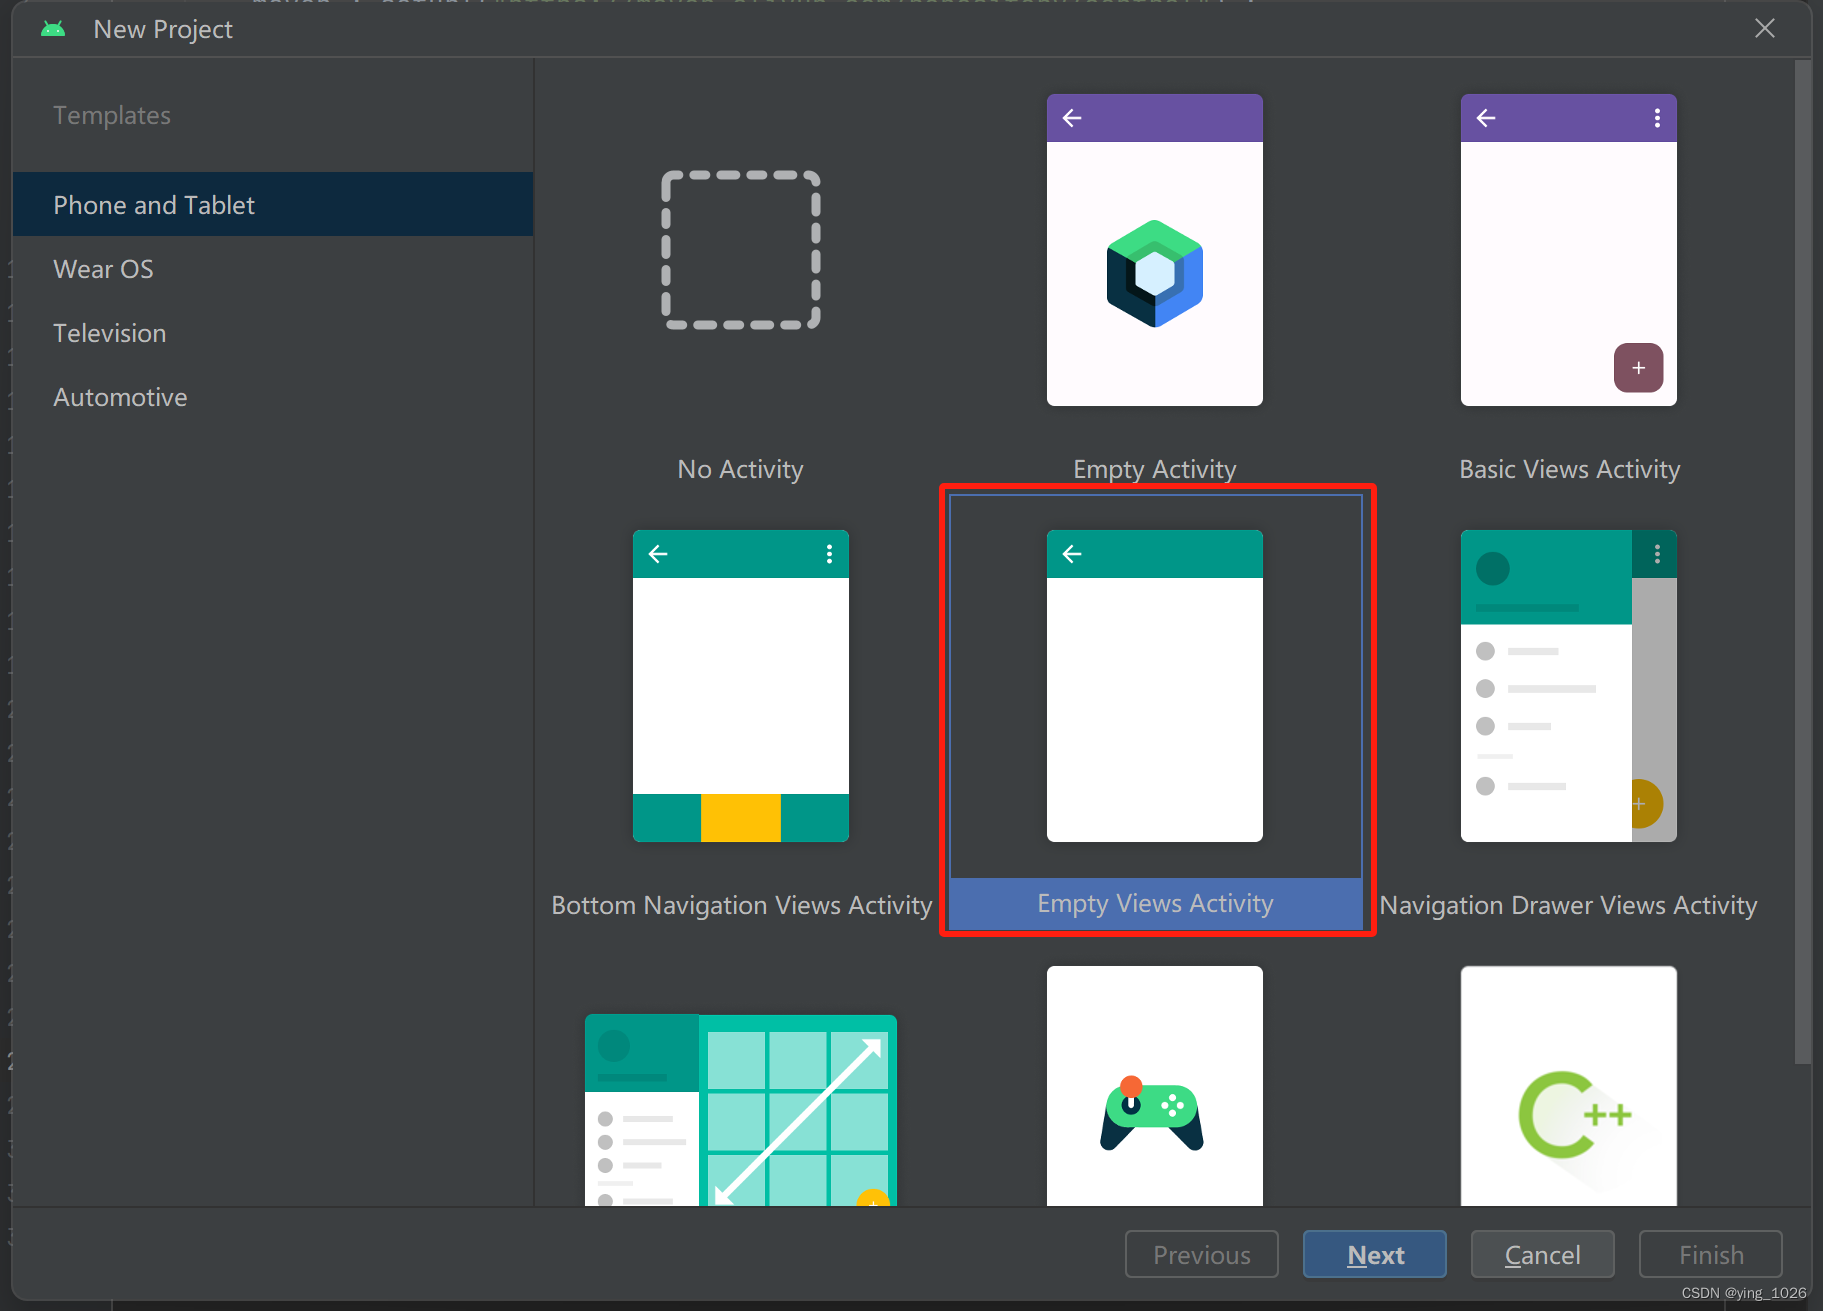
选empty views activity,这样可以选开发语言是java;如果是empty activity,默认是kotlin语言,而且不能修改
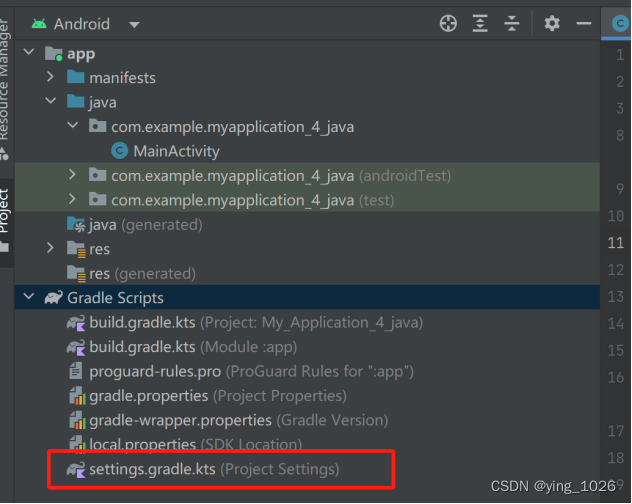
5、gradle更换阿里云源
创建项目后会一直卡住,因为gradle国外源下载超级超级慢,而且总是显示超时无法下载,所以需要更换国内源,方法如下:
找到项目中settings.gradle.kts
修改内容为:
pluginManagement {
    repositories {
        // 改为阿里云的镜像地址
        maven { setUrl("https://maven.aliyun.com/repository/central") }
        maven { setUrl("https://maven.aliyun.com/repository/jcenter") }
        maven { setUrl("https://maven.aliyun.com/repository/google") }
        maven { setUrl("https://maven.aliyun.com/repository/gradle-plugin") }
        maven { setUrl("https://maven.aliyun.com/repository/public") }
        maven { setUrl("https://jitpack.io") }
        gradlePluginPortal()
        google()
        mavenCentral()
    }
}
dependencyResolutionManagement {
    repositoriesMode.set(RepositoriesMode.FAIL_ON_PROJECT_REPOS)
    repositories {
        // 改为阿里云的镜像地址
        maven { setUrl("https://maven.aliyun.com/repository/central") }
        maven { setUrl("https://maven.aliyun.com/repository/jcenter") }
        maven { setUrl("https://maven.aliyun.com/repository/google") }
        maven { setUrl("https://maven.aliyun.com/repository/gradle-plugin") }
        maven { setUrl("https://maven.aliyun.com/repository/public") }
        maven { setUrl("https://jitpack.io") }
        google()
        mavenCentral()
    }
}

rootProject.name = "My Application_4_java"
include(":app")

- 1
- 2
- 3
- 4
- 5
- 6
- 7
- 8
- 9
- 10
- 11
- 12
- 13
- 14
- 15
- 16
- 17
- 18
- 19
- 20
- 21
- 22
- 23
- 24
- 25
- 26
- 27
- 28
- 29
- 30
- 31
然后cancel原来的gradle下载,这时候上面会弹出蓝色的retry,点一下,就可以刷刷刷的下载啦
6、可能是我之前安装AS的时候安装虚拟机报错,所以项目启动起来后虚拟机无法正常运行:
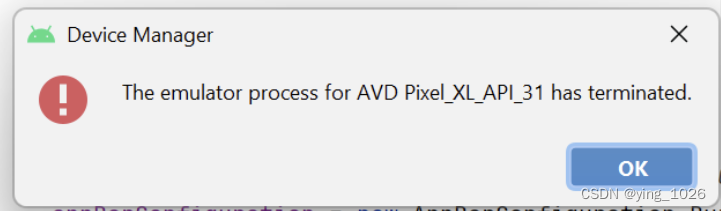
但是我电脑是intel的,不是amd,所以不应该是硬件问题,后来网上搜了教程,将虚拟机改成软解:
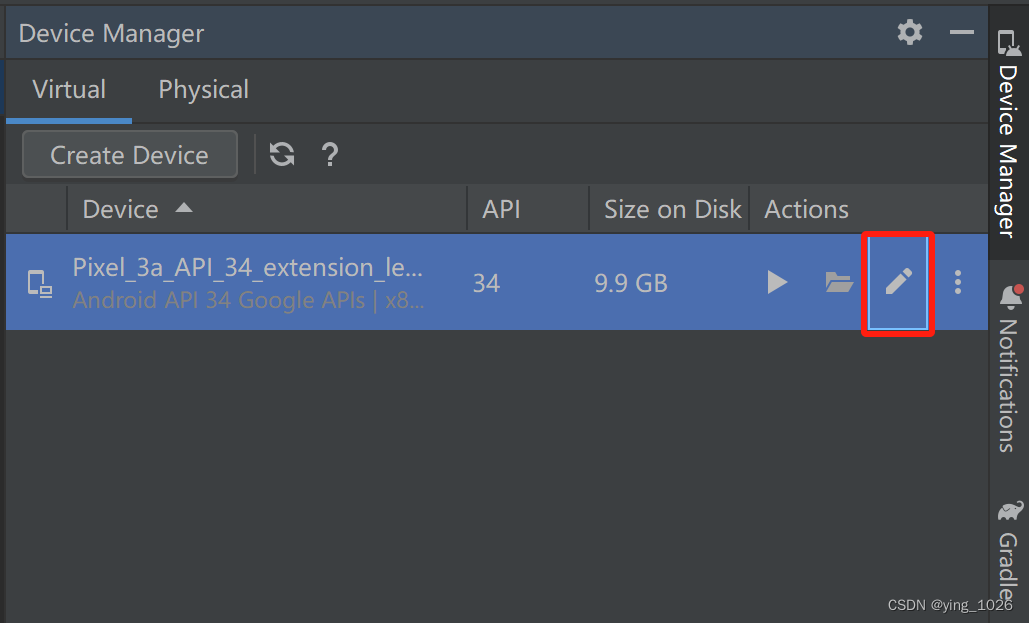
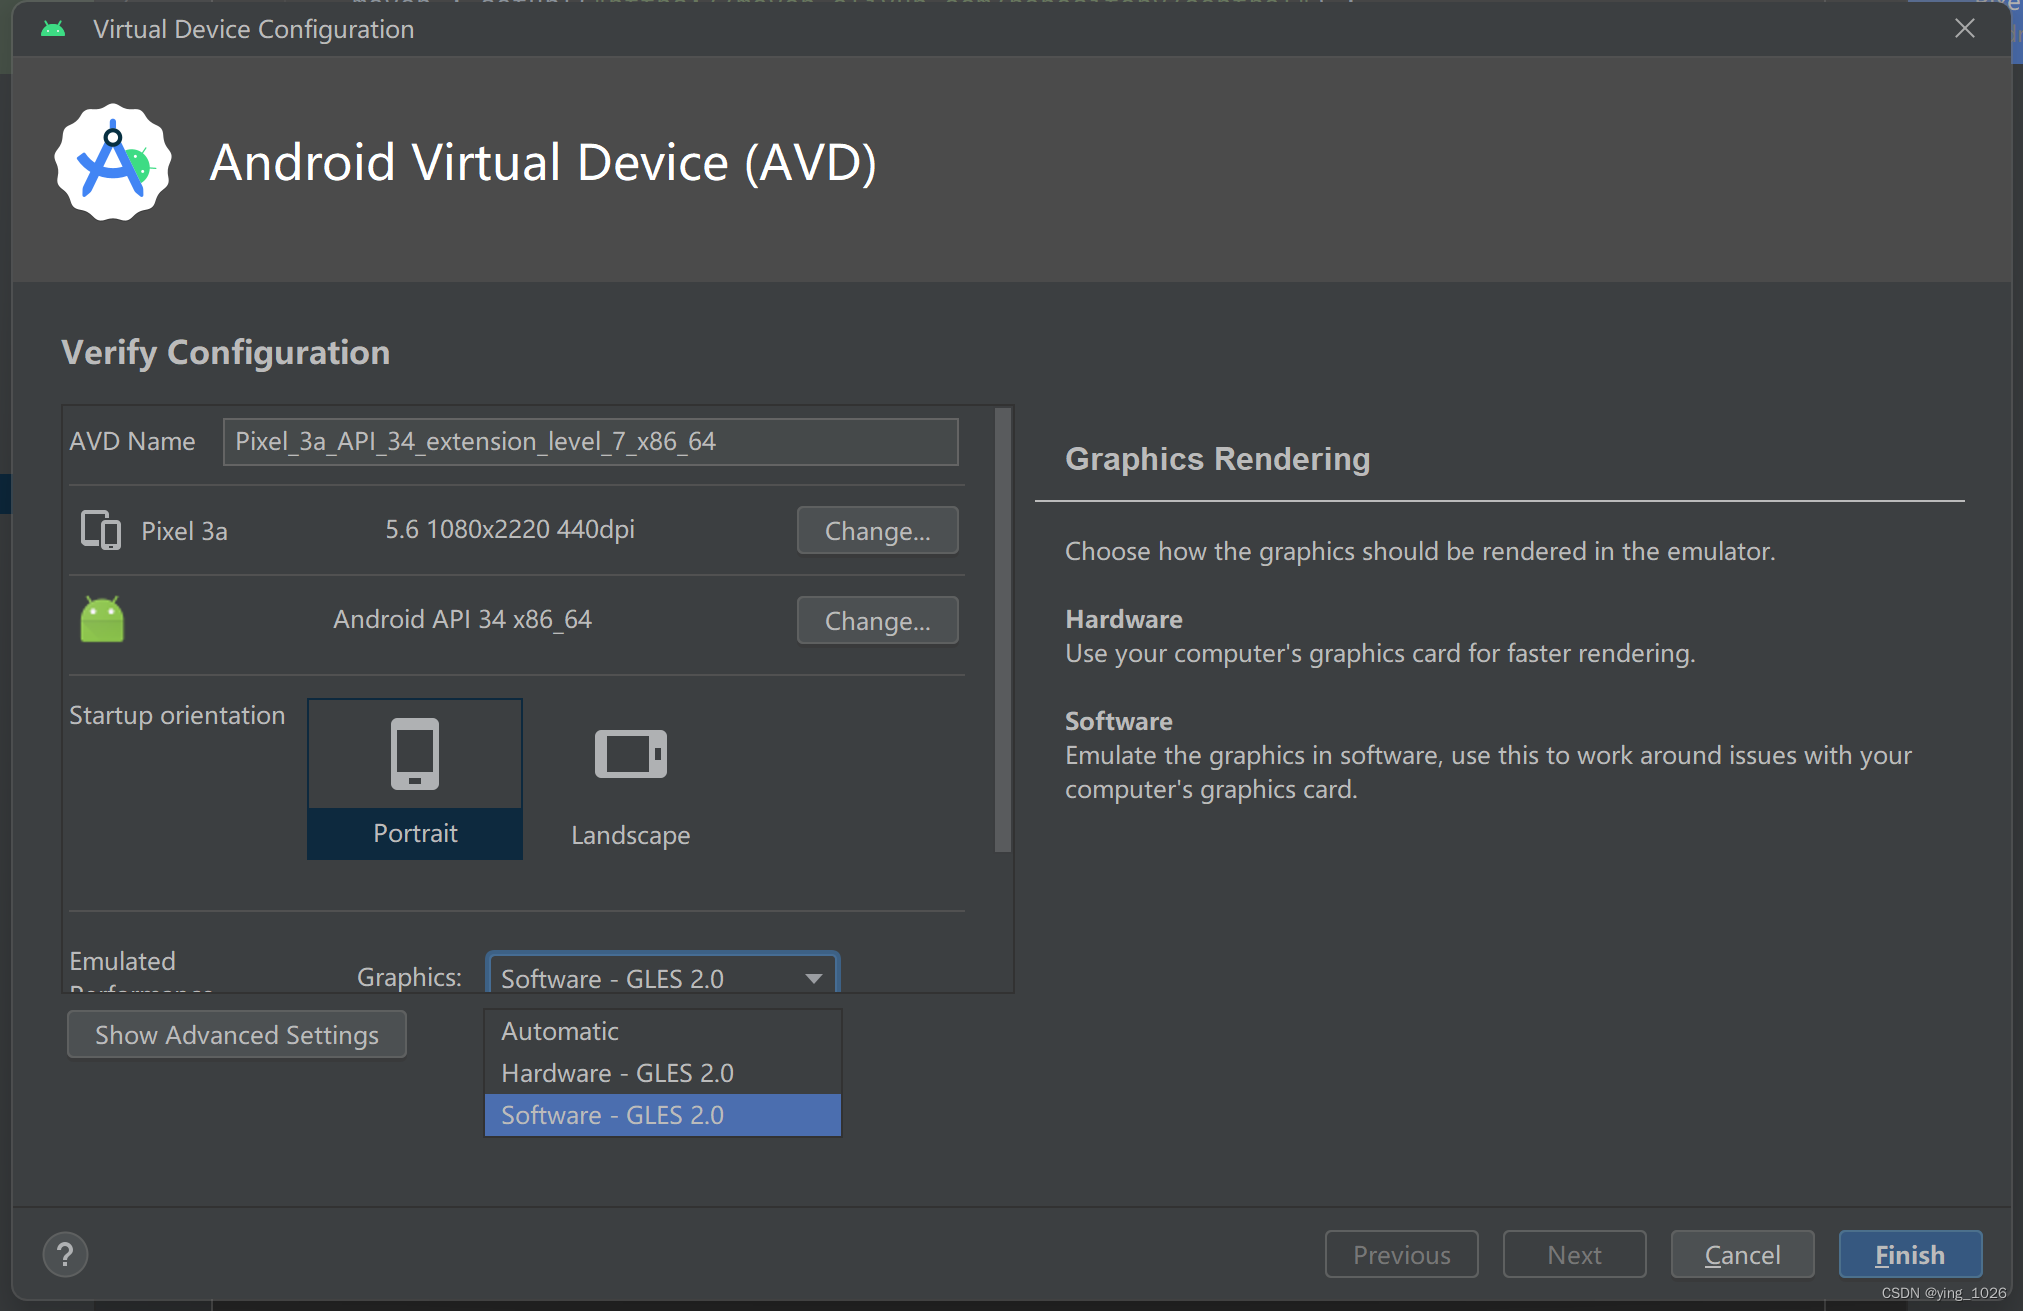
之后就可以正常运行了
声明:本文内容由网友自发贡献,不代表【wpsshop博客】立场,版权归原作者所有,本站不承担相应法律责任。如您发现有侵权的内容,请联系我们。转载请注明出处:https://www.wpsshop.cn/w/运维做开发/article/detail/737747
推荐阅读
相关标签

