- 1毕业设计:基于大数据的餐饮消费可视化系统 python_城市餐饮消费行为数据分析系统的设计与实现
- 2IDEA 中 git fetch 验证报错 The provided password or token is incorrect_idea中的git验证失败怎么办提供的密码或令牌不正确,或者您的帐户启用了2fa,您必须
- 3git常用命令_git 强制删除分支
- 4阿里云,AWS和DigitalOcean:云服务比较
- 5Cisco:标准ACL实验配置实验以及知识讲解_cisco acl
- 6Android SDK开发 安卓sdk开发和app开发
- 7[ROS项目]无人机仿真(位置控制)_ros1控制无人机俯仰角
- 8Neo4j【环境部署 01】图形数据库(简介+下载地址+安装_neo4j-community-3.4.5
- 9布隆过滤器详解 原理+实现 C++_布隆过滤器 哈希函数
- 10网络安全:Web 安全 面试题.(XSS)
【安全】linux audit审计使用入门_audit linux
赞
踩
文章目录
-
* * 1 audit简介- 1
- 2 auditctl的使用
- 2 audit配置和规则
- 3 工作原理
- 4 audit接口调用
-
* 4.1 获取和修改配置- 1
- 4.2 获取和修改规则
- 4.3 获取审计日志
- 5 audit存在的问题
-
* 5.1 内核版本- 1
- 5.2 审计日志过多造成的缓存队列和磁盘问题
- 5.2 容器环境下同一个命令的日志存在差异
- 6 参考文档
1 audit简介
audit是Linux内核提供的一种审计机制,由于audit是内核提供的,因此,在使用audit的过程中就包含内核空间和用户空间部分:
- rules:审计规则,其中配置了审计系统需要审计的操作
- auditctl:用户态程序,用于审计规则配置和配置变更
- kaudit:内核空间程序,根据配置好的审计规则记录发生的事件
- auditd:用户态程序,通过netlink获取审计日志
通常的使用流程:
- 用户通过auditctl配置审计规则
- 内核的kauditd程序获取到审计规则后,记录对应的审计日志
- 用户态的auditd获取审计日志并写入日志文件。
audit的主要应用场景是安全审计,通过对日志进行分析发现异常行为。
2 auditctl的使用
auditctl是用户态的控制程序,可以修改audit配置以及审计规则的操作。
auditctl的选项可以分成两类。
配置类:
- -b:配置buffer的大小
- -e:设置enabled标记
- -f:设置failure标记
- -s:返回整体的状态
- –backlog_wait_time:设置backlog_wait_time
审计规则类:
- -a & -A l,a:往某个规则表中增加需要记录的行为
- -d:从某个规则表中删除规则
- -D:删除所有规则
- -F f=v:设置更多监控条件
- -l:查看规则
- -p:在文件监控上设置权限过滤
- -i:当从文件中读取规则时忽略错误
- -c:出错时继续
- -r:设置rate_limit,每秒多少条消息
- -R:从文件中读取规则
- -S:设置要监控的系统调用名或者系统调用号
- -w:增加监控点
- -W:删除监控点
例如,假如我们想要获取调用execve系统调用的事件,可以增加下列的规则:
auditctl -a always,exit -S execve -F key=123456
- 1
然后就可以通过ausearch查找该日志:
ausearch -k 123456
- 1
如果想要获取执行tail命令的事件,可以增加规则:
auditctl -w /usr/bin/tail -p x -k 123456
- 1
然后使用tail命令查看通过ausearch命令查看日志:
time->Sun Apr 23 15:47:36 2023
type=PROCTITLE msg=audit(1682236056.128:4318964): proctitle=7461696C002D6E0032006C756F2E7368
type=PATH msg=audit(1682236056.128:4318964): item=1 name="/lib64/ld-linux-x86-64.so.2" inode=36969 dev=08:03 mode=0100755 ouid=0 ogid=0 rdev=00:00 obj=system_u:object_r:ld_so_t:s0 objtype=NORMAL cap_fp=0000000000000000 cap_fi=0000000000000000 cap_fe=0 cap_fver=0
type=PATH msg=audit(1682236056.128:4318964): item=0 name="/usr/bin/tail" inode=100666597 dev=08:03 mode=0100755 ouid=0 ogid=0 rdev=00:00 obj=system_u:object_r:bin_t:s0 objtype=NORMAL cap_fp=0000000000000000 cap_fi=0000000000000000 cap_fe=0 cap_fver=0
type=CWD msg=audit(1682236056.128:4318964):  cwd="/root"
type=EXECVE msg=audit(1682236056.128:4318964): argc=4 a0="tail" a1="-n" a2="2" a3="luo.sh"
type=SYSCALL msg=audit(1682236056.128:4318964): arch=c000003e syscall=59 success=yes exit=0 a0=20749e0 a1=218ecd0 a2=2179ee0 a3=7fffa4a99460 items=2 ppid=58219 pid=59519 auid=0 uid=0 gid=0 euid=0 suid=0 fsuid=0 egid=0 sgid=0 fsgid=0 tty=pts1 ses=956 comm="tail" exe="/usr/bin/tail" subj=unconfined_u:unconfined_r:unconfined_t:s0-s0:c0.c1023 key="123456"
- 1
- 2
- 3
- 4
- 5
- 6
- 7
可以看到,开头一行是事件发生的事件,后面的若干行是执行tail命令产生的事件日志,有些日志很简单,例如CWD,表示操作的当前路径,而有些日志很复杂,例如SYSCALL,有接近30个字段。每行日志都有type字段和msg字段(冒号前面是时间戳,可以通过date命令转换,冒号后面是事件ID,同一条规则产生的事件的事件ID是一样的,因此,如果不使用ausearch查找某条规则产生的日志,就需要先用key进行查找,找到对应的事件ID,然后再通过事件ID查找产生的所有日志)。
这里的tail命令的监控,我们只关注上面的2个事件:
- EXECVE:这里给出了调用的参数,argc和argv
- SYSCALL:arch(架构),syscall(系统调用号,可以通过ausyscall --dump查看),success(调用是否成功),exit(返回码),a0~a3为系统调用前4个参数,ppid(父进程ID),pid(进程ID),comm(执行的命令),exe(执行execve的可执行文件)
2 audit配置和规则
通过auditctl -s命令可以看到当前audit的一些属性和配置:
- enabled:表明audit是否会记录事件,可以通过auditctl -e设置
- failure:表明audit是否会记录失败事件,设置为1,才会记录失败事件
- pid:占用audit的进程的pid
- rate_limit:内核每秒发送的最大消息数,如果是0,表示不限制
- backlog_limit:缓存队列长度限制
- lost:由于缓存队列超过限制而导致的丢失的记录数
- backlog:当前缓存队列中等待读取的记录数
- backlog_wait_time:缓存队列满时的等待时间
其中backlog_wait_time是后面的版本提供的。
3 工作原理
除了上述的使用外,audit还有一个特点:独占性。实际的审计操作是由内核中的kauditd完成的,auditd再通过netlink读取审计日志。而kauditd是只允许与一个用户态进程连接,因此,如果系统上已经有auditd进程与kauditd建立连接,后续其他进程进行了抢占,auditd则会断开。那么,如果判断当前是哪个进程与kautid建立了连接呢?可以通过auditctl
-s中的pid进行判断。
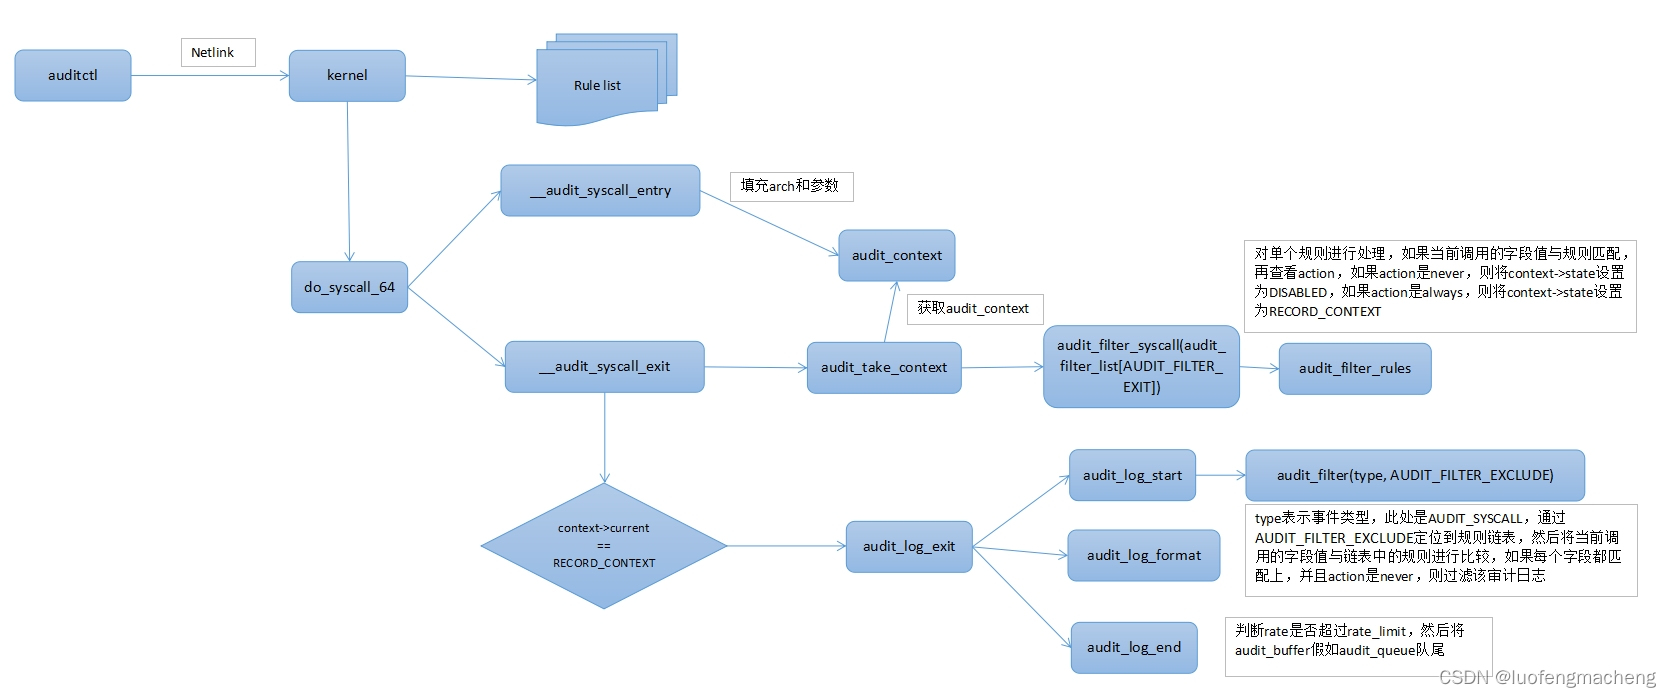
另一个重要的地方是kaudit如何去应用配置的规则。在auditctl的-a <l,a>选项中,给出的选项含义是:将规则和对应的action加入到list后面。list有4种:task、exit、user、exclude,action有2种:never、always。
task、exit、user分别表示审计事件的三种类型:user事件是指与用户相关的事件,例如用户登录、注销、切换等。task是指与进程相关的事件,例如进程创建、退出、切换等。exit是指与系统调用相关的事件。exclude只是一个关键字,用于排除不需要审计的文件或者目录。因此,这里面的事件类型与其他的某些选项有强相关:
- -a用于增加规则,-w用于监视文件,两者不能同时使用,说明在实现上,分别维护了以事件类型进行分类的4个列表,同时还维护了需要监视的文件列表
- -S指定系统调用号,因此,只能用于-a exit
配置和规则的变更:
当通过auditctl操作配置或者规则时,会通过netlink将规则发送到内核,内核接收到到配置后会对内部的配置或者规则进行更新
对于规则来说,内核(4.19.281)内部会维护7个链表:
- AUDIT_FILTER_USER:用户生成的日志
- AUDIT_FILTER_TASK:进程创建
- AUDIT_FILTER_ENTRY:系统调用入口
- AUDIT_FILTER_WATCH:文件系统监控
- AUDIT_FILTER_EXIT:系统调用退出
- AUDIT_FILTER_EXCLUDE:审计日志排除
- AUDIT_FILTER_FS

4 audit接口调用
auditctl使用netlink与内核进行交互,因此,要想实现audit的一些能力,就需要采用netlink实现一套交互接口,幸运的是,已经有库可以完成这项工作:yum
install -y audit-libs-devel,然后编译时带上-laudit。
安装完成后,可以查看头文件/usr/include/libaudit.h看下提供的方法。
4.1 获取和修改配置
#include <iostream>
#include <libaudit.h>

using namespace std;

int main() {

    int fd = audit_open();

    audit_request_status(fd);

    struct audit_reply reply;
    audit_get_reply(fd, &reply, GET_REPLY_BLOCKING, 0);
    struct audit_status *status;
    status = reply.status;

    cout <<"auditctl -s return:" <<endl;
    cout << "enabled=" << status->enabled << endl;
    cout << "failure=" << status->failure << endl;
    cout << "pid=" << status->pid << endl;
    cout << "rate_limit=" << status->rate_limit << endl;
    cout << "backlog_limit=" << status->backlog_limit << endl;
    cout << "lost=" << status->lost << endl;
    cout << "backlog=" << status->backlog << endl;

    return 0;
}
- 1
- 2
- 3
- 4
- 5
- 6
- 7
- 8
- 9
- 10
- 11
- 12
- 13
- 14
- 15
- 16
- 17
- 18
- 19
- 20
- 21
- 22
- 23
- 24
- 25
- 26
- 27
先试用audit_request_status()向内核发送请求,表明要获取配置信息,然后再通过audit_get_reply()接收数据,数据放在struct
audit_reply的结构体:
// /usr/src/libaudit.h
struct audit_reply {
        int                      type;
        int                      len;
        struct nlmsghdr         *nlh;
        struct audit_message     msg;

        /* Using a union to compress this structure since only one of
         * the following should be valid for any packet. */
        union {
        struct audit_status     *status;
        struct audit_rule_data  *ruledata;
        struct audit_login      *login;
        char                    *message;
        struct nlmsgerr         *error;
        struct audit_sig_info   *signal_info;
        struct daemon_conf      *conf;
#ifdef AUDIT_FEATURE_BITMAP_ALL
        struct audit_features   *features;
#endif
        };
};
- 1
- 2
- 3
- 4
- 5
- 6
- 7
- 8
- 9
- 10
- 11
- 12
- 13
- 14
- 15
- 16
- 17
- 18
- 19
- 20
- 21
- 22
如果是获取配置信息,此时数据放在status中:
// include/uapi/linux/audit.h
struct audit_status {
        __u32           mask;           /* Bit mask for valid entries */
        __u32           enabled;        /* 1 = enabled, 0 = disabled */
        __u32           failure;        /* Failure-to-log action */
        __u32           pid;            /* pid of auditd process */
        __u32           rate_limit;     /* messages rate limit (per second) */
        __u32           backlog_limit;  /* waiting messages limit */
        __u32           lost;           /* messages lost */
        __u32           backlog;        /* messages waiting in queue */
        union {
                __u32   version;        /* deprecated: audit api version num */
                __u32   feature_bitmap; /* bitmap of kernel audit features */
        };
};
- 1
- 2
- 3
- 4
- 5
- 6
- 7
- 8
- 9
- 10
- 11
- 12
- 13
- 14
- 15
因此,只要读取返回的audit_reply中的status中的上述字段即可。需要注意的是,如果audit_get_reply()中的第3个参数设置为GET_REPLY_NONBLOCKING,可能拿不到数据,因为fd可能还没有可读的数据,所以,这里要么设置为GET_REPLY_BLOCKING,要么使用select:
#include <iostream>
#include <libaudit.h>

using namespace std;

int main() {

    struct timeval t = {
        .tv_sec = 0, .tv_usec = 500000
    };

    int fd = audit_open();

    audit_request_status(fd);

    fd_set read_mask;
    FD_ZERO(&read_mask);
    FD_SET(fd, &read_mask);
    select(fd+1, &read_mask, NULL, NULL, &t);

    struct audit_reply reply;
    audit_get_reply(fd, &reply, GET_REPLY_NONBLOCKING, 0);
    struct audit_status *status;
    status = reply.status;

    cout <<"auditctl -s return:" <<endl;
    cout << "enabled=" << status->enabled << endl;
    cout << "failure=" << status->failure << endl;
    cout << "pid=" << status->pid << endl;
    cout << "rate_limit=" << status->rate_limit << endl;
    cout << "backlog_limit=" << status->backlog_limit << endl;
    cout << "lost=" << status->lost << endl;
    cout << "backlog=" << status->backlog << endl;

    return 0;
}
- 1
- 2
- 3
- 4
- 5
- 6
- 7
- 8
- 9
- 10
- 11
- 12
- 13
- 14
- 15
- 16
- 17
- 18
- 19
- 20
- 21
- 22
- 23
- 24
- 25
- 26
- 27
- 28
- 29
- 30
- 31
- 32
- 33
- 34
- 35
- 36
对于修改配置的操作,libaudit直接提供了对应的api函数,例如,设置backlog_limit,可以直接调用audit_set_backlog_limit()。
4.2 获取和修改规则
#include <iostream>
#include <libaudit.h>

using namespace std;

int main() {

    struct timeval t = {
        .tv_sec = 0, .tv_usec = 500000
    };

    int fd = audit_open();

    do {
        audit_request_rules_list_data(fd);

        fd_set read_mask;
        FD_ZERO(&read_mask);
        FD_SET(fd, &read_mask);
        select(fd+1, &read_mask, NULL, NULL, &t);

        struct audit_reply reply;
        audit_get_reply(fd, &reply, GET_REPLY_NONBLOCKING, 0);
        if(reply.type == NLMSG_DONE) {
            break;
        }
        struct audit_rule_data *rules;
        rules = reply.ruledata;

        cout <<"auditctl -l return:" <<endl;
        cout << audit_flag_to_name(rules->flags) << endl;
        cout << audit_action_to_name(rules->action) << endl;
    } while(true);

    return 0;
}
- 1
- 2
- 3
- 4
- 5
- 6
- 7
- 8
- 9
- 10
- 11
- 12
- 13
- 14
- 15
- 16
- 17
- 18
- 19
- 20
- 21
- 22
- 23
- 24
- 25
- 26
- 27
- 28
- 29
- 30
- 31
- 32
- 33
- 34
- 35
- 36
获取规则跟获取配置的区别只是发起操作的函数和数据解析不同,获取规则使用audit_request_rules_list_data()发起操作,解析数据时则需要解析struct
audit_rule_data的数组。
#include <iostream>
#include <libaudit.h>
#include <linux/audit.h>

using namespace std;

int main() {

    int fd = audit_open();

    struct audit_rule_data *rule = new(struct audit_rule_data);

    audit_rule_syscall_data(rule, 57);

    audit_add_rule_data(fd, rule, AUDIT_FILTER_EXIT, AUDIT_NEVER);

    return 0;
}
- 1
- 2
- 3
- 4
- 5
- 6
- 7
- 8
- 9
- 10
- 11
- 12
- 13
- 14
- 15
- 16
- 17
- 18
上面的代码相当于auditctl -a exit,never -S execve。
#include <iostream>
#include <libaudit.h>
#include <linux/audit.h>

using namespace std;

int main() {

    int fd = audit_open();

    struct audit_rule_data *rule = new(struct audit_rule_data);

    audit_add_watch(&rule, "/etc/passwd");

    audit_add_rule_data(fd, rule, AUDIT_FILTER_EXIT, AUDIT_ALWAYS);

    return 0;
}
- 1
- 2
- 3
- 4
- 5
- 6
- 7
- 8
- 9
- 10
- 11
- 12
- 13
- 14
- 15
- 16
- 17
- 18
上面的代码相当于auditctl -w /etc/passwd -p rwxa。
4.3 获取审计日志
获取升级日志还是使用netlink的方式读取:
#include <iostream>
#include <libaudit.h>
#include <string.h>
#include <unistd.h>

using namespace std;

int main() {
    int audit_fd = audit_open();
    if (audit_fd < 0) {
	cout << "open audit fail:" << strerror(errno) << endl;
        return -1;
    }

    audit_set_enabled(audit_fd, 1);
    struct audit_reply audit_rep;
    int ret;
    struct timeval t = {
            .tv_sec = 5, .tv_usec = 0
        };
    pid_t cur_pid = getpid();
    ret = audit_set_pid(audit_fd, static_cast<uint32_t>(cur_pid),
                               WAIT_NO);
    if (ret <= 0) {
        cout << "audit_set_pid fail:" << strerror(errno) << endl;
        return -1;
    }
    do {
        fd_set read_mask;
        FD_ZERO(&read_mask);
        FD_SET(audit_fd, &read_mask);
        ret = select(audit_fd + 1, &read_mask, nullptr, nullptr, &t);
        if (ret <= 0) {
            cout << "select fail:" << strerror(errno) << endl;
            continue;
        }
        ret = audit_get_reply(audit_fd, &audit_rep,
                          GET_REPLY_NONBLOCKING, 0);
        if (ret <= 0) {
            cout << "open audit fail:" << strerror(errno) << endl;
        }

        printf("%s %s", __FUNCTION__, audit_rep.msg.data);
        cout << audit_rep.msg.data << endl;
    } while(true);

    return 0;
}
- 1
- 2
- 3
- 4
- 5
- 6
- 7
- 8
- 9
- 10
- 11
- 12
- 13
- 14
- 15
- 16
- 17
- 18
- 19
- 20
- 21
- 22
- 23
- 24
- 25
- 26
- 27
- 28
- 29
- 30
- 31
- 32
- 33
- 34
- 35
- 36
- 37
- 38
- 39
- 40
- 41
- 42
- 43
- 44
- 45
- 46
- 47
- 48
5 audit存在的问题
如果只是正常使用audit:配置audit规则,查看审计日志,也没啥问题,但是,实际使用过程中,还是存在一些问题。
5.1 内核版本
不同版本的内核在实现机制上有所不同,因此,运行表现和参数控制上也有所不同:
- 小于3.14的内核没有提供设置backlog_wait_time的接口
5.2 审计日志过多造成的缓存队列和磁盘问题
audit_log_end将审计日志放到audit_queue的队尾,如果审计日志较多,可能会导致队列很长,占用的资源增多,因此,内核也提供了一些参数进行控制:
-
backlog_limit:缓存队列长度限制
-
backlog_wait_time:缓存队列满的等待时间
// audit_log_start(linux-4.19.281)
// auditd_test_task:检查当前进程是否是audit daemon进程
// audit_ctl_owner_current:检查当前进程是否持有audit_cmd_mutex锁
// 因此,这里进入if的条件是:当前进程不是audit daemon进程,并且没有持有锁
if (!(auditd_test_task(current) || audit_ctl_owner_current())) {// 获取audit_backlog_wait_time,就是auditctl -s中的backlog_wait_time long stime = audit_backlog_wait_time; // audit_backlog_limit就是auditctl -s中的backlog_limit,默认值是64 // 因此,这里进入while的条件是:设置了backlog_limit,并且当前缓存队列的长度大于backlog_limit while (audit_backlog_limit && (skb_queue_len(&audit_queue) > audit_backlog_limit)) { // 唤醒kauditd处理队列中的日志 wake_up_interruptible(&kauditd_wait); /* sleep if we are allowed and we haven't exhausted our * backlog wait limit */ // 如果当前进程允许休眠,并且backlog_wait_time大于0,则进入if,backlog_wait_time默认是60s if (gfpflags_allow_blocking(gfp_mask) && (stime > 0)) { // 创建等待队列的节点 DECLARE_WAITQUEUE(wait, current); // 将刚才创建的等待队列的节点wait加入到队列audit_backlog_wait中 add_wait_queue_exclusive(&audit_backlog_wait, &wait); set_current_state(TASK_UNINTERRUPTIBLE); // 让当前进程休眠一段时间 stime = schedule_timeout(stime); // 将wait从audit_backlog_wait队列中移除 remove_wait_queue(&audit_backlog_wait, &wait); } else { // 如果当前进程没有休眠,则先检查审计日志的生成速度是否超过rate_limit if (audit_rate_check() && printk_ratelimit()) pr_warn("audit_backlog=%d > audit_backlog_limit=%d\n", skb_queue_len(&audit_queue), audit_backlog_limit); // lost自增1,并在审计日志中打印缓存队列超过限制 audit_log_lost("backlog limit exceeded"); return NULL; } } }
- 1
- 2
- 3
- 4
- 5
- 6
- 7
- 8
- 9
- 10
- 11
- 12
- 13
- 14
- 15
- 16
- 17
- 18
- 19
- 20
- 21
- 22
- 23
- 24
- 25
- 26
- 27
- 28
- 29
- 30
- 31
- 32
- 33
- 34
- 35
- 36
- 37
- 38
- 39
- 40
从上面的代码可以看出,当队列长度超过backlog_limit时,内核会休眠一段时间backlog_wait_time(默认60秒),如果backlog_limit为0,则不会休眠,而是会打印backlog
limit exceeded日志。
因此,如果backlog_wait_time不为0,而日志太多时,可能导致内核频繁休眠,极端情况下,系统直接卡死。
如果要解决这个问题,可以从几个方面入手:
- 审计规则尽可能只配置必要的,防止生成大量无用的审计日志
- 根据机器配置增加backlog_limit,例如,将backlog_limit可以设置为8193或者更大
- backlog_wait_time设置为0,当日志过多时直接丢弃,防止影响日常的使用
- 审计日志的消费者尽可能快速消费日志,可能的情况下,可以增加丢弃策略,防止审计日志堆积
当审计日志过多,还会造成磁盘占用率的问题:当审计日志太多,可能会占用大量磁盘空间。
需要注意的是,即使没有配置审计规则,日志中也可能有审计日志,pam认证、服务启动等,在没有规则的情况下内核也会生成审计日志。
同时,从3.16.0开始,内核增加了多消费者,允许多个进程同时读取审计日志,那么,如果存在其他进程也读取审计然后写到日志文件的话,磁盘占用的问题又会放大,因此,对于磁盘占用的问题,可以从以下几个方面入手:
- 是否有其他进程也读取了审计日志
- 在没有配置审计规则的情况下是否也会产生大量日志
5.2 容器环境下同一个命令的日志存在差异
在容器环境下,同一个命令的日志可能存在差异,因为命令的实现有所不同,比较典型的是,有些镜像的vi是重定向到busybox,有些则是跟主机一样的二进制文件,那么他们产生的日志就不同,就会造成分析上的困难。
6 参考文档
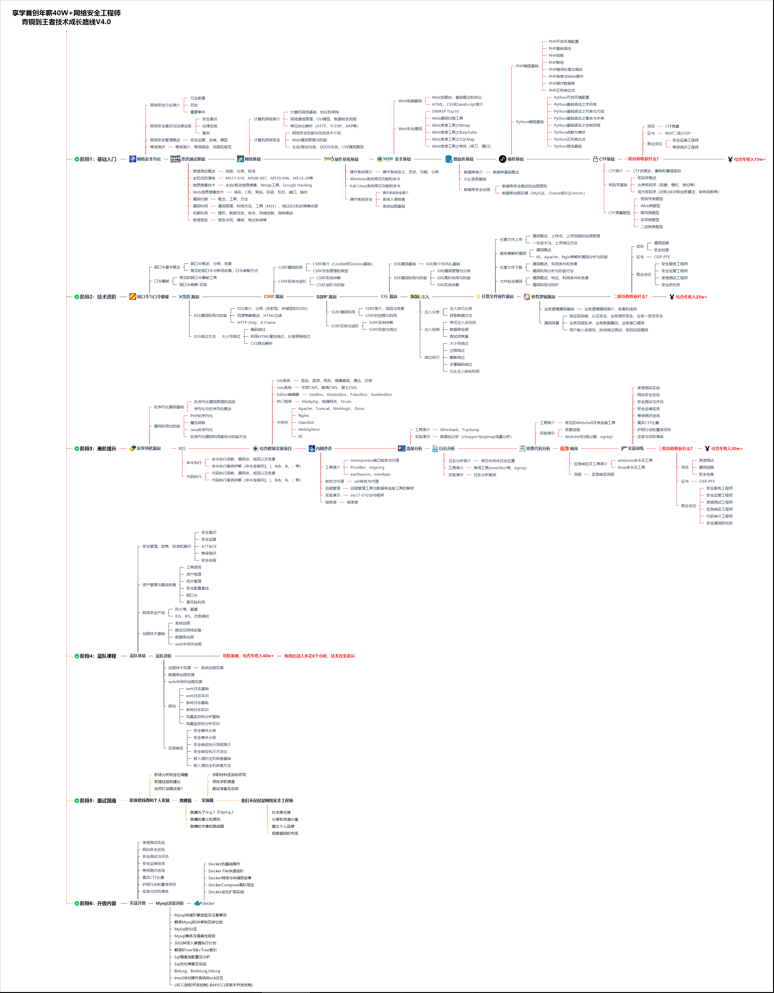
学习计划安排

我一共划分了六个阶段,但并不是说你得学完全部才能上手工作,对于一些初级岗位,学到第三四个阶段就足矣~
这里我整合并且整理成了一份【282G】的网络安全从零基础入门到进阶资料包,需要的小伙伴可以扫描下方CSDN官方合作二维码免费领取哦,无偿分享!!!
如果你对网络安全入门感兴趣,那么你需要的话可以
点击这里
Copyright © 2003-2013 www.wpsshop.cn 版权所有,并保留所有权利。


