
- 1IPSec协议簇(含Cisco实验配置)_cisco ipsec
- 2C# Winform DPI自适应方案_winform控件在分辨率缩放后变形
- 3VMware17Pro虚拟机安装教程(超详细)
- 4OpenCV之边缘检测(附python代码)_python opencv 边缘检测
- 5FAST-LIO:A Fast Robust LiDAR-inertial Odometry Package by Tightly-Coupled Iterated Kalman Filter论文翻译_fast-lio: a fast, robust lidar-inertial odometry p
- 6AI绘画揭秘:7种Midjourney后缀参数详解_ai软件生成4:3的图片
- 7掌握Git:从入门到精通_git提代码命令
- 8多元回归分析_线性回归完美拟合无法统计
- 928.【C语言】库函数
- 10详细分析Python中的win32com(附Demo)_python win32com
星火大模型AI接口Spring中项目中使用【星火、AIGC】
赞
踩
星火大模型AI接口使用
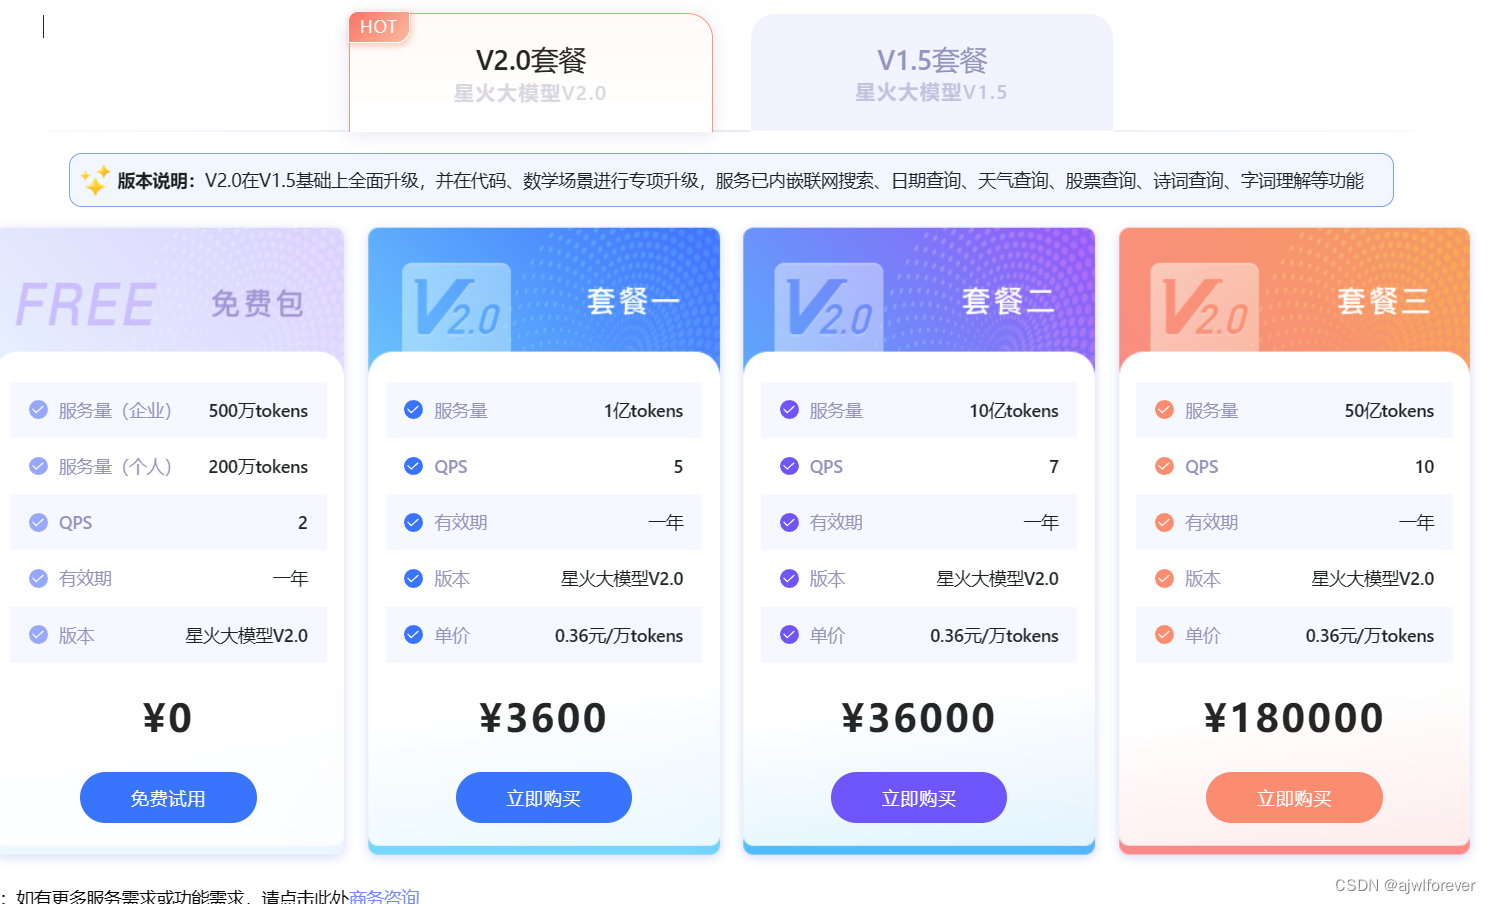
讯飞的星火大模型是有免费版本赠送200万个Token,就个人学习来说完全够用了。
免费申请过后,到控制台,两个红色方框是最要紧的。
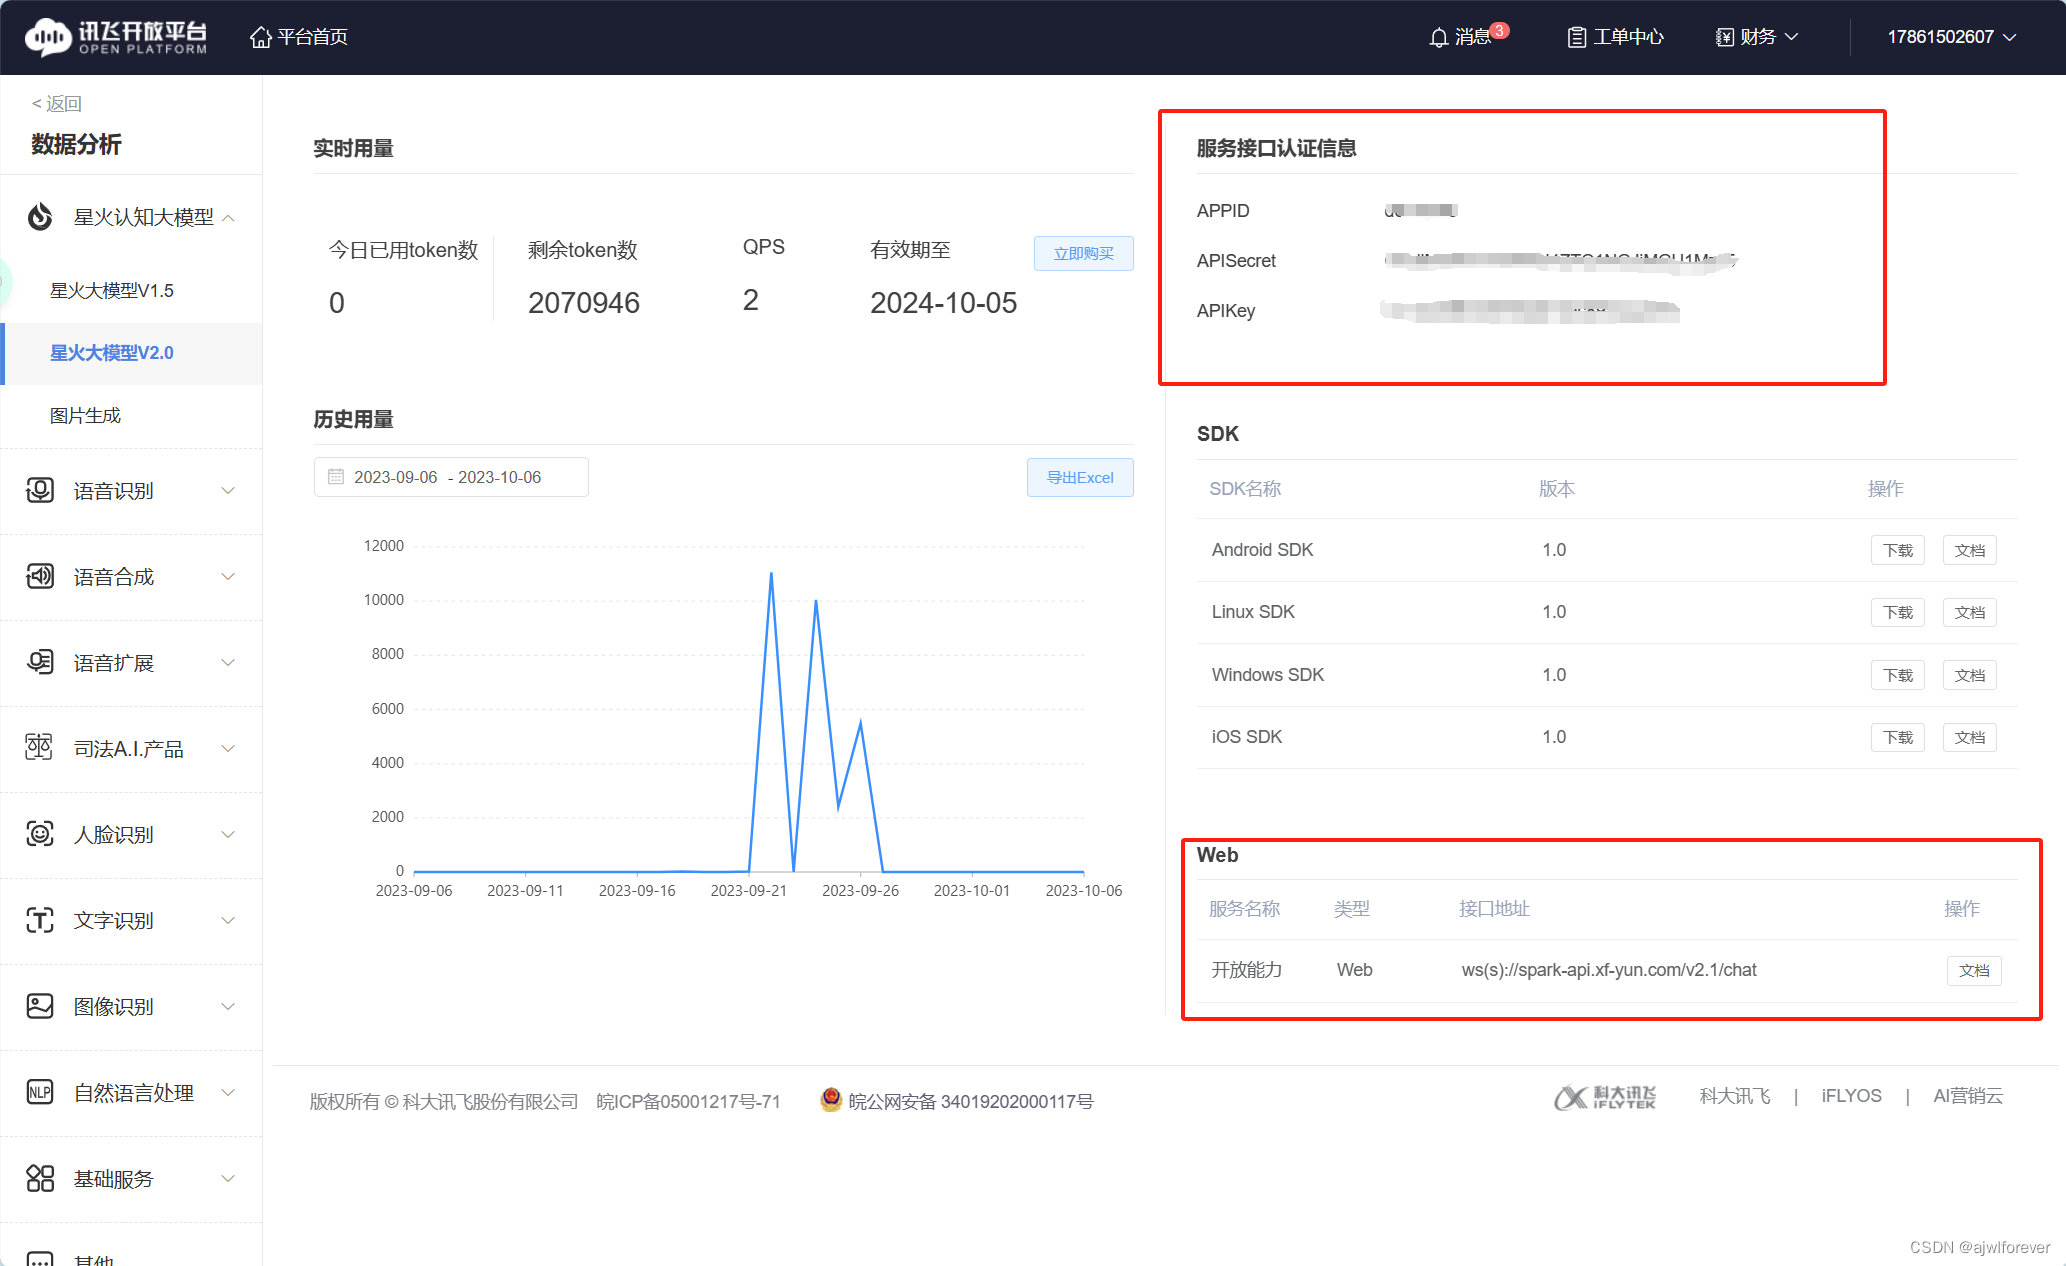
星火认知大模型Web文档 | 讯飞开放平台文档中心 (xfyun.cn)这是官方文档对于接口的详细使用,里面有对各种请求的详细描述。接下来我们将在Spring项目中使用星火的AIGC能力。
首先是星火给的APPID、APISecret、APIKey是连接到大模型的关键,通过这三个参数按照通用鉴权URL生成说明 | 讯飞开放平台文档中心 (xfyun.cn)生成通用鉴权URL就可以就行html请求,发送请求参数,接受返回信息。
https://xfyun-doc.cn-bj.ufileos.com/static%2F16933832521697972%2Fbig_model.zip 这是官方给出的Java例子。
通用鉴权URL的生成
官方给的,直接拿来用。
/ 获得鉴权地址
    public static String getAuthUrl(String hostUrl, String apiSecret, String apiKey) throws Exception {
        URL url = new URL(hostUrl);
        // 时间
        SimpleDateFormat format = new SimpleDateFormat("EEE, dd MMM yyyy HH:mm:ss z", Locale.US);
        format.setTimeZone(TimeZone.getTimeZone("GMT"));
        String date = format.format(new Date());
        // 拼接
        String preStr = "host: " + url.getHost() + "\n" +
                "date: " + date + "\n" +
                "GET " + url.getPath() + " HTTP/1.1";
        // System.err.println(preStr);
        // SHA256加密
        Mac mac = Mac.getInstance("hmacsha256");
        SecretKeySpec spec = new SecretKeySpec(apiSecret.getBytes(StandardCharsets.UTF_8), "hmacsha256");
        mac.init(spec);

        byte[] hexDigits = mac.doFinal(preStr.getBytes(StandardCharsets.UTF_8));
        // Base64加密
        String sha = Base64.getEncoder().encodeToString(hexDigits);
        // System.err.println(sha);
        // 拼接
        String authorization = String.format("api_key=\"%s\", algorithm=\"%s\", headers=\"%s\", signature=\"%s\"", apiKey, "hmac-sha256", "host date request-line", sha);
        // 拼接地址
        HttpUrl httpUrl = Objects.requireNonNull(HttpUrl.parse("https://" + url.getHost() + url.getPath())).newBuilder().//
                addQueryParameter("authorization", Base64.getEncoder().encodeToString(authorization.getBytes(StandardCharsets.UTF_8))).//
                addQueryParameter("date", date).//
                addQueryParameter("host", url.getHost()).//
                build();

        // System.err.println(httpUrl.toString());
        return httpUrl.toString();
    }

- 1
- 2
- 3
- 4
- 5
- 6
- 7
- 8
- 9
- 10
- 11
- 12
- 13
- 14
- 15
- 16
- 17
- 18
- 19
- 20
- 21
- 22
- 23
- 24
- 25
- 26
- 27
- 28
- 29
- 30
- 31
- 32
- 33
项目中实现
在项目中使用我们需要一个Config进行全局配置,一个WebListener发送接受请求,还有与星火交互的DTO。
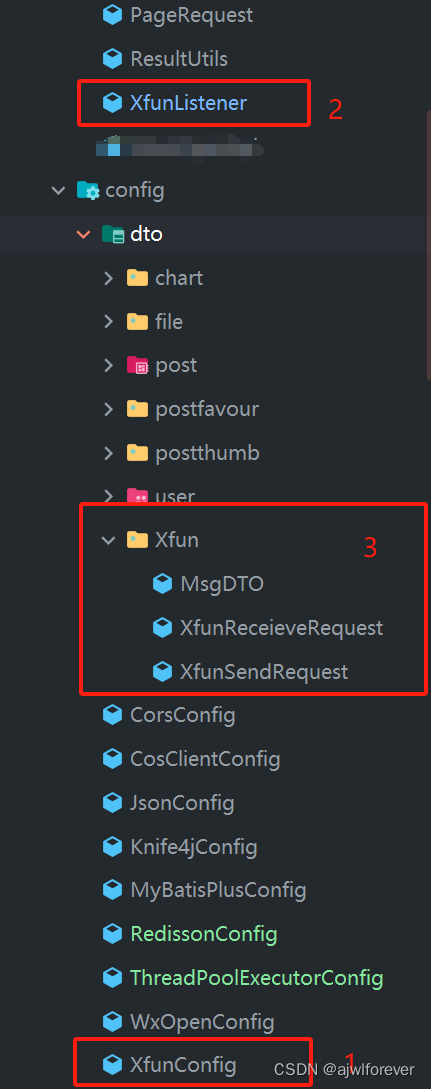
1. XfunConfig
/**
 *   星火大模型AI接口配置
 */
@Configuration
@Data
@ConfigurationProperties(prefix = "xfun.open")
public class XfunConfig {
    private String appid;
    private String apiSecret;
    private String hostUrl;
    private String apiKey;
}
- 1
- 2
- 3
- 4
- 5
- 6
- 7
- 8
- 9
- 10
- 11
- 12
- 13
在application.yml中的配置
#星火
xfun:
  open:
    appid: XXXXXXXXXXXXXXXXXXXXXXX
    apiSecret: XXXXXXXXXXXXXXXXXXXXXXX
    hostUrl: https://spark-api.xf-yun.com/v2.1/chat
    apiKey: XXXXXXXXXXXXXXXXXXXXXXX
- 1
- 2
- 3
- 4
- 5
- 6
- 7
3. DTO – Xfun
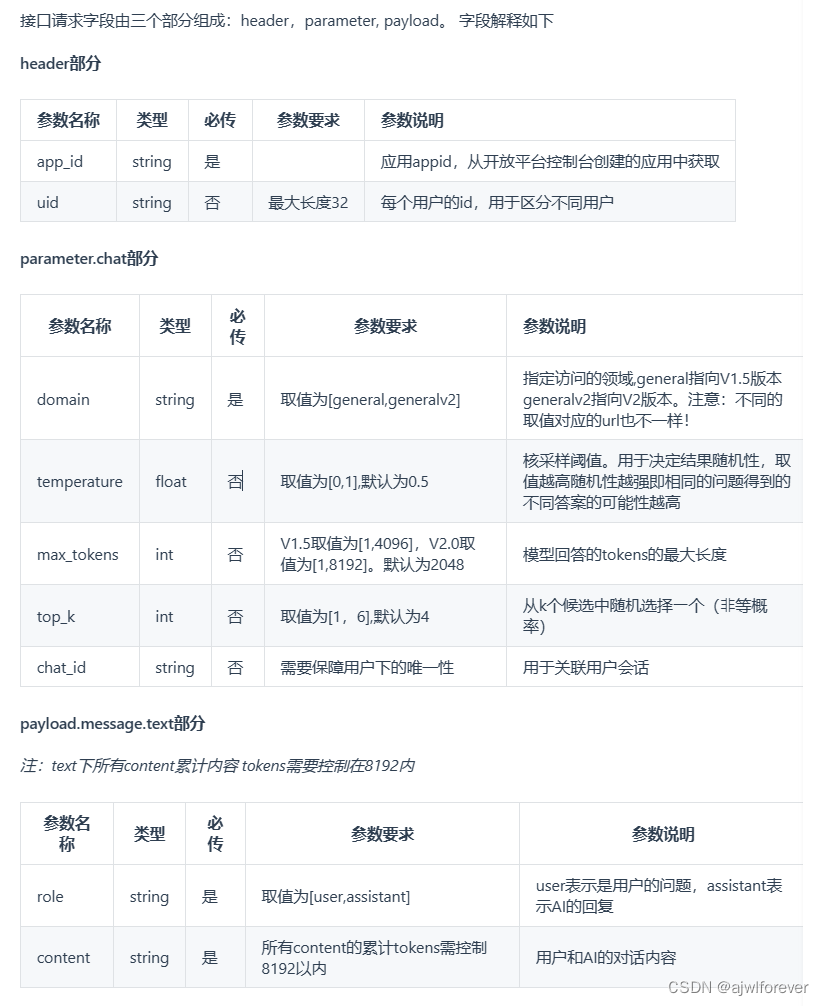
看官方文档中对请求参数以及对各个字段的解释。
# 参数构造示例如下
{
        "header": {
            "app_id": "12345",
            "uid": "12345"
        },
        "parameter": {
            "chat": {
                "domain": "general",
                "temperature": 0.5,
                "max_tokens": 1024,
            }
        },
        "payload": {
            "message": {
                # 如果想获取结合上下文的回答,需要开发者每次将历史问答信息一起传给服务端,如下示例
                # 注意:text里面的所有content内容加一起的tokens需要控制在8192以内,开发者如有较长对话需求,需要适当裁剪历史信息
                "text": [
                    {"role": "user", "content": "你是谁"} # 用户的历史问题
                    {"role": "assistant", "content": "....."}  # AI的历史回答结果
                    # ....... 省略的历史对话
                    {"role": "user", "content": "你会做什么"}  # 最新的一条问题,如无需上下文,可只传最新一条问题
                ]
        }
    }
}
- 1
- 2
- 3
- 4
- 5
- 6
- 7
- 8
- 9
- 10
- 11
- 12
- 13
- 14
- 15
- 16
- 17
- 18
- 19
- 20
- 21
- 22
- 23
- 24
- 25
- 26
其中Message单独为一个类
/**
 * 消息对象
 *
 */
@Data
public class MsgDTO {
    /**
     * 角色
     */
    private String role;
    /**
     * 消息内容
     */
    private String content;
    private Integer index;

    @Getter
    public static enum Role {
        SYSTEM("system"),
        USER("user"),
        ASSISTANT("assistant");

        private String name;

        private Role(String name) {
            this.name = name;
        }
    }

}
- 1
- 2
- 3
- 4
- 5
- 6
- 7
- 8
- 9
- 10
- 11
- 12
- 13
- 14
- 15
- 16
- 17
- 18
- 19
- 20
- 21
- 22
- 23
- 24
- 25
- 26
- 27
- 28
- 29
- 30
这样一个请求构成的数据对象类如下:
@Data
public class XfunSendRequest {

    @JsonProperty("header")
    private Header header;

    @JsonProperty("parameter")
    private ParameterDTO parameterDTO;

    @JsonProperty("payload")
    private PayloadDTO payload;
    @Data
    public static class Header{
        @JSONField(name = "app_id")
        private String appId;
        @JSONField(name = "uid")
        private String uid;
    }

    @ Data
    public static class ParameterDTO{

        @JsonProperty("chat")
        private ChatDTO chat;
        @Data
        public static class ChatDTO {
            @JsonProperty("domain")
            private String domain = "generalv2";
            @JsonProperty("temperature")
            private Double temperature = 0.5;
            @JSONField(name = "max_tokens")
            private Integer maxTokens = 2048;
        }
    }

    @Data
    public static class PayloadDTO {
        @JsonProperty("message")
        private MessageDTO message;


        @Data
        public static class MessageDTO {
            @JsonProperty("text")
            private List<MsgDTO> text;


        }
    }


}
- 1
- 2
- 3
- 4
- 5
- 6
- 7
- 8
- 9
- 10
- 11
- 12
- 13
- 14
- 15
- 16
- 17
- 18
- 19
- 20
- 21
- 22
- 23
- 24
- 25
- 26
- 27
- 28
- 29
- 30
- 31
- 32
- 33
- 34
- 35
- 36
- 37
- 38
- 39
- 40
- 41
- 42
- 43
- 44
- 45
- 46
- 47
- 48
- 49
- 50
- 51
- 52
接下来是构造接口响应对象:
# 接口为流式返回,此示例为最后一次返回结果,开发者需要将接口多次返回的结果进行拼接展示
{
    "header":{
        "code":0,
        "message":"Success",
        "sid":"cht000cb087@dx18793cd421fb894542",
        "status":2
    },
    "payload":{
        "choices":{
            "status":2,
            "seq":0,
            "text":[
                {
                    "content":"我可以帮助你的吗?",
                    "role":"assistant",
                    "index":0
                }
            ]
        },
        "usage":{
            "text":{
                "question_tokens":4,
                "prompt_tokens":5,
                "completion_tokens":9,
                "total_tokens":14
            }
        }
    }
}
- 1
- 2
- 3
- 4
- 5
- 6
- 7
- 8
- 9
- 10
- 11
- 12
- 13
- 14
- 15
- 16
- 17
- 18
- 19
- 20
- 21
- 22
- 23
- 24
- 25
- 26
- 27
- 28
- 29
- 30
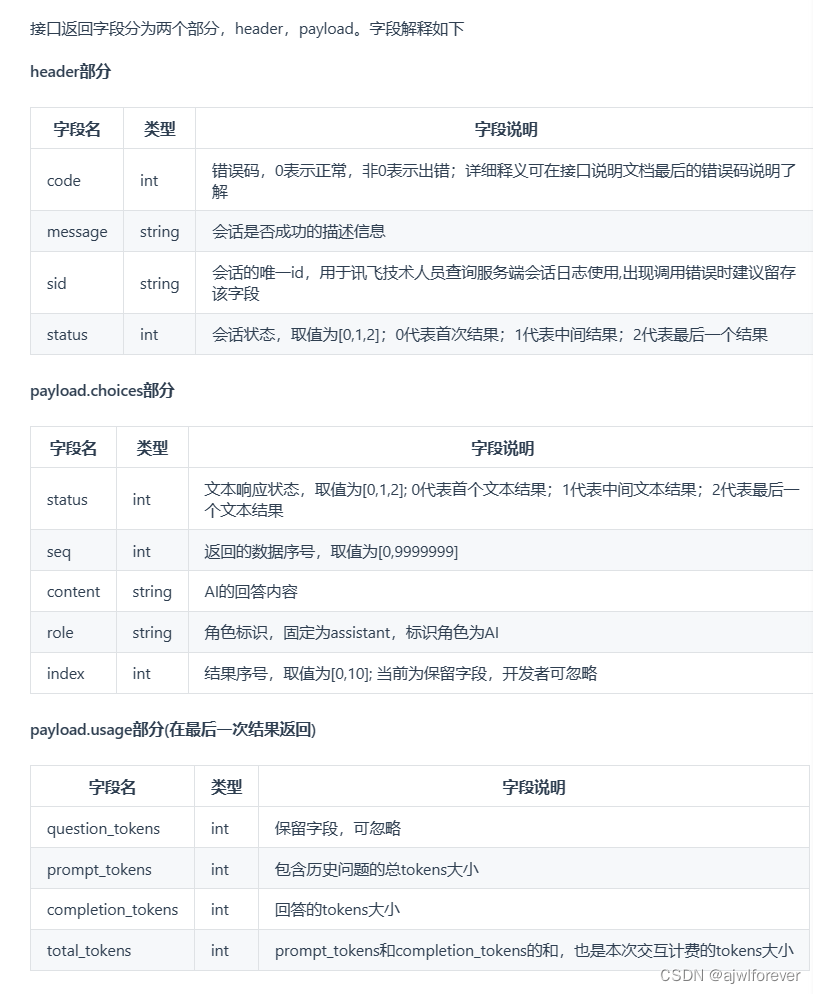
由官方描述可见,其中 payload.choice.text中的内容就是构造的MsgDto, 根据官方文档给出的接口响应构造XfunReceieveRequest;
@Data
public class XfunReceieveRequest {

    @JsonProperty("header")
    private HeaderDTO header;
    @JsonProperty("payload")
    private PayloadDTO payload;

    @NoArgsConstructor
    @Data
    public static class HeaderDTO {
        @JsonProperty("code")
        private Integer code;
        @JsonProperty("message")
        private String message;
        @JsonProperty("sid")
        private String sid;
        @JsonProperty("status")
        private Integer status;
    }

    @NoArgsConstructor
    @Data
    public static class PayloadDTO {
        @JsonProperty("choices")
        private ChoicesDTO choices;
        @JsonProperty("usage")
        private UsageDTO usage;

        @NoArgsConstructor
        @Data
        public static class ChoicesDTO {
            @JsonProperty("status")
            private Integer status;
            @JsonProperty("seq")
            private Integer seq;
            @JsonProperty("text")
            private List<MsgDTO> text;

        }

        @NoArgsConstructor
        @Data
        public static class UsageDTO {
            @JsonProperty("text")
            private TextDTO text;

            @NoArgsConstructor
            @Data
            public static class TextDTO {
                @JsonProperty("question_tokens")
                private Integer questionTokens;
                @JsonProperty("prompt_tokens")
                private Integer promptTokens;
                @JsonProperty("completion_tokens")
                private Integer completionTokens;
                @JsonProperty("total_tokens")
                private Integer totalTokens;
            }
        }
    }

}
- 1
- 2
- 3
- 4
- 5
- 6
- 7
- 8
- 9
- 10
- 11
- 12
- 13
- 14
- 15
- 16
- 17
- 18
- 19
- 20
- 21
- 22
- 23
- 24
- 25
- 26
- 27
- 28
- 29
- 30
- 31
- 32
- 33
- 34
- 35
- 36
- 37
- 38
- 39
- 40
- 41
- 42
- 43
- 44
- 45
- 46
- 47
- 48
- 49
- 50
- 51
- 52
- 53
- 54
- 55
- 56
- 57
- 58
- 59
- 60
- 61
- 62
- 63
- 64
这样发送和接受请求都构造完成可以尝试与星火进行交互。
使用WebSocket将XfunSendRequest发出即可;以下是XfunListener中发送消息代码:
    public XfunListener sendMsg(String uid, List<MsgDTO> msgs, XfunListener webSocketListener) throws Exception {
        // 获取鉴权url
        String url = getAuthUrl(hostUrl,apiSecret,apiKey);
        //建立请求
        OkHttpClient okHttpClient = new OkHttpClient.Builder().build();
        Request request = new Request.Builder().url(url).build();

        WebSocket webSocket = okHttpClient.newWebSocket(request, webSocketListener);

        XfunSendRequest xfunSendRequest = this.getSendRequest(uid, msgs);
        System.out.println("params:" + JSONObject.toJSONString(xfunSendRequest));

        //发送消息
        webSocket.send(JSONObject.toJSONString(xfunSendRequest));

        return webSocketListener;
    }
- 1
- 2
- 3
- 4
- 5
- 6
- 7
- 8
- 9
- 10
- 11
- 12
- 13
- 14
- 15
- 16
- 17
可以看到整个发送消息的过程:
- 建立请求,根据请求创建WebSoeckt
- 利用WebSocket发出XfunSendRequest
接受消息写在XfunListener的OnMessage重载函数中,根据XfunReceiveRequest来处理数据;
3. XfunListener
具体代码如下:
最关键的就是两个函数:
- OnMessage: 接受消息,处理消息
- SendMsg: 发送消息
@Builder
public class XfunListener extends WebSocketListener {
    private String hostUrl;
    private String appid;
    private String apiSecret;
    private String apiKey;

    @Builder.Default
    public boolean is_finished = false;

    @Builder.Default
    private String answer = "";

    public String getAnswer() {
        return answer;
    }
    public boolean isFinished() {
        return is_finished;
    }

    public List<MsgDTO> getHistoryList() {
        return historyList;
    }

    @Builder.Default
    public List<MsgDTO> historyList = new ArrayList<>();
    @Override
    public void onOpen(@NotNull WebSocket webSocket, @NotNull Response response) {
        super.onOpen(webSocket, response);
    }

    public  void deleteHistory(){
        historyList = new ArrayList<>();
    }
    public void init_chat(){
        is_finished = false;
    }
    // 接收到消息如何处理
    @Override
    public void onMessage(@NotNull WebSocket webSocket, @NotNull String text) {
        super.onMessage(webSocket, text);

        // System.out.println("接收到消息:" + text);

        // 消息格式处理
        XfunReceieveRequest xfunReceieveRequest = JSONObject.parseObject(text, XfunReceieveRequest.class);


        //状态判断
        if(xfunReceieveRequest.getHeader().getCode() == 0) {
            // 0的话 ,获取状态成功
            XfunReceieveRequest.PayloadDTO payload = xfunReceieveRequest.getPayload();
            XfunReceieveRequest.PayloadDTO.ChoicesDTO choices = payload.getChoices();
            //处理得到的答案
            List<MsgDTO> msgs = choices.getText();
            //打上index
            for(int i = 0; i < msgs.size(); i++){
                MsgDTO msg =msgs.get(i);
                msg.setIndex(historyList.size()+i);
                historyList.add(msg);
            }

            if(xfunReceieveRequest.getHeader().getStatus() == 2){
                //表示会话来到最后一个结果
                XfunReceieveRequest.PayloadDTO.UsageDTO.TextDTO text1 = payload.getUsage().getText();
                System.out.println("PromptTokecn:" + text1.getPromptTokens());
                System.out.println("QuestionToken:" + text1.getQuestionTokens());
                System.out.println("CompletionToken:" + text1.getCompletionTokens());
                System.out.println("TotalToken"+text1.getTotalTokens());

                is_finished = true;

                // 消息整合
                StringBuilder message = new StringBuilder();
                for(MsgDTO msg: historyList){
                    message.append(msg.getContent());
                }
                deleteHistory();
                answer = message.toString();
                //断开连接
               // webSocket.close(3,"客户端断开连接");


            }
        }
    }

    // 获得鉴权地址
    public static String getAuthUrl(String hostUrl, String apiSecret, String apiKey) throws Exception {
        URL url = new URL(hostUrl);
        // 时间
        SimpleDateFormat format = new SimpleDateFormat("EEE, dd MMM yyyy HH:mm:ss z", Locale.US);
        format.setTimeZone(TimeZone.getTimeZone("GMT"));
        String date = format.format(new Date());
        // 拼接
        String preStr = "host: " + url.getHost() + "\n" +
                "date: " + date + "\n" +
                "GET " + url.getPath() + " HTTP/1.1";
        // System.err.println(preStr);
        // SHA256加密
        Mac mac = Mac.getInstance("hmacsha256");
        SecretKeySpec spec = new SecretKeySpec(apiSecret.getBytes(StandardCharsets.UTF_8), "hmacsha256");
        mac.init(spec);

        byte[] hexDigits = mac.doFinal(preStr.getBytes(StandardCharsets.UTF_8));
        // Base64加密
        String sha = Base64.getEncoder().encodeToString(hexDigits);
        // System.err.println(sha);
        // 拼接
        String authorization = String.format("api_key=\"%s\", algorithm=\"%s\", headers=\"%s\", signature=\"%s\"", apiKey, "hmac-sha256", "host date request-line", sha);
        // 拼接地址
        HttpUrl httpUrl = Objects.requireNonNull(HttpUrl.parse("https://" + url.getHost() + url.getPath())).newBuilder().//
                addQueryParameter("authorization", Base64.getEncoder().encodeToString(authorization.getBytes(StandardCharsets.UTF_8))).//
                addQueryParameter("date", date).//
                addQueryParameter("host", url.getHost()).//
                build();

        // System.err.println(httpUrl.toString());
        return httpUrl.toString();
    }

    // msgs和uid 转成 XfunSendRequest
    public XfunSendRequest getSendRequest(String uid, List<MsgDTO> msgs) {
        XfunSendRequest xfunSendRequest = new XfunSendRequest();
        XfunSendRequest.Header header = new XfunSendRequest.Header();
        header.setAppId(appid);
        header.setUid(uid);
        xfunSendRequest.setHeader(header);
        XfunSendRequest.ParameterDTO parameterDTO = new XfunSendRequest.ParameterDTO();
        XfunSendRequest.ParameterDTO.ChatDTO chatDTO = new XfunSendRequest.ParameterDTO.ChatDTO();
        parameterDTO.setChat(chatDTO);
        xfunSendRequest.setParameterDTO(parameterDTO);
        XfunSendRequest.PayloadDTO payloadDTO = new XfunSendRequest.PayloadDTO();
        XfunSendRequest.PayloadDTO.MessageDTO messageDTO = new XfunSendRequest.PayloadDTO.MessageDTO();
        messageDTO.setText(msgs);
        payloadDTO.setMessage(messageDTO);
        xfunSendRequest.setPayload(payloadDTO);
        return xfunSendRequest;

    }

    /**
     *  发送信息
     */
    public XfunListener sendMsg(String uid, List<MsgDTO> msgs, XfunListener webSocketListener) throws Exception {
        // 获取鉴权url
        String url = getAuthUrl(hostUrl,apiSecret,apiKey);
        //建立请求
        OkHttpClient okHttpClient = new OkHttpClient.Builder().build();
        Request request = new Request.Builder().url(url).build();

        WebSocket webSocket = okHttpClient.newWebSocket(request, webSocketListener);

        XfunSendRequest xfunSendRequest = this.getSendRequest(uid, msgs);
        System.out.println("params:" + JSONObject.toJSONString(xfunSendRequest));

        //发送消息
        webSocket.send(JSONObject.toJSONString(xfunSendRequest));

        return webSocketListener;
    }
}
- 1
- 2
- 3
- 4
- 5
- 6
- 7
- 8
- 9
- 10
- 11
- 12
- 13
- 14
- 15
- 16
- 17
- 18
- 19
- 20
- 21
- 22
- 23
- 24
- 25
- 26
- 27
- 28
- 29
- 30
- 31
- 32
- 33
- 34
- 35
- 36
- 37
- 38
- 39
- 40
- 41
- 42
- 43
- 44
- 45
- 46
- 47
- 48
- 49
- 50
- 51
- 52
- 53
- 54
- 55
- 56
- 57
- 58
- 59
- 60
- 61
- 62
- 63
- 64
- 65
- 66
- 67
- 68
- 69
- 70
- 71
- 72
- 73
- 74
- 75
- 76
- 77
- 78
- 79
- 80
- 81
- 82
- 83
- 84
- 85
- 86
- 87
- 88
- 89
- 90
- 91
- 92
- 93
- 94
- 95
- 96
- 97
- 98
- 99
- 100
- 101
- 102
- 103
- 104
- 105
- 106
- 107
- 108
- 109
- 110
- 111
- 112
- 113
- 114
- 115
- 116
- 117
- 118
- 119
- 120
- 121
- 122
- 123
- 124
- 125
- 126
- 127
- 128
- 129
- 130
- 131
- 132
- 133
- 134
- 135
- 136
- 137
- 138
- 139
- 140
- 141
- 142
- 143
- 144
- 145
- 146
- 147
- 148
- 149
- 150
- 151
- 152
- 153
- 154
- 155
- 156
- 157
- 158
- 159
- 160
- 161
- 162
可以看到这个XfunListener不是一个Bean,所以在MainApplication中创建了这个Bean。
@SpringBootApplication(exclude = {RedisAutoConfiguration.class})
@MapperScan("com.yupi.springbootinit.mapper")
@EnableScheduling
@EnableAspectJAutoProxy(proxyTargetClass = true, exposeProxy = true)
public class MainApplication {

    @Autowired
    private XfunConfig xfunConfig;


    public static void main(String[] args) {

        SpringApplication.run(MainApplication.class, args);

    }

    @Bean
    public XfunListener getXfunListener() {
        return XfunListener.builder()
                .apiKey(xfunConfig.getApiKey())
                .apiSecret(xfunConfig.getApiSecret())
                .hostUrl(xfunConfig.getHostUrl())
                .appid(xfunConfig.getAppid()).build();
    }
}
- 1
- 2
- 3
- 4
- 5
- 6
- 7
- 8
- 9
- 10
- 11
- 12
- 13
- 14
- 15
- 16
- 17
- 18
- 19
- 20
- 21
- 22
- 23
- 24
- 25
这样整个星火的AIGC就设计完成,可以随意复用在任意的项目之中,利用XfunListener即可发送消息或获取消息。
详细的数据处理,发送消息,另外写一个AI的Service做具体的处理即可。例如以下一个简单的实例:
@Service
public class AiManager {


    @Resource
    private XfunListener xfunListener;  // 实现发送接受消息的websockect

        public String testChat(String question){

        //8位随机数
        String random = String.valueOf((int)((Math.random()*9+1)*10000000));
        List<MsgDTO> msgs = new ArrayList<>();
        MsgDTO msgDTO = new MsgDTO( );
        msgDTO.setRole("user");
        msgDTO.setContent(question);
        msgDTO.setIndex(0);
        msgs.add(msgDTO);

        xfunListener.init_chat();
        try {
            // 获取接受消息的webSoeckt
            XfunListener webSocket = xfunListener.sendMsg(random, msgs, xfunListener);
            //等待weSocked返回消息 , 这是一个笨笨的处理方法。
            int cnt = 30;
            //最长等待30S
            while (!webSocket.isFinished() && cnt > 0){
                Thread.sleep(1000);  //休息1S
                cnt--;
            }
            if(cnt == 0){
                return null;
            }

            String answer = webSocket.getAnswer();
            //返回答案
            return answer;
        } catch (Exception e) {
            throw new RuntimeException(e);
        }
    }
    public static void main(String[] args) {
        AiManager ai = new AiManager();
        ai.xfunListener =  XfunListener.builder()
             .apiKey("xxxxxxx")
               .apiSecret("xxxxxxx")
               .appid("xxxxxxx")
                .hostUrl("https://spark-api.xf-yun.com/v2.1/chat")
               .build();

        System.out.println(ai.testChat("你好啊!"));
    }


}
- 1
- 2
- 3
- 4
- 5
- 6
- 7
- 8
- 9
- 10
- 11
- 12
- 13
- 14
- 15
- 16
- 17
- 18
- 19
- 20
- 21
- 22
- 23
- 24
- 25
- 26
- 27
- 28
- 29
- 30
- 31
- 32
- 33
- 34
- 35
- 36
- 37
- 38
- 39
- 40
- 41
- 42
- 43
- 44
- 45
- 46
- 47
- 48
- 49
- 50
- 51
- 52
- 53
- 54
AiManager运行结果


