
- 1P27-32:完整的训练模型(Pytorch小土堆学习笔记)_maxpool2d(2)
- 2【附源码】Java计算机毕业设计食堂在线点餐系统小程序(程序+LW+部署)_电子点餐系统流程图
- 3Ubuntu 20.04 升级到 Ubuntu 22.04
- 4【JavaScript】使用 scrollIntoView 实现描点跳转定位
- 5MySQL百万级数据量分页查询方法及其优化_mysql 500万条数据分页查询
- 6好用的IntelliJ IDEA ChatGPT插件:NexChatGPT
- 7linux下搭建PHP测试环境--转载自https://blog.csdn.net/c_fangfujiang/article/details/51536064
- 8js 正则 限制 input 只能输入数字,不能输入特殊符号,保留两位小数等效果_js input 正则保留2位小数
- 9代码review神器Upsource,让你快乐的进行CodeReview
- 10开源中文大语言模型集合【2023-06-19】
十分钟学会动态路由_动态路由怎么实现
赞
踩
目录
1.理解动态路由思路分析
介绍
动态路由,要实现的最终效果是:不同用户登陆进来时,显示出来的菜单功能是不同的
思路分析
1用户A登录成功之后,后端返回A的权限信息:能访问的页面的标识集合
2根据上一步得到的标识集合,在本地的项目页面中,选出用户A能访问的页面集合
3加上合法用户都能访问的页面集合(俗称静态页面),一起构成
图表分析
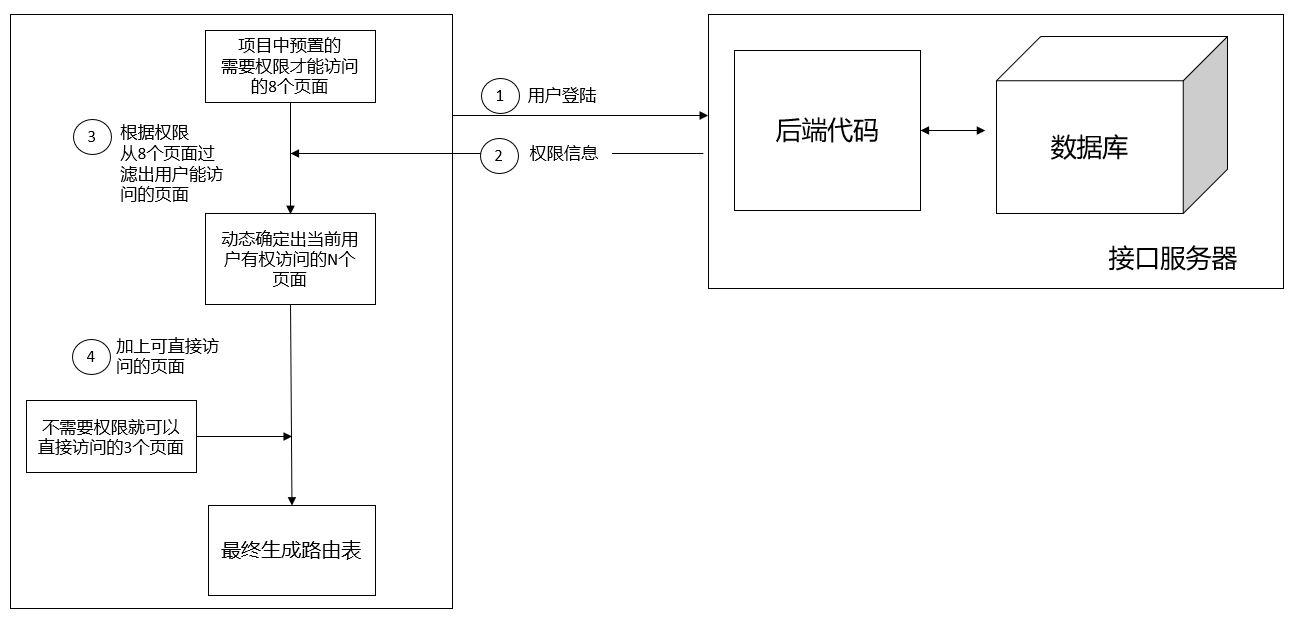
动态生成路由表
2.具体实现方式
(1)拆分静态路由表和动态路由表
理解动态和静态路由
静态路由表:不需要做权限控制的路由,每个用户都可以正常访问。
动态路由表:需要做权限控制的路由,用户如果权限不一致访问到的路由也不一样。
工作原理
用户登录之后,根据后端返回的数据表示携带的功能不同,动态生成路由配置

具体实现
进入 router/index.js文件,做两处修改:
第一个就是补充一个动态路由表asyncRoutes
第二个就是将动态和静态合并在一起
- // 省略其他...
- // 动态路由表,项目中不同的用户可以访问不同的功能
- + export const asyncRoutes = [
- // 先空着这里,后面来补充功能
- ]
-
- // 静态路由表,项目中每个用户都可以访问的功能
- export const constantRoutes = [
- // 省略....
- ]
-
- const createRouter = () => new Router({
- // 控制路由滚动行为 滚动到顶部
- scrollBehavior: () => ({ y: 0 }),
- // 组合到一起组成路由表
- + routes: [...constantRoutes, ...asyncRoutes]
- })

(2)创建功能页面组件并配置路由
在 src/views/ 的文件下配置功能页面组件
设置路由
这里我们要嵌套路由,就是让我们在显示功能页面(以 employees为例)的同时还能看到 项目的整体架子(以layout为例),我们可以将它设置为layout的二级路由
- {
- path: '/employees',
- component: Layout,
- children: [
- {
- path: '', // 作为默认渲染路由
- name: 'employees',
- component: () => import('@/views/employees/employees.vue'),
- meta: { title: 'Employees', icon: 'employees' }
- }
- ]
- }
模仿原来首页的写法,实现了Layout架子的渲染。注意到:把二级路由的path选项置空,作为默认渲染路由。
原来的写法是:不使用,用上面的那个代码
- export const asyncRoutes = [
- {
- path: '/employees',
- name: 'employees',
- component: () => import('@/views/employees/employees.vue'),
- meta: { title: 'Employees', icon: 'employees' }
- }
- ]
小结
要想所有的功能页面中都包含左侧菜单及顶部导航条,需要将它们设置成layout的子路由。
(3)模块化管理动态路由
分析
前面已经定义了动态路由的方式,直接继续往asyncRoutes表里继续添加定义就可以实现,但有个问题,若功能越来越负责,可能动态管理的路由数量会很多,那 router/index.js文件会变的非常大,不好维护。
为了解决这个问题,我们对动态的路由进行物理目录拆分,实现模块化管理
思路
把每一个路由配置单独写在一个文件中,然后再统一导入使用
在src/router下补充创建modules文件夹,并创建自己需要的几个.js文件。我们知道路由模块和业务模块是一一对应的,所以我们需要创建相等数量的路由模块文件,具体如下:
- ├── router # 路由目录
- ├── index.js # 路由主文件
- ├── modules # 模块目录
- ├── departments.js # 组织架构
- ├── employees.js # 员工
- ├── settings.js # 公司设置
- ├── salarys.js # 工资
- ├── social_securitys.js # 社保
- ├── attendances.js # 考勤
- ├── approvals.js # 审批
- ├── permissions.js # 权限管理
文件内容
以router/modules/employees.js为例,它的代码是:
- import Layout from '@/layout'
- // Layout组件中包含
- export default {
- path: '/employees', // 路径
- component: Layout, // 组件
- children: [{
- name: 'employees', // 给路由规则加一个name
- path: '', // 这里当二级路由的path什么都不写的时候 表示当前路由为默认路由直接渲染对应组件
- component: () => import('@/views/employees/employees.vue'),
- // 路由元信息 其实就是存储数据的对象 我们可以在这里放置一些信息
- meta: { title: '员工管理' }
- }]
- }
注意上边的导入 layout 和 默认导出
router/index.js
- import employeesRouter from './modules/employees'
- const asyncRoutes = [
- employeesRouter
- ]
-
- const createRouter = () => new Router({
- scrollBehavior: () => ({ y: 0 }), // 管理滚动行为 如果出现滚动 切换就让 让页面回到顶部
- routes: [...constantRoutes, ...asyncRoutes] // 临时合并所有的路由
- })
最终完成的代码,如下
- // 引入多个动态路由模块
- import approvalsRouter from './modules/approvals'
- import departmentsRouter from './modules/departments'
- import employeesRouter from './modules/employees'
- import permissionRouter from './modules/permission'
- import attendancesRouter from './modules/attendances'
- import salarysRouter from './modules/salarys'
- import settingRouter from './modules/settings'
- import socialRouter from './modules/social_securitys'
-
- // 省略其它...
-
- // 组合动态路由模块
- export const asyncRoutes = [
- approvalsRouter,
- departmentsRouter,
- employeesRouter,
- permissionRouter,
- attendancesRouter,
- salarysRouter,
- settingRouter,
- socialRouter
- ]
- const createRouter = () => new Router({
- scrollBehavior: () => ({ y: 0 }), // 管理滚动行为 如果出现滚动 切换就让 让页面回到顶部
- routes: [...constantRoutes, ...asyncRoutes] // 临时合并所有的路由
- })
(4)左侧菜单自动生成的逻辑
问题1:为什么路由表里添加了新路由就会显示到左侧
答案就在 layout/components/SideBar/index.vue 文件中,下面摘录核心代码如下:
- <template>
- <sidebar-item
- v-for="route in routes"
- :key="route.path"
- :item="route"
- :base-path="route.path"
- />
- </template>
-
- <script>
- export default {
- computed: {
- routes() {
- // this.$router.options.routes可以拿到路由配置中的路由表数据
- return this.$router.options.routes
- }
- }
- }
- </script>
通过分析源码我们得知
1、this.$router.options.routes 可以拿到完整的路由表数据
2、项目左侧的菜单时根据完整的路由表遍历出来的
问题2:菜单中的title和图标从哪里来?
负责菜单标题渲染的是meta属性中的title属性
负责图标渲染的是meta中的icon属性
(5)动态设置标题
分析
进去不同的页面,显示不同的标题
通过设置路由导航守卫来设置。
在不同页面中独立设置标题,把标题信息保存在meta中;
在路由跳转时:在路由前置守卫中,获取title,并设置
设置页面标题
document.title = '标题内容'代码
在src/permission.js中
1.引入工具方法 getPageTitle
import getPageTitle from '@/utils/get-page-title'2.在路由守卫中调用
补充一个路由守卫
- router.beforeEach((to, from, next) => {
- document.title = getPageTitle(to.meta.title)
- next()
- })
小结
- 导航守卫可以写多个
- 设置标题是 document.title='xxxx'
- ApacheVelocity是templateengine.这意味着您可以向上下文添加变量,加载引用这些变量的模板,并从该模板呈现文本,其中变量的引用替换为变量的实际值.它的目的是将设计和静态内容与代码分开.以一个网站为例.你不想在你的ja... [详细]
赞
踩
- 西雅图IT圈:seattleit【今日作者】拖拉机IT圈里烧柴油的干货担当今天是3月8日女神节祝圈里所有的女神们节日快乐祝女程序媛们敲码如流水,oncall没sev周末不..._中美码农薪酬对比中美码农薪酬对比西雅图IT圈:seattlei... [详细]
赞
踩
- Python将base64编码转换为图片并存储Python将图片转换为base64编码:https://blog.csdn.net/J__Max/article/details/82424551涉及到的就是文件的写入和base64库的使用,... [详细]
赞
踩
- 对于web应用,少不了Ajax请求,因此少不了JSON输出支持,在spring-mvc中实现这点非常简单、如下:------------------------------------------spring-mvc配置----------... [详细]
赞
踩
- 1.可以检测前端代码规范的工具。2.typora文件阅读工具。_jixxbojixxbo文档devdocs:开发知识css-trickscss技巧分享开发工具可以检测前端代码规范的工具sonarlint(还未用过)样式工具collectui... [详细]
赞
踩
- 版权声明:本文由田飞雨原创文章,转载请注明出处:文章原文链接:https://www.qcloud.com/community/article/97来源:腾云阁https://www.qcloud.com/community制作Docker... [详细]
赞
踩
- 如上图所示,index参数加了@NotBlank验证,然后使用swagger请求发现swagger识别index参数的类型为json了,去掉@NotBlank注解发现正常。但是工作中实际上我们的确需要非空验证的解决:细心的小伙伴可能已经发现... [详细]
赞
踩
- 地理信息系统(GIS)在城市智能交通信息系统中主要有如下几个功能:1.电子地图的基本操作具有地图放大、缩小、平移、图层、测距、查找设备等功能。2.设备图形化表示与操作在电子地图中显示各种设备的名称、地理位置、工作状态等信息。比如:车辆检测器... [详细]
赞
踩
- swagger-ui是一个允许API交互和可视化的库,Swagger-UI有一个特性它允许您向API规范提供URL一个yaml或json文件,它将被获取并显示给用户。该漏洞产生的原因是swagger-ui使用了一个过时的库DomPurify... [详细]
赞
踩
- 每年年初跳槽最多,跳槽是一门学问,也是一种策略。跳槽并不意味着你就能够取得职业的成功,当面临跳槽时,如何顺利地完成跳槽,从而取得职业的成功呢?以下是一些切身体会,值得大家参考。 不错,大家逐渐逐渐步入了跳槽的殿堂。这三年,我是跳烦... [详细]
赞
踩
- IntelRealSenseD435是Intel推出的一款结合RGB和深度摄像的立体视觉摄像头,具有以下主要特点:使用双摄像头和红外投射器实现立体视觉采集。提供频率可达90Hz的VGA分辨率(640x480)深度图像。具有2个720pRGB... [详细]
赞
踩
- 操作系统真象还原实验记录之实验十四:内存管理系统对应书P4099.2节1.相关基础知识总结进程有资源即页表,进程的所有线程公用进程的页表2.实验代码2.1thread.h#ifndef__THREAD_THREAD_H#define__TH... [详细]
赞
踩
- Docker容器-------dockerfile镜像优化_容器镜像优化容器镜像优化文章目录引言无优化构建镜像优化一:不需要输出的指令丢入/dev/null优化二:减少RUN构建优化三:多阶段构建优化四:使用更为轻量级的linux发行版本引... [详细]
赞
踩
- 利用几十块钱的机械臂自制了一个摄像头云台,使用了两个MG90S舵机和一块PCA9685驱动的16路舵机扩展板,再通过谷歌的MediaPipe库实现摄像机跟随人脸移动的功能树莓派+MediaPipe+PCA9685+自制摄像机云台实现人脸跟踪... [详细]
赞
踩
- [出现错误2147942402(0x80070002)(启动“ubuntu2004.exe”时)]_[出现错误2147942402(0x80070002)(启动“ubuntu2004.exe”时)][出现错误2147942402(0x800... [详细]
赞
踩
- 首先我会讲下年龄焦虑的本质,然后会谈谈大龄程序员的8种出路,最后会聊聊如何选择自己的方向。欢迎大家流言讨论。年龄焦虑的本质是竞争力不足所有和我聊年龄的程序员,聊到最后,都会确认这个事实:所谓年龄焦虑,焦虑的根本不是年龄,而是竞争力相较于年轻... [详细]
赞
踩
- 1、下载安装jdk7.0forlinux我下载的版本为:jdk-7u2-linux-i586.rpm下载地址为:http://www.oracle.com/technetwork/java/javase/downloads/jdk-7u2-... [详细]
赞
踩
- 提示:文章写完后,目录可以自动生成,如何生成可参考右边的帮助文档文章目录前言 一、pandas是什么? 二、使用步骤 1.引入库 2.读入数据 总结前言研一刚上来,导师就让部署从来没碰过的树莓派和人体姿态识别,网上将人体姿态识别部署至树... [详细]
赞
踩
- 2、在进行梯度变化的过程中,虽然之后都会进行变化,但是权重会始终保持一样,即蓝色的权重等于蓝色的权重,红色的权重等于红色的权重,绿色的权重等于绿色的权重,这样就会一直使a。如果有多个隐藏层,那么每个隐藏层的单元数最好相同(虽然更多的单元数会... [详细]
赞
踩
- InterRealSenseT265InterRealSenseT265追踪相机T265包括两个带鱼眼的灰度相机,一个IMU和一个因特尔Movidius™Myriad™2VPU。所有VSLAM算法都直接在VPU上运行,从而实现了极低的延迟和... [详细]
赞
踩

