
- 1基于Java+Servlet+Mysql的人才招聘网站的设计与实现(附源码 调试 文档)
- 2【文末送书】Python OpenCV从入门到精通
- 3HarmonyOS应用开发者基础认证【闯关习题 满分答案】
- 4android studio 连接安卓手机/鸿蒙手机教程_android studio 鸿蒙
- 5免费获取GPT-4的五种工具
- 6IM通信技术快速入门:短轮询、长轮询、SSE、WebSocket
- 7MySQL的体系结构与SQL的执行流程
- 8国外资源国内镜像访问(亲测)_huggingface 镜像
- 9[segment-anything]使用onnxruntime部署sam模型,速度提高30倍!
- 10Kafka中的leader选举算法Raft_kafka raft
配置中心(Config-Server)_config server
赞
踩
目录
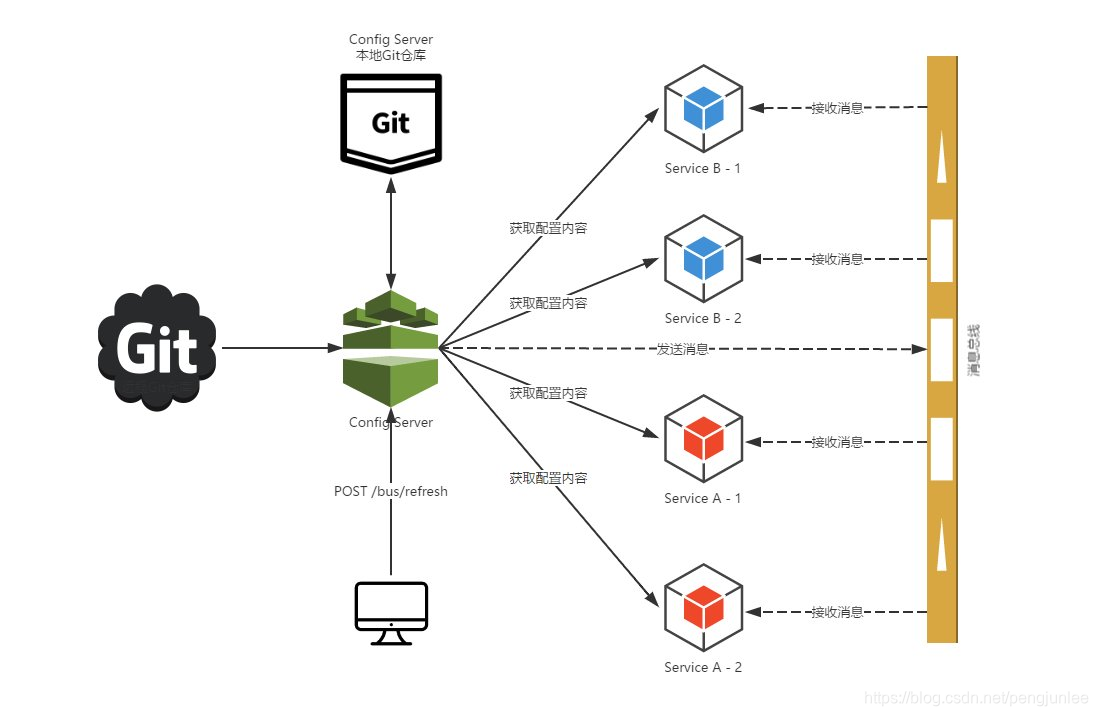
Spring Cloud 配置中心为分布式系统中的服务器端和客户端提供外部化配置支持。通过Config-Server,你可以在一个地方集中对所有环境中的应用程序的外部化配置进行管理。例如,当一个应用程序从开发环境切换到测试环境,然后再从测试环境切换到生产环境,你可以使用Config-Server统一管理这些环境之间的配置,并确保应用程序在迁移时能够拥有它运行所需要的一切配置。简而言之:Config-Server 就是用来实现配置统一管理和不同环境间配置的统一切换的。Config-Server 服务器的后端存储默认使用Git,因此它很容易支持配置环境的标签版本,同时可供多数的内容管理工具去访问。你也可以很容易地添加其他的替代实现,并将它们插入到Spring配置中。
相关产品:
来自淘宝的Diamond:https://github.com/takeseem/diamond
来自百度的Disconf:https://disconf.readthedocs.io/zh_CN/latest/
来自Springcloud的Config-Server:https://cloud.spring.io/spring-cloud-stream/
搭建配置中心
Config-Server配置中心的工作原理如下图所示:
引入依赖
新建一个maven项目,起名为config-center,在其 pom.xml 文件中引入如下依赖:
- <parent>
- <groupId>org.springframework.boot</groupId>
- <artifactId>spring-boot-starter-parent</artifactId>
- <version>2.0.6.RELEASE</version>
- </parent>
-
- <properties>
- <spring-cloud.version>Finchley.SR2</spring-cloud.version>
- </properties>
-
- <dependencies>
- <!-- Eureka-Client 依赖 -->
- <dependency>
- <groupId>org.springframework.cloud</groupId>
- <artifactId>spring-cloud-starter-netflix-eureka-client</artifactId>
- </dependency>
- <!-- Config-Server 依赖 -->
- <dependency>
- <groupId>org.springframework.cloud</groupId>
- <artifactId>spring-cloud-config-server</artifactId>
- </dependency>
- </dependencies>
-
- <dependencyManagement>
- <dependencies>
- <!-- SpringCloud 版本控制依赖 -->
- <dependency>
- <groupId>org.springframework.cloud</groupId>
- <artifactId>spring-cloud-dependencies</artifactId>
- <version>${spring-cloud.version}</version>
- <type>pom</type>
- <scope>import</scope>
- </dependency>
- </dependencies>
- </dependencyManagement>

创建启动类
新建一个Springboot应用的启动类ConfigCenterApplication类,并在上增加@EnableConfigServer注解,用来启用Config-Server。
- import org.springframework.boot.SpringApplication;
- import org.springframework.boot.autoconfigure.SpringBootApplication;
- import org.springframework.cloud.config.server.EnableConfigServer;
-
- @SpringBootApplication
- @EnableConfigServer
- public class ConfigCenterApplication {
- public static void main(String[] args) {
- SpringApplication.run(ConfigCenterApplication.class, args);
- }
- }
添加配置
application.yml 添加配置如下:
- server:
- port: 9001
- spring:
- application:
- name: config-center
- eureka:
- client:
- serviceUrl:
- defaultZone: http://localhost:8761/eureka/
此时,由于尚未配置用来作为服务器后端存储的Git仓库地址,若启动应用会报如下错误:
- ***************************
- APPLICATION FAILED TO START
- ***************************
-
- Description:
-
- Invalid config server configuration.
-
- Action:
-
- If you are using the git profile, you need to set a Git URI in your configuration. If you are using a native profile and have spring.cloud.config.server.bootstrap=true, you need to use a composite configuration.
与一般的Spring Boot应用相同,默认情况下Config-Server也通过8080端口启动。为了客户端读取配置方便,你可以把启动端口改为8888(客户端默认会从http://localhost:8888/加载与服务ID相同的配置)。此外,Config-Server还通过spring.config.name=configserver(Config-Server Jar包中有一个configserver.yml 配置文件)配置为我们设置了一个默认配置库,客户端通过配置 spring.cloud.config.discovery.serviceId=configserver 便可直接使用。当然你也可以通过application.yml来对配置中心进行配置。
创建Git仓库
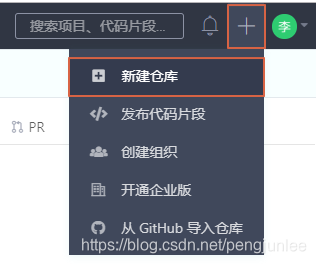
本文使用开源中国的码云来创建我们的Git仓库,当然你也可以选择其他的Github或者阿里云Git等创建自己的Git仓库。
点击导航栏中的“+”按钮==>新建仓库,填入仓库信息,完成创建。
点击 克隆/下载 ==>复制,将Git仓库地址复制下来备用。

配置Git仓库
接下来,在application.yml中添加Git仓库配置如下:
- spring:
- cloud:
- config:
- server:
- git:
- uri: https://gitee.com/pengjunlee/config-cloud.git
- username: 你的码云账号
- password: 你的账号密码
再次启动ConfigCenterApplication,发现可以正常启动了。启动完成之后,Eureka注册中心中注册的服务列表如下:

搭建客户端
接下来,我们通过对上一章《微服务下的链路追踪(Sleuth+Zipkin)》中的product-service服务进行改造,来示例如何从配置中心获取配置。
引入依赖
在product-service的pom.xml中添加配置中心客户端依赖:
- <!-- Config-Client 依赖 -->
- <dependency>
- <groupId>org.springframework.cloud</groupId>
- <artifactId>spring-cloud-config-client</artifactId>
- </dependency>
或者:
- <!-- Starter-Config 依赖 -->
- <dependency>
- <groupId>org.springframework.cloud</groupId>
- <artifactId>spring-cloud-starter-config</artifactId>
- </dependency>
修改配置
先将product-service中的application.yml文件改名为bootstrap.yml(bootstrap.yml在应用上下文启动阶段加载,比application.yml早),然后再对其内容进行修改:
- # 设置服务(应用)名称
- spring:
- application:
- name: product-service
-
- # 指定用于获取配置的配置中心服务(应用)名称
- cloud:
- config:
- discovery:
- enabled: true
- serviceId: config-center
- profile: dev
- # 指定分枝版本,默认为master
- label: master
-
- # 指定注册中心地址
- eureka:
- client:
- serviceUrl:
- defaultZone: http://localhost:8761/eureka/
注意:如果不指定配置中心,客户端默认会从http://localhost:8888 加载与服务ID相同的配置。
在Git仓库创建配置文件
客户端通过发送Http请求来从配置中心读取配置,这些Http请求的URI遵循以下规则:
- /{name}-{profiles}.properties
- /{name}-{profiles}.yml || /{name}-{profiles}.yaml
- /{label}/{name}-{profiles}.properties
- /{label}/{name}-{profiles}.json
- /{name}/{profiles}/{label:.*}
- /{name}-{profiles}.json
- /{label}/{name}-{profiles}.yml || /{label}/{name}-{profiles}.yaml
- /{name}/{profiles:.*[^-].*}
- /{name}/{profile}/{label}/**
- /{name}/{profile}/{label}/**
- /{name}/{profile}/**
其中各个参数的含义如下:
name 服务的ID,即spring.application.name的值,本例中为 product-service;
profiles 激活的profile,通过spring.cloud.config.profile指定,本例中为 dev;
label 分枝的版本,通过spring.cloud.config.label指定,本例中为默认值 master;
接下来我们需要按照上述规则,在Git仓库的相应位置创建配置文件。根据bootstrap.yml中的配置,资源请求地址可以为 /master/product-service-dev.yml 。
在Git仓库的master分枝中创建product-service-dev.yml和product-service-test.yml两个文件,分别将服务的启动端口指定为8771和8772:
- # product-service-dev.yml
- server:
- port: 8771
-
- # product-service-test.yml
- server:
- port: 8772
文件创建完成之后,启动配置中心,先在浏览器对两个文件进行访问。


此时,启动product-service将读取http://localhost:8888/product-service-dev.yml中的配置,即启动端口为8771。若将 bootstrap.yml中的spring.cloud.config.profile的值设置为test,则将读取http://localhost:8888/product-service-test.yml中的配置,应用的启动端口也会相应地变为8772,证明从配置中心读取配置成功。
参考文章
https://cloud.spring.io/spring-cloud-stream/
https://spring.io/projects/spring-cloud-config
https://cloud.spring.io/spring-cloud-static/Finchley.SR2/single/spring-cloud.html
- article
史上最详细Docker安装最新版Minio 带详解 绝对值得收藏!!! 让我们一起学会使用minio搭建属于自己的文件服务器!!走上白嫖之路!解决启动了但是浏览器访问不了的原因_error unable to start the server: --console-addres
Docker安装新版Minio解决启动但是浏览器访问不了的原因WARNING:Consoleendpointislisteningonadynamicport(34451),pleaseuse--console-address“:PORT”... [详细]赞
踩
- 有关下载和安装WWI数据库的说明,请参阅使用SQLServer2022数据湖屋的数据科学和AI,有关其他信息,请参阅MicrosoftSQL的广阔世界导入程序示例数据库。在Microsoft的说法中,还原是指将数据和日志从备份复制到数据库的... [详细]
赞
踩
- 首先我们可以知道只有有客户端连接服务器就会生成一个socket对象,socket对象中获取对应的输入输出流读取和写入就可以实现发送消息;也就是只要咱们把每次连接的socket保存起来,发送和接收数据就直接获取对应的socket就可以实现。也... [详细]
赞
踩
- article
centos7 配置cuda+mxnet+jupyter+pytorch+tensorflow1.14_please install the `pkg-config` utility and the x.
目录1.安装wget2.安装anaconda3.安装nvidia驱动+cuda+cudnn3.1安装显卡驱动3.2安装cuda3.3安装cudnn4.安装pip5.安装mxnet6.处理matplotlib7.安装pytorch8.安装te... [详细]赞
踩
- 在虚拟机WindowsServer2016中安装MySQL8.0并通过本机Navicat远程连接虚拟机WindowsServer2016安装MySQL8目录一、下载MySQL81.下载地址:2.创建my.ini文件二、安装步骤 第... [详细]
赞
踩
- VScoderemotessh配置经验分享,内含ssh-keygen密钥配置一键登录操作配置,以及在VScode中配置多级跳转服务器的方法~_vscodessh远程连接vscodessh远程连接文章目录1.插件安装:Remote-SSH2.... [详细]
赞
踩
- Pycharm(Community版本)安装PyCharm是一种功能强大的Python编辑器,具有跨平台性。1、下载Pycharm,可以直接到官网下载(根据需求选择professional或community版本),或者在软件商城(一般是c... [详细]
赞
踩
- 打开终端输入一下命令,重启MAMP就可以解决!(可以直接复制上去,别问我是谁,我是JC)sudolaunchctlunload-w/System/Library/LaunchDaemons/org.apache.httpd.plist_ph... [详细]
赞
踩
- Serverisunreachable服务器不可及Serverisunreachable服务器不可及问题描述:PyCharmIntelliJIDEA系列软件登录GitHub账号报如下错误信息:Serverisunreachable服务器不可... [详细]
赞
踩
- 设置gituser.name和user.email首先进入当前用户的Home目录,在各个系统上分别是:#WindowsC:\Users\用户名\#Linux/home/用户名~#MacOSX/Users/用户名~查看是否存在.gitconf... [详细]
赞
踩
- 银河麒麟v10系统安装Python3.8、Mysql5.7、Redis_麒麟v10安装python3.8麒麟v10安装python3.8文章目录前言一安装Python3.8二安装Mysql5.7三安装Redis前言该系统和centos有一定... [详细]
赞
踩
- 首先python2和python3版本是不兼容的,所有不能同时安装,本次因为做实验需要python2的环境1.下载安装包下载地址:https://www.python.org/2.安装这里第一步我本来想创建一个文件夹的,但是发现他自己创建了... [详细]
赞
踩
- 提示:以下是本篇文章正文内容,下面案例可供参考Anaconda3是python的虚拟环境,所以不需要提另外安装python安装Superset之前提前安装whl文件(下载后执行命令安装),减少错误不同环境可能会产生一些错误,逐个解决再进入下... [详细]
赞
踩
- article
【code-server】配置code server语言运行环境「IPAD编程」「Python」「JAVA」「C++」「HTML」_code-server 运行python代码需要哪些插件
文章目录Python环境配置1.安装python32.安装插件3.配置coderunnerJAVA环境配置1.安装jdk2.安装对应的插件C++环境配置1.安装C/C++插件1.打开vscode的插件网站2.下载C/C++3.VSIX安装2... [详细]赞
踩
- 注:以下删除、复制和粘贴均是在非编辑模式下的操作(esc)一、删除x小写的x表示向后删除一个字符,也就是删除光标所在字符nxn表示数字,表示向后删除每个字符,例如:10x表示删除包括光标在内的后面10个字符X大写的X表示删除光标前的一个字符... [详细]
赞
踩
- 注:本文使用的Python解释器为PyCharm。_mssqlserver2022python连接mssqlserver2022python连接注:本文使用的Python解释器为PyCharm代码如下: 运行结果如下: ... [详细]
赞
踩
- 在VSCode使用远程开发时,遇到了"Waitingforserverlog..."问题。尝试更新glibc未解决,后发现VSCode1.86版本不兼容CentOS7。通过降级至1.85版本解决,但SSHRemote插件也不兼容。解决方法为... [详细]
赞
踩
- article
服务器远程桌面报错,vscode离线初次远程连接服务器报错解决:Downloading VS Code Server failed. Please try again later....
1.错误:vscode离线情况下初次远程连接服务器无法连接成功报错,并弹框提示【关闭】【更多操作】【重试】,这是说明没有网络无法安装vscode-server服务。2.解决办法:(1)其他方式如git中登录远程服务器,并输入命令:ps-au... [详细]赞
踩
- sshinstallationnotfoundVSCoderemotedevelopmenttoolerror-AnSSHinstallationcouldn'tbefoundhttps://frederick-s.github.io/20... [详细]
赞
踩
- 之前写过教程:Windows下使用VSCode远程SSH连接Linux服务器进行开发vscode使用ssh密钥登录远程Linux–vscoderemotelinuxsshkey_downloadingvscodeserverdownload... [详细]
赞
踩

