- 1openssl命令行生成SM2证书_openssl sm2
- 2基于Text-CNN模型的中文文本分类实战_m3e如何微调文本分类
- 3Docker 快速上手学习入门教程_docker菜鸟教程
- 4mysql中关于字符集的系统变量
- 5剑指Offer(Python)—— 二维数组中的查找(中等)_python查找矩阵元素位置
- 6【论文阅读】BERTopic:采用一个基于类的TF-IDF流程进行神经网络的主题建模_bertopic论文解读
- 7Trying to resize storage that is not resizeable 解决_trying to resize storage that is not resizable
- 8MMDetection 3D入门_mmdetection3d的dev什么意思
- 9如何手机搜国家开放大学答案?分享9个软件和公众号,来对比看看吧! #职场发展#微信_国开大学作业怎样搜答案 免费
- 10偏序关系_如何证明一个关系是偏序关系
Linux和华为欧拉系统下安装mysql-5.7.30详细步骤_欧拉系统安装mysql
赞
踩
大家好,又见面了,我是你们的朋友全栈君。
Hello everyone, see you again, I'm your friend Quan Zhanjun.
Detailed steps to install mysql-5.7.30 under Linux [easy to understan
前言
下面记录了我在Linux环境下安装Mysql的完整过程,实操记录,
只为让更多人少踩坑,本次安装版本为:mysql-5.7.30,64位操作系统 官网下载地址:mysql-5.7.30-el7-x86_64.tar.gz 百度网盘地址:百度网盘地址 提取码:lyqh
The following records the complete process of installing Mysql in the Linux environment, practical records, just to let more people step on the pit, this installation version is: mysql-5.7.30, 64-bit operating system Official website download address: mysql-5.7.30-el7-x86_64.tar.gz Baidu network disk address: Baidu network disk address Extraction code: lyqh
1、安装前准备
1、检测系统是否自带mysql
[root@localhost /]# rpm -qa | grep mysql2、如果是,则使用下面命令进行删除:
[root@localhost /]# rpm -e --nodeps ‘上一步查找的名称’3、删除成功后,查询所有Mysql对应的文件夹 (After the deletion is successful, query all folders corresponding to MySQL)
- [root@localhost ~]# whereis mysql
- mysql: /usr/bin/mysql /usr/local/mysql
- [root@localhost ~]# find / -name mysql
- /run/lock/subsys/mysql
- /etc/rc.d/init.d/mysql
- /usr/bin/mysql
- /usr/local/mysql
- /usr/local/mysql/bin/mysql
- /usr/local/mysql/include/mysql
- /usr/local/mysql/data/mysql
4、删除上面查找的所有文件夹
2、安装
1、使用rz命令上传下载好的jar包
- [root@localhost ~]# cd /usr/local/
- [root@localhost local]# rz
2、解压
[root@localhost local]# tar -zxvf mysql-5.7.30-el7-x86_64.tar.gz3、修改解压目录名称
[root@localhost local]# mv mysql-5.7.30-el7-x86_64/ mysql4、在/usr/local/mysql目录下创建data目录 Create a data directory in the /usr/local/mysql directory
[root@localhost local]# mkdir mysql/data5、检查mysql用户组和用户是否存在,如果没有,则创建 Check if the mysql user group and user exist, and if not, create it
- [root@localhost local]# cat /etc/group | grep mysql
- [root@localhost local]# cat /etc/passwd | grep mysql
- [root@localhost local]# groupadd mysql
- [root@localhost local]# useradd -r -g mysql mysql
6、更改mysql目录下所属的用户组和用户,以及权限 Change the user groups, users, and permissions of the mysql directory
- [root@localhost local]# chown -R mysql:mysql /usr/local/mysql/
- [root@localhost local]# chmod -R 755 /usr/local/mysql
7、编译安装并初始化mysql
- [root@localhost local]# cd mysql/bin/
- [root@localhost bin]# ./mysqld --initialize --user=mysql --datadir=/usr/local/mysql/data/ --basedir=/usr/local/mysql/

8. 查看并安装libaio包
- [root@localhost bin]# rmp -qa|grep libaio
- -bash: rmp: command not found
- [root@localhost bin]# yum -y install libaio-devel.x86_64
9、再次执行步骤7,并记住日志最后的初始化密码(记住) Perform step 7 again and remember the initialization password at the end of the log (remember)
10、编辑配置文件my.cnf
[root@localhost bin]# vi /etc/my.cnf11、添加配置如下
- [mysqld]
- datadir=/usr/local/mysql/data
- port=3306
- # Disabling symbolic-links is recommended to prevent assorted security risks
- symbolic-links=0
- # Settings user and group are ignored when systemd is used.
- # If you need to run mysqld under a different user or group,
- # customize your systemd unit file for mariadb according to the
- # instructions in http://fedoraproject.org/wiki/Systemd
- [mysqld_safe]
- log-error=/usr/local/mysql/data/mysql.log
- pid-file=/usr/local/mysql/data/mysql.pid
12、启动mysql服务器
[root@localhost bin]# /usr/local/mysql/support-files/mysql.server start
13. 添加软连接,并重启mysql服务 13. Add a soft connection and restart the MySQL service
- [root@localhost bin]# ln -s /usr/local/mysql/support-files/mysql.server /etc/init.d/mysql
- [root@localhost bin]# ln -s /usr/local/mysql/bin/mysql /usr/bin/mysql
- [root@localhost bin]# service mysql restart
- Shutting down MySQL.. SUCCESS!
- Starting MySQL. SUCCESS!
14、登录mysql,修改密码为123456(登录的密码是步骤9中初始化密码)
Log in to MySQL and change the password to 123456 (the login password is the initialization password in step 9)
- [root@localhost bin]# mysql -u root -p
- Enter password:
- mysql>set password for root@localhost = password('123456');
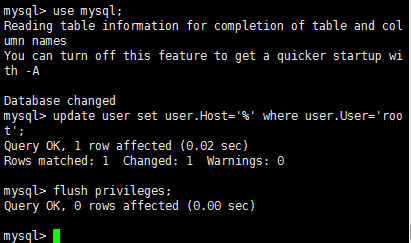
15、开放远程连接
- mysql>use mysql;
- msyql>update user set user.Host='%' where user.User='root';
- mysql>flush privileges;

3、测试
1、关闭Linux防火墙
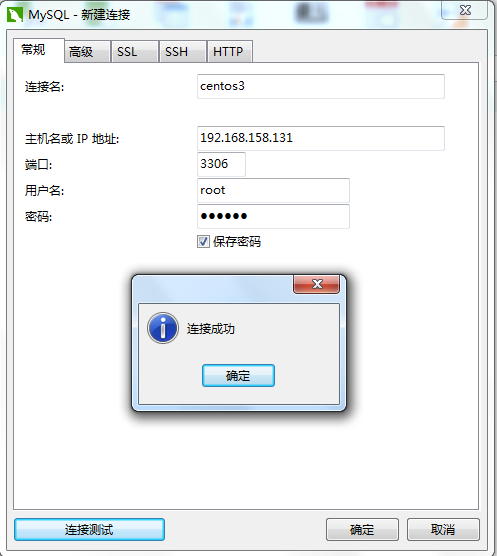
[root@localhost bin]# systemctl stop firewalld.service2、Navicat连接测试

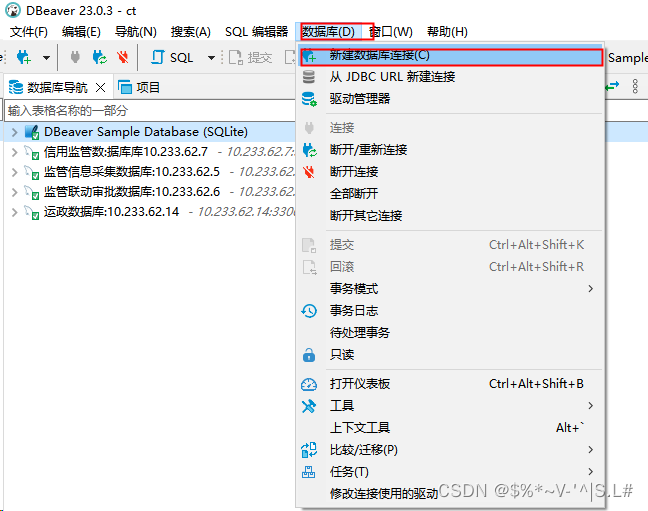
3、使用DBeaver连接MySQ


下载一个DBeaver.exe
下载地址:Download | DBeaver Community
使用DBeaver连接MySQL时的驱动问题
报错:
Can’t create driver instance Error creating driver ‘MySQL’ instance. Most likely required jar files are missing. You should configure jars in driver settings. Reason: can’t load driver class ‘com.mysql.cj.jdbc.Driver’ Error creating driver ‘MySQL’ instance. Most likely required jar files are missing. You should configure jars in driver settings. Reason: can’t load driver class ‘com.mysql.cj.jdbc.Driver’ com.mysql.cj.jdbc.Driver com.mysql.cj.jdbc.Driver
无法创建驱动程序实例 创建驱动程序“MySQL”实例时出错。很可能缺少所需的 jar 文件。应在驱动程序设置中配置 jar。原因:无法加载驱动程序类“com.mysql.cj.jdbc.Driver”创建驱动程序“MySQL”实例时出错。很可能缺少所需的 jar 文件。应在驱动程序设置中配置 jar。原因:无法加载驱动程序类'com.mysql.cj.jdbc.Driver' com.mysql.cj.jdbc.Driver com.mysql.cj.jdbc.Driver
解决方案: 一般都是因为默认镜像延迟太高的问题,把默认镜像换成国内镜像就行了。
找到 首选项 > 连接 > 驱动 > 驱动位置 ,点击添加
阿里云中央仓库地址:
http://maven.aliyun.com/nexus/content/groups/public/
仓库服务 关系 /内容/组/公共/
文章知识点与官方知识档案匹配,可进一步学习相关知识
————————————————
结束语
如果本篇对您有帮助,请点个赞再加个关注,您的点赞是博主前进的动力!
If this article is helpful to you, please like and follow, your likes are the motivation for bloggers to move forward!
本篇详细的介绍了mysql-5.7.30的详细安装步骤,为mysql的主从复制教程提供了基础。
This article introduces the detailed installation steps of MySQL-5.7.30 in detail, and provides the basis for the master-slave replication tutorial of MySQL.
感兴趣的同学可以看看博主下一篇linux下搭建mysql主从复制。
Interested students can take a look at the blogger's next article Building MySQL Master-slave Copy under Linux.
发布者:全栈程序员栈长,转载请注明出处:https://javaforall.cn/140513.html原文链接:https://javaforall.cn
Publisher: full-stack programmer stack manager, please indicate the source: https://javaforall.cn/140513.html original link: https://javaforall.cn
本文参与 腾讯云自媒体分享计划 ,欢迎热爱写作的你一起参与!
This article participates in the Tencent Cloud Self-Media Sharing Program, welcome you who love writing to participate!
因本文参考了以上作者的博文,已添加出处。


