- 1阿里巴巴达摩院:自然语言处理技术有哪些进展和趋势?_阿里巴巴自然语言mos象限对比
- 2一篇文章说清Python数据分析,这个学习路线绝了
- 3史上最简单ubuntu安装opencv+contrib3.30(傻瓜教程)_ubuntu opencv_contrib-3.3.0
- 47-24 约分最简分式(PTA)
- 5华为畅享8的悬浮窗在哪里_华为畅享20SE发布,搭载麒麟710A,1299元起
- 6Microsoft Word Web 版式视图切换页面视图_web office怎么使用页面视图
- 7【Linux】进程>环境变量&&地址空间&&进程调度
- 8启动Vue项目报错Error: error:0308010C:digital envelope routines::unsupported_vue build过程中js/chunk-2c991d34.7756e6ef.js from ter
- 9c语言的静态变量分配在,C++局部静态变量在什么时候分配内存和初始化?
- 10CentOS7通过指令获取系统信息_manufacturer: rdo
基于python的网络爬虫爬取天气数据及可视化分析(Matplotlib、sk-learn等,包括ppt,视频)_csdn 天气预报分析论文
赞
踩
基于Python爬取天气数据信息与可视化分析(文末完整源码)
基于python的网络爬虫爬取天气数据及可视化分析
可以看看演示视频。
摘要
基于Python爬取天气数据信息与可视化分析
本论文旨在利用Python编程语言实现天气数据信息的爬取和可视化分析。天气数据对于人们的生活和各个领域都有着重要的影响,因此准确获取和有效分析天气数据对于气象预测、农业、旅游等方面至关重要。
在本文中,我们首先介绍了Python编程语言的基本原理和相关库的使用。Python作为一种简单易学且功能强大的编程语言,被广泛应用于数据处理和分析领域。通过使用Python,我们可以方便地进行网页爬取和数据处理。详细介绍了如何使用Python编写网络爬虫程序来获取天气数据。我们选择了一些知名的气象网站作为数据源,并通过分析网页结构和标签,准确提取所需的天气信息。通过编写自动化的爬虫程序,可以快速获取大量的天气数据。
我们介绍了如何使用Python的数据处理和分析库对获取的天气数据进行清理和整理。我们使用Pandas和NumPy等工具,去除重复数据、处理缺失值,并进行格式转换,确保数据的准确性和一致性。
最后,我们展示了如何使用Python的可视化库对清理后的天气数据进行可视化分析。我们使用Matplotlib库,绘制折线图、散点图等,展示不同时间段内的温度变化、湿度分布等。通过这些可视化图表,我们可以更直观地观察和分析天气数据,揭示其潜在的趋势和规律。
通过使用Python编程语言,我们可以快速获取和分析大量的天气数据,并通过可视化手段展示其特征和规律。这将有助于人们更好地理解和应用天气数据,从而做出更准确的决策和规划。
关键词:天气数据信息;处理数据信息;数据可视化分析;模型构建
第1章 引言
1.1 选题背景与意义
天气数据是人们日常生活中非常重要的信息之一,对于气象学、农业、城市规划、交通运输等领域都有着重要的影响。随着科技的发展,越来越多的天气数据可以通过互联网获取,而通过Python爬取天气数据并进行可视化分析就成为了一个热门的研究方向。
数据获取与处理:通过Python爬取天气数据,可以方便地获取到各种天气参数,如温度、湿度、降水量等。这些数据对于研究天气变化、分析气候模式、进行气象预测具有重要意义。
数据分析与模式识别:通过对爬取的天气数据进行统计分析和模式识别,可以揭示天气现象的规律性和周期性。这有助于理解天气变化的趋势和模式,为气象预测和应对天气变化提供参考。
可视化分析:通过将天气数据进行可视化分析,可以更直观地展示天气变化的趋势和模式。这有助于决策者更好地理解和利用天气信息,例如用于城市规划、交通运输等方面的决策制定。
因此,基于Python爬取天气数据并进行可视化分析作为本文选题具有重要的背景和意义,对于提高天气数据的利用价值以及相关领域的研究和应用都具有积极的推动作用。
1.3 本文的研究内容与主要工作
本文涵盖了气象数据的获取、处理与分析,以及基于历史天气数据进行的气候变化研究、预测模型建立等方面。在数据获取方面,使用各种方法从气象局、科研机构或第三方数据提供商获取历史天气数据。同时,也有研究对获取的数据进行清洗、整合和格式化处理,确保数据的可靠性和完整性。同时使用Python编程语言中的数据分析库(如pandas、numpy)和可视化库(如matplotlib)来进行历史天气数据的分析和可视化。这些工具可以帮助更好地理解数据中的规律和趋势,并生成直观的可视化图表。并且可以利用历史天气数据来研究气候变化趋势,包括全球范围的气候变化、特定地区的气候特征变化等。通过分析历史天气数据,可以发现气候变化的规律,并探讨其对生态环境、农业生产等方面的影响。除了纯粹的数据分析和可视化,还有建立气象数据的预测模型,以实现对未来天气情况的预测。这些模型通常基于历史气象数据和机器学习算法,能够为气象预报提供更准确的参考。
1.4 本文的论文结构与章节安排
本文共分为5章,章节内容安排如下:
- 第1章:引言
- 第2章:历史天气网站数据的获取
- 第3章:数据可视化分析与处理
- 第4章:模型预测
- 第5章:总结与展望
第2章 历史天气网站数据的获取
2.1 天气网站数据来源
数据来源:查看天气网网址:http://www.tianqi.com.cn。访问广东省东莞市的天气网址:https://lishi.tianqi.com/dongguan/index.html,利用Python的爬虫技术从网站上爬取东莞市2018-2023年天气数据信息。
2.2 利用Python进行数据爬取与数据处理
首先查看中国天气网的网址:https://lishi.tianqi.com/dongguan/index.html。访问广东省东莞市的天气信息,我们主要访问的是2023年中国天气网的天气数据,对东莞2023年1-11月份数据进行爬取。采用requests.get方法,请求网页,运行后显示成功访问,则得到的是网页的所有字符串文本。这就是请求过程。

采用xpath库对获取的字符串进行数据提取:首先对网页进行检查,找到需要获取数据的标签(截图举例说明)采用lxml解析HTML、XPath提取数据,通过循环调用getWeather函数,找到需要获取数据的标签,提取标签的数据值,保存到对应列表并进行切片处理。

2.3 数据存储与数据标准化处理
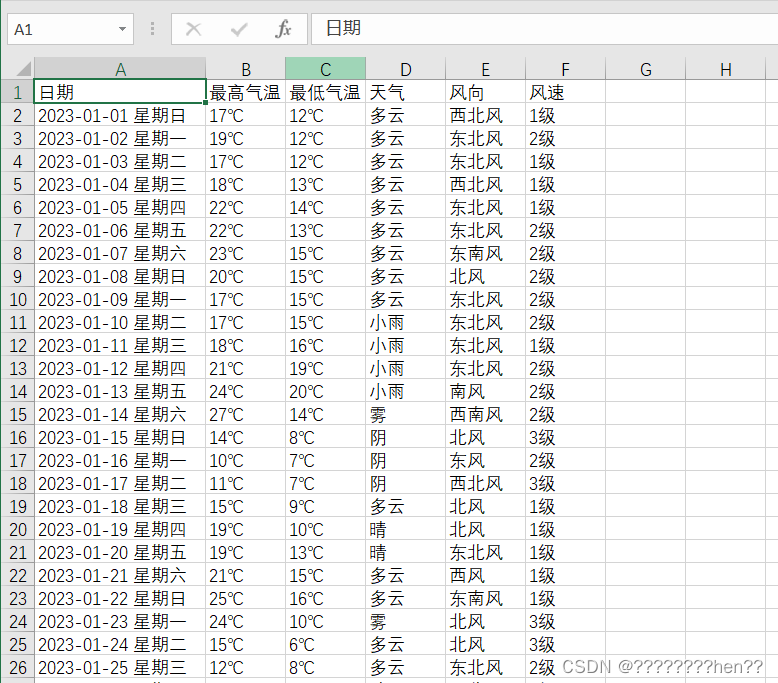
数据存储:将爬取的数据存储在CSV文件中,对数据进行了结构化处理,每个样本包含日期、最高气温、最低气温、天气状况、风向、风速6个特征数据。

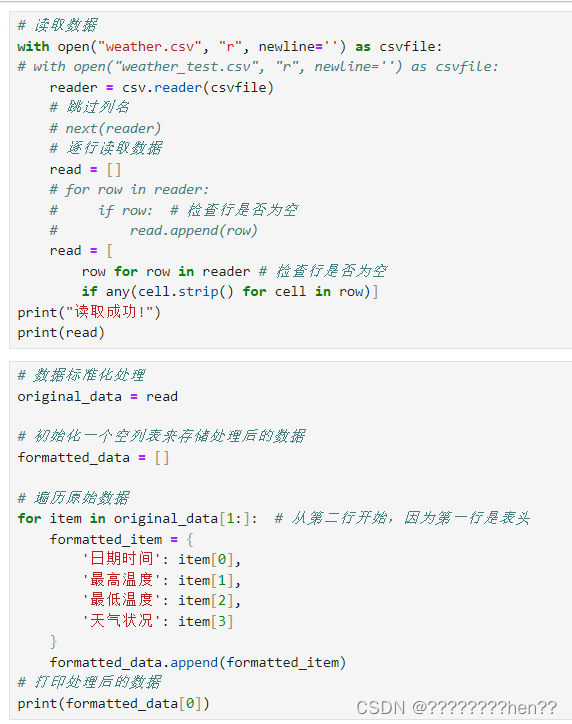
数据标准化处理:对读取存储的CSV数据文件对数据进行格式化、清洗,去掉无效行等将数据转换为字典的格式,即每个字典代表一天的数据,字典的键和爬虫部分一致,但是值都转换为合适的类型,例如日期转换为datetime对象,温度转换为浮点数等,方便后续处理数据分析与可视化。
第3章 数据可视化分析与处理
3.1 利用matplotlib库绘制图像
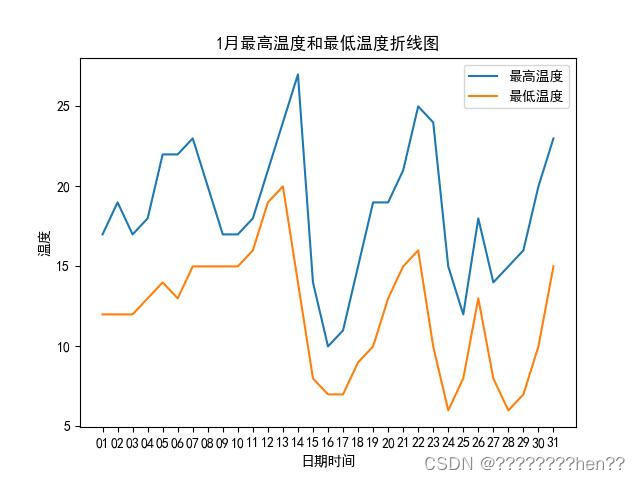
折线图:采用matplotlib中plt.plot()方法分别制作出每月的温度变化曲线图,并用plt.plot()方法点出最高温和最低温,并分别画出最高温度线、最低温度线。
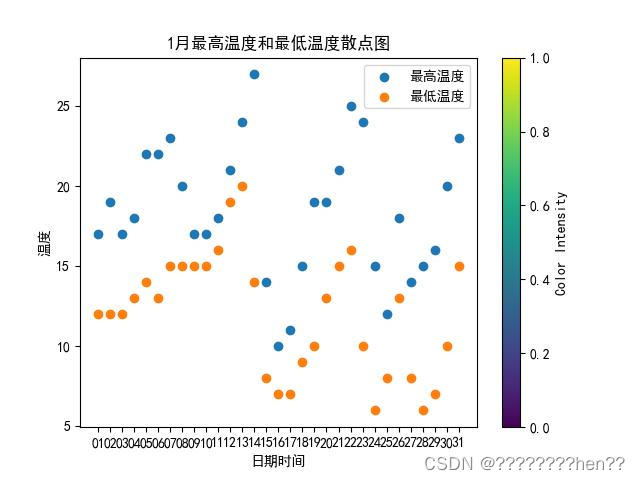
散点图:使用plt.scatter()方法将日期和时间为横坐标、温度为纵坐标,每天气温情况在图中绘制出来,展示相关数据。
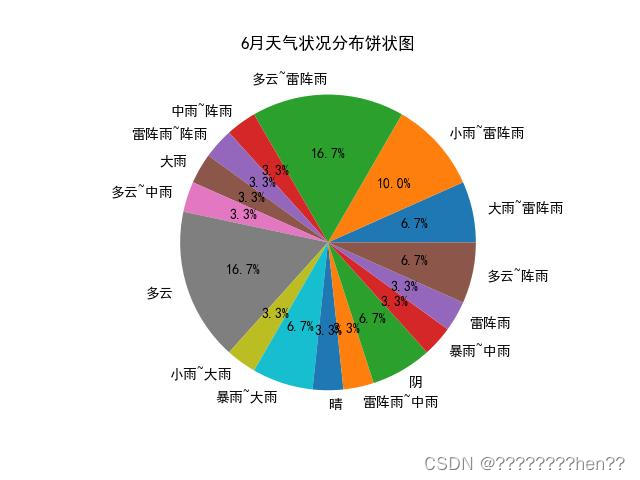
饼状图:使用plt.pie()方法对每月天气状况进行了饼状图绘制,并且根据5个等级的不同。相应饼柱状图的颜色各异,更直观的显示天气状况。
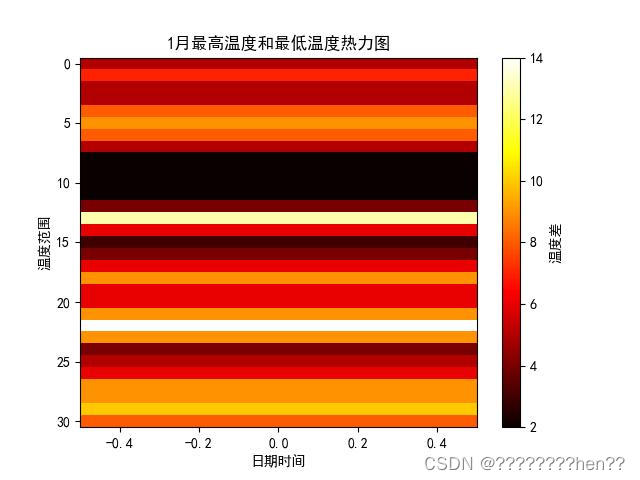
热力图:使用plt.imshow()方法将日期和时间为横坐标、温度范围为纵坐标,整合最高温度和最低温度数据。
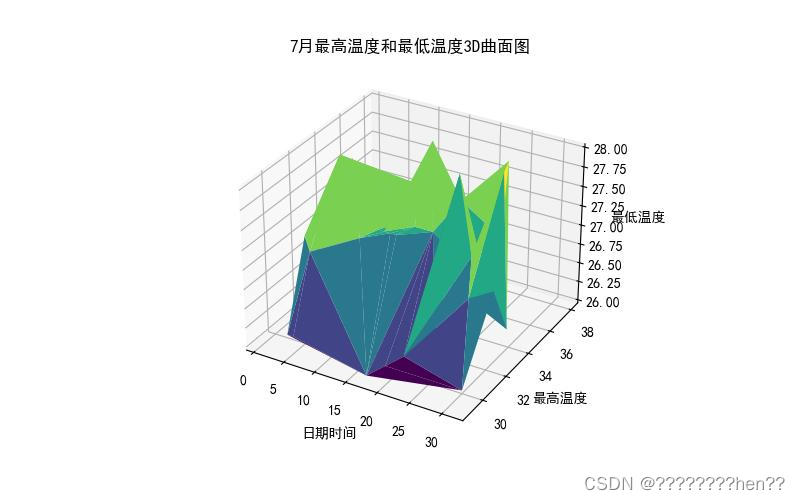
3D立体图:使用ax.plot_trisurf和ax.grid方法绘制月最高温和最低温3D曲面图。

(说明,这里本来要做抓取12个月 每个月份生成一张对应的可视化图,再将这些可视化图合作一个GIF动态图,达到类似轮播图的效果。直到我刚好看见一个动态图,有了新的想法。。。)
3.2 生成静态词云与动态词语图
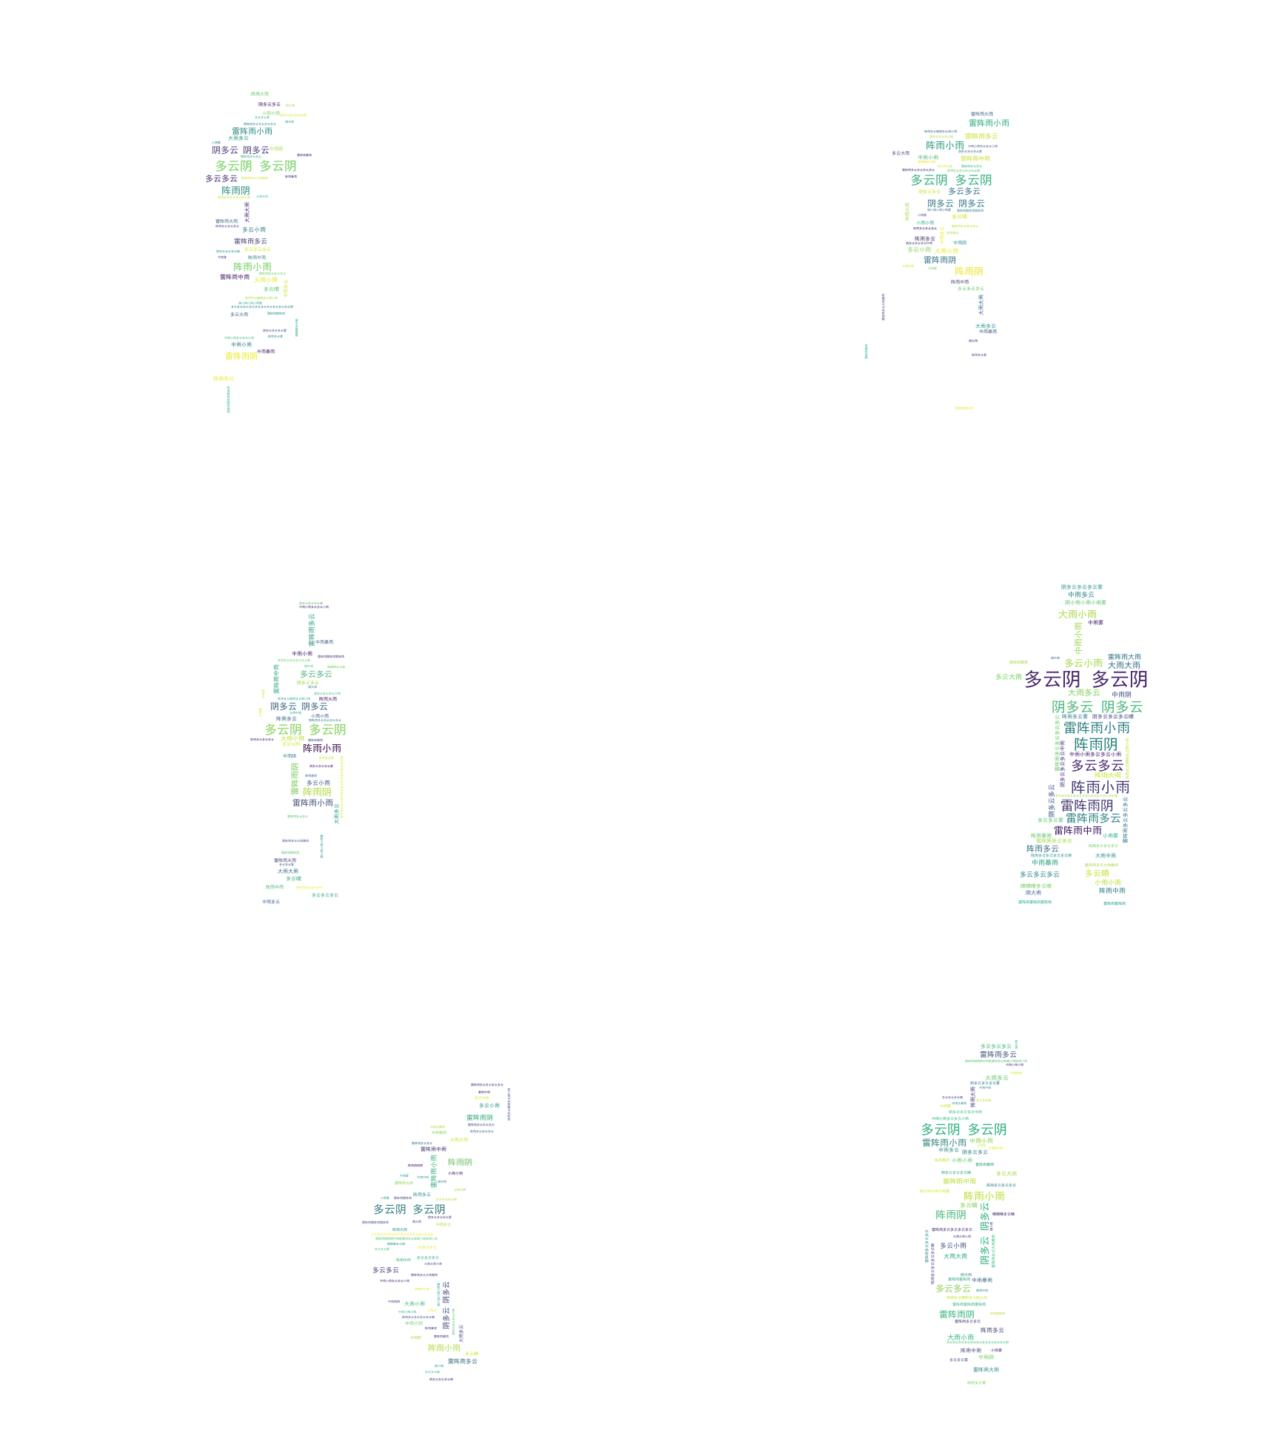
使用wordcloud库,创建WordCloud对象,设置参数生成词云图,使用一个热门表情包作为遮罩图片,使词云图更具特色,增强观感,吸引注意力,添加趣味性。并将词云图保存到指定的路径。

最后,我们需要制作词云动图,包括:
- 分解GIF帧:用opencv读取热门表情包的GIF图片,保存每一帧为图片,作为遮罩图片的序列。
- 生成词云:对每张遮罩图片调用词云生成函数, 生成对应的词云图片,作为词云图片的序列。
- 拼接GIF:用imageio库将词云图片的序列顺序拼接成GIF图片,并保存到指定的路径。
第4章 模型预测
4.1 构建和训练模型的设计
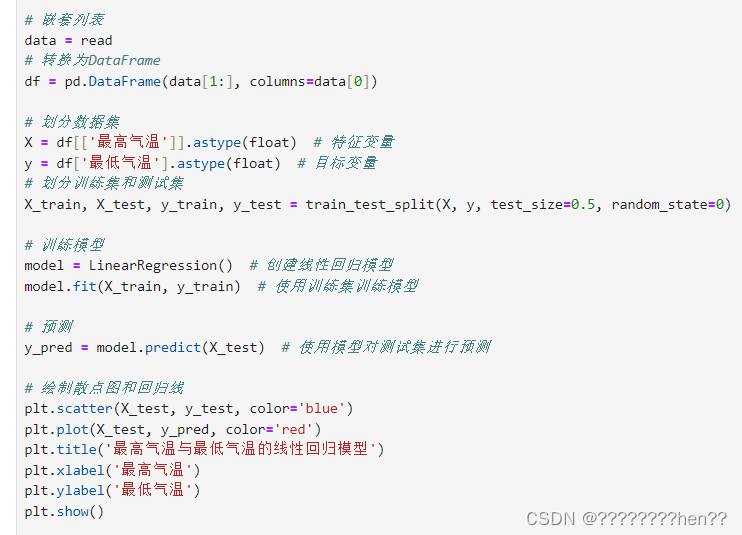
构建模型:使用sklearn库构建一个线性回归模型,设置参数。
- 训练模型:将训练集的X和Y传入,训练模型,得到模型的参数。
- 预测模型:使用predict()方法,将测试集的X传入,得到预测Y,与测试集的真实Y进行比较,评估模型的性能。
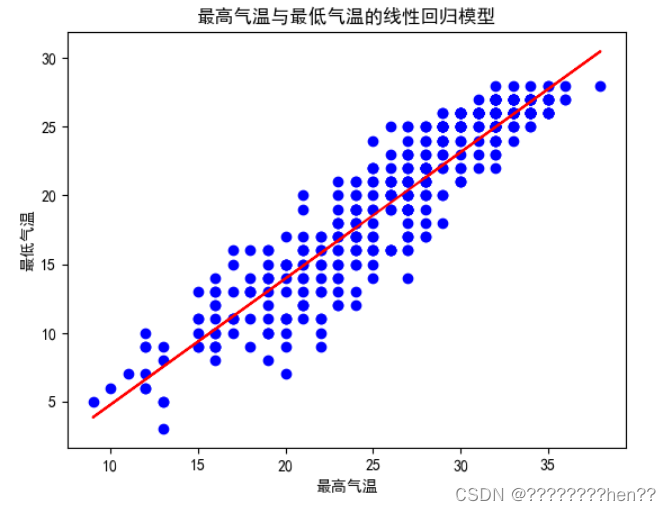
4.2 绘制散点图一元回归线图
- 绘制散点图:使用matplotlib库绘制散点图,展示东莞市每一天的日期和平均温度的关系,用不同的颜色区分训练集和测试集。
- 绘制回归线:使用matplotlib库绘制回归线,展示模型的分析结果,用不同的颜色区分训练集和测试集。
- 设置图表:设置合适的标题、图例、坐标轴标签等,使图表清晰易懂。并将图表保存到指定的路径。
第5章 总结与展望
5.1 工作总结
在文中,我们旨在利用爬取的历史天气数据进行可视化分析。首先,我们选择了一个可靠的数据源,并使用Python编程语言和BeautifulSoup库实现了数据的爬取。接着,我们对原始数据进行了清洗和处理,包括缺失值的处理和数据格式转换。然后,我们采用了Matplotlib可视化工具,设计了多种图表类型,如折线图、柱状图和热力图,以展示历史天气数据的趋势和变化。通过分析结果,我们发现了不同时间段内温度、天气状况等指标的变化情况,并与历史数据进行了比较。总的来说,本次研究通过爬取历史天气数据并进行可视化分析,为相关领域的研究提供了有益的参考和启示。
一些参考链接
[1]python Matplotlib库:根据excel生成各种柱状图:https://mp.weixin.qq.com/s/lhOB8XO2zhjLRQZVqQe9sg
[2]踏入数据可视化的世界:Matplotlib库的完整学习指南:https://mp.weixin.qq.com/s/uUWQti7lXuS2CE7SU2FnjQ
[3]使用Python可视化CSV文件数据:https://mp.weixin.qq.com/s/iKxP-8FIdGyi8F6kRCCouA
[4]Python数据可视化-词云:https://mp.weixin.qq.com/s/kz9zBYwN3HDm9vESJ5VqgQ
[5]Python 实现图片转字符画,静态图、GIF 都能转:https://mp.weixin.qq.com/s/bzgpstD5_u6z75FvXYhVQg
[6]【python】4行代码实现将多张图片合成gif动图(imageio):https://mp.weixin.qq.com/s/LIlX8eu6MOhwa32ZS19kIQ
[7] Python基础教程:强大的Pandas数据分析库: http://www.poycode.cn/coding/python/python-basic-tutorial-18/
[8]Python基础教程:sklearn机器学习入门:https://mp.weixin.qq.com/s/8PoPxaR2R25krNt7H44zZA
[9]学习 Scikit-learn,从这 5 个步骤开始:https://mp.weixin.qq.com/s/QTacqEFJcdUoQsrwe3jjUw
[10] sklearn: https://scikit-learn.org/stable/index.html
**
说明:这只是一个学了十一二周python的课程大作业,
并不是真的毕业论文,只是学校要求按照毕业论文的格式写。
完整代码如下
各部分懒得封装了,使用jupyter依次运行即可。
加了一些注释,方便阅读。
**
import requests
from lxml import etree
import csv
import numpy as np
from collections import defaultdict
from datetime import datetime
import matplotlib.pyplot as plt
from matplotlib import font_manager
from matplotlib import rcParams
from mpl_toolkits.mplot3d import Axes3D  用于创建3D图形
import imageio.v2 as imageio
from IPython.display import Image, display
from wordcloud import WordCloud
from PIL import Image
# 设置字体为支持减号的字体,例如"SimHei"
rcParams['font.sans-serif'] = ['SimHei']
font = font_manager.FontProperties(fname="C:/Windows/Fonts/simsun.ttc", size=14)  # 请将路径替换为你的字体文件路径
plt.rcParams['axes.unicode_minus'] = False  # 解决保存图像时负号'-'显示为方块的问题
- 1
- 2
- 3
- 4
- 5
- 6
- 7
- 8
- 9
- 10
- 11
- 12
- 13
- 14
- 15
- 16
- 17
- 18
def getWeather(url):
    # 请求头信息:浏览器版本型号,接收数据的编码格式
    headers = {
            # 必填,不填拿不到数据
            # 'User-Agent': 'Mozilla/5.0 (Windows NT 6.1; WOW64) AppleWebKit/535.1 (KHTML, like Gecko) Chrome/14.0.835.163 Safari/535.1',
            'User-Agent': 'Mozilla/5.0 (Windows NT 10.0; Win64; x64) AppleWebKit/537.36 (KHTML, like Gecko) Chrome/119.0.0.0 Safari/537.36'
        }
        # 请求 接收到了响应数据
    resp = requests.get(url, headers=headers)

    # 使用lxml解析HTML
    tree = lxml.html.fromstring(resp.text)
    resp_list = tree.xpath("//ul[@class='thrui']/li")

    # for循环迭代遍历
    day_weather_info = []
    for li in resp_list:
        dates = li.xpath('.//div[@class="th200"]/text()')  # 提取日期
        max_temperatures = li.xpath('.//div[@class="th140"]/text()')  # 提取最高气温
        min_temperatures = li.xpath('.//div[@class="th140"][2]/text()')  # 提取最低气温
        weather_conditions = li.xpath('.//div[@class="th140"][3]/text()')  # 提取天气情况
        wind_directions = li.xpath('.//div[@class="th140"][4]/text()')[0].split(' ')[0]  # 提取风向
        wind_speeds = li.xpath('.//div[@class="th140"][4]/text()')[0].split(' ')[1]  # 提取风速

        # 将提取的信息存储到day_weather_info列表中
        day_weather_info.append({
            "日期": dates[0],
            "最高气温": max_temperatures[0],
            "最低气温": min_temperatures[0],
            "天气情况": weather_conditions[0],
            "风向": wind_directions,
            "风速": wind_speeds
        })
    return day_weather_info
- 1
- 2
- 3
- 4
- 5
- 6
- 7
- 8
- 9
- 10
- 11
- 12
- 13
- 14
- 15
- 16
- 17
- 18
- 19
- 20
- 21
- 22
- 23
- 24
- 25
- 26
- 27
- 28
- 29
- 30
- 31
- 32
- 33
- 34
- 35
weathers = [getWeather(f'https://lishi.tianqi.com/dongguan/2023{str(month).zfill(2)}.html') for month in range(1, 13)]
print(weathers)
- 1
- 2
# 数据写入(一次性写入)
with open("test01_weather.csv", "w",newline='') as csvfile:
    writer = csv.writer(csvfile)
    # 先写入列名:columns_name 日期 最高气温 最低气温  天气
    writer.writerow(["日期", "最高气温", "最低气温", '天气',"风向","风速"])
    # 一次写入多行用writerows(写入的数据类型是列表,一个列表对应一行)
    writer.writerows([list(day_weather_dict.values()) for month_weather in weathers for day_weather_dict in month_weather])
print("写入成功!")
- 1
- 2
- 3
- 4
- 5
- 6
- 7
- 8
# 读取数据
with open("weather.csv", "r", newline='') as csvfile:
# with open("weather_test.csv", "r", newline='') as csvfile:
    reader = csv.reader(csvfile)
    # 跳过列名
    # next(reader)
    # 逐行读取数据
    read = []
    # for row in reader:
    #     if row:  # 检查行是否为空
    #         read.append(row)
    read = [
        row for row in reader # 检查行是否为空
        if any(cell.strip() for cell in row)]
print("读取成功!")
print(read)
- 1
- 2
- 3
- 4
- 5
- 6
- 7
- 8
- 9
- 10
- 11
- 12
- 13
- 14
- 15
- 16
# 数据标准化处理
original_data = read

# 初始化一个空列表来存储处理后的数据
formatted_data = []

# 遍历原始数据
for item in original_data[1:]:  # 从第二行开始,因为第一行是表头
    formatted_item = {
        '日期时间': item[0],
        '最高温度': item[1],
        '最低温度': item[2],
        '天气状况': item[3]
    }
    formatted_data.append(formatted_item)
# 打印处理后的数据
print(formatted_data[0])
- 1
- 2
- 3
- 4
- 5
- 6
- 7
- 8
- 9
- 10
- 11
- 12
- 13
- 14
- 15
- 16
- 17
def show(date_time,high_temp,low_temp,weather):

# 绘制折线图
    plt.plot(date_time, high_temp, label='最高温度')
    plt.plot(date_time, low_temp, label='最低温度')
    plt.xlabel('日期时间')
    plt.ylabel('温度')
    plt.title(str(month)+'月最高温度和最低温度折线图')
    plt.legend()
    plt.savefig('./show/plot_'+str(month)+'.jpg')  # 将图片保存
    plt.show()
    # print('plot_'+str(month)+'.jpg保存成功!')

# 使用scatter()函数绘制散点图
    plt.scatter(date_time, high_temp, label='最高温度')
    plt.scatter(date_time, low_temp, label='最低温度')
    # 添加颜色条
    cbar = plt.colorbar()
    cbar.set_label('Color Intensity')
    # 设置标题和标签
    plt.title(str(month)+'月最高温度和最低温度散点图')
    # 设置x轴和y轴的标签
    plt.xlabel('日期时间')
    plt.ylabel('温度')
    # 添加图例
    plt.legend()
    plt.savefig('./show/scatter_'+str(month)+'.jpg')  # 将图片保存
    # 显示图形
    plt.show()
    # print('scatter_'+str(month)+'.jpg保存成功!')

# 绘制饼状图
    # 提取数据
    weather = [item['天气状况'] for item in monthly_data[month]]
    # 计算每个天气状况的数量
    weather_counts = {weather_type: weather.count(weather_type) for weather_type in set(weather)}
    plt.pie(weather_counts.values(), labels=weather_counts.keys(), autopct='%1.1f%%')
    plt.title(str(month)+'月天气状况分布饼状图')
    plt.savefig('./show/pie_'+str(month)+'.jpg')  # 将图片保存
    plt.show()
    # print('pie_'+str(month)+'.jpg保存成功!')

# 绘制热力图
    # 整合最高温度和最低温度数据
    temp_range = np.array([high - low for high, low in zip(high_temp, low_temp)])
    # 创建一个新的图形
    plt.figure()

    plt.imshow(temp_range.reshape(-1, 1), cmap='hot', aspect='auto')
    # 设置x轴和y轴的标签
    plt.xlabel('日期时间')
    plt.ylabel('温度范围')
    # 添加颜色条
    plt.colorbar(label='温度差')
    # 添加标题
    plt.title(str(month)+'月最高温度和最低温度热力图')
    plt.savefig('./show/hot_'+str(month)+'.jpg')  # 将图片保存
    # 显示图形
    plt.show()
    # print('hot_'+str(month)+'.jpg保存成功!')

#3D曲面图
    # 创建一个新的图形
    fig = plt.figure(figsize=(8,5),dpi=100)
    ax = fig.add_subplot(111, projection='3d')
    # 提取数据
    X = [item['日期时间'][-2:] for item in monthly_data[month]]
    Y = [int(item['最高温度']) for item in monthly_data[month]]
    Z = [int(item['最低温度']) for item in monthly_data[month]]
    # 绘制带有网格线的曲面图
    ax.plot_trisurf(X, Y, Z, cmap='viridis', edgecolor='none')
    ax.grid(True)
    plt.title(str(month)+'月最高温度和最低温度3D曲面图')
    # 设置x轴和y轴的标签
    ax.set_xlabel('日期时间')
    ax.set_ylabel('最高温度')
    ax.set_zlabel('最低温度')
    plt.savefig('./show/3D_'+str(month)+'.jpg')  # 将图片保存
    # 显示图形
    plt.show()
    # print('3D_'+str(month)+'.jpg保存成功!')
- 1
- 2
- 3
- 4
- 5
- 6
- 7
- 8
- 9
- 10
- 11
- 12
- 13
- 14
- 15
- 16
- 17
- 18
- 19
- 20
- 21
- 22
- 23
- 24
- 25
- 26
- 27
- 28
- 29
- 30
- 31
- 32
- 33
- 34
- 35
- 36
- 37
- 38
- 39
- 40
- 41
- 42
- 43
- 44
- 45
- 46
- 47
- 48
- 49
- 50
- 51
- 52
- 53
- 54
- 55
- 56
- 57
- 58
- 59
- 60
- 61
- 62
- 63
- 64
- 65
- 66
- 67
- 68
- 69
- 70
- 71
- 72
- 73
- 74
- 75
- 76
- 77
- 78
- 79
- 80
- 81
# 初始化 monthly_data 字典
monthly_data = defaultdict(list)
# 遍历 formatted_data,将日期时间字符串转换为月份并添加到 monthly_data 字典中
for item in formatted_data:
    month = datetime.strptime(item['日期时间'], '%Y-%m-%d').month
    if 1 <= month <= 12:
        monthly_data[month].append(item)

# 提取数据
for month in range(1, 12):
    date_time = [item['日期时间'][-2:] for item in monthly_data[month]]
    high_temp = [int(item['最高温度']) for item in monthly_data[month]]
    low_temp = [int(item['最低温度']) for item in monthly_data[month]]
    weather = [item['天气状况'] for item in monthly_data[month]]

    # 调用 show() 函数绘制折线图、散点图、饼状图和热力图、3D曲面图
    show(date_time, high_temp, low_temp, weather)
- 1
- 2
- 3
- 4
- 5
- 6
- 7
- 8
- 9
- 10
- 11
- 12
- 13
- 14
- 15
- 16
- 17
- 18
import numpy as np
from PIL import Image
from wordcloud import WordCloud
import matplotlib.pyplot as plt
# 制作静态词云图方法
def generate_wordcloud(image_path, font_path, weather_data, save_path=None):
    # 读取字图片文件,生成轮廓
    mask_array = np.array(Image.open(image_path))

    # 从formatted_data变量中提取天气状况数据,将其转换为字符串
    weather = weather_data
    weather_str = ''.join(weather)

    # 生成词云图,并显示出来
    wordcloud = WordCloud(background_color='white',
                          font_path=font_path,
                          mask=mask_array,
                          max_words=len(weather_str)).generate(weather_str)
    plt.imshow(wordcloud, interpolation='bilinear')
    plt.axis('off')

    # 如果提供了保存路径,则保存词云图
    if save_path:
        plt.savefig(save_path)
        print("词云图已保存至"+save_path)
    # else:
    #     plt.show()
- 1
- 2
- 3
- 4
- 5
- 6
- 7
- 8
- 9
- 10
- 11
- 12
- 13
- 14
- 15
- 16
- 17
- 18
- 19
- 20
- 21
- 22
- 23
- 24
- 25
- 26
- 27
- 28
# 示例用法
# 生成静态词云图
image_path = "./sucai/basketball.jpg"
font_path = 'simhei.ttf'

weather_data = [item['天气状况'] for item in formatted_data]*2

# 调用函数时提供保存路径,将保存词云图为指定路径的文件
save_path = "./sucai/basketball2.jpg"
generate_wordcloud(image_path, font_path, weather_data, save_path)
display(Image.open(image_path).resize((100, 100)))
- 1
- 2
- 3
- 4
- 5
- 6
- 7
- 8
- 9
- 10
- 11
# 把GIF逐帧分解保存
import cv2
def process_gif_to_jpg(gif_path, output_folder):
    # 读取GIF图像
    gif = cv2.VideoCapture(gif_path)
    # 检查是否成功打开GIF文件
    if not gif.isOpened():
        print("无法打开GIF文件")
        return
    # 获取GIF的帧数
    frame_count = int(gif.get(cv2.CAP_PROP_FRAME_COUNT))
    # 遍历每一帧
    for i in range(frame_count):
        # 读取当前帧
        ret, frame = gif.read()
        # 检查是否成功读取帧
        if not ret:
            print("无法读取帧")
            break
        # 构建输出文件名
        output_file = f"{output_folder}/frame_{i}.jpg"
        print(output_file)
        # 保存当前帧为jpg图
        cv2.imwrite(output_file, frame)
    # 释放GIF资源
    gif.release()

# 使用示例
gif_path = r'./sucai/basketball.gif'
output_folder = r'./sucai/tmp'
process_gif_to_jpg(gif_path, output_folder)
- 1
- 2
- 3
- 4
- 5
- 6
- 7
- 8
- 9
- 10
- 11
- 12
- 13
- 14
- 15
- 16
- 17
- 18
- 19
- 20
- 21
- 22
- 23
- 24
- 25
- 26
- 27
- 28
- 29
- 30
- 31
# 生成动态词云图
import imageio
from IPython.display import Image, display
from imageio import imread, mimsave

def create_gif(image_files, output_file, fps=10):
    images = []
    for image_file in image_files:
        images.append(imread(image_file))
    mimsave(output_file, images, fps=fps)
    display(Image(filename=output_file))


# 使用函数的方式创建GIF
images_path = ['./sucai/tmp2/jitu_{}.jpg'.format(i) for i in range(160)]
output_path='./sucai/dance.gif'
create_gif(images_path, output_path)
- 1
- 2
- 3
- 4
- 5
- 6
- 7
- 8
- 9
- 10
- 11
- 12
- 13
- 14
- 15
- 16
- 17
# 打开文件,准备获取入近6年天气数据
with open("6years_weather.csv", "w", newline='') as csvfile:
    writer = csv.writer(csvfile)
    # 先写入列名:columns_name 日期 最高气温 最低气温  天气
    writer.writerow(["日期", "最高气温", "最低气温", '天气'])

    # for循环生成
    for year in range(2018, 2024):
        yearly_weather = []  # 创建一个新的列表来存储每年的天气数据
        for month in range(1, 13):
            # 获取某一月的天气信息
            # 三元表达式
            weather_time = str(year) + ('0' + str(month) if month < 10 else str(month))
            print(weather_time)
            url = f'https://lishi.tianqi.com/dongguan/{weather_time}.html'
            # 爬虫获取这个月的天气信息
            weather = getWeather(url)
            # 将这个月的天气数据添加到年度天气数据列表中
            yearly_weather.extend([list(day_weather_dict.values()) for day_weather_dict in weather])
        # 一次写入一年的天气数据
        writer.writerows(yearly_weather)
        print(str(year)+"年数据存入完成。")
        # 清空年度天气数据列表,以便于存储下一年的数据
        yearly_weather.clear()

print("6年数据写入成功!")
- 1
- 2
- 3
- 4
- 5
- 6
- 7
- 8
- 9
- 10
- 11
- 12
- 13
- 14
- 15
- 16
- 17
- 18
- 19
- 20
- 21
- 22
- 23
- 24
- 25
- 26
# 读取数据
with open("6years_weather.csv", "r", newline='') as csvfile:
    reader = csv.reader(csvfile)
    read = [
        row for row in reader # 检查行是否为空
        if any(cell.strip() for cell in row)]
print("6年数据读取成功!")
print(read)
- 1
- 2
- 3
- 4
- 5
- 6
- 7
- 8
import pandas as pd
import numpy as np
from sklearn.model_selection import train_test_split
from sklearn.linear_model import LinearRegression
from sklearn import metrics
import matplotlib.pyplot as plt

# 嵌套列表
data = read
# 转换为DataFrame
df = pd.DataFrame(data[1:], columns=data[0])

# 划分数据集
X = df[['最高气温']].astype(float)  # 特征变量
y = df['最低气温'].astype(float)  # 目标变量
# 划分训练集和测试集
X_train, X_test, y_train, y_test = train_test_split(X, y, test_size=0.5, random_state=0)

# 训练模型
model = LinearRegression()  # 创建线性回归模型
model.fit(X_train, y_train)  # 使用训练集训练模型

# 预测
y_pred = model.predict(X_test)  # 使用模型对测试集进行预测

# 绘制散点图和回归线
plt.scatter(X_test, y_test, color='blue')
plt.plot(X_test, y_pred, color='red')
plt.title('最高气温与最低气温的线性回归模型')
plt.xlabel('最高气温')
plt.ylabel('最低气温')
plt.show()
- 1
- 2
- 3
- 4
- 5
- 6
- 7
- 8
- 9
- 10
- 11
- 12
- 13
- 14
- 15
- 16
- 17
- 18
- 19
- 20
- 21
- 22
- 23
- 24
- 25
- 26
- 27
- 28
- 29
- 30
- 31
- 32
- 33


