热门标签
热门文章
- 1Cursor游标(光标)的使用_cursor cur_jy is
- 2用Python绘制动态可视化图表,屌爆了
- 3计算机设计大赛 深度学习OCR中文识别 - opencv python
- 4eclipse中用jetty启动项目及debug调试项目_debug org.eclipse.jetty.jndi.namingcontext - looki
- 5vue中的public文件夹的作用,vue实例部署在index.html_public文件夹下放index.html做什么用的
- 6一行代码教你撩妹手到擒来~html+css+js烟花告白3D相册(含音乐+可自定义文字)
- 7CentOS 部署 express 项目_express项目部署
- 8HTML+CSS+JavaScript基础知识总结_html,css,js总结
- 9【Unity 3D】利用C#、Unity和Socket实现简单的在线聊天室工具(附源码 简单易懂)_c# 聊天室
- 10Unity3d集成Wwise音频引擎的心得体会_如何将wwise在unity中打包
当前位置: article > 正文
为你的目标检测添加GUI可视化(Python)_pythongui实现监控图形化界面
作者:2023面试高手 | 2024-02-22 05:15:04
赞
踩
pythongui实现监控图形化界面
GUI是图形用户界面的简称,可以添加各种有趣的东西,接下来说一个比较简单的GUI界面,可以调用其他的脚本运行然后显示出结果。
1.需要的库
- import subprocess
- import sys
- import numpy as np
- from PIL import Image
- import os
-
- from PyQt5.QtGui import QImage, QPixmap, QIcon, QColor
- from PyQt5.QtCore import pyqtSlot, QSize, Qt
- from PyQt5.QtWidgets import QApplication, QTextBrowser, QWidget, QLabel, QPushButton, QFileDialog, QFrame, QVBoxLayout, QMessageBox
2.可视化界面设置
- class YourName(QWidget):
- def __init__(self):
- QWidget.__init__(self)
- self.initUI()
3.界面布局
- def initUI(self):
- # -----------------------------#
- # 初始化标题,界面大小,以及layout自适应大小
- # -----------------------------#
- self.resize(1170, 702)
- self.setWindowTitle('写软件的名称')
-
- self.layout = QVBoxLayout()
- self.setLayout(self.layout)
-
- # -----------------------------#
- # 设置寻找初始图片路径的按钮
- # -----------------------------#
- self.btn_photo = QPushButton(' 获取图片', self)
- self.btn_photo.setToolTip('点击后从电脑中读取图片')
- self.btn_photo.setIcon(QIcon("path")) #填入图片的地址,为你的搜索增添色彩
- self.btn_photo.clicked.connect(self.open_and_save_image)
-
- self.selected_image = None
- self.save_path = 'path' #选择图片后图片保存的位置
-
- # -----------------------------#
- # 设置“input”这个文字大小和位置
- # 放到10,60
- # 拉伸长度为200,30
- # -----------------------------#
- self.origin_text = QTextBrowser(self)
- self.origin_text.setTextColor(QColor(23, 32, 32))
- self.origin_text.setText("Inputs:")
- self.origin_text.setStyleSheet("border:none;background-color:rgba(0,0,0,0)")
- # -----------------------------#
- # 设置“output”这个文字大小和位置
- # 放到10,60
- # 拉伸长度为200,30
- # -----------------------------#
- self.output_text = QTextBrowser(self)
- self.output_text.setText("Outputs:")
- self.output_text.setStyleSheet("border:none;background-color:rgba(0,0,0,0)")
-
- # -----------------------------#
- # 设置箭头
- # -----------------------------#
- self.arrow_text = QTextBrowser(self)
- self.arrow_text.setText("→")
- self.arrow_text.setStyleSheet("border:none;background-color:rgba(0,0,0,0);font-size:50px")
-
- # -----------------------------#
- # 设置运行的按钮
- # 设置名称
- # 设置位置以及大小
- # 设置调用的函数
- # -----------------------------#
- self.btn_detect = QPushButton('Detect', self)
- self.btn_detect.clicked.connect(self.Call_Function)
-
- # -----------------------------#
- # 设置输入显示的图片
- # -----------------------------#
- self.label_h = 500
- self.label_w = 500
- self.label_show_input = QLabel(self)
- self.label_show_input.setStyleSheet("QLabel{background:white;}")
- self.label_show_input.setObjectName("Inputs")
- self.label_show_input.setScaledContents(True)
-
-
- # -----------------------------#
- # 设置输出显示的图片
- # -----------------------------#
- self.label_h = 500
- self.label_w = 500
- self.label_show_output = QLabel(self)
- self.label_show_output.setStyleSheet("QLabel{background:white;}")
- self.label_show_output.setObjectName("Outputs")
- self.label_show_output.setScaledContents(True)
-
- self.show()

4.设置对检测目标的打开和保存的函数
- # -----------------------------#
- # 打开图片模式
- # -----------------------------#
- @pyqtSlot()
- def open_and_save_image(self):
- imgName, _ = QFileDialog.getOpenFileName(self, '打开图片', '.', 'Images (*.png *.jpg *.jpeg *.bmp)')
- if len(imgName) == 0:
- return
- show = Image.open(imgName).convert("RGB")
- show = show.resize([self.label_w, self.label_h])
-
- showImage = QImage(np.array(show), np.shape(show)[1], np.shape(show)[0], QImage.Format_RGB888)
- self.label_show_input.setPixmap(QPixmap.fromImage(showImage))
-
- if imgName:
- self.selected_image = QPixmap(imgName)
- if not self.selected_image.isNull():
- self.label_show_input.setPixmap(self.selected_image)
- self.label_show_input.setText("")
- self.selected_image.save(self.save_path)
- print(f"Image saved to {self.save_path}")
- else:
- self.label_show_input.setText("Invaild Image File")

5.设置运行其他脚本的函数
- def Call_Function(self):
- out_image_path = "E:/pycharm_workspace/Muti-DLC-GUI/Detect Img/0001.jpg"
-
- try:
- # 运行另一个Python的脚本
- subprocess.run(["python", "E:/pycharm_workspace/Muti-DLC-GUI/v7/predict.py"])
- pixmap = QPixmap(out_image_path)
- if not pixmap.isNull():
- self.label_show_output.setPixmap(pixmap)
- else:
- self.show_error()
- #os.remove(self.save_path) #可选项,检测完后删除原图,可以新开图点检测不报错
- #os.remove(out_image_path) #可选项,检测完后删除检测好的图片,可以新开图点检测不报错
- except FileNotFoundError:
- print("File not found or path is incorrect.")
6.设置保存检测目标的函数
- def save_image(self):
- if self.selected_image:
- save_path, _ = QFileDialog.getSaveFileName(self, 'Save File', '.', 'PNG Files (*.png);;JPEG Files (*.jpg *.jpeg)')
- if save_path:
- self.selected_image.save(save_path)
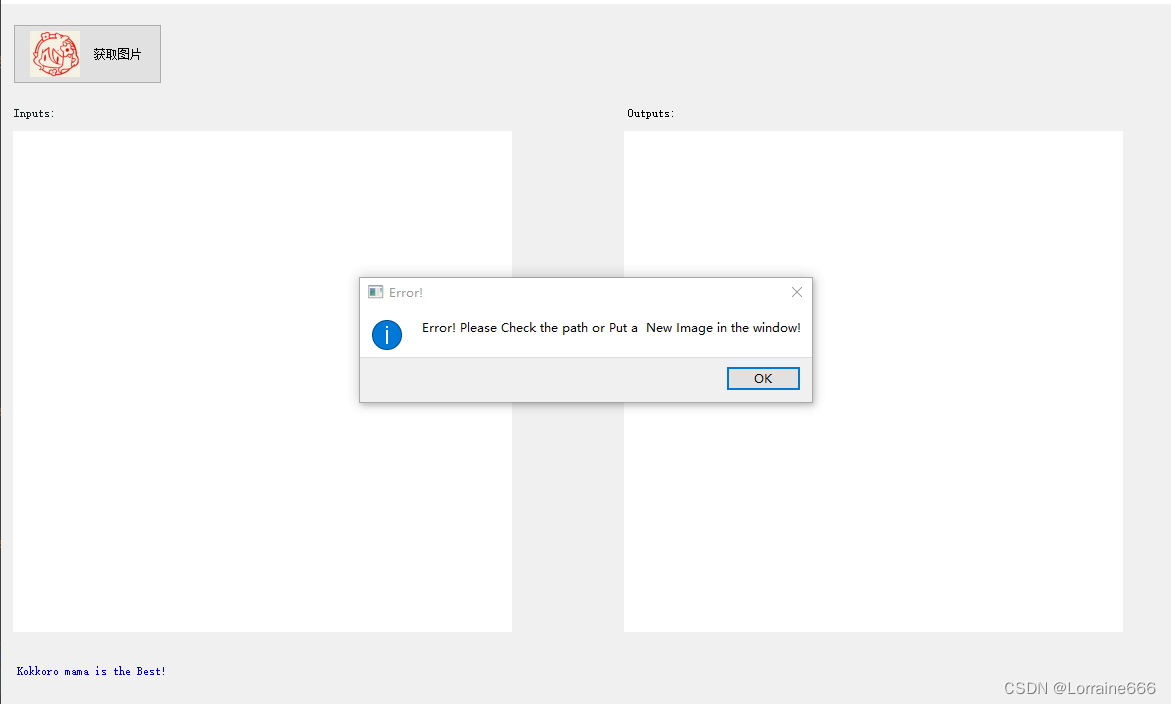
7.设置报错函数
- def show_error(self):
- msg_box = QMessageBox()
- msg_box.setWindowTitle('Error!')
- msg_box.setText('Error! Please Check the path or Put a Image in the window!')
- msg_box.setIcon(QMessageBox.Information)
- msg_box.setStandardButtons(QMessageBox.Ok)
-
- msg_box.exec_()
8.设置GUI内所有元素的自适应大小变化
- def resizeEvent(self, event):
- # 获取窗口的实时大小,设置基础参数,保证大小自适应
- origin_height = 702 #当前窗口的大小
- origin_width = 1170
- window_height = self.height()
- window_width = self.width()
- height_radio = window_height / origin_height
- width_radio = window_width / origin_width
- height_add = height_radio*origin_height #高度的相对位置参数
- width_add = width_radio*origin_width #宽度的相对位置参数
-
- #以下的所有数字都可以变化,看你的布局自行调整
- #1.自适应图片获取的按钮设置
- self.btn_photo.setIconSize(QSize(int(0.043*width_add), int(0.071*height_add)))
- self.btn_photo.resize(int(0.128*width_add), int(0.086*height_add))
- self.btn_photo.move(int(0.011*width_add), int(0.029*height_add))
-
- #2.自适应私货的设置
- self.text_browser.move(int(0.011*width_add), int(0.936*height_add))
- self.text_browser.setFixedSize(int(0.222*width_add), int(0.056*height_add))
-
- #3.自适应"输入"文字的设置
- self.origin_text.move(int(0.008*width_add), int(0.142*height_add))
- self.origin_text.setFixedSize(int(0.222*width_add), int(0.057*height_add))
-
- #4.自适应"输出"文字的设置
- self.output_text.move(int(0.533*width_add), int(0.142*height_add))
- self.output_text.setFixedSize(int(0.222*width_add), int(0.056*height_add))
-
- #5.自适应箭头的设置
- self.arrow_text.move(int(0.462*width_add), int(0.5*height_add))
- self.arrow_text.setFixedSize(int(0.256*width_add), int(0.114*height_add))
-
- #6.自适应检测按钮的设置
- self.btn_detect.setGeometry(int(0.453*width_add), int(0.456*height_add), int(0.068*width_add), int(0.046*height_add))
-
- #7.自适应两个框大小的设置
- self.label_show_input.move(int(0.011*width_add), int(0.181*height_add))
- self.label_show_input.setFixedSize(int(0.427*width_add), int(0.714*height_add))
-
- self.label_show_output.move(int(0.533*width_add), int(0.181*height_add))
- self.label_show_output.setFixedSize(int(0.427*width_add), int(0.714*height_add))

最后添加主函数连接起来即可
- if __name__ == '__main__':
- app = QApplication(sys.argv)
- ex = YourName()
- sys.exit(app.exec_())
以下是我弄的最后的效果图:

 鄙人还是新手小白,如果有什么可以改进的地方请务必私聊我!谢谢各位大佬
声明:本文内容由网友自发贡献,不代表【wpsshop博客】立场,版权归原作者所有,本站不承担相应法律责任。如您发现有侵权的内容,请联系我们。转载请注明出处:https://www.wpsshop.cn/w/2023面试高手/article/detail/128660
推荐阅读
相关标签


