- 1SteamVR---UI交互_steam vr ui 交互
- 2检查c#代码内存泄露工具-CLR Profiler_c# clr profiler
- 3如何在Linux下使用GPG(GnuPG)加密及解密_gungpg
- 4python从入门到精通第三版,python3.8从入门到精通pdf_python从入门到精通第三版pdf下载
- 5python常见相关组件汇总(个人学习)_python组件
- 6深度半监督学习方法总结
- 7【Unity】 2D贪吃豆开发流程_unity2d吃豆豆游戏向上碰撞物体,不能销毁
- 8jq用到的插件整理_jquery.superslide.2.1.1.min.js
- 9却话文心一言(Chatgpt们),存算一体真能突破AI算力“存储墙”|“能耗墙”|“编译墙”?_计算 存储墙
- 10正则表达式的一些高级用法
springboot网站开发01-如何搭建Maven类型父子嵌套结构项目
赞
踩
springboot网站开发01-如何搭建Maven类型父子嵌套结构项目!众所周知,实际上,在真正的公司项目开发中为了让代码实现更多的复用,提升项目的开发效率,节省开发的成本(人力成本较高,代码可以尽量复用),很多都会采取父子嵌套的结构搭建Maven项目。下面为大家展示一下,如何搭建一个基础的父子嵌套Maven项目。
首先,我们需要创建一个父级别的Maven工程。里面的重点是:你只需要配置好你的子模块(子项目)的名字即可。当然了,如果你不提前配置,直接创建子模块,也是可以的,它会自动识别到,自动追加配置参数的。很方便。
- <?xml version="1.0" encoding="UTF-8"?>
- <project xmlns="http://maven.apache.org/POM/4.0.0"
- xmlns:xsi="http://www.w3.org/2001/XMLSchema-instance"
- xsi:schemaLocation="http://maven.apache.org/POM/4.0.0 http://maven.apache.org/xsd/maven-4.0.0.xsd">
- <modelVersion>4.0.0</modelVersion>
-
- <groupId>org.example</groupId>
- <artifactId>blog</artifactId>
- <packaging>pom</packaging>
- <version>1.0-SNAPSHOT</version>
- <modules>
- <module>blog-framework</module>
- <module>blog-admin</module>
- <module>hnseo321-blog</module>
- </modules>
-
- <properties>
- <maven.compiler.source>8</maven.compiler.source>
- <maven.compiler.target>8</maven.compiler.target>
- <project.build.sourceEncoding>UTF-8</project.build.sourceEncoding>
- <java.version>1.8</java.version>
- </properties>
- <dependencyManagement>
- <dependencies>
- <!-- SpringBoot的依赖配置-->
- <dependency>
- <groupId>org.springframework.boot</groupId>
- <artifactId>spring-boot-dependencies</artifactId>
- <version>2.5.0</version>
- <type>pom</type>
- <scope>import</scope>
- </dependency>
- <!--fastjson依赖-->
- <dependency>
- <groupId>com.alibaba</groupId>
- <artifactId>fastjson</artifactId>
- <version>1.2.33</version>
- </dependency>
- <!--jwt依赖-->
- <dependency>
- <groupId>io.jsonwebtoken</groupId>
- <artifactId>jjwt</artifactId>
- <version>0.9.0</version>
- </dependency>
- <!--mybatisPlus依赖-->
- <dependency>
- <groupId>com.baomidou</groupId>
- <artifactId>mybatis-plus-boot-starter</artifactId>
- <version>3.4.3</version>
- </dependency>
-
- <!--阿里云OSS-->
- <dependency>
- <groupId>com.aliyun.oss</groupId>
- <artifactId>aliyun-sdk-oss</artifactId>
- <version>3.10.2</version>
- </dependency>
-
-
- <dependency>
- <groupId>com.alibaba</groupId>
- <artifactId>easyexcel</artifactId>
- <version>3.0.5</version>
- </dependency>
-
- <dependency>
- <groupId>io.springfox</groupId>
- <artifactId>springfox-swagger2</artifactId>
- <version>2.9.2</version>
- </dependency>
- <dependency>
- <groupId>org.springframework.boot</groupId>
- <artifactId>spring-boot-starter-thymeleaf</artifactId>
- <version>3.0.9</version>
- </dependency>
- </dependencies>
-
-
- </dependencyManagement>
- <build>
- <plugins>
- <plugin>
- <groupId>org.apache.maven.plugins</groupId>
- <artifactId>maven-compiler-plugin</artifactId>
- <version>3.1</version>
- <configuration>
- <source>${java.version}</source>
- <target>${java.version}</target>
- <encoding>${project.build.sourceEncoding}</encoding>
- </configuration>
- </plugin>
- </plugins>
- </build>
- </project>

以上信息,就是创建根项目(父级根项目的pom.xml内容)
里面有2个地方需要注意:
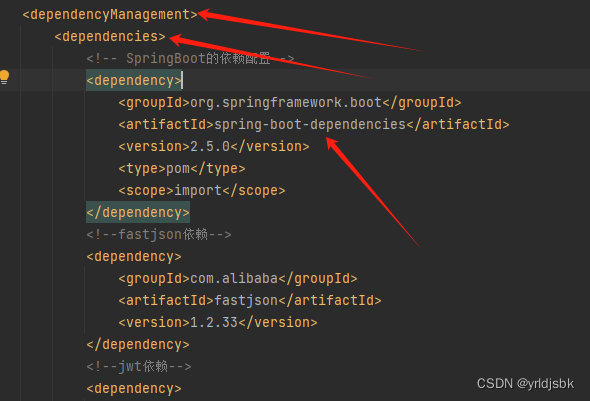
第一个注意点:

如图,这里面有一个《modules》标签,这个标签就是可以告诉代码,我是一个根,你要帮我管理我的子集合模块。
里面的《module》都是每一个子模块(子项目)的名字。
第二个注意点:

这个标签,是告诉代码,你需要帮我管理子模块的导入,采用import的方式导入子模块内容,子模块类型也是pom格式配置的。
如下图所示,我这个就是其中一个子模块,名字叫做hnseo321-blog。
这是它自己的pom.xml信息,里面可以看见,多了标签《parent》,父标签,里面写清楚了,它隶属于谁,谁是它的父项目。
下面那个《artifactId》标签,写的是它自己本身的名字。
里面有一个点需要注意:
它作为一个前端项目(前端用户可以看见交互的webUI界面,调用的业务处理接口,都来自这个子项目啊。)它肯定少不了和数据库查询互动的,它里面还会调用一个公共的子模块(blog-framework);
这个blog-framework子模块,和hnseo321-blog是同一个级别的,都是隶属于父模块的。同一级别。
这样我们就可以省去写两遍代码了,因为我们的项目,还有一个子模块叫后端模块,负责后端管理的业务处理逻辑接口服务。(blog-admin).在后端处理接口项目中,也会调用到这一批CUDA的代码,为了实现代码复用,我们就把CUDA的代码封装到了一个公共子模块里,取个名字叫:blog-framework.

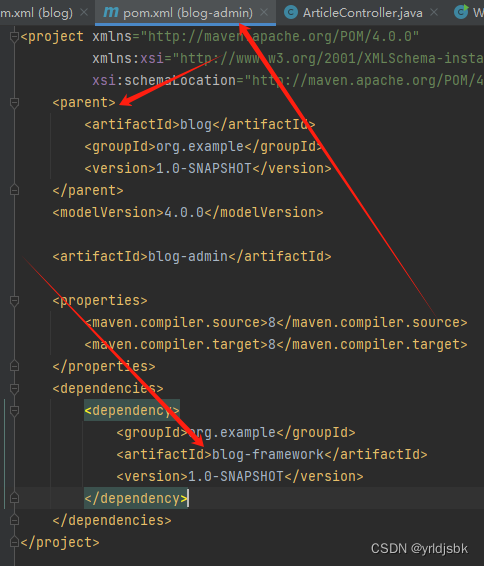
下面给大家看看,在子模块(后端模块)li也是同样的方式,调用了公共模块(blog-framework)

如图,这个内容就是后端模块(blog-admin)的pom.xml信息,和前端模块(hnseo321-blog)的配置信息基本上是一样的,都带有一个parent标签(声明自己隶属于谁),都有一个依赖项(告诉springboot框架,我需要依赖于哪个子模块的代码信息。)
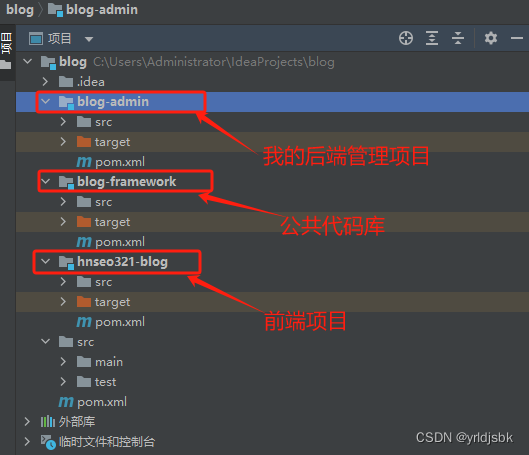
下面给大家展示一下我的完整项目逻辑图:

如图,实际上,这个搭建过程很快,1-2分钟就能完成了,剩下的就是你的编码任务了。详细的内容后面会和大家陆续分享的。欢迎交流互动,springboot网站开发技术。
祝您可以一次性成功创建属于自己的父子嵌套Maven项目结构。


