- 1JSR-303 @Validated实现List集合元素校验_@validated list撖寡情
- 2Android集成科大讯飞语音识别、语音唤醒、语音播报简易封装_科大讯飞语音唤醒+命令
- 3python正则表达式
- 4ESP32/ESP8266 使用WIFI模块进行UDP通信 - 米思齐/Arduino_米思齐esp32
- 5Git进阶(十一):Git 常用操作汇总_git restore --staged
- 6数学建模论文写作学习——论文题目、关键词、摘要写作学习_数模论文关键词
- 7同城搭子同城组局JAVA系统源码是如何开发的
- 8ExtJS——AJAX请求数据_extjs ajax 请求
- 9VMware vSphere开启客户机的VNC远程控制
- 10nRF Sniffer在wireshark下的环境搭建
Android lint配置及使用
赞
踩
关于作者:CSDN内容合伙人、技术专家, 从零开始做日活千万级APP。
专注于分享各领域原创系列文章 ,擅长java后端、移动开发、商业变现、人工智能等,希望大家多多支持。

一、导读
我们继续总结学习** lint 基础知识**,温故知新。
二、概览
Android Studio 提供了一个名为 lint 的代码扫描工具,可帮助您发现并更正代码结构质量方面的问题,而无需您实际执行应用,
也不必编写测试用例。系统会报告该工具检测到的每个问题并提供问题的描述消息和严重级别,以便您可以快速确定需要优先进行的关键改进。
此外,您还可以降低问题的严重级别以忽略与项目无关的问题,或者提高严重级别以突出特定问题。
lint 工具可以检查您的 Android 项目源文件是否有潜在的 bug,以及在正确性、安全性、性能、易用性、无障碍性和国际化方面是否需要优化改进。
三、将 lint 配置为不显示警告
默认情况下,当您运行 lint 扫描时,凡是 lint 可帮助检查的问题,lint 工具都会检查是否存在。
您也可以限定让 lint 只检查是否存在某些问题,并为这些问题指定严重级别。例如,您可以禁止 lint 检查是否存在与项目无关的特定问题,
还可以将 lint 配置为以较低的严重级别报告非关键问题。
您可以配置不同级别的 lint 检查:
全局(整个项目)
项目模块
生产模块
测试模块
打开的文件
类层次结构
版本控制系统 (VCS) 范围
- 1
- 2
- 3
- 4
- 5
- 6
- 7
3.1 在 Android Studio 项目 中配置 lint
可以在 lint.xml 文件中指定 lint 检查偏好设置,在项目的根目录下创建此文件,
通过在 标记中设置严重级别属性来更改某个问题的严重级别或禁止对该问题进行 lint 检查。
<?xml version="1.0" encoding="utf-8" ?>
<lint>
    <!--配置所有Issue的默认优先级-->
    <!--<issue id="all" severity="warning"/>-->

    <!--配置指定Issue的优先级-->
    <!--<issue id="ShowToast" severity="error"/>-->

    <!--忽略指定路径的指定问题,支持正则表达式或path匹配-->
    <!--<issue id="NewApi">-->
        <!--<ignore regexp=".*MainActivity.java"/>-->
        <!--<ignore path="**/com/paincker/lint/demo/MainActivity.java"/>-->
        <!--<ignore path="res/layout/activation.xml"/>-->
    <!--</issue>-->

    <!--<issue id="all" severity="warning"/>-->

    <!-- 忽略android建议的最小尺寸建议提示 -->
    <issue id="SmallSp" severity="ignore"/>
    <!-- 忽略 ButtonStyle-->
    <issue id="ButtonStyle" severity="ignore"/>
    <!-- 忽略拼写问题-->
    <issue id="SpellCheckingInspection" severity="ignore"/>
    <issue id="Spelling" severity="ignore"/>
    <!-- 忽略对控件内容描述的检查 -->
    <issue id="ContentDescription" severity="ignore"/>

    <issue id="SameParameterValue" severity="ignore"/>

    <issue id="UsingHttp" severity="ignore" >
        <ignore path="demo/gradle/wrapper/gradle-wrapper.properties" />
    </issue>

    <!-- 忽略google提供的云端备份功能 -->
    <issue id="AllowBackup" severity="ignore"/>
    <issue id="RtlEnabled" severity="ignore" />
    <!-- 忽略Missing density variation folders in 'src/main/res': drawable-hdpi, drawable-mdpi, drawable-xxhdpi -->
    <issue id="IconMissingDensityFolder" severity="ignore"/>
    <issue id="GradleDependency" severity="ignore" />
</lint>
- 1
- 2
- 3
- 4
- 5
- 6
- 7
- 8
- 9
- 10
- 11
- 12
- 13
- 14
- 15
- 16
- 17
- 18
- 19
- 20
- 21
- 22
- 23
- 24
- 25
- 26
- 27
- 28
- 29
- 30
- 31
- 32
- 33
- 34
- 35
- 36
- 37
- 38
- 39
- 40
3.2 配置 Java、Kotlin 和 XML 源文件的 lint 检查
settings > Editor > Inspections
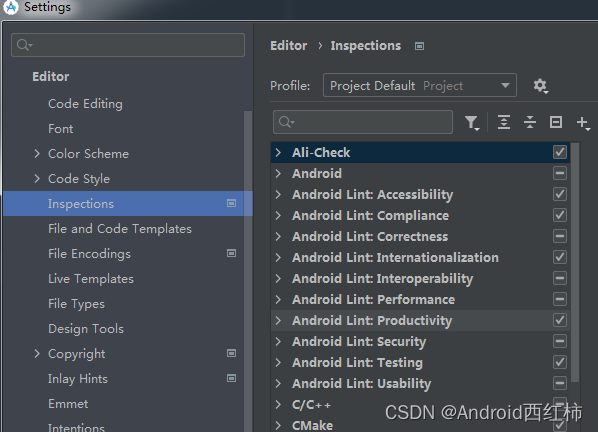
- Accessibility 辅助选项,比如ImageView的contentDescription往往建议在属性中定义等。
- Compliance 合规性,违反了Google Play的要求,比如使用了过期的库版本,性能、安全性、API等级等没有遵循新系统的要求等。
- Correctness 不够完美的编码,比如硬编码、使用过时API等。
- Internationalization 国际化,直接使用汉字,没有使用资源引用等
- Interoperability 互操作性,比如和Kotln的交互等。
- Performanc 对性能有影响的编码,比如:静态引用,循环引用等
- Security 不安全的编码,比如在 WebView 中允许使用 JavaScriptInterface等
- Usability 可用的,有更好的替换的 比如排版、图标格式建议.png格式等
3.3 配置 Java 或 Kotlin 的 lint 检查
要专门对 Android 项目中的某个类或方法停用 lint 检查,请向该代码添加 @SuppressLint 注解。
以下示例展示了如何对 onCreate 方法中的 NewApi 问题停用 lint 检查。lint 工具会继续检查该类的其他方法中的 NewApi 问题。
@SuppressLint("NewApi")
@Override
public void onCreate(Bundle savedInstanceState) {
    super.onCreate(savedInstanceState);
    setContentView(R.layout.main);
}
- 1
- 2
- 3
- 4
- 5
- 6
以下示例展示了如何对 FeedProvider 类中的 ParserError 问题停用 lint 检查:
@SuppressLint("ParserError")
public class FeedProvider extends ContentProvider {
- 1
- 2
要禁止 lint 检查文件中的所有问题,请使用 all 关键字,如下所示
@SuppressLint("all")
- 1
3.4 配置 XML 的 lint 检查
以使用 tools:ignore 属性对 XML 文件的特定部分停用 lint 检查。在 lint.xml 文件中添加以下命名空间值,以便 lint 工具能够识别该属性:
namespace xmlns:tools="http://schemas.android.com/tools"
- 1
以下示例展示了如何对 XML 布局文件的 元素中的 UnusedResources 问题停用 lint 检查。如果某个父元素声明了 ignore 属性,则该元素的子元素会继承此属性。在本示例中,也会对 子元素停用 lint 检查。
<LinearLayout
    xmlns:android="http://schemas.android.com/apk/res/android"
    xmlns:tools="http://schemas.android.com/tools"
    tools:ignore="UnusedResources" >

    <TextView
        android:text="@string/auto_update_prompt" />
</LinearLayout>
- 1
- 2
- 3
- 4
- 5
- 6
- 7
- 8
要禁止检查多个问题,请使用以英文逗号分隔的字符串列出要禁止检查的问题。例如:
tools:ignore="NewApi,StringFormatInvalid"
- 1
要禁止 lint 检查 XML 元素中的所有问题,请使用 all 关键字,如下所示:
tools:ignore="all"
- 1
- 2
3.5 通过 Gradle 配置 lint 选项
通过 Android Plugin for Gradle,您可以使用模块级 build.gradle 文件中的 lint{} 代码块配置某些 lint 选项,例如要运行或忽略哪些检查。以下代码段展示了您可以配置的部分属性:
android {
    ...
    lint {
        // Turns off checks for the issue IDs you specify.
        disable 'TypographyFractions','TypographyQuotes'
        // Turns on checks for the issue IDs you specify. These checks are in
        // addition to the default lint checks.
        enable 'RtlHardcoded','RtlCompat', 'RtlEnabled'
        // To enable checks for only a subset of issue IDs and ignore all others,
        // list the issue IDs with the 'check' property instead. This property overrides
        // any issue IDs you enable or disable using the properties above.
        checkOnly 'NewApi', 'InlinedApi'
        // If set to true, turns off analysis progress reporting by lint.
        quiet true
        // If set to true (default), stops the build if errors are found.
        abortOnError false
        // If true, only report errors.
        ignoreWarnings true
        // If true, lint also checks all dependencies as part of its analysis. Recommended for
        // projects consisting of an app with library dependencies.
        checkDependencies true
    }
}
...
- 1
- 2
- 3
- 4
- 5
- 6
- 7
- 8
- 9
- 10
- 11
- 12
- 13
- 14
- 15
- 16
- 17
- 18
- 19
- 20
- 21
- 22
- 23
- 24
四、Android studio 运行lint检查
通过依次选择 code > Inspect Code,手动运行配置的 lint 及其他 IDE 检查。检查结果将显示在 Inspection Results 窗口中
结果。
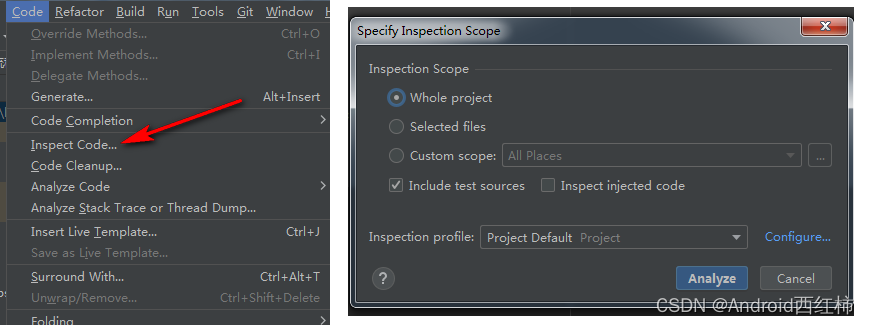
点击 OK 以运行检查。下图 显示了通过运行 Inspect Code 所生成的 lint 及其他 IDE 检查结果
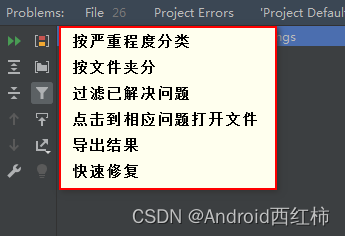
下面我们列出一些常用的单独的选项
4.1 去掉无用资源
通过依次选择 code > Analyze Code > Run Inspection By Name
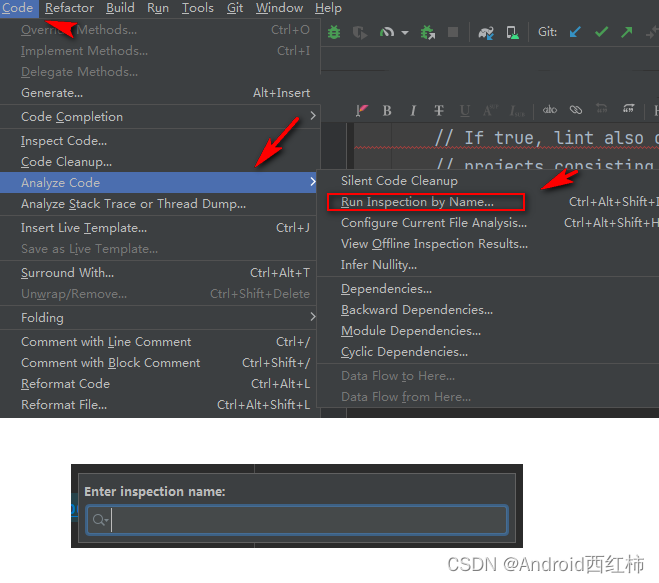
然后在对话框中输入 unused resources
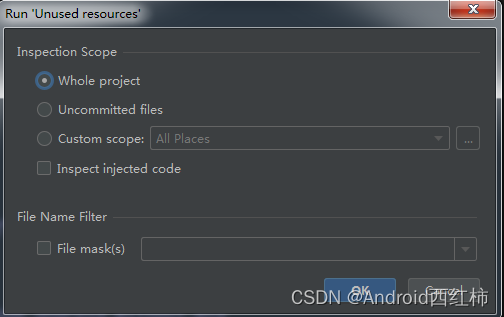
点击ok
4.2 去掉 无用的import
通过依次选择 code > Analyze Code > Run Inspection By Name

然后在对话框中输入 unused import

点击ok
4.3 去掉无用声明
方式同上,
然后在对话框中输入 unused declaration
4.4 去掉无用赋值
方式同上,
然后在对话框中输入 unused assignment
4.5 去掉xml中未使用的命名空间声明或位置提示
方式同上,
然后在对话框中输入 unused schema declaration
4.6 去掉无用依赖库
方式同上,
然后在对话框中输入 unused library
constant conditional expression
更多选项请在 配置 Java、Kotlin 和 XML 源文件的 lint 检查 中查看。
五、从命令行运行 lint
如果您当前未使用 Android Studio 或 Gradle,您可以在通过 SDK 管理器安装 Android SDK 命令行工具后使用独立 lint 工具。
安装该组件后,您可以在 android_sdk/cmdline-tools/version/bin/lint 中找到 lint 工具。
如需对项目目录中的文件列表运行 lint,请使用以下命令:
lint [flags] <project directory>
- 1
例如,您可以发出以下命令来扫描 myproject 目录及其子目录下的文件。问题 ID MissingPrefix 提示 lint 仅扫描是否存在缺少 Android 命名空间前缀的 XML 属性。
lint --check MissingPrefix myproject
- 1
要查看该工具支持的标志和命令行参数的完整列表,请使用以下命令:
lint --help
- 1
下例显示了对一个名为 Earthquake 的项目运行 lint 命令时的控制台输出。
$ lint Earthquake

Scanning Earthquake: ...............................................................................................................................
Scanning Earthquake (Phase 2): .......
AndroidManifest.xml:23: Warning: <uses-sdk> tag appears after <application> tag [ManifestOrder]
  <uses-sdk android:minSdkVersion="7" />
  ^
AndroidManifest.xml:23: Warning: <uses-sdk> tag should specify a target API level (the highest verified version; when running on later versions, compatibility behaviors may be enabled) with android:targetSdkVersion="?" [UsesMinSdkAttributes]
  <uses-sdk android:minSdkVersion="7" />
  ^
res/layout/preferences.xml: Warning: The resource R.layout.preferences appears to be unused [UnusedResources]
res: Warning: Missing density variation folders in res: drawable-xhdpi [IconMissingDensityFolder]
0 errors, 4 warnings
- 1
- 2
- 3
- 4
- 5
- 6
- 7
- 8
- 9
- 10
- 11
- 12
- 13
以上输出未列出任何错误,但列出了四条警告:其中三条警告(ManifestOrder、UsesMinSdkAttributes 和 UnusedResources)
出现在项目的 AndroidManifest.xml 文件中,一条警告 (IconMissingDensityFolder) 出现在 Preferences.xml 布局文件中。
五、 推荐阅读
