
热门标签
热门文章
- 1Vue学习笔记(尚硅谷天禹老师)_尚硅谷天禹老师vue2021讲课笔记下载
- 2【git系列】研发到后期,如何创建一个空白分支?_gitlab创建空分支
- 3Resnet论文精读_resnet论文精度
- 4python爬取今日头条评论,python3爬今日头条新闻_python爬虫今日头条
- 5Can‘t find third_party/gtest. Run git submodule update --init, or disable with CMake -DBUILD_TEST
- 6AWS入门实践-AWS CLI工具的使用介绍_awscli使用教程
- 7二叉树的前序遍历(LeetCode)_编写一段程序,前序遍历二叉树
- 8解决Redis、MySQL缓存双写不一致问题_python代码,模拟一下redis+mysql读写不一致
- 9mysql begin commit_MySql之commit、rollback等事务控制命令
- 10使用System-Verilog实现FPGA基于DE2-115开发板驱动HC_SR04超声波测距模块|集成蜂鸣器,led和vga提示功能
当前位置: article > 正文
通俗易懂的JAVA BIO NIO AIO 原理白话文解释,区别,优缺点及代码使用案例_java aio
作者:2023面试高手 | 2024-05-21 19:00:36
赞
踩
java aio
BIO 介绍与原理
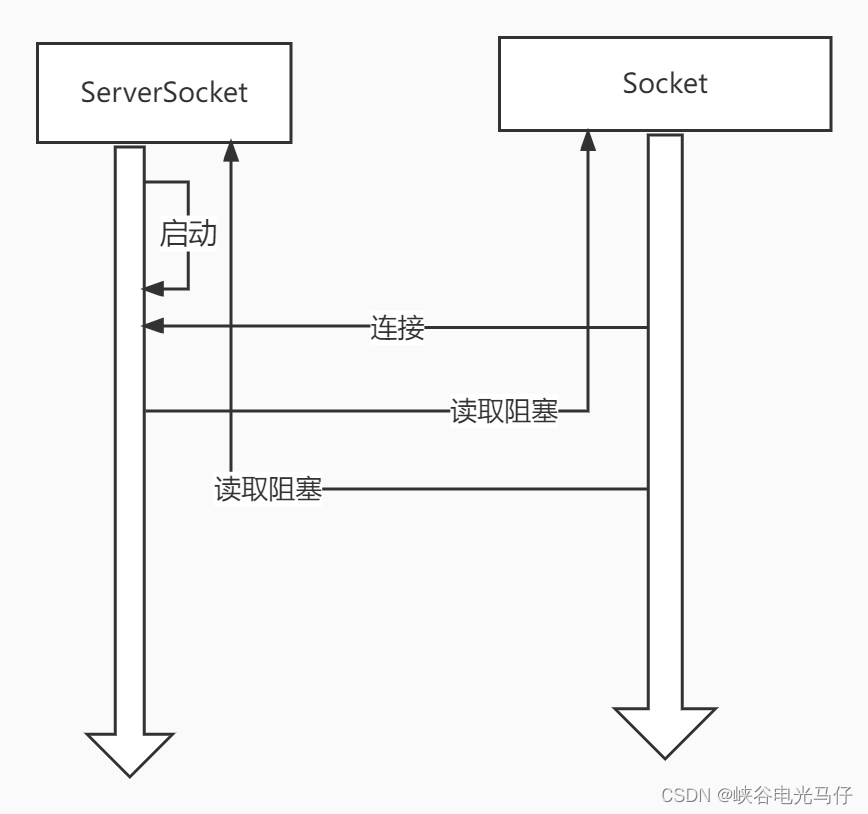
BIO 全程Blocking I/O ,阻塞io, 是java最早的 网络io模型
基于基本ServerSocket ,Socket 实现,
SOCKET 所有的操作都是基于阻塞IO的,比如socket inpustream read方法
如果没有数据进来就会一直阻塞,除非新创建线程处理每一个socket
BIO 匹配我们饭店吃饭场景
我们先到第一个窗口,发现厨师还没做好,那么就一直等着,直到这到菜做好了,我们拿到这个菜,然会回到座位吃完了
然后又去第二个窗口,等待第二道菜做好,然后拿回座位吃完,以此循环下去
以上场景可以匹配ServerSocket 的accept 方法,以及Socket 的read write方法
一般解决方案是每一个socket 启用一个thread 处理,这会导致并发数很低
BIO 优缺点:
优点:代码通俗易懂,在低并发场景或者分布式场景依然应用很广
缺点: 所有流程都是阻塞模式,需要依赖创建多个thread 处理每个socket,并发量很低
BIO运行图:
BIO 案例代码:
服务端最简单示例:
创建服务端有客户端连接后发送hello 字符串,并接受客户端reply 回复
- /**
- * @description: demos of jdk8 java.net.ServerSocket class
- * 创建服务端,有客户端连接后发送hello 字符串,并接受客户端reply 回复
- *
- * */
- @Test
- public void testServer() throws IOException {
-
- ServerSocket serverSocket = new ServerSocket(8679);
- while(true){
- Socket socket = serverSocket.accept();
- socket.getOutputStream().write("hello".getBytes());
- try{
- ByteBuffer byteBuffer = ByteBuffer.allocate(1024);
- byte[] bytes = new byte[1024];
- int read = 0;
- while ((read =socket.getInputStream().read(bytes))>0){
- byteBuffer.put(bytes,0,read);
- byteBuffer.flip();
- String rs = new String(byteBuffer.array());
- System.out.println(rs);
- byteBuffer.clear();
- }
- }catch (Exception e){
- e.printStackTrace();
- }finally {
- if(!socket.isClosed()) {
- try {
- socket.close();
- }catch (Exception e1){
- e1.printStackTrace();
- }
-
- }
- }
-
- }
- }
客户端最简单示例:
创建客户端,连接到服务端后接收到hello 字符串,并接向服务端发送reply 字符串回复
- /**
- * @description: demos of jdk8 java.net.Socket class
- * 创建客户端,连接到服务端后接收到hello 字符串,并接向服务端发送reply 字符串回复
- */
- @Test
- public void testClient() throws IOException {
-
- Socket socket = new Socket("127.0.0.1", 8679);
- ByteBuffer byteBuffer = ByteBuffer.allocate(1024);
- byte[] bytes = new byte[1024];
- int read = 0;
- while ((read = socket.getInputStream().read(bytes)) > 0) {
-
- byteBuffer.put(bytes, 0, read);
- byteBuffer.flip();
- String rs = new String(byteBuffer.array());
- byteBuffer.clear();
- System.out.println(rs);
- socket.getOutputStream().write("reply".getBytes());
- }
- }
NIO 介绍与原理
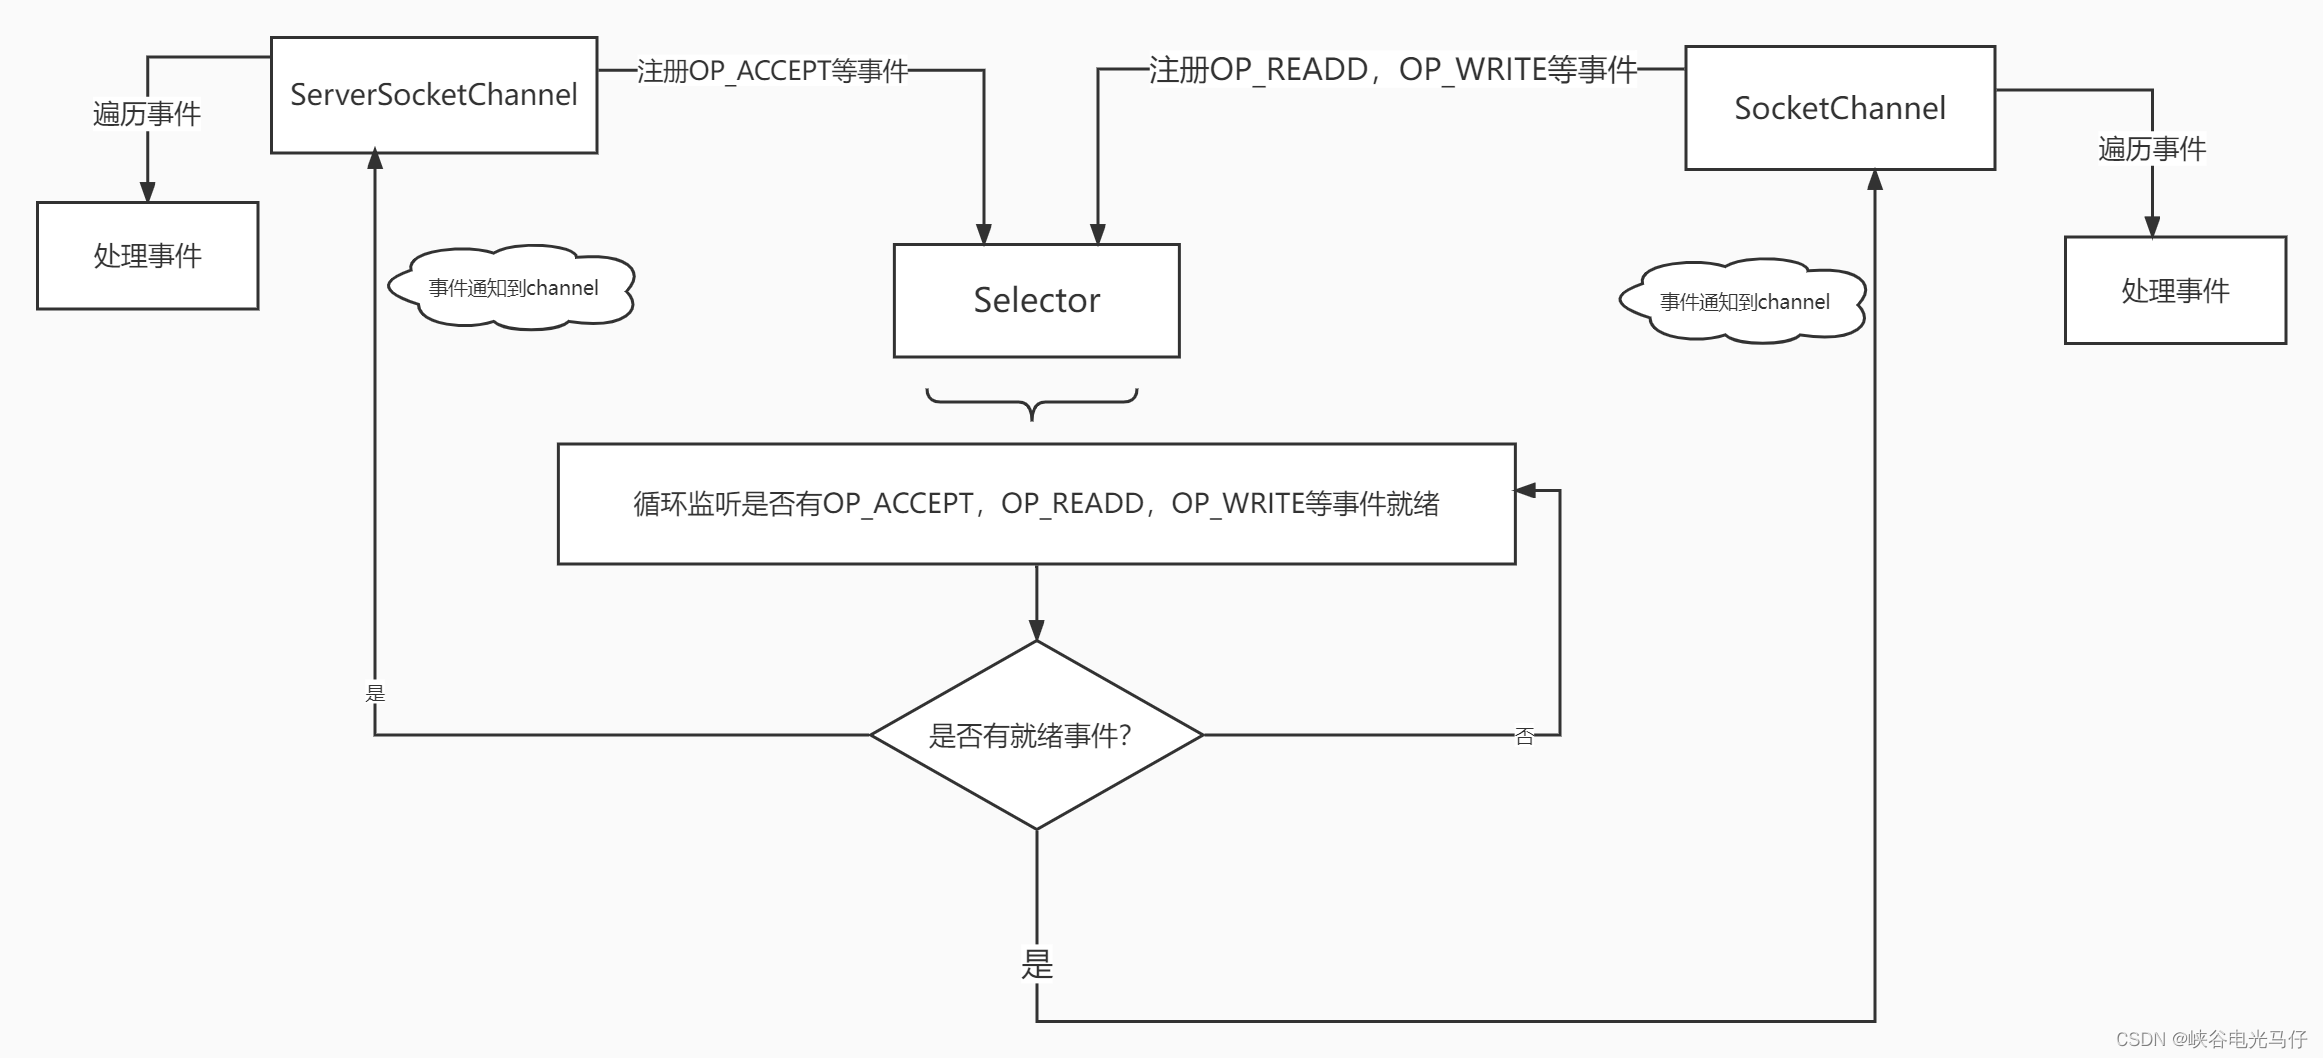
 NIO 全称 non-blocking I/O ,意思是非阻塞io
 与上面BIO 对应的,是JAVA 后加入的nio 包内的网络io模型
 核心类是Selector ,    ServerSocketChannel,SocketChannel
NIO 匹配我们饭店吃饭场景
同样是进了一个饭店,饭店有几个窗口,每个窗口做不同的菜,比如宫保鸡丁,油闷大虾,醋溜鱼等等
我们这次选择另一种方式等菜,我们不断的在每个窗口走来走去,而不是一直等在某个窗口
每一轮查看就把所有做好的菜一起打包带走,拿回来放到桌上吃完,然后在去窗口再继续一轮轮循环往复
这样做对程序来说的好处就是一直只有一个线程在不断循环监听某些事件就绪了也就是Selector的select()方法,相当于上面的查看哪些菜好了
NIO 优缺点:
优点:这样做极大的压缩了需要使用的线程,极大的提高了并发量
确定:在高并发场景下会有阻塞问题,因为在处理某个任务的时候其他事件的处理需要等待
NIO运行图:
NIO 案例代码:
NIO 服务端最简单示例:
创建服务端,有客户端连接后发送hello 字符串,并接受客户端reply 回复
- /**
- * @description: demos of jdk8 java.nio.ServerSocketChannel class
- * java.nio.ServerSocketChannel 作用:ServerSocketChannel 是 socket nio server 服务端
- * ServerSocketChannel 例子:
- * nio 服务端简单demo,流程如下
- * 1. 服务端创建并注册OP_ACCEPT事件到selector 中
- * 2. 循环获取selector中事件
- * 2.1 如果是OP_ACCEPT 事件,则获取到对应连接的客户端socketChannel
- * 2.2 将socketChannel 注册读事件OP_READ到selector 中
- * 2.3 如果是OP_READ ,则读取信息
- */
- @Test
- public void testServerSocketChannel() throws IOException {
-
- Selector selector = Selector.open();
- ServerSocketChannel ssc = ServerSocketChannel.open();
- ssc.bind(new InetSocketAddress(8970));
- ssc.configureBlocking(false);
- ssc.register(selector, SelectionKey.OP_ACCEPT);
- ByteBuffer byteBuffer = ByteBuffer.allocate(1024);
- while (true) {
-
-
- selector.select();
- Iterator<SelectionKey> skIterator = selector.selectedKeys().iterator();
- while (skIterator.hasNext()) {
- SelectionKey sk = skIterator.next();
- try {
-
- if (sk.isValid() && sk.isAcceptable()) {
- ServerSocketChannel assc = (ServerSocketChannel) sk.channel();
- SocketChannel asc = assc.accept();
- asc.configureBlocking(false);
- asc.register(selector, SelectionKey.OP_READ);
- byteBuffer.clear();
- byteBuffer.put("hello".getBytes());
- byteBuffer.flip();
- asc.write(byteBuffer);
- }
- if (sk.isValid() && sk.isReadable()) {
- SocketChannel sc = (SocketChannel) sk.channel();
- byteBuffer.clear();
- sc.read(byteBuffer);
- byteBuffer.flip();
- String rs = new String(byteBuffer.array());
- System.out.println(rs);
-
- }
- skIterator.remove();
-
-
- } catch (Exception e) {
- //e.printStackTrace();
- sk.cancel();
- sk.channel().close();
- }
- }
- }
- }
客户端最简单示例:
创建客户端,连接到服务端后接收到hello 字符串,并接向服务端发送reply 字符串回复
- /**
- * @description: demos of jdk8 java.nio.ServerChannel class
- * java.nio.ServerChannel 作用:ServerChannel 是 客户端
- * ServerChannel 例子:
- */
- @Test
- public void testServerChannel() throws IOException {
-
- SocketChannel sc = SocketChannel.open(new InetSocketAddress("127.0.0.1", 8970));
- sc.configureBlocking(false);
- ByteBuffer byteBuffer = ByteBuffer.allocate(1024);
- while (true) {
- byteBuffer.clear();
- while (sc.read(byteBuffer) > 0) {
- byteBuffer.flip();
- String rs = new String(byteBuffer.array());
- System.out.println(rs);
-
- byteBuffer.clear();
- byteBuffer.put("reply".getBytes());
- byteBuffer.flip();
- sc.write(byteBuffer);
- }
- }
- }
AIO 介绍与原理
AIO 全称 Asynchronous I/O ,意思是异步io,属于完全的非阻塞io
也是NIO 包内的异步网络io模型 ,与上面NIO 相比,去掉了循环监听事件并收集取回遍历的过程
核心类是 AsynchronousServerSocketChannel AsynchronousSocketChannel CompletionHandler
AIO 匹配我们饭店吃饭场景
我也又进入了这家饭店,饭店有几个窗口,每个窗口做不同的菜,比如宫保鸡丁,油闷大虾,醋溜鱼等等
这次我们换了一种更方便的方式,我们不在每个窗口前走来走去看哪个菜好了
而是告诉每个窗口放菜的人,我在某某号桌,菜好了直接送到我桌子上就行,这样就完全避免了任何阻塞
无论在任何场景 accept ,read ,write 等都是注册一个回调函数,然后这些事件发生了自然就会回调到这些函数
AIO 优缺点:
优点:完全异步io,没有阻塞问题, 最大限度的提高并发量
缺点:需要计算机操作系统底层支持事件注册回调函数,目前来说大多数linux系统都支持注册回调,windows以及其他一些系统部分不支持,不支持的时候默认会用nio实现
AIO运行图:

AIO 案例代码:
服务端最简单示例:
创建AIO 服务端,有客户端连接后发送hello 字符串,并接受客户端reply 回复
- /**
- * @description: demos of jdk8 java.nio.AsynchronousServerSocketChannel CompletionHandler class
- * 创建AIO 服务端,有客户端连接后发送hello 字符串,并接受客户端reply 回复
- */
- @Test
- public void testAIOServer() throws IOException {
-
- ByteBuffer byteBuffer = ByteBuffer.allocate(1024);
- AsynchronousServerSocketChannel serverSocketChannel = AsynchronousServerSocketChannel.open().bind(new InetSocketAddress(8097));
- serverSocketChannel.accept(null, new CompletionHandler<AsynchronousSocketChannel, Object>() {
-
- @Override
- public void completed(AsynchronousSocketChannel asc, Object attachment) {
-
-
- byteBuffer.clear();
- byteBuffer.put("hello".getBytes());
- byteBuffer.flip();
-
- asc.write(byteBuffer, null, new CompletionHandler<Integer, Object>() {
-
- @Override
- public void completed(Integer result, Object attachment) {
- byteBuffer.clear();
- }
-
- @Override
- public void failed(Throwable exc, Object attachment) {
-
- }
- });
-
- asc.read(byteBuffer, null, new CompletionHandler<Integer, Object>() {
-
- @Override
- public void completed(Integer result, Object attachment) {
-
- byteBuffer.flip();
- String rs = new String(byteBuffer.array());
- System.out.println(rs);
- }
-
- @Override
- public void failed(Throwable exc, Object attachment) {
-
- }
- });
-
- }
-
- @Override
- public void failed(Throwable exc, Object attachment) {
-
- }
- });
- while(true) {}
-
- }
客户端最简单示例:
创建客户端,连接到服务端后接收到hello 字符串,并接向服务端发送reply 字符串回复
- /**
- * @description: demos of jdk8 java.nio.AsynchronousSocketChannel CompletionHandler class
- * 创建客户端,连接到服务端后接收到hello 字符串,并接向服务端发送reply 字符串回复
- */
- @Test
- public void testAIOClient() throws IOException {
-
- ByteBuffer byteBuffer = ByteBuffer.allocate(1024);
- AsynchronousSocketChannel asynchronousSocketChannel = AsynchronousSocketChannel.open();
- asynchronousSocketChannel.connect(new InetSocketAddress("127.0.0.1", 8097), null, new CompletionHandler<Void, Object>() {
- @Override
- public void completed(Void result, Object attachment) {
- byteBuffer.clear();
-
- asynchronousSocketChannel.read(byteBuffer, null, new CompletionHandler<Integer, Object>() {
- @Override
- public void completed(Integer result, Object attachment) {
- byteBuffer.flip();
- String rs = new String(byteBuffer.array());
- System.out.println(rs);
-
- byteBuffer.clear();
- byteBuffer.put("relpy".getBytes());
- byteBuffer.flip();
- asynchronousSocketChannel.write(byteBuffer);
- }
-
- @Override
- public void failed(Throwable exc, Object attachment) {
-
- }
- });
- }
-
- @Override
- public void failed(Throwable exc, Object attachment) {
-
- }
- });
-
-
- while(true) {}
-
- }
声明:本文内容由网友自发贡献,不代表【wpsshop博客】立场,版权归原作者所有,本站不承担相应法律责任。如您发现有侵权的内容,请联系我们。转载请注明出处:https://www.wpsshop.cn/w/2023面试高手/article/detail/604156
推荐阅读
相关标签

