- 1Linux命令 - /etc/passwd文件详解_cat /etc/passwd
- 2如何在Flatter中以正确的方式存储登录凭证_flutter_secure_storage
- 3基于 LangChain 的优秀项目资源库_anything-llm
- 4在哪里能看鸿蒙审核进度,鸿蒙开源第三方组件——进度轮ProgressWheel
- 5TypeScript 与 JavaScript 的区别(TypeScript万字基础入门,了解TS,看这一篇就够了)_typescript和javascript
- 6【老鸟进阶】deepfacelab合成参数详解_deepfacelab 合成模式参数
- 7关于51单片机中的C语言使用及总结_51单片机c语言
- 8STM32——SysTick timer(STK)----系统定时器_stm32 systemcoreclock
- 9微信小程序隐私指引完整填写范本_小程序隐私保护指引填写模板
- 10C++函数重载实现的原理以及为什么在C++中调用C语言编译的函数时要加上extern "C"声明_c调用c++函数时,需要给c++函数声明加上
PyTorch学习笔记:GRU的原理及其手写复现_手写gru和调用库函数
赞
踩
目录
前言
首先再开始之前,我想问一下在座的各位实现过GRU的源码吗,不会的扣1,会的小伙伴们扣脚指头,嘿嘿,开玩笑的,我也不知道,那么接下来我们一起学习如何写吧!
其次 ,对于上一篇LSTM,其实还存在另外一种四个门都存在c(t-1),有兴趣的小伙伴可以 自行修改代码以实现
或者可以查看视频讲解
推荐教学视频:
30、PyTorch LSTM和LSTMP的原理及其手写复现_哔哩哔哩_bilibili
31、PyTorch GRU的原理及其手写复现_哔哩哔哩_bilibili
推荐博客讲解:
循环神经网络(超详细|附代码训练)_后来后来啊的博客-CSDN博客
接上文我们对于LSTM代码的实现,有兴趣的小伙伴可以看看上一篇博客:PyTorch学习笔记:LSTM和LSTMP的原理及其手写复现_后来后来啊的博客-CSDN博客
需要注意的,例如LSTM存在prej_size,存在俩个初始状态(在原公式中找下标有t-1的)
实现GRU网络
在此之前推荐查看LSTM定义的网络,为什么不让各位宝子们麻烦,我就直接复制代码过来了,但是原理还是需要各位宝子们细细去体会的(LSTM)
以下是博客链接
PyTorch学习笔记:LSTM和LSTMP的原理及其手写复现_后来后来啊的博客-CSDN博客
step1-4
- #实现lstm和lstmp的源码
- import torch
- import torch.nn as nn
-
- #定义常量
- bs, T, i_size, h_size = 2, 3, 4, 5
- proj_size = 3
- input = torch.randn(bs, T, i_size) #输入序列
- c0 = torch.randn(bs, h_size) #初始值,不需要训练
- h0 = torch.randn(bs, proj_size)
-
- # 调用官方LSTM API
- lstm_layer = nn.LSTM(i_size, h_size, batch_first=True, proj_size = proj_size)
- output, (h_final, c_final) = lstm_layer(input, (h0.unsqueeze(0), c0.unsqueeze(0)))
- print(output, h_final.shape, c_final.shape)
- # for k,v in lstm_layer.named_parameters()
- # print(k, v) #打印出 lstm权重,具体的张量是什么,为了更清晰,可以print(k, v.shape)
-
- #自己写一个lstm模型
- def lstm_forward(input, initial_states, w_ih, w_hh, b_ih, b_hh, w_hr=None):
- h0, c0 = initial_states #初始状态
- bs, T ,i_size = input.shape #T是时间维度,也就是序列的长度
- h_size = w_ih.shape[0] // 4
-
- prev_h = h0
- prev_c = c0
- #w_ih #维度是[4 * h_size, i_size] h_size及是hidden_size,所以要进行扩维
- batch_w_ih = w_ih.unsqueeze(0).tile(bs, 1, 1) #现在batch是1,但是需要bs,所以进行tile
- # w_hh #维度是[4 * h_size, h_size] h_size及是hidden_size,所以要进行扩维
- batch_w_hh = w_hh.unsqueeze(0).tile(bs, 1, 1) #同理
-
- if w_hr is not None:
- p_size = w_hr.shape[0]
- output_size = p_size
- batch_w_hr = w_hr.unsqueeze(0).tile(bs, 1, 1) #[bs, p_size, h_size]
- else:
- output_size = h_size
-
- output = torch.zeros(bs, T, output_size) #输出序列(输出矩阵)
-
- for t in range(T):
- x = input[:, t, :] #当期时刻的输入向量 , 维度为[bs, i_size],需要对x进行扩维
- w_times_x = torch.bmm(batch_w_ih, x.unsqueeze(-1)) #[bs, 4*h_size, 1]
- w_times_x = w_times_x.squeeze(-1) # [bs, 4*h_size]
-
- w_times_h_prev = torch.bmm(batch_w_hh, prev_h.unsqueeze(-1)) #[bs, 4*h_size, 1]
- w_times_h_prev = w_times_h_prev.squeeze(-1) # [bs, 4*h_size]
-
- #分别计算输入门(i),遗忘门(f),ceell门(c),输出门(o)
- i_t = torch.sigmoid(w_times_x[:, : h_size] + w_times_h_prev[:, :h_size] + b_ih[:h_size] + b_hh[:h_size])
- f_t = torch.sigmoid(w_times_x[:, h_size:2*h_size] + w_times_h_prev[:, h_size:2*h_size] + b_ih[h_size:2*h_size] + b_hh[h_size:2*h_size])
- g_t = torch.tanh(w_times_x[:, 2*h_size:3 * h_size] + w_times_h_prev[:, 2*h_size:3 * h_size] + b_ih[2*h_size:3 * h_size] + b_hh[2*h_size:3 * h_size])
- o_t = torch.tanh(w_times_x[:, 3 * h_size:4 * h_size] + w_times_h_prev[:, 3 * h_size:4 * h_size] + b_ih[ 3 * h_size:4 * h_size] + b_hh[ 3 * h_size:4 * h_size])
- prev_c = f_t * prev_c + i_t * g_t
- prev_h = o_t * torch.tanh(prev_c) #[bs, h_size]
-
- if w_hr is not None:
- prev_h = torch.bmm(batch_w_hr , prev_h.unsqueeze(-1)) #[bs, p_size, 1]
- prev_h = prev_h.squeeze(-1) # [bs, p_size]
-
- output[:, t, :] = prev_h
-
- return output, (prev_h, prev_c)
-
- output_custom, (h_final_custom, c_final_custom) = lstm_forward(input, (h0, c0), lstm_layer.weight_ih_l0, lstm_layer.weight_hh_l0, lstm_layer.bias_ih_l0, lstm_layer.bias_hh_l0, lstm_layer.weight_hr_l0)
-
- print(output_custom)

step5 逐行实现GRU网络
首先就是我们的官方链接:GRU — PyTorch 2.0 documentation
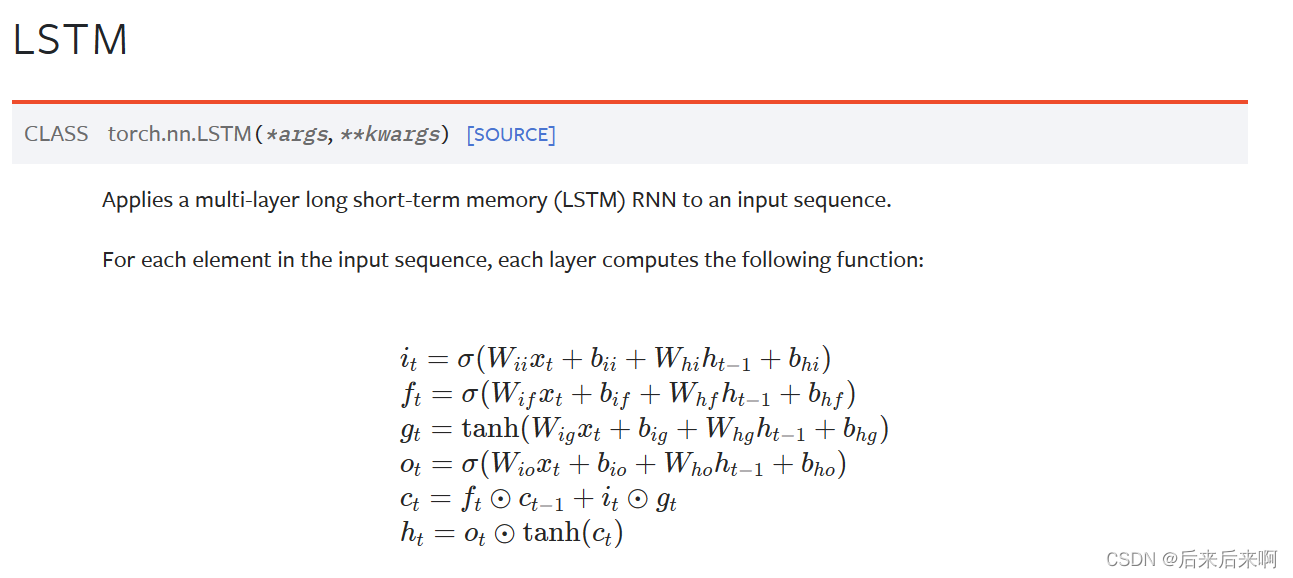
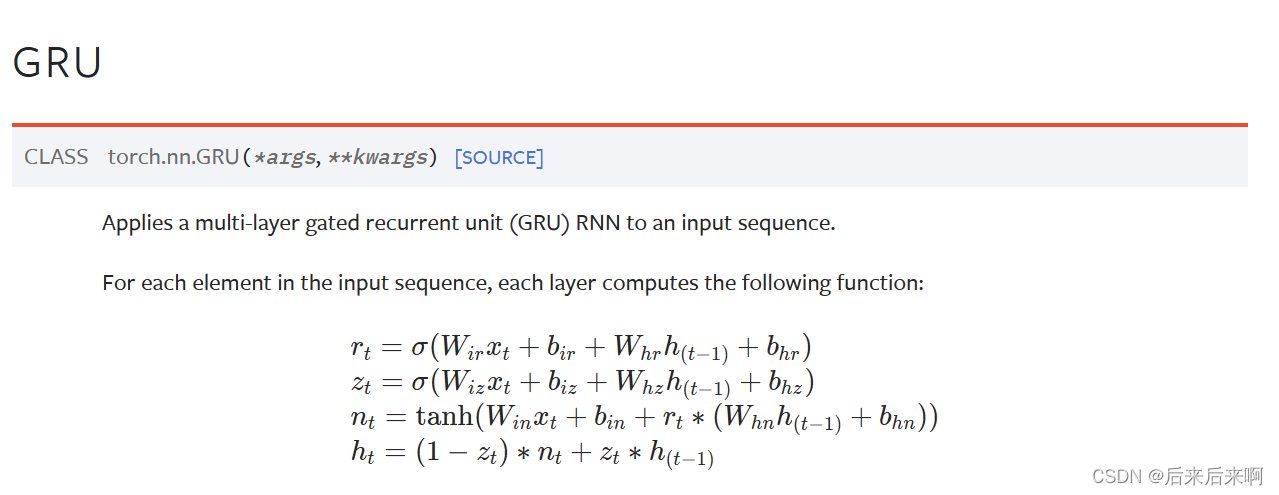
LSTM和GRU的公式


可以看到相比于lstm中的ct保留,GRU只有俩个门:重置门,更新门;
且因为GRU中没有c(细胞状态),所以初始值只需要提供h0即可,且GRU参数量很小,大概是LSTM参数量的0.75倍(hidden size相等的情况下),计算量也差不多是0.75倍
所以这就是GRU参数上的区别
还有GRU中的nt可以看做是ht最新的一个候选者,相当于ht是对历史的h(t-1)*更新系数zt,在加上候选者nt*(1-更新系数zt)
肯定有很多小伙伴有疑惑,什么时候该用LSTM,什么时候又该用GRU?为此,笔者为读者找了一篇论文供大家参考,链接如下:1412.3555v1.pdf (arxiv.org)
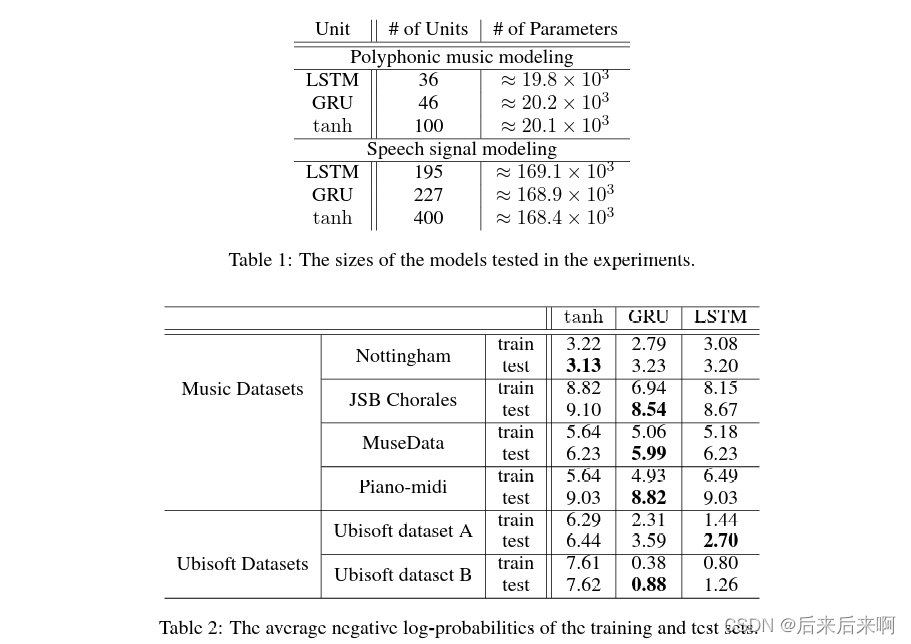
该论文就讲述了一个带有门的循环神经网络在序列建模上的一个经验性的评估,该论文评估了RNNs,LSTM以及GRU三个循环神经网络在序列建模上的一个表现,我们大体可以参考下
下面我们看下实验的结果:

Table 1:讲在复调音乐建模和语音信号建模俩个任务上,分别用了LSTM,GRU和RNN三个模型,三个模型参数大致相等,设置神经元个数(如复调音乐建模中):LSTM设置为36,GRU设置为46,RNN设置为100,最后参数数目大致为20000左右,模型2也差不多
Table 2:在参数差不多的情况下,在复调音乐模型和语音信号模型中GRU效果最好
如何查看参数数目
- # 首先先交大家如何查看参数数目
- lstm_layer = nn.LSTM(3,5)
- gru_layer = nn.GRU(3, 5)
- print(sum(p.numel() for p in lstm_layer.parameters())) #p.numel()表示对p张量的统计
- print(sum(p.numel() for p in gru_layer.parameters()))
打印出结果为
可以看到GRU参数为LSTM的3/4倍,所以如果自己写网络都可以使用torch.nn对每一层参数进行列举
实例化GRU
- # 逐行实现GRU网络
- def gru_forward(input, initial_state, w_ih, w_hh, b_ih, b_hh):
- prev_h = initial_state #初始状态
- bs, T ,i_size = input.shape #T是时间维度,也就是序列的长度
- h_size = w_ih.shape[0] // 3 #相比于LSTM//4,该模型只有三组hidden相乘,所以//3
-
- #对权重扩维.复制成batch_size倍
- batch_w_ih = w_ih.unsqueeze(0).repeat(bs, 1, 1) #扩一维,二维变三维,且一维为1,但是要做bmm运算,需要保证bs大小为bs,所以需要进行复制
- batch_w_hh = w_hh.unsqueeze(0).repeat(bs, 1, 1)
-
- output = torch.zeros(bs , T, h_size) #GRU网络的输出状态序列
-
- for t in range(T):
- x = input[:, t, :] #t时刻GRU cell的输入特征向量,大小为[bs, i_size],所以需要扩充为3维度
- w_times_x = torch.bmm(batch_w_ih, x.unsqueeze(-1)) #此处算好了w*x,维度为[bs , 3* h_size, 1]
- w_times_x = w_times_x.squeeze(-1) #去掉1维度,维度为[bs, 3*h_size]
- #以上操作将三组门(重置门,更新门,候选状态)中的wx进行集体的运算
-
- w_times_h_prev = torch.bmm(batch_w_hh, prev_h.unsqueeze(-1)) #维度为[bs , 3* h_size, 1]
- w_times_h_prev = w_times_h_prev.squeeze(-1) # 去掉1维度,维度为[bs, 3*h_size]
- #此处算好的是重置门,更新门,候选状态中的w*h(t-1)
-
- r_t = torch.sigmoid(w_times_x[:, :h_size] + w_times_h_prev[:, :h_size] + b_ih[:h_size] + b_hh[:h_size]) #重置门
- z_t = torch.sigmoid(w_times_x[:, h_size:2*h_size] + w_times_h_prev[:, h_size:2*h_size] + \
- b_ih[h_size:2*h_size] + b_hh[h_size:2*h_size]) #更新门
-
- #计算候选状态nt
- n_t = torch.tanh(w_times_x[:, 2*h_size:3*h_size] + b_ih[2*h_size:3*h_size] + \
- r_t*(w_times_h_prev[:, 2*h_size:3*h_size] + b_hh[2*h_size:3*h_size])) #候选状态
-
- prev_h = (1-z_t)*n_t + z_t*prev_h #增量更新得到当前时刻最新隐含状态hidden_state
- output[:, t, :] = prev_h # 将最新状态的hidden_state移动到输出矩阵中
-
- return output, prev_h #返回最后的状态序列和最后一个时刻的hidden_state
-
- #测试函数的正确性
- #定义常量
- bs, T, i_size, h_size = 2, 3, 4, 5
- input = torch.randn(bs, T, i_size) #输入序列
- h0 = torch.randn(bs, h_size) #初始值,不需要训练
-
- #调用PyTorch官方GRU API
- gru_layer = nn.GRU(i_size, h_size, batch_first=True)
- output, h_final = gru_layer(input, h0.unsqueeze(0)) #扩一维(在0维处)
- print(output)
- for k,v in gru_layer.named_parameters():
- print(k,v.shape) #打印查看 gru参数
-
- #调用自定义的gru_forward函数
- output_custom , h_final_custom = gru_forward(input, h0, gru_layer.weight_ih_l0, gru_layer.weight_hh_l0, gru_layer.bias_ih_l0, gru_layer.bias_hh_l0)
- # print(torch.allclose(output, output_custom)) #打印俩个张量是否接近,若为True则是一致的
- # print(torch.allclose(h_final, h_final_custom))

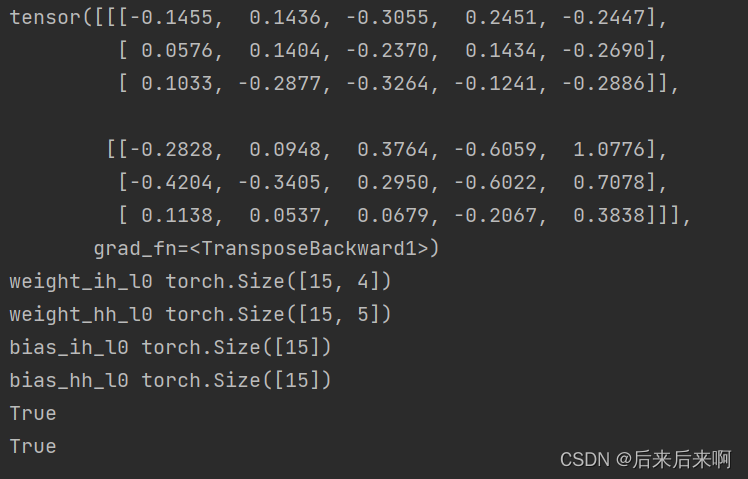
打印结果为
有疑问的读者可以更加 深入了解GRU,或者参考视频 :31、PyTorch GRU的原理及其手写复现_哔哩哔哩_bilibili
以上就是今天的全部内容,感谢观看


