热门标签
热门文章
- 1浏览器跨标签页通信BroadCast和ServiceWorker-连载1_serviceworker event.source
- 2远程桌面,前端部署_前端库 远程桌面
- 3Python玫瑰花_python matplolib圣诞树
- 4C/C++ 学生选课管理系统(源码 + 详解)_学生管理系统c++课程设计源代码
- 5第二百三十二回 如何通过相机获取图片文件
- 6扫描工具nmap、ncat
- 7Linux 安裝mitmproxy抓包基础教程_linux mitmproxy.tar.gz
- 8【AI绘画】个人电脑部署免费AI绘画软件——Stable Diffusion webui启动器_stable diffusion启动器
- 9Golang:监听binlog日志_golang监听binlog
- 10【2023版】Nmap的概述、安装并进行网络扫描实战_nmap扫描
当前位置: article > 正文
小程序抽象节点(插槽获取组件数据)_小程序抽象节点事件
作者:AllinToyou | 2024-02-15 23:40:09
赞
踩
小程序抽象节点事件
在开发过程中,封装组件经常会遇到这一种场景,例如这里我要封装一个swiper组件,但是不同的使用位置,布局结构样式这些需要不同的展现方式,这里我们就会使用插槽,在vue中我们可以使用slot-scope来获取组件的数据,但是小程序中没有类似方法,但是提供了一个抽象节点,可以达到使用目的。

首先创建一个swiper组件
下面代码中,item就是抽象节点名,你可以自己定义,itemData就是向抽象节点传数据,其实与组件使用方法一致
<swiper
  class="swiper"
  autoplay="{{autoplay}}"
  interval="{{interval}}"
  duration="{{duration}}"
  display-multiple-items="{{2}}">
  <block wx:for="{{list}}" wx:key="index">
    <swiper-item>
      <!-- 抽象节点 -->
      <item itemData="{{item}}"></item>
    </swiper-item>
  </block>
</swiper>
- 1
- 2
- 3
- 4
- 5
- 6
- 7
- 8
- 9
- 10
- 11
- 12
- 13
// js文件中接收数据
properties: {
    list: {
      type: Array
    }
}
- 1
- 2
- 3
- 4
- 5
- 6
之后在swiper组件的
json文件中,componentGenerics字段中声明抽象节点。
{
  "component": true,
  "usingComponents": {},
  "componentGenerics": {
    "item": true
  }
}
- 1
- 2
- 3
- 4
- 5
- 6
- 7
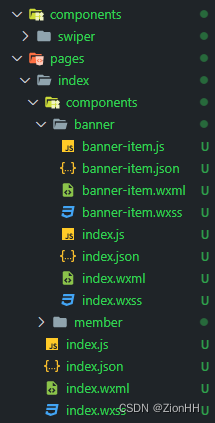
我这里创建了banner和member两个组件,下面以banner组件为示例

创建banner组件,引用swiper组件以及banner-item组件
{
  "component": true,
  "usingComponents": {
    "swiper": "/components/swiper/index",
    "banner-item": "./banner-item"
  }
}
- 1
- 2
- 3
- 4
- 5
- 6
- 7
generic:item="banner-item"这里就是指定抽象节点的组件,item为抽象节点名,与前面定义一致,banner-item则是渲染到抽象节点处的组件,主要是这里来写不同的样式结构。
<swiper list="{{list}}" generic:item="banner-item"></swiper>
- 1
banner-item组件
接收传入的数据
properties: {
    itemData: {
      type: Object
    }
}
- 1
- 2
- 3
- 4
- 5
组件样式结构
<view class="banner-item">
  <view class="bg" style="background-color: {{itemData.color}};"></view>
  <text class="name">{{itemData.name}}</text>
</view>
- 1
- 2
- 3
- 4
可以点击下方链接直接在开发者工具预览我上面的代码示例。
声明:本文内容由网友自发贡献,不代表【wpsshop博客】立场,版权归原作者所有,本站不承担相应法律责任。如您发现有侵权的内容,请联系我们。转载请注明出处:https://www.wpsshop.cn/w/AllinToyou/article/detail/88316
推荐阅读
相关标签


