- 1layui遍历json数组_前端获取后端传来的foreach然后将foreach中的数据传送给后端(Layui向后台传送json数据)...
- 2openlayer加载百度离线地图坐标不准确问题_openlayers tile百度地图 加载不到对应的x y z
- 3生成对抗网络
- 4adb命令强制禁用鸿蒙3.0以上的纯净模式
- 5K8S 快速入门(十一)实战篇:资源清单运作原理解析&Pod的生命周期&探针_k8s job lifecycle
- 6Java 和 JavaScript 的关系
- 7Python 读取 Excel 表格的几种方法_python读取excel
- 8GitHub痛改代码搜索引擎,18小时给155亿个文档创建索引,背后技术原理已公开...
- 9kubernetes 之 Pod 控制器 Deployment_查看pod属于哪个deployment
- 10Visual Studio 调试系列7 查看变量占用的内存(使用内存窗口)
【SLAM学习】基于Pangolin绘制运动轨迹_pangolin projectmatrix
赞
踩
Pangolin库是一个轻量级的跨平台视图控制库,主要用于可视化、交互和调试三维数据。该库提供了一系列图形界面工具,包括窗口、OpenGL渲染器、3D相机、图像显示等,可以方便地进行三维数据可视化和交互。
Pangolin库的主要特点如下:
-
轻量级:Pangolin库的代码量很少,只依赖于少量的第三方库,因此非常轻量级,可以很容易地集成到其他项目中。
-
跨平台:Pangolin库支持跨平台开发,可以在Windows、Linux和Mac OS等操作系统上使用。
-
多功能:Pangolin库提供了丰富的图形界面工具,包括窗口、OpenGL渲染器、3D相机、图像显示等,可以满足不同需求的开发者。
-
易于使用:Pangolin库的接口简单易用,可以快速搭建三维数据可视化和交互界面,同时还提供了丰富的示例程序和文档,方便开发者上手使用。
-
开源免费:Pangolin库是开源的,使用MIT许可证发布,可以免费使用、修改和分发。
Pangolin库下载:
https://github.com/stevenlovegrove/Pangolin/tree/1ec721d59ff6b799b9c24b8817f3b7ad2c929b83
百度网盘链接: https://pan.baidu.com/s/1W75vsmctFheksPfExzpU4A 提取码: rwg2
- cd Pagolin
- mkdir build
- cd build
- cmake ..
- make
Eigen库是一个开源的C++线性代数库,它提供了快速的有关矩阵的线性代数运算,还包括解方程等功能。但没有提供李代数的支持。
Sophus库提供一个较好的李群和李代数的库,它很好的支持了SO(3),so(3),SE(3)和se(3)。是基于Eigen基础上开发的,继承了Eigen库中的定义的各个类。
安装Eigen库:
sudo apt install libeigen3-devEigen 头文件路径默认安装在:
"/usr/include/eigen3/"注:Eigen是一个纯用头文件搭建起来的库,因此不需要链接库文件,只需要引入Eigen的头文件即可,后续的CMakeLists.txt 文件有体现到。
安装Sophus库:
可以通过GitHub下载最新的:(现在是1.22.10版本)
git clone https://github.com/strasdat/Sophus.git也可以通过百度网盘:(1.0.0)
链接: https://pan.baidu.com/s/1aCJzvDNRAfz_VEtH47DslA 提取码: xtak
安装:
- cd Sophus
- mkdir build
- cd build
- cmake ..
- make
若出现下面问题:
Could not find a package configuration file provided by "fmt" with any of
the following names:fmtConfig.cmake
fmt-config.cmake
则需要再安装一个fmt库:
- git clone https://github.com/fmtlib/fmt.git
- cd fmt
- mkdir build
- cd build
- cmake ..
- make
- sudo make install
使用Pangolin绘制轨迹
- // pangolin库
- #include <pangolin/pangolin.h>
- // Eigen库
- #include <Eigen/Core>
- #include <Eigen/Dense>
-
- #include <unistd.h>
-
- #include <string>
- #include <vector>
- #include <fstream>
-
- // 演示了如何画出一个预先存储的轨迹
-
- std::string trajectory_file = "./trajectory.txt"; // 轨迹文件
- // 格式为:time,tx,ty,tz,qx,qy,qz,qw
-
-
- void DrawTrajectory(std::vector<Eigen::Isometry3d,Eigen::aligned_allocator<Eigen::Isometry3d>> poses){
- // create pangolin window and plot the trajectory
- pangolin::CreateWindowAndBind("Trajectory Viewer",1024,768); // 创建窗口
-
- glEnable(GL_DEPTH_TEST); // 开启深度测试
- glEnable(GL_BLEND); // 开启混合渲染
- glBlendFunc(GL_SRC_ALPHA, GL_ONE_MINUS_SRC_ALPHA); // 设置混合函数
-
- pangolin::OpenGlRenderState s_cam(
- pangolin::ProjectionMatrix(1024, 768, 500, 500, 512, 389, 0.1, 1000), //投影矩阵
- // 屏幕的宽度、高度、相机的水平视角、垂直视角、相机在z轴上的位置、相机到屏幕的距离的最小值和最大值。
- pangolin::ModelViewLookAt(0, -0.1, -1.8, 0, 0, 0, 0.0, -1.0, 0.0) // 视图矩阵
- // 相机的位置、相机观察的目标点、相机的朝向向量
- );
-
- pangolin::View &d_cam = pangolin::CreateDisplay()
- .SetBounds(0.0, 1.0, 0.0, 1.0, -1024.0f / 768.0f)
- // 表示窗口在x轴和y轴上的起点和终点位置,以及窗口的宽高比,宽高比为负数,则实际上是768:1024
- .SetHandler(new pangolin::Handler3D(s_cam));
-
- while (pangolin::ShouldQuit() == false) {
- glClear(GL_COLOR_BUFFER_BIT | GL_DEPTH_BUFFER_BIT); // 清空颜色缓冲区和深度缓冲区
- d_cam.Activate(s_cam); // 激活显示窗口和渲染状态对象
- glClearColor(1.0f, 1.0f, 1.0f, 1.0f); // 设置清屏颜色
- glLineWidth(2); // 设置线宽
-
- for (size_t i = 0; i < poses.size(); i++) {
- // 画每个位姿的三个坐标轴
- Eigen::Vector3d Ow = poses[i].translation(); // 获取相机位姿矩阵中的平移部分,即相机的位置。
- Eigen::Vector3d Xw = poses[i] * (0.1 * Eigen::Vector3d(1, 0, 0)); // 获取x轴方向的单位向量,乘以0.1是为了调整坐标轴线段的长度
- Eigen::Vector3d Yw = poses[i] * (0.1 * Eigen::Vector3d(0, 1, 0)); // 获取y轴方向的单位向量
- Eigen::Vector3d Zw = poses[i] * (0.1 * Eigen::Vector3d(0, 0, 1)); // 获取z轴方向的单位向量
-
- glBegin(GL_LINES); // 开始绘制线段
- glColor3f(1.0, 0.0, 0.0); // 设置线段颜色 rgb
- // 绘制线段的两个端点
- glVertex3d(Ow[0], Ow[1], Ow[2]); // 原点的坐标
- glVertex3d(Xw[0], Xw[1], Xw[2]); // x轴方向的坐标 ----> 绘制x轴线段 为红色
-
- glColor3f(0.0, 1.0, 0.0);
- glVertex3d(Ow[0], Ow[1], Ow[2]);// 原点的坐标
- glVertex3d(Yw[0], Yw[1], Yw[2]);// y轴方向的坐标 ----> 绘制y轴线段 为绿色
-
- glColor3f(0.0, 0.0, 1.0);
- glVertex3d(Ow[0], Ow[1], Ow[2]);// 原点的坐标
- glVertex3d(Zw[0], Zw[1], Zw[2]);// z轴方向的坐标 ----> 绘制z轴线段 为蓝色
- glEnd(); // 结束绘制
- }
-
- // 画出连线
- for (size_t i = 0; i < poses.size(); i++) {
- glColor3f(0.0, 0.0, 0.0); // 黑色
- glBegin(GL_LINES); // 开始绘制线段
- auto p1 = poses[i], p2 = poses[i + 1]; // 获取相邻相机位姿
- glVertex3d(p1.translation()[0], p1.translation()[1], p1.translation()[2]); // 绘制线段的两个端点(相邻相机位姿的位置)
- glVertex3d(p2.translation()[0], p2.translation()[1], p2.translation()[2]);
- glEnd();
- }
- pangolin::FinishFrame(); // 结束当前帧的绘制
- usleep(5000); // sleep 5ms ,每5ms绘画一次
-
- }
- }
-
- int main(int argc,char** argv)
- {
- std::vector<Eigen::Isometry3d,Eigen::aligned_allocator<Eigen::Isometry3d>> poses;
-
- std::ifstream fin(trajectory_file);
- if(!fin){
- std::cout << "cannot find trajectory file at " << trajectory_file << std::endl;
- return -1;
- }
-
- while (!fin.eof()) {
- double time, tx, ty, tz, qx, qy, qz, qw;
- fin >> time >> tx >> ty >> tz >> qx >> qy >> qz >> qw;
- Eigen::Isometry3d Twr(Eigen::Quaterniond(qw, qx, qy, qz));
- Twr.pretranslate(Eigen::Vector3d(tx, ty, tz));
- poses.push_back(Twr);
- }
- std::cout << "read total " << poses.size() << " pose entries" << std::endl;
-
- // draw trajectory in pangolin
- DrawTrajectory(poses);
-
- return 0;
- }
CMakeLists.txt文件:
- # 声明要求的cmake最低版本
- cmake_minimum_required(VERSION 2.8)
-
- # 声明一个cmake工程
- project(Examples)
-
- # 查找系统的库路径
- find_package(Pangolin REQUIRED)
-
- # 添加头文件
- include_directories(
- "/usr/include/eigen3"
- ${Pangolin_INCLUDE_DIRS}
- )
-
- # 添加可执行程序
- add_executable(plotTrajectory plotTrajectory.cc)
- # 链接库文件
- target_link_libraries(plotTrajectory ${Pangolin_LIBRARIES})

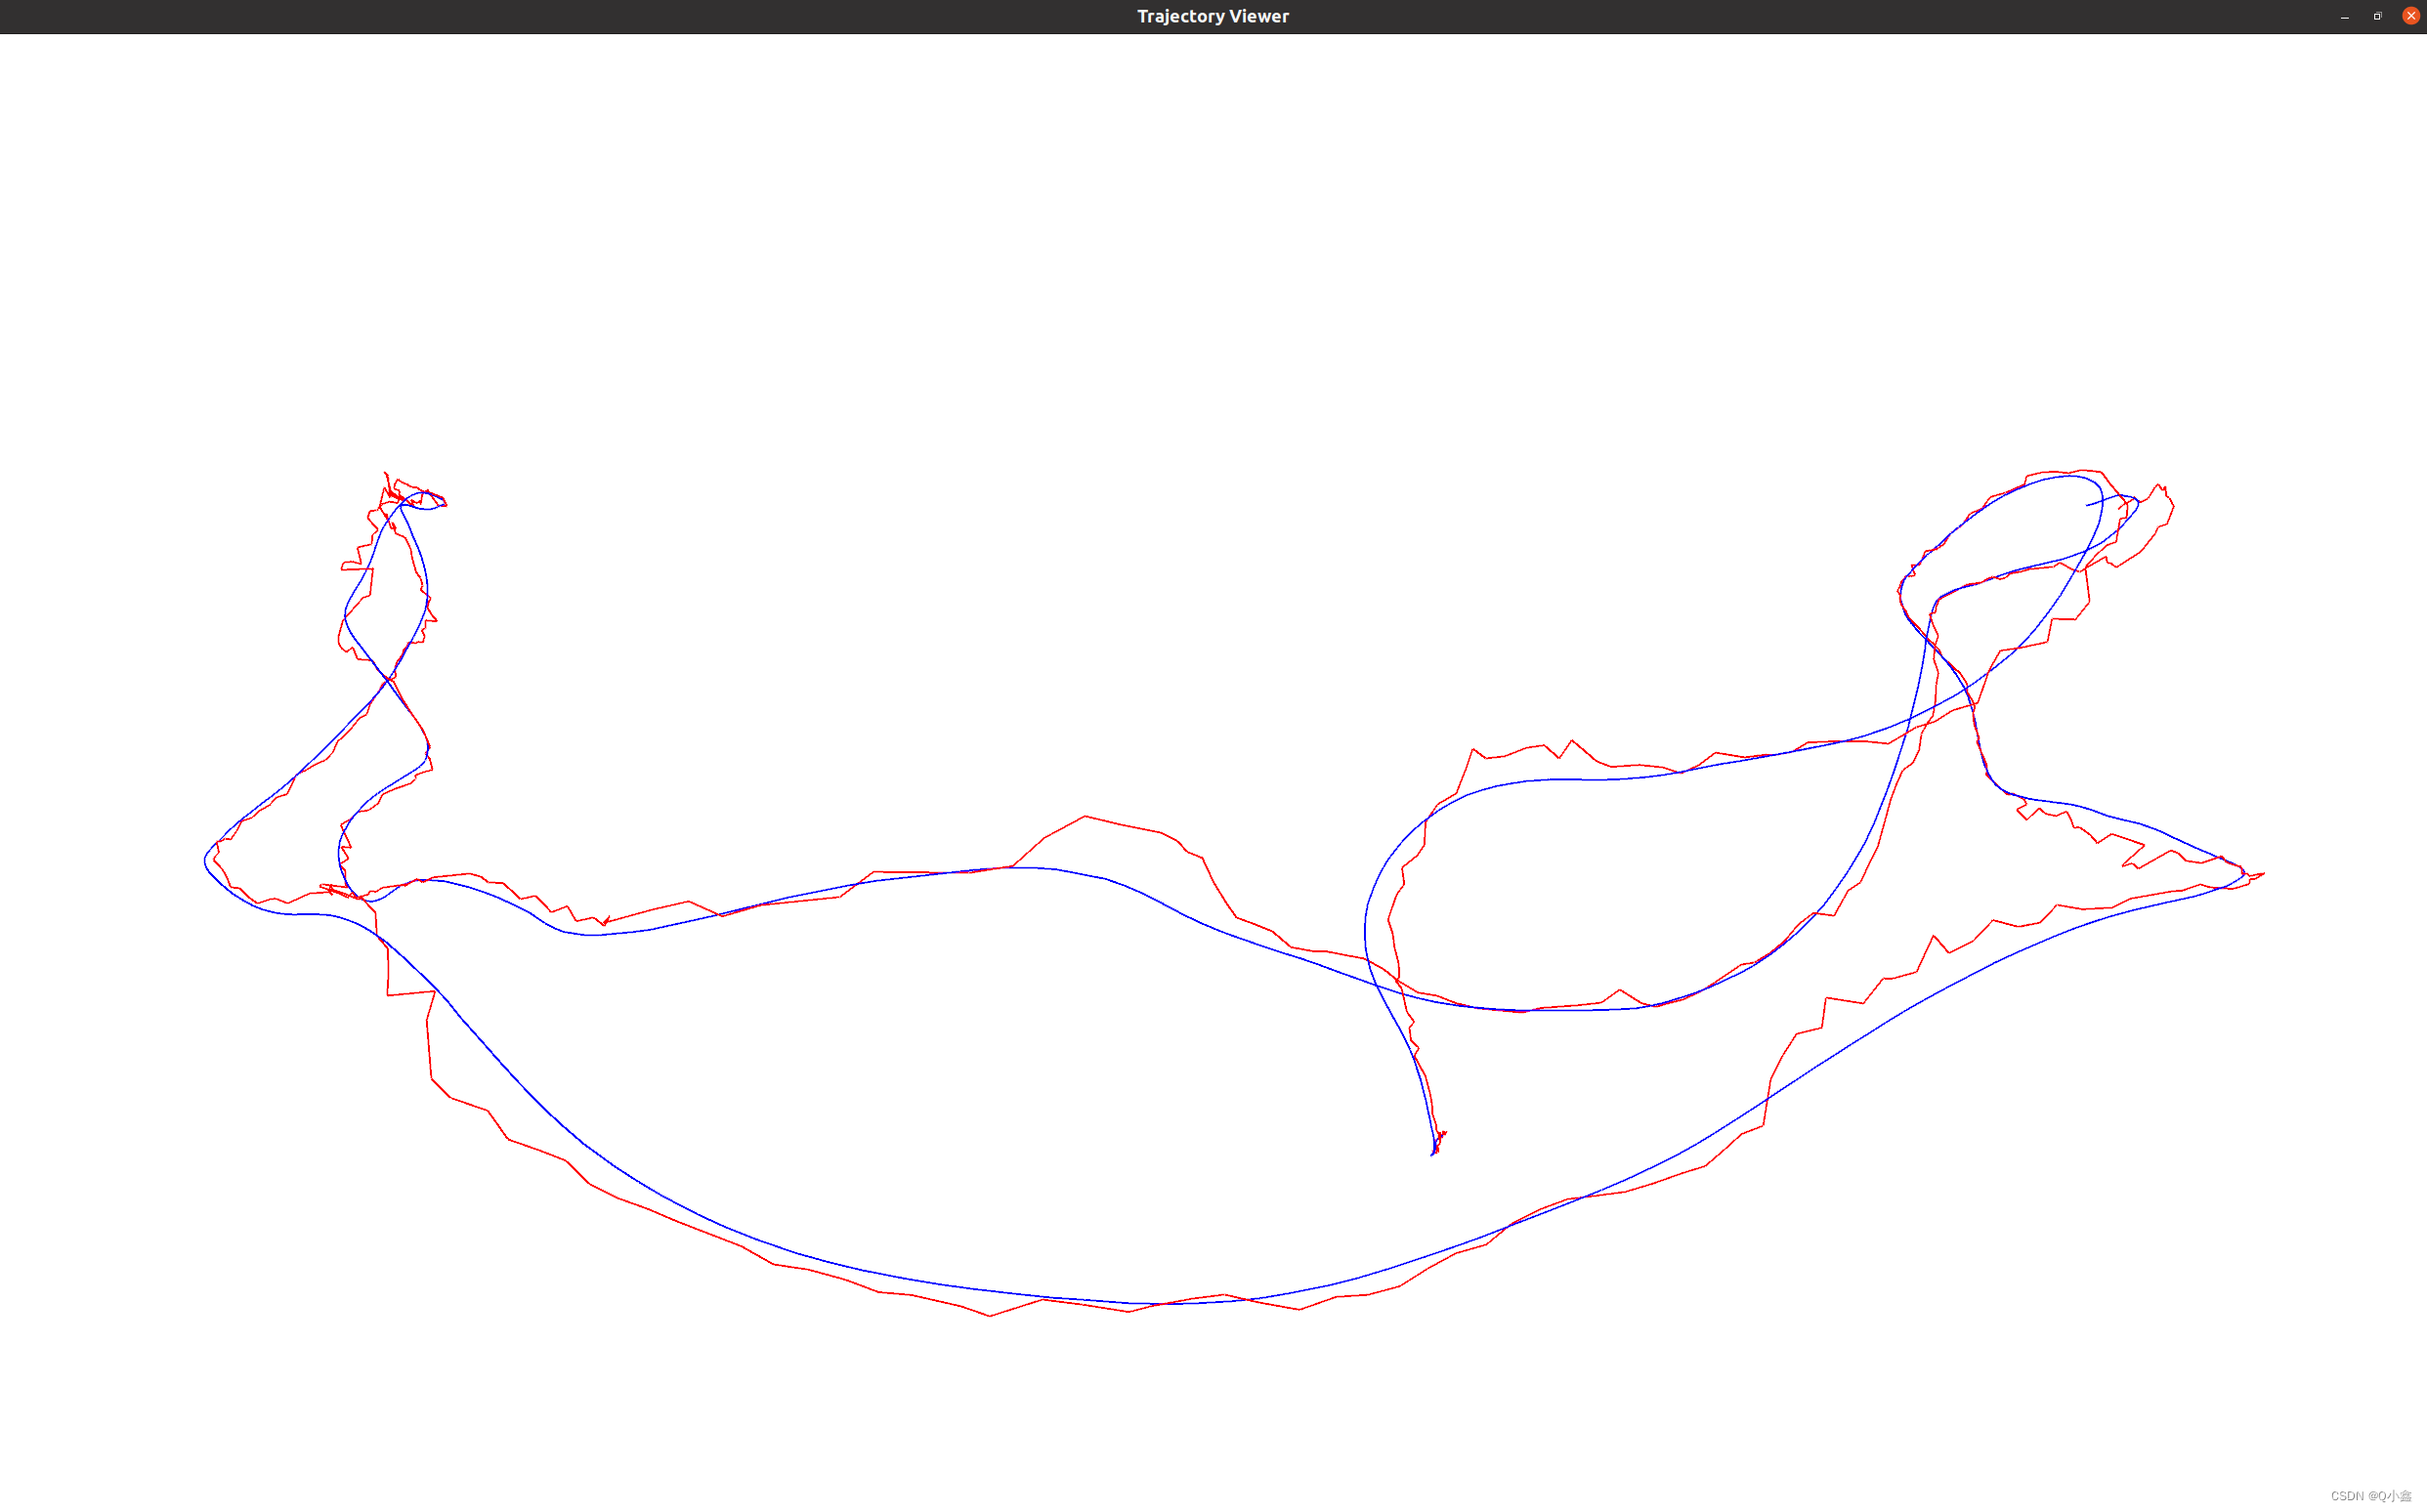
估计轨迹的误差
在实际工程当中,需要估计一个算法估计轨迹(estimate trajectory)和真实轨迹(groundtruth trajectory) 的差异来评价算法的精度。
绝对轨迹误差(Absolute Trajectory Error,ATE)

这实际上是每个位姿李代数的均方根误差(Root-Mean-Squared Error,RMSE)
- #include <iostream>
- #include <fstream>
- #include <unistd.h>
- #include <string>
- #include <vector>
-
- // Pangolin库
- #include <pangolin/pangolin.h>
-
- // Sophus库
- #include <sophus/se3.hpp>
-
- // 轨迹文件路径
- std::string groundtruth_file = "./groundtruth.txt";
- std::string estimated_file = "./estimated.txt";
-
- using TrajectoryType = std::vector<Sophus::SE3d,Eigen::aligned_allocator<Sophus::SE3d> >;
-
- // 读取轨迹txt文件
- TrajectoryType ReadTrajectory(const std::string &path) {
- std::ifstream fin(path);
- TrajectoryType trajectory;
- if (!fin) {
- std::cerr << "trajectory " << path << " not found." << std::endl;
- return trajectory;
- }
-
- while (!fin.eof()) {
- double time, tx, ty, tz, qx, qy, qz, qw;
- fin >> time >> tx >> ty >> tz >> qx >> qy >> qz >> qw;
- Sophus::SE3d p1(Eigen::Quaterniond(qw, qx, qy, qz), Eigen::Vector3d(tx, ty, tz));
- trajectory.push_back(p1);
- }
- return trajectory;
- }
-
- // 绘制两条轨迹(一个是真实轨迹,一个是估计轨迹)
- void DrawTrajectory(const TrajectoryType >, const TrajectoryType &esti){
- // create pangolin window and plot the trajectory
- pangolin::CreateWindowAndBind("Trajectory Viewer",1024,768); // 创建窗口
-
- glEnable(GL_DEPTH_TEST); // 开启深度测试
- glEnable(GL_BLEND); // 开启混合渲染
- glBlendFunc(GL_SRC_ALPHA, GL_ONE_MINUS_SRC_ALPHA); // 设置混合函数
-
- pangolin::OpenGlRenderState s_cam(
- pangolin::ProjectionMatrix(1024, 768, 500, 500, 512, 389, 0.1, 1000), //投影矩阵
- // 屏幕的宽度、高度、相机的水平视角、垂直视角、相机在z轴上的位置、相机到屏幕的距离的最小值和最大值。
- pangolin::ModelViewLookAt(0, -0.1, -1.8, 0, 0, 0, 0.0, -1.0, 0.0) // 视图矩阵
- // 相机的位置、相机观察的目标点、相机的朝向向量
- );
-
- pangolin::View &d_cam = pangolin::CreateDisplay()
- .SetBounds(0.0, 1.0, 0.0, 1.0, -1024.0f / 768.0f)
- // 表示窗口在x轴和y轴上的起点和终点位置,以及窗口的宽高比,宽高比为负数,则实际上是768:1024
- .SetHandler(new pangolin::Handler3D(s_cam));
-
- while (pangolin::ShouldQuit() == false) {
- glClear(GL_COLOR_BUFFER_BIT | GL_DEPTH_BUFFER_BIT); // 清空颜色缓冲区和深度缓冲区
- d_cam.Activate(s_cam); // 激活显示窗口和渲染状态对象
- glClearColor(1.0f, 1.0f, 1.0f, 1.0f); // 设置清屏颜色
- glLineWidth(2); // 设置线宽
-
- // 画出真实轨迹
- for (size_t i = 0; i < gt.size() - 1; i++) {
- glColor3f(0.0, 0.0, 1.0); // 蓝色
- glBegin(GL_LINES); // 开始绘制线段
- auto p1 = gt[i], p2 = gt[i + 1]; // 获取相邻相机位姿
- glVertex3d(p1.translation()[0], p1.translation()[1], p1.translation()[2]); // 绘制线段的两个端点(相邻相机位姿的位置)
- glVertex3d(p2.translation()[0], p2.translation()[1], p2.translation()[2]);
- glEnd();
- }
-
- // 画出估计轨迹
- for (size_t i = 0; i < esti.size() - 1; i++) {
- glColor3f(1.0, 0.0, 0.0); // 红色
- glBegin(GL_LINES); // 开始绘制线段
- auto p1 = esti[i], p2 = esti[i + 1]; // 获取相邻相机位姿
- glVertex3d(p1.translation()[0], p1.translation()[1], p1.translation()[2]); // 绘制线段的两个端点(相邻相机位姿的位置)
- glVertex3d(p2.translation()[0], p2.translation()[1], p2.translation()[2]);
- glEnd();
- }
-
- pangolin::FinishFrame(); // 结束当前帧的绘制
- usleep(5000); // sleep 5ms ,每5ms绘画一次
-
- }
- }
-
- int main(int argc,char** argv)
- {
- TrajectoryType groundtruth = ReadTrajectory(groundtruth_file);
- TrajectoryType estimated = ReadTrajectory(estimated_file);
-
- // assert(!groundtruth.empty() && !estimated.empty());
- // assert(groundtruth.size() == estimated.size());
-
- if(groundtruth.empty() && estimated.empty() && (groundtruth.size() == estimated.size())){
- // 判断读取的真实轨迹文件和估计轨迹文件是否为空,并且判断两个文件的数据大小是否一致
- std::cout << "groudtruth file or estimated_file is error!" << std::endl;
- return -1;
- }
-
- // 计算ATE(绝对轨迹误差)
- double ate = 0;
- for (size_t i = 0; i < estimated.size();i++){
- Sophus::SE3d p1 = estimated[i];
- Sophus::SE3d p2 = groundtruth[i];
- double error = (p2.inverse()*p1).log().norm();
- ate += (error*error);
- }
- ate = ate / double(estimated.size());
- ate = sqrt(ate);
-
- std::cout << "ATE: " << ate << std::endl;
-
- // 绘制两条轨迹
- DrawTrajectory(groundtruth,estimated);
-
- return 0;
- }
CMakeLists.txt文件:
- # 声明要求的cmake最低版本
- cmake_minimum_required(VERSION 3.16)
-
- # 声明一个cmake工程
- project(example)
-
- # 查找系统的库路径
- find_package(Sophus REQUIRED)
- find_package(Pangolin REQUIRED)
-
- # 添加头文件
- include_directories("/usr/include/eigen3")
-
- # 添加可执行程序
- add_executable(trajectoryError trajectoryError.cc)
-
- # 链接库文件
- target_link_libraries(trajectoryError
- Sophus::Sophus
- ${Pangolin_LIBRARIES}
- )