热门标签
热门文章
- 1Anaconda详细安装及配置教程(Windows)_windows anaconda
- 2微信小程序tabBar不显示的问题描述解决_微信小程序功能出问题如何解决
- 3分布式数据库Cassandra_cassandra数据库
- 4数据结构中线性表简述
- 5elasticsearch安装部署
- 6打造专业级ChatGPT风格聊天界面:SpringBoot与Vue实现动态打字机效果,附完整前后端源码_vue仿chatgpt打字机效果
- 7优雅地关闭 Kubernetes 集群的命令如下_停止k8s集群
- 8目标检测经典模型(二)--fast rcnn_用fast_r-cnn训练好的模型
- 9【HarmonyOS应用开发】ArkUI 开发框架-基础篇-第二部分(八)_arkui $r('app.media.'+
- 10uni-app/vue css实现商城分类页面选项卡选中时,右上左下是圆弧过度的选中样式_uniapp 做一个圆弧形菜单
当前位置: article > 正文
智能合约开发笔记-hardhat入门_hardhat 生成advanced项目
作者:Cpp五条 | 2024-02-27 04:37:32
赞
踩
hardhat 生成advanced项目
Hardhat是什么?
Hardhat是一个编译、部署、测试和调试以太坊应用的开发环境。
怎么安装?
先安装nodejs环境;
然后打开命令行执行以下命令, 在项目目录pj_220509下安装hardhat环境:
- mkdir pj_220509
-
- cd pj_220509
-
- npm install --save-dev hardhat
怎么创建项目?
pj_220509目录下, 执行命令 npx hardhat
- D:\01steven-disk\blockchain\workspace\pj220509>npx hardhat
- 888 888 888 888 888
- 888 888 888 888 888
- 888 888 888 888 888
- 8888888888 8888b. 888d888 .d88888 88888b. 8888b. 888888
- 888 888 "88b 888P" d88" 888 888 "88b "88b 888
- 888 888 .d888888 888 888 888 888 888 .d888888 888
- 888 888 888 888 888 Y88b 888 888 888 888 888 Y88b.
- 888 888 "Y888888 888 "Y88888 888 888 "Y888888 "Y888
- Welcome to Hardhat v2.9.3
- √ What do you want to do? · Create an advanced sample project
- √ Hardhat project root: · D:\01steven-disk\blockchain\workspace\pj220509
- √ Do you want to add a .gitignore? (Y/n) · y
- You need to install these dependencies to run the sample project:
- npm install --save-dev "hardhat@^2.9.3" "@nomiclabs/hardhat-waffle@^2.0.0" "ethereum-waffle@^3.0.0" "chai@^4.2.0" "@nomiclabs/hardhat-ethers@^2.0.0" "ethers@^5.0.0" "@nomiclabs/hardhat-etherscan@^3.0.0" "dotenv@^10.0.0" "eslint@^7.29.0" "eslint-config-prettier@^8.3.0" "eslint-config-standard@^16.0.3" "eslint-plugin-import@^2.23.4" "eslint-plugin-node@^11.1.0" "eslint-plugin-prettier@^3.4.0" "eslint-plugin-promise@^5.1.0" "hardhat-gas-reporter@^1.0.4" "prettier@^2.3.2" "prettier-plugin-solidity@^1.0.0-beta.13" "solhint@^3.3.6" "solidity-coverage@^0.7.16"
- Project created
- See the README.md file for some example tasks you can run.

然后按提示安装相关的nodejs包,如下;完成安装;
npm install --save-dev "hardhat@^2.9.3" "@nomiclabs/hardhat-waffle@^2.0.0" "ethereum-waffle@^3.0.0" "chai@^4.2.0" "@nomiclabs/hardhat-ethers@^2.0.0" "ethers@^5.0.0" "@nomiclabs/hardhat-etherscan@^3.0.0" "dotenv@^10.0.0" "eslint@^7.29.0" "eslint-config-prettier@^8.3.0" "eslint-config-standard@^16.0.3" "eslint-plugin-import@^2.23.4" "eslint-plugin-node@^11.1.0" "eslint-plugin-prettier@^3.4.0" "eslint-plugin-promise@^5.1.0" "hardhat-gas-reporter@^1.0.4" "prettier@^2.3.2" "prettier-plugin-solidity@^1.0.0-beta.13" "solhint@^3.3.6" "solidity-coverage@^0.7.16"装完了有啥用?怎么用?
装完后呀,可以在本地启动一个区块链本地环境节点,厉害吧;
装完后,可以编译你的智能合约,测试你的智能合约,部署你的智能合约到本地网、测试网、或主网。
还有提供一个控制台,即命令窗口,你可以用来和区块链、智能合约 “对话聊天”
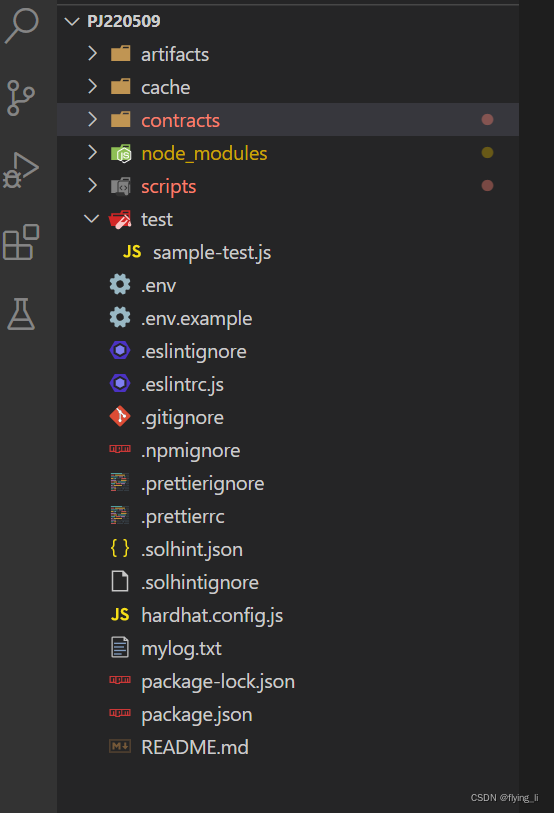
项目的目录结构长啥样?
下图即是项目的目录结构,主要目录简单说明下:
contracts 合约源文件目录
scripts 部署脚本、交互脚本存放目录
test 测试程序目录
artifacts 编译后生成的目录
hardhat.config.js 配置文件

怎么启动一个本地的区块链环境节点?
在pj_220509目录下,在命令行中执行
- D:\01steven-disk\blockchain\workspace\pj220509>npx hardhat node
- Started HTTP and WebSocket JSON-RPC server at http://127.0.0.1:8545/
怎么编译合约?
在pj_220509目录下,在命令行中执行: npx hardhat compile
将会编译项目中所有的合约;
怎么测试合约?
在pj_220509目录下,在命令行中执行: npx hardhat test
将会执行test目录所有的测试程序;
怎么部署合约到区块链网络上去?
在scripts目录下,写好部署脚本 deploy.js , 然后使用以下命令执行脚本进行部署,
--network localhost 参数用来指定连接到哪个网,这里是本地环境;(即上面用 npx hardhat node启动的本地环境)
- npx hardhat run --network localhost scripts/deploy.js
- Greeter deployed to: 0x5FbDB2315678afecb367f032d93F642f64180aa3
声明:本文内容由网友自发贡献,转载请注明出处:【wpsshop】
推荐阅读
相关标签


