- 1基于Java+SpringBoot+Vue前后端分离婚纱影楼管理系统设计和实现_springboot vue婚纱影楼系统
- 2保姆级教程-如何使用LLAMA2 大模型_如何调用 llama 的 api
- 3Jenkins忘记密码解决方案_jenkins忘记用户名和密码
- 4《Python编程:从入门到实践》第12章:武装飞船_python入门到实践中的 ship.bmg
- 52023美赛E题_2023美赛e题 背景 光污染是用来描述任何过度或不良的使用人工光。一些我们称之为
- 6MYSQL 8 UNDO 表空间 你了解多少
- 7vs code解决无法识别已安装python库的问题(Mac版)
- 8初始MyBatis,w字带你解MyBatis
- 9video 标签设置样式_video标签样式
- 10如何在论文中画出漂亮的插图?
使用 React 和 MUI 创建多选 Checkbox 树组件_react mui
赞
踩
在本篇博客中,我们将使用 React 和 MUI(Material-UI)库来创建一个多选 Checkbox 树组件。该组件可以用于展示树形结构的数据,并允许用户选择多个节点。
前提
在开始之前,确保你已经安装了以下依赖:
- React
- MUI(Material-UI)
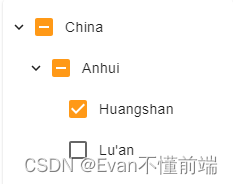
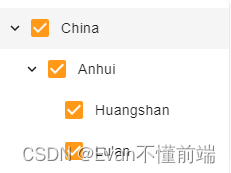
最终样式
非全选状态

全选状态

思路
我们的目标是创建一个多选 Checkbox 树组件,它可以接收树节点数据,并根据用户的选择返回选中的节点数据。为了实现这个目标,我们将按照以下步骤进行:
- 创建一个 React 函数组件
CheckBoxTree,它接收一个data属性作为树节点数据,并可选地接收一个handleCheckData属性作为回调函数,用于传递选中的节点数据。 - 在组件的状态中,创建一个
selected数组,用于存储选中的节点的 id。 - 实现一个
onCheck函数,用于处理节点 Checkbox 的点击事件。在该函数中,我们将根据用户的选择更新selected数组,并递归处理子节点的选中状态。 - 实现一个
renderTree函数,用于递归渲染树节点。在该函数中,我们将根据节点的选中状态和子节点的数量来渲染 Checkbox 和节点名称。 - 使用
TreeView和TreeItem组件来展示树形结构,并将树节点数据传递给renderTree函数进行渲染。
步骤
下面是实现多选 Checkbox 树组件的详细步骤:
1. 创建 React 函数组件
首先,我们需要创建一个 React 函数组件 CheckBoxTree,并定义它的属性和状态。代码如下:
import React from 'react';

interface CheckboxTreeState {
  selected: string[];
}

interface CheckBoxTreeProps {
  data: RegionType[]; //起码要包含childre,name和parentId,
  handleCheckData?: (data: string[]) => void;
}

export default function CheckBoxTree(props: CheckBoxTreeProps) {
  const { data, handleCheckData } = props;

  const [state, setState] = React.useState<CheckboxTreeState>({
    selected: []
  });

  // ...
}
- 1
- 2
- 3
- 4
- 5
- 6
- 7
- 8
- 9
- 10
- 11
- 12
- 13
- 14
- 15
- 16
- 17
- 18
- 19
- 20
2. 分割父节点
接下来,我们定义了splitNodeId函数,用于将节点id拆分为所有父节点id。它接受一个节点id字符串,格式为'1_2_3',并返回一个父节点id数组,例如['1_2', '1']。3表示的是当前节点。
/**
 * 拆分节点id为所有父节点id
 * @param id 节点id,格式为'1_2_3'
 * @returns 父节点id数组,如['1_2', '1']
 */
function splitNodeId(id: string) {
  // 按'_'分割节点id
  const path = id.split('_');

  // 累加生成父节点id
  return path.reduce((result: string[], current) => {
    // 拼接'_'和当前节点
    result.push(`${result.at(-1) ? result.at(-1) + '_' : ''}${current}`);
    return result;
  }, []);
}
- 1
- 2
- 3
- 4
- 5
- 6
- 7
- 8
- 9
- 10
- 11
- 12
- 13
- 14
- 15
- 16
3. 实现节点 Checkbox 的点击事件处理函数
接下来,我们需要实现一个 onCheck 函数,用于处理节点 Checkbox 的点击事件。在该函数中,我们将根据用户的选择更新 selected 数组,并递归处理子节点的选中状态。代码如下:
const onCheck = (
  event: React.ChangeEvent<HTMLInputElement>,
  node: RegionType,
  parentNodeName?: string
) => {
  const { checked } = event.target;
  const currentId = parentNodeName ?
    `${parentNodeName}_${node.id.id}` :
    node.id.id;
  const parentAreaName = splitNodeId(currentId);

  if (checked) {
    setState((prevState) => ({
      ...prevState,
      selected: Array.from(
        new Set([...prevState.selected, ...parentAreaName])
      )
    }));

    if (node.children && node.children.length > 0) {
      node.children.forEach((item) => {
        onCheck(event, item, currentId);
      });
    }
  } else if (!checked) {
    let tempState = { ...state };

    for (let index = parentAreaName.length - 1; index >= 0; index--) {
      const element = parentAreaName[index];

      if (
        tempState.selected.filter((id) => id.startsWith(`${element}_`))
          .length === 0
      ) {
        tempState = {
          ...tempState,
          selected: tempState.selected.filter((id) => id !== element)
        };
      }

      if (
        tempState.selected.filter((id) => id.startsWith(`${currentId}_`))
          .length !== 0
      ) {
        tempState = {
          ...tempState,
          selected: tempState.selected.filter(
            (id) =>
              !id.startsWith(`${currentId}_`) &&
              !id.startsWith(`${currentId}`)
          )
        };
      }
    }

    setState(tempState);
  }
};
- 1
- 2
- 3
- 4
- 5
- 6
- 7
- 8
- 9
- 10
- 11
- 12
- 13
- 14
- 15
- 16
- 17
- 18
- 19
- 20
- 21
- 22
- 23
- 24
- 25
- 26
- 27
- 28
- 29
- 30
- 31
- 32
- 33
- 34
- 35
- 36
- 37
- 38
- 39
- 40
- 41
- 42
- 43
- 44
- 45
- 46
- 47
- 48
- 49
- 50
- 51
- 52
- 53
- 54
- 55
- 56
- 57
- 58
4. 实现递归渲染树节点的函数
然后,我们需要实现一个 renderTree 函数,用于递归渲染树节点。在该函数中,我们将根据节点的选中状态和子节点的数量来渲染 Checkbox 和节点名称。代码如下:
const renderTree = (nodes: RegionType, parentNodeName?: string) => {
  let currentLength = 0;

  function getNodeLength(currentNodes: RegionType) {
    currentNodes.children?.forEach((node) => {
      currentLength++;
      if (node.children) {
        getNodeLength(node);
      }
    });
  }

  const currentId = parentNodeName ?
    `${parentNodeName}_${nodes.id.id}` :
    nodes.id.id;

  getNodeLength(nodes);

  return (
    <TreeItem
      key={nodes.id.id}
      nodeId={nodes.id.id}
      label={
        <FormControlLabel
          onClick={(e) => e.stopPropagation()}
          control={
            <Checkbox
              name={nodes.name}
              checked={
                nodes.children &&
                  nodes.children.length &&
                  state.selected.filter((id) =>
                    id.startsWith(`${currentId}_`)
                  ).length === currentLength ||
                state.selected.some((id) => id === currentId)
              }
              indeterminate={
                nodes.children &&
                nodes.children.length > 0 &&
                state.selected.some((id) => id.startsWith(`${currentId}_`)) &&
                state.selected.filter((id) => id.startsWith(`${currentId}_`))
                  .length < currentLength
              }
              onChange={(e) => {
                e.stopPropagation();
                onCheck(e, nodes, parentNodeName);
              }}
              onClick={(e) => e.stopPropagation()}
            />
          }
          label={nodes.name}
        />
      }
    >
      {Array.isArray(nodes.children) ?
        nodes.children.map((node) => renderTree(node, currentId)) :
        null}
    </TreeItem>
  );
};
- 1
- 2
- 3
- 4
- 5
- 6
- 7
- 8
- 9
- 10
- 11
- 12
- 13
- 14
- 15
- 16
- 17
- 18
- 19
- 20
- 21
- 22
- 23
- 24
- 25
- 26
- 27
- 28
- 29
- 30
- 31
- 32
- 33
- 34
- 35
- 36
- 37
- 38
- 39
- 40
- 41
- 42
- 43
- 44
- 45
- 46
- 47
- 48
- 49
- 50
- 51
- 52
- 53
- 54
- 55
- 56
- 57
- 58
- 59
- 60
5. 渲染树形结构
最后,我们使用 TreeView 和 TreeItem 组件来展示树形结构,并将树节点数据传递给 renderTree 函数进行渲染。代码如下:
return (
  <TreeView
    aria-label="checkbox tree"
    defaultCollapseIcon={<ExpandMore />}
    defaultExpandIcon={<ChevronRight />}
    disableSelection={true}
  >
    {data.map((item) => {
      return renderTree(item);
    })}
  </TreeView>
);
- 1
- 2
- 3
- 4
- 5
- 6
- 7
- 8
- 9
- 10
- 11
- 12
6. 完整代码
import { ChevronRight, ExpandMore } from '@mui/icons-material';
import { TreeItem, TreeView } from '@mui/lab';
import { Checkbox, FormControlLabel } from '@mui/material';
import React from 'react';

export interface RegionType {
  abbreviation: string;
  children?: RegionType[];
  createdTime: number;
  id: EntityData;
  level: number;
  name: string;
  nameCn: string;
  parentId: string;
  sort: number;
  status: boolean;
}

// 组件状态
int
erface CheckboxTreeState {
  // 选中节点id数组
  selected: string[];
}

// 组件属性
interface CheckBoxTreeProps {
  // 树节点数据
  data: RegionType[];
  // 向外传递选择框数据,
  handleCheckData?: (data: string[]) => void;
}

/**
 * 拆分节点id为所有父节点id
 * @param id 节点id,格式为'1_2_3'
 * @returns 父节点id数组,如['1_2', '1']
 */
function splitNodeId(id: string) {
  // 按'_'分割节点id
  const path = id.split('_');

  // 累加生成父节点id
  return path.reduce((result: string[], current) => {
    // 拼接'_'和当前节点
    result.push(`${result.at(-1) ? result.at(-1) + '_' : ''}${current}`);
    return result;
  }, []);
}

/**
 * 多选Checkbox树组件
 * @param props 组件属性
 * @returns JSX组件
 */
export default function CheckBoxTree(props: CheckBoxTreeProps) {
  // 获取树节点数据
  const { data, handleCheckData } = props;

  // 组件状态:选中节点id数组
  const [state, setState] = React.useState<CheckboxTreeState>({
    selected: []
  });

  /**
   * 点击节点Checkbox触发
   * @param event 事件对象
   * @param node 节点对象
   * @param parentNodeName 父节点名称
   */
  const onCheck = (
    event: React.ChangeEvent<HTMLInputElement>,
    node: RegionType,
    parentNodeName?: string
  ) => {
    // 获取Checkbox选中状态
    const { checked } = event.target;

    // 当前节点id
    const currentId = parentNodeName ?
      `${parentNodeName}_${node.id.id}` :
      node.id.id;

    // 父节点id数组
    const parentAreaName = splitNodeId(currentId);

    // 选中状态:选中当前节点和父节点
    if (checked) {
      setState((prevState) => ({
        ...prevState,
        //使用Set对selected数组去重
        selected: Array.from(
          new Set([...prevState.selected, ...parentAreaName])
        )
      }));

      // 若有子节点,递归选中
      if (node.children && node.children.length > 0) {
        node.children.forEach((item) => {
          onCheck(event, item, currentId);
        });
      }
    } else if (!checked) {
      // 临时state
      let tempState = { ...state };

      // 逆序遍历,进行选中状态更新
      for (let index = parentAreaName.length - 1; index >= 0; index--) {
        const element = parentAreaName[index];

        // 若父区域已无选中节点,取消选中父区域
        if (
          tempState.selected.filter((id) => id.startsWith(`${element}_`))
            .length === 0
        ) {
          tempState = {
            ...tempState,
            selected: tempState.selected.filter((id) => id !== element)
          };
        }

        // 取消选中当前区域
        if (
          tempState.selected.filter((id) => id.startsWith(`${currentId}_`))
            .length !== 0
        ) {
          tempState = {
            ...tempState,
            selected: tempState.selected.filter(
              (id) =>
                !id.startsWith(`${currentId}_`) &&
                !id.startsWith(`${currentId}`)
            )
          };
        }
      }
      // 更新state
      setState(tempState);
    }
  };

  /**
   * 递归渲染树节点
   * @param nodes 树节点数组
   * @param parentNodeName 父节点名称
   * @returns JSX组件
   */
  const renderTree = (nodes: RegionType, parentNodeName?: string) => {
    // 子节点总数
    let currentLength = 0;

    /**
     * 获取子节点总数
     * @param currentNodes 当前节点
     */
    function getNodeLength(currentNodes: RegionType) {
      currentNodes.children?.forEach((node) => {
        currentLength++;
        if (node.children) {
          getNodeLength(node);
        }
      });
    }

    // 当前节点id
    const currentId = parentNodeName ?
      `${parentNodeName}_${nodes.id.id}` :
      nodes.id.id;

    // 获取当前节点子节点总数
    getNodeLength(nodes);

    return (
      <TreeItem
        key={nodes.id.id}
        nodeId={nodes.id.id}
        sx={{
          '.MuiTreeItem-label': {
            'maxWidth': '100%',
            'overflow': 'hidden',
            'wordBreak': 'break-all',
            '.MuiFormControlLabel-label': {
              pt: '2px'
            }
          }
        }}
        label={
          <FormControlLabel
            onClick={(e) => e.stopPropagation()}
            sx={{ alignItems: 'flex-start', mt: 1 }}
            control={
              <Checkbox
                name={nodes.name}
                sx={{ pt: 0 }}
                checked={
                  // 若有子节点,判断子节点是否全部选中
                  // 或节点自身是否选中
                  nodes.children &&
                    nodes.children.length &&
                    state.selected.filter((id) =>
                      id.startsWith(`${currentId}_`)
                    ).length === currentLength ||
                  state.selected.some((id) => id === currentId)
                }
                indeterminate={
                  // 子节点存在选中与非选中状态
                  nodes.children &&
                  nodes.children.length > 0 &&
                  state.selected.some((id) => id.startsWith(`${currentId}_`)) &&
                  state.selected.filter((id) => id.startsWith(`${currentId}_`))
                    .length < currentLength
                }
                onChange={(e) => {
                  e.stopPropagation();
                  onCheck(e, nodes, parentNodeName);
                }}
                onClick={(e) => e.stopPropagation()}
              />
            }
            label={nodes.name}
          />
        }
      >
        {Array.isArray(nodes.children) ?
          nodes.children.map((node) => renderTree(node, currentId)) :
          null}
      </TreeItem>
    );
  };

  /**
   * 组件加载时触发,获取去重后的多选框id列表
   */
  React.useEffect(() => {
    // state.selected拆分数组并合并,返回成一个数组,如果需要去重后的值,可以使用Array.from(new set)
    const checkBoxList = state.selected.flatMap((item) => item.split('_'));
    // 因为是通过parent id来绑定子元素,所以下面的元素是只返回最后的子元素
    const checkTransferList = checkBoxList.filter(
      (value) => checkBoxList.indexOf(value) === checkBoxList.lastIndexOf(value)
    );

    // 从多选值数组中生成集合Set,再使用Array.from转换为数组
    if (handleCheckData) {
      handleCheckData(checkTransferList);
    }
  }, [state]);

  React.useEffect(() => {
    if (data.length) {
      setState({ selected: [] });
    }
  }, [data]);

  return (
    <TreeView
      aria-label="checkbox tree"
      defaultCollapseIcon={<ExpandMore />}
      defaultExpandIcon={<ChevronRight />}
      disableSelection={true}
    >
      {data.map((item) => {
        return renderTree(item);
      })}
    </TreeView>
  );
}
- 1
- 2
- 3
- 4
- 5
- 6
- 7
- 8
- 9
- 10
- 11
- 12
- 13
- 14
- 15
- 16
- 17
- 18
- 19
- 20
- 21
- 22
- 23
- 24
- 25
- 26
- 27
- 28
- 29
- 30
- 31
- 32
- 33
- 34
- 35
- 36
- 37
- 38
- 39
- 40
- 41
- 42
- 43
- 44
- 45
- 46
- 47
- 48
- 49
- 50
- 51
- 52
- 53
- 54
- 55
- 56
- 57
- 58
- 59
- 60
- 61
- 62
- 63
- 64
- 65
- 66
- 67
- 68
- 69
- 70
- 71
- 72
- 73
- 74
- 75
- 76
- 77
- 78
- 79
- 80
- 81
- 82
- 83
- 84
- 85
- 86
- 87
- 88
- 89
- 90
- 91
- 92
- 93
- 94
- 95
- 96
- 97
- 98
- 99
- 100
- 101
- 102
- 103
- 104
- 105
- 106
- 107
- 108
- 109
- 110
- 111
- 112
- 113
- 114
- 115
- 116
- 117
- 118
- 119
- 120
- 121
- 122
- 123
- 124
- 125
- 126
- 127
- 128
- 129
- 130
- 131
- 132
- 133
- 134
- 135
- 136
- 137
- 138
- 139
- 140
- 141
- 142
- 143
- 144
- 145
- 146
- 147
- 148
- 149
- 150
- 151
- 152
- 153
- 154
- 155
- 156
- 157
- 158
- 159
- 160
- 161
- 162
- 163
- 164
- 165
- 166
- 167
- 168
- 169
- 170
- 171
- 172
- 173
- 174
- 175
- 176
- 177
- 178
- 179
- 180
- 181
- 182
- 183
- 184
- 185
- 186
- 187
- 188
- 189
- 190
- 191
- 192
- 193
- 194
- 195
- 196
- 197
- 198
- 199
- 200
- 201
- 202
- 203
- 204
- 205
- 206
- 207
- 208
- 209
- 210
- 211
- 212
- 213
- 214
- 215
- 216
- 217
- 218
- 219
- 220
- 221
- 222
- 223
- 224
- 225
- 226
- 227
- 228
- 229
- 230
- 231
- 232
- 233
- 234
- 235
- 236
- 237
- 238
- 239
- 240
- 241
- 242
- 243
- 244
- 245
- 246
- 247
- 248
- 249
- 250
- 251
- 252
- 253
- 254
- 255
- 256
- 257
- 258
- 259
- 260
- 261
- 262
- 263
- 264
- 265
- 266
- 267
总结
通过以上步骤,我们成功地创建了一个多选 Checkbox 树组件。该组件可以接收树节点数据,并根据用户的选择返回选中的节点数据。我们使用了 React 和 MUI(Material-UI)库来实现这个功能,并按照前提、思路和步骤的顺序进行了解析和实现。
希望本篇博客对你理解如何使用 React 和 MUI 创建多选 Checkbox 树组件有所帮助!如果你有任何问题或建议,请随时留言。谢谢阅读!


