热门标签
热门文章
- 1RK3568 OpenHarmony3.2 音频Audio之MIC调试_openharmony 麦克风
- 2LangChain - 01 - 快速开始_to install langchain-community run `pip install -u
- 3Python缺失值处理_python连续变量缺失值
- 4nn.MultiheadAttention详解 -- forward()中维度、计算方式_multi_head_attention_forward
- 5在pycharm中导入pytorch项目 | 10-10-2020_pycharm导入pytorch没有python.exe
- 6零基础HTML入门教程(21)——无序列表_web无序列表代码
- 7自然语言处理 - Language model和RNN_rnn language model
- 8深度学习-GRU_深度学习中的gru
- 9Android Jetpack:简化开发、提高Android App质量的利器
- 10个人记录jenkins编译ios过程 xcode是9.4.1_jenkins xcodebuild' requires xcode, but active dev
当前位置: article > 正文
安装NLP所需环境 pip install -r deeplearning_requirement.txt_aiohttp==3.8.4
作者:Cpp五条 | 2024-04-05 11:18:13
赞
踩
aiohttp==3.8.4
先展示我要安装的环境文件,文件名为deeplearning_requirement.txt
absl-py==0.15.0
aiohttp==3.8.1
aiosignal==1.2.0
astunparse==1.6.3
async-timeout==4.0.2
asynctest==0.13.0
attrs==21.4.0
boto3==1.20.30
botocore==1.23.30
cachetools==4.2.4
certifi==2021.10.8
charset-normalizer==2.0.10
click==8.0.3
cycler==0.11.0
datasets==1.17.0
dill==0.3.4
fasttext @ file:///root/fastText
filelock==3.4.2
flatbuffers==1.12
fonttools==4.28.5
frozenlist==1.2.0
fsspec==2021.11.1
gast==0.3.3
google-auth==2.3.3
google-auth-oauthlib==0.4.6
google-pasta==0.2.0
google-trans-new==1.1.9
grpcio==1.32.0
h5py==2.10.0
huggingface-hub==0.2.1
idna==3.3
importlib-metadata==4.10.0
jieba==0.42.1
jmespath==0.10.0
joblib==1.1.0
Keras-Preprocessing==1.1.2
kiwisolver==1.3.2
Markdown==3.3.6
matplotlib==3.5.1
mkl-fft==1.3.1
mkl-random @ file:///tmp/build/80754af9/mkl_random_1626179032232/work
mkl-service==2.4.0
multidict==5.2.0
multiprocess==0.70.12.2
numpy==1.19.5
oauthlib==3.1.1
olefile==0.46
opt-einsum==3.3.0
packaging==21.3
pandas==1.3.5
Pillow==8.4.0
protobuf==3.19.1
pyarrow==6.0.1
pyasn1==0.4.8
pyasn1-modules==0.2.8
pybind11==2.9.0
pyparsing==3.0.6
python-dateutil==2.8.2
pytz==2021.3
PyYAML==6.0
regex==2021.11.10
requests==2.27.1
requests-oauthlib==1.3.0
rsa==4.8
s3transfer==0.5.0
sacremoses==0.0.46
scipy==1.7.3
seaborn==0.11.2
sentencepiece==0.1.96
six==1.15.0
tensorboard==2.7.0
tensorboard-data-server==0.6.1
tensorboard-plugin-wit==1.8.1
tensorflow==2.4.0
tensorflow-estimator==2.4.0
termcolor==1.1.0
tokenizers==0.10.3
torch==1.10.1
torchaudio==0.10.1
torchsummary==1.5.1
torchvision==0.11.2
tqdm==4.62.3
transformers @ file:///root/nlp_base/codeNLP/05fasttext%E5%8F%8A%E8%BF%81%E7%A7%BB%E5%AD%A6%E4%B9%A0/transformers
typing-extensions==3.7.4.3
urllib3==1.26.7
Werkzeug==2.0.2
wordcloud==1.8.1
wrapt==1.12.1
xxhash==2.0.2
yarl==1.7.2
zipp==3.7.0
- 1
- 2
- 3
- 4
- 5
- 6
- 7
- 8
- 9
- 10
- 11
- 12
- 13
- 14
- 15
- 16
- 17
- 18
- 19
- 20
- 21
- 22
- 23
- 24
- 25
- 26
- 27
- 28
- 29
- 30
- 31
- 32
- 33
- 34
- 35
- 36
- 37
- 38
- 39
- 40
- 41
- 42
- 43
- 44
- 45
- 46
- 47
- 48
- 49
- 50
- 51
- 52
- 53
- 54
- 55
- 56
- 57
- 58
- 59
- 60
- 61
- 62
- 63
- 64
- 65
- 66
- 67
- 68
- 69
- 70
- 71
- 72
- 73
- 74
- 75
- 76
- 77
- 78
- 79
- 80
- 81
- 82
- 83
- 84
- 85
- 86
- 87
- 88
- 89
- 90
- 91
1.用Anaconda创建虚拟环境,命名为NLP_learn
conda create -n NLP_learn python==3.7.2
- 1
报错:CondaHTTPError: HTTP None None for url

再次之前我已经是改为清华源了,结果还是报错
解决办法:改镜像源 https -->http
C:\Users\19820.condarc
channels:
  - defaults
show_channel_urls: true
default_channels:
  - http://mirrors.tuna.tsinghua.edu.cn/anaconda/pkgs/main
  - http://mirrors.tuna.tsinghua.edu.cn/anaconda/pkgs/free
  - http://mirrors.tuna.tsinghua.edu.cn/anaconda/pkgs/r
custom_channels:
  conda-forge: http://mirrors.tuna.tsinghua.edu.cn/anaconda/cloud
  msys2: http://mirrors.tuna.tsinghua.edu.cn/anaconda/cloud
  bioconda: http://mirrors.tuna.tsinghua.edu.cn/anaconda/cloud
  menpo: http://mirrors.tuna.tsinghua.edu.cn/anaconda/cloud
  pytorch: http://mirrors.tuna.tsinghua.edu.cn/anaconda/cloud
  simpleitk: http://mirrors.tuna.tsinghua.edu.cn/anaconda/cloud
- 1
- 2
- 3
- 4
- 5
- 6
- 7
- 8
- 9
- 10
- 11
- 12
- 13
- 14
然后重新运行
conda create -n NLP_learn python==3.7.2
- 1
这时候就创建成功了,查看是否有了NLP_learn这个环境
conda env list
- 1

2.在NLP_learn环境下安装
2.1首先把deeplearning_requirements.txt放到“C:\Users\你的用户名”的路径下:

2.2激活虚拟环境
activate NLP_learn
- 1
2.3运行安装命令
pip install -i https://pypi.tuna.tsinghua.edu.cn/simple/ -r deeplearning_requirement.txt
- 1

这里又报错了
解决办法:手动删除文件中的下载链接,删除后的效果如下:
absl-py==0.15.0
aiohttp==3.8.1
aiosignal==1.2.0
astunparse==1.6.3
async-timeout==4.0.2
asynctest==0.13.0
attrs==21.4.0
boto3==1.20.30
botocore==1.23.30
cachetools==4.2.4
certifi==2021.10.8
charset-normalizer==2.0.10
click==8.0.3
cycler==0.11.0
datasets==1.17.0
dill==0.3.4
fasttext
filelock==3.4.2
flatbuffers==1.12
fonttools==4.28.5
frozenlist==1.2.0
fsspec==2021.11.1
gast==0.3.3
google-auth==2.3.3
google-auth-oauthlib==0.4.6
google-pasta==0.2.0
google-trans-new==1.1.9
grpcio==1.32.0
h5py==2.10.0
huggingface-hub==0.2.1
idna==3.3
importlib-metadata==4.10.0
jieba==0.42.1
jmespath==0.10.0
joblib==1.1.0
Keras-Preprocessing==1.1.2
kiwisolver==1.3.2
Markdown==3.3.6
matplotlib==3.5.1
mkl-fft==1.3.1
mkl-random
mkl-service==2.4.0
multidict==5.2.0
multiprocess==0.70.12.2
numpy==1.19.5
oauthlib==3.1.1
olefile==0.46
opt-einsum==3.3.0
packaging==21.3
pandas==1.3.5
Pillow==8.4.0
protobuf==3.19.1
pyarrow==6.0.1
pyasn1==0.4.8
pyasn1-modules==0.2.8
pybind11==2.9.0
pyparsing==3.0.6
python-dateutil==2.8.2
pytz==2021.3
PyYAML==6.0
regex==2021.11.10
requests==2.27.1
requests-oauthlib==1.3.0
rsa==4.8
s3transfer==0.5.0
sacremoses==0.0.46
scipy==1.7.3
seaborn==0.11.2
sentencepiece==0.1.96
six==1.15.0
tensorboard==2.7.0
tensorboard-data-server==0.6.1
tensorboard-plugin-wit==1.8.1
tensorflow==2.4.0
tensorflow-estimator==2.4.0
termcolor==1.1.0
tokenizers==0.10.3
torch==1.10.1
torchaudio==0.10.1
torchsummary==1.5.1
torchvision==0.11.2
tqdm==4.62.3
transformers
typing-extensions==3.7.4.3
urllib3==1.26.7
Werkzeug==2.0.2
wordcloud==1.8.1
wrapt==1.12.1
xxhash==2.0.2
yarl==1.7.2
zipp==3.7.0
- 1
- 2
- 3
- 4
- 5
- 6
- 7
- 8
- 9
- 10
- 11
- 12
- 13
- 14
- 15
- 16
- 17
- 18
- 19
- 20
- 21
- 22
- 23
- 24
- 25
- 26
- 27
- 28
- 29
- 30
- 31
- 32
- 33
- 34
- 35
- 36
- 37
- 38
- 39
- 40
- 41
- 42
- 43
- 44
- 45
- 46
- 47
- 48
- 49
- 50
- 51
- 52
- 53
- 54
- 55
- 56
- 57
- 58
- 59
- 60
- 61
- 62
- 63
- 64
- 65
- 66
- 67
- 68
- 69
- 70
- 71
- 72
- 73
- 74
- 75
- 76
- 77
- 78
- 79
- 80
- 81
- 82
- 83
- 84
- 85
- 86
- 87
- 88
- 89
- 90
- 91
- 92
重新运行
pip install -i https://pypi.tuna.tsinghua.edu.cn/simple/ -r deeplearning_requirement.txt
- 1
这里可以安装了,为了避免下载速度慢,用的清华源
这里说一下安装时怎么使用清华源:
安装总包时:
conda install --yes --file requirements.txt
- 1
或者
pip install -i https://pypi.doubanio.com/simple/ -r requirements.txt
- 1
安装单个包时:
pip --default-timeout=100 install tensorflow==2.0.0 -i https://pypi.tuna.tsinghua.edu.cn/simple
- 1
这时命令已经可以正常运行了,不过很不幸又出现了错误:

这里的意思就是发生了版本冲突,不同的包对numpy要求的版本不一样,第一行写的现在安装的是1.19.5,下面写的是不同的包对numpy版本的需求,简直头秃,不知道找哪个版本合适了,他还给了解决方法和链接,说可以试试不指定numpy的版本,不过我试了一下也不行,最后我是单独安装的这些冲突的包,不指定版本,让它自己匹配,例如下面这样:
pip install h5py -i https://pypi.tuna.tsinghua.edu.cn/simple
- 1
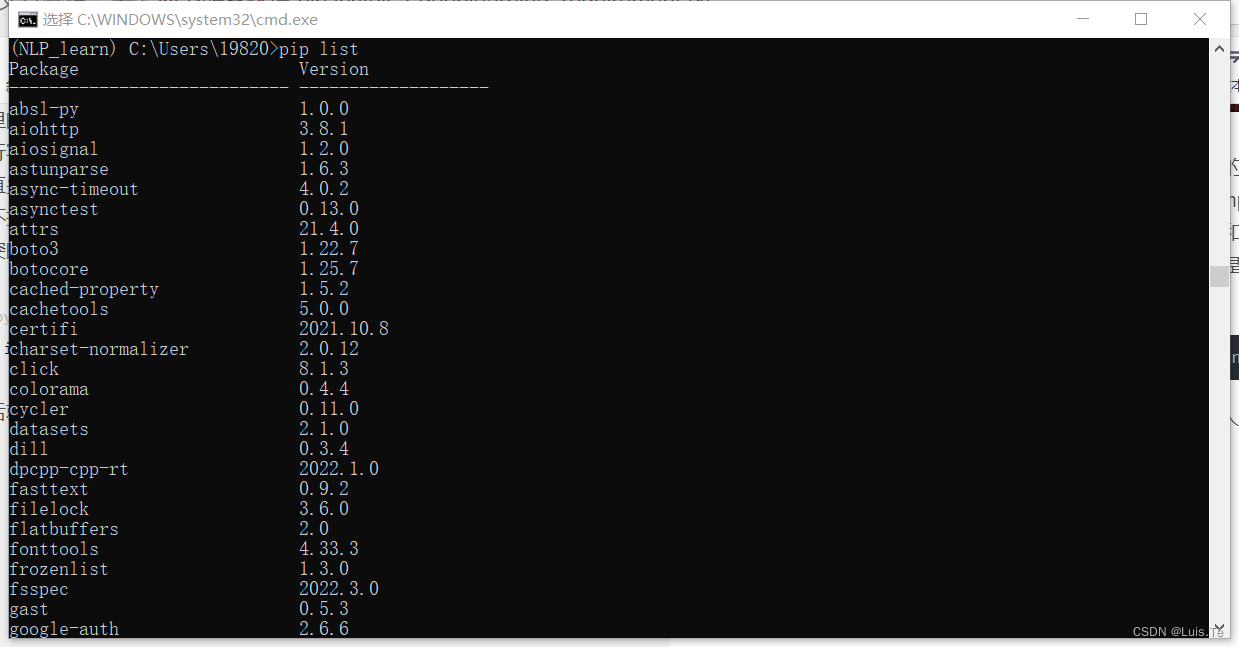
之后就是用pip list命令看一下现在环境中还缺什么包,逐个安装一下
3.结果展示

大功告成了!!!
声明:本文内容由网友自发贡献,不代表【wpsshop博客】立场,版权归原作者所有,本站不承担相应法律责任。如您发现有侵权的内容,请联系我们。转载请注明出处:https://www.wpsshop.cn/w/Cpp五条/article/detail/365230
推荐阅读
相关标签


