热门标签
热门文章
- 1SyntaxError: Non-UTF-8 code starting with_scanning of 172.16.42.198:4433 was aborted (networ
- 2浅谈智能物联网家居平台安全隐患_智能家居行业网络安全(2)
- 3适合上班族做的副业,四个下班后可以操作的副业项目_下班后适合做的副业
- 4【1. MySql基础】_缓存,比如表、记录、权限等等
- 5第14章 用BERT实现中文语句分类_14.1 背景说明 本章用到预训练模型库transformers为自然语言理解(nlu)和自然语言
- 6最全最详细ChatGPT预设词Prompt教程_gpt模拟终端prompt
- 7读取CSV文件并将值存储到数组中_c++ 将csv转成数组
- 82021年第十二届蓝桥杯省赛C/C++B组题解 试题 E: 路径_小蓝的旅行计划 最短路经
- 9Leecode刷题总结
- 10【NLP】实体识别BERT-MRC论文阅读笔记
当前位置: article > 正文
SpringBoot对接企业微信群机器人_springboot 机器人 对接微信群
作者:Gausst松鼠会 | 2024-05-06 05:39:47
赞
踩
springboot 机器人 对接微信群
注意注意!
微信群必须是内部群 外部群添加不了群机器人

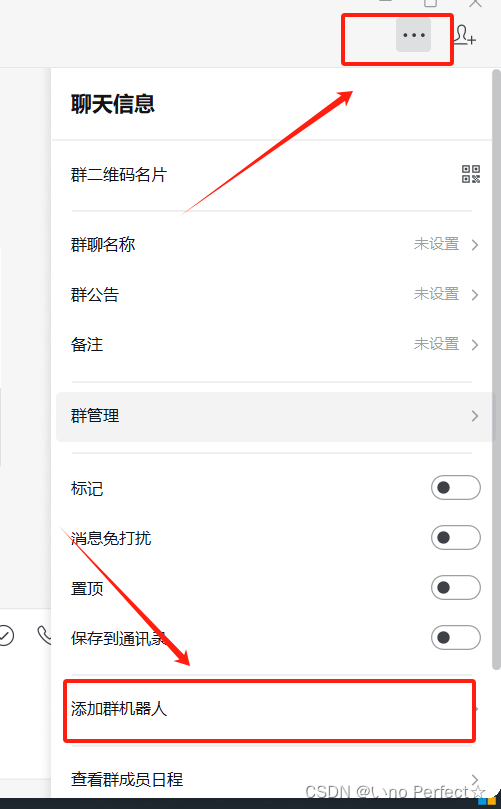
第一步:添加群机器人

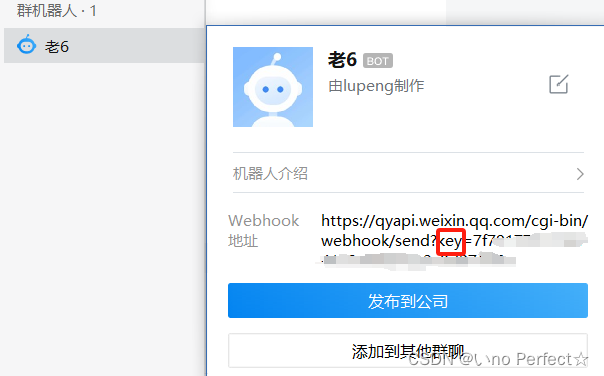
第二步: 获取到机器人的key值

第三步:创建springboot项目 并导入对应的依赖
- <dependency>
- <groupId>com.dtflys.forest</groupId>
- <artifactId>forest-spring-boot-starter</artifactId>
- <version>1.5.14</version>
- </dependency>
第四步:配置yml文件
第五步 配置url的地址 并发送消息
- @Component
- public interface WechatNoticeClient {
- @Post(
- url = "https://qyapi.weixin.qq.com/cgi-bin/webhook/send?key={key}",
- headers = {
- "Accept-Charset: utf-8",
- "Content-Type: application/json"
- },
- dataType = "json")
- void sendWechatMsg(@Var("key") String key, @JSONBody Map<String, Object> body);
-
-
- }
第六步:编写controller(发送请求)
controller
- @RestController
- public class RebotController {
-
- @Autowired
- MyNoticeUtil myNoticeUtil;
-
- @GetMapping("/doTest/{testType}")
- public String doTest(@PathVariable("testType") String testType){
- if (testType.equals("1")){
- myNoticeUtil.sendTextMsg();
- }
- if (testType.equals("2")){
- myNoticeUtil.sendMarkDownTextMsg();
- }
- if (testType.equals("3")){
- myNoticeUtil.sendImageMsg();
- }
- if (testType.equals("4")){
- myNoticeUtil.sendImageAndTxtMsg();
- }
- return "success";
- }
-
- }

第七步:发送具体的消息
- @Component
- public class MyNoticeUtil {
- @Autowired
- private WechatNoticeClient wechatNoticeClient;
- @Value("${wechat.notice.key}")
- private String NOTICE_KEY;
-
- /**
- * 发送文本消息
- */
- public void sendTextMsg() {
- Map<String, Object> sendMap = new HashMap<>();
- //设置消息类型 txt文本
- sendMap.put("msgtype", "text");
- Map<String, String> contentMap = new HashMap<>();
- contentMap.put("content", "你好,lupeng的机器人");
- sendMap.put("text", contentMap);
- wechatNoticeClient.sendWechatMsg(NOTICE_KEY, sendMap);
- }
-
- /**
- * 发送markdown文本消息
- */
- public void sendMarkDownTextMsg() {
- Map<String, Object> sendMap = new HashMap<>();
- //设置消息类型 markdown文本
- sendMap.put("msgtype", "markdown");
- Map<String, String> contentMap = new HashMap<>();
- contentMap.put("content", "支付宝到账<font color=\\\"warning\\\">100元</font>,开心起来吧。\\\n" +
- " >付款方:<font color=\\\"comment\\\">空气</font>");
- sendMap.put("markdown", contentMap);
- wechatNoticeClient.sendWechatMsg(NOTICE_KEY, sendMap);
- }
-
- /**
- * 发送图片消息
- */
- public void sendImageMsg() {
- String url = "D:\\javaWeb\\image\\image-20231006212440733.png";
- Map<String, Object> sendMap = new HashMap<>();
- sendMap.put("msgtype", "image");
- Map<String, String> contentMap = new HashMap<>();
- contentMap.put("md5", getMd5(url));
- contentMap.put("base64", getBase64(url).replaceAll("\r|\n", ""));
- sendMap.put("image", contentMap);
- wechatNoticeClient.sendWechatMsg(NOTICE_KEY, sendMap);
- }
-
- /**
- * 发送图文消息
- */
- public void sendImageAndTxtMsg() {
- Map<String, Object> sendMap = new HashMap<>();
- sendMap.put("msgtype", "news");
- Map<String, Object> contentMap = new HashMap<>();
- List<Map<String, Object>> list = new ArrayList<>();
- Map<String, Object> obj = new HashMap<>();
- obj.put("title", "lupeng的博客");
- obj.put("description", "大家给他点点赞!点击图片立即跳转");
- obj.put("url", "https://blog.csdn.net/qq_44910673?type=blog");
- obj.put("picurl", "https://pic.iqshw.com/d/file/wzgdq/tx/2018/05/06/efa1b8c542784d05804c21bb9ec5f77e.jpg");
- list.add(obj);
- contentMap.put("articles", list);
- sendMap.put("news", contentMap);
- wechatNoticeClient.sendWechatMsg(NOTICE_KEY, sendMap);
- }
-
-
- /**
- * 图片转为base64编码
- */
- public String getBase64(String imgFile) {
- InputStream in = null;
- byte[] data = null;
- // 读取图片字节数组
- try {
- in = new FileInputStream(imgFile);
- data = new byte[in.available()];
- in.read(data);
- in.close();
- } catch (IOException e) {
- e.printStackTrace();
- }
- // 对字节数组Base64编码
- BASE64Encoder encoder = new BASE64Encoder();
- // 返回Base64编码过的字节数组字符串
- return encoder.encode(data);
- }
-
- /**
- * 获取文件的MD5值
- *
- * @param path
- * @return
- */
- public String getMd5(String path) {
- try {
- MessageDigest md5 = MessageDigest.getInstance("MD5");
- FileInputStream fis = new FileInputStream(path);
- byte[] buffer = new byte[1024];
- int len;
- while ((len = fis.read(buffer)) != -1) {
- md5.update(buffer, 0, len);
- }
- fis.close();
- byte[] byteArray = md5.digest();
- StringBuilder sb = new StringBuilder();
- for (byte b : byteArray) {
- sb.append(String.format("%02x", b));
- }
- return sb.toString();
- } catch (Exception e) {
- e.printStackTrace();
- }
- return null;
- }
-
-
- }

最后运行!
消息效果:

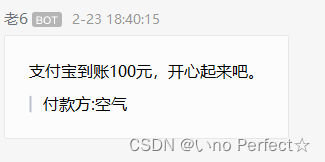
发送md效果

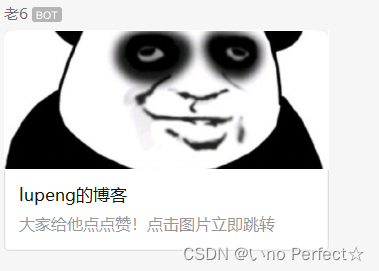
发送卡片效果

......
可以根据自己的需求进行更改
声明:本文内容由网友自发贡献,不代表【wpsshop博客】立场,版权归原作者所有,本站不承担相应法律责任。如您发现有侵权的内容,请联系我们。转载请注明出处:https://www.wpsshop.cn/w/Gausst松鼠会/article/detail/542734
推荐阅读
相关标签


