
热门标签
热门文章
- 1使用IntelliJ IDEA进行Android应用开发_idea开发android教程
- 2米哈游,顺利进入二面!_米哈游面试
- 3[译]A guide to deep learning in healthcare 深度学习在医疗健康领域的应用概述--nature论文
- 4Node.js 使用RSA加密/解密_nodejs rsa加密
- 5[转载]#人物表情的次级控制_huadingjin_新浪博客
- 6shell sed命令实现自动化批量修改文本文件中首个匹配到的关键字
- 7vue项目生成的两个地址Local和Network的区别_起项目之后,local跟notwork区别
- 8stm32+SSD1306 oled屏图形库开源项目_oled开源库
- 9MSVCP110.dll丢失修复办法
- 10C#实现定时器_c# 定时器
当前位置: article > 正文
从Plasmic创建本地代码库_plasmic studio csdn
作者:Gausst松鼠会 | 2024-04-11 11:59:44
赞
踩
plasmic studio csdn
创建新仓库时,使用create-plasmic-app,将会自动设置所有内容。要创建项目,在命令行工具中运行如下代码:
npx create-plasmic-app
- 1
大约一分半钟,提示安装成功。接着可以根据提示设置项目名称、代码语言、react 框架、集成方案、项目链接。除项目名称和链接外,剩余三项都是用键盘上的↑/↓ 箭头来选择。
项目名称随便写一个即可,项目链接是 plasmic 的设计图链接,其他选项都是根据官方推荐的选项。
比如我输入的(仅供参考):
Please specify the project directory
? What is your project named? plasmicdesign
? What language do you want to use? TypeScript
? What React framework do you want to use? Next.js
? Which scheme do you want to use to integrate Plasmic? PlasmicLoader

? What is the URL of your project?
(If you don't have a project yet, create one by going to
https://studio.plasmic.app/starters/simple-light):
 https://studio.plasmic.app/projects/x2MP8nP6DT8WT9iEdA83zr
- 1
- 2
- 3
- 4
- 5
- 6
- 7
- 8
- 9
- 10
接着,会提示如下内容:
Let's get started! Here's what we'll do:
1. Authenticate with Plasmic
2. Create a React/Next/Gatsby repo
3. Integrate with Plasmic

==================================================
AUTHENTICATING WITH PLASMIC
==================================================

If your browser doesn't automatically open, enter the following URL:
https://studio.plasmic.app/auth/plasmic-init/94da7201-bd39-4ccd-951c-36e6fa043bbf

Please log in and authorize Plasmic CLI.
Waiting for token...
- 1
- 2
- 3
- 4
- 5
- 6
- 7
- 8
- 9
- 10
- 11
- 12
- 13
- 14
此时浏览器会出现一个页面,点击按钮授权。
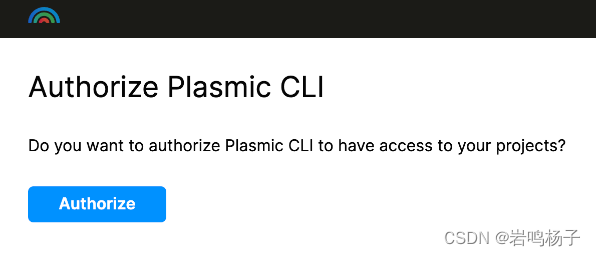
授权后,会显示 Plasmic 的代码库在本地电脑中的位置。
接着,会自动创建项目文件,并安装依赖。
Successfully created Plasmic credentials file at /Users/ym/.plasmic.auth

==================================================
CREATING THE PROJECT
==================================================
npx -p create-next-app create-next-app --typescript /Users/ym/plasmicdesign
npx: 1 安装成功,用时 2.924 秒
Creating a new Next.js app in /Users/ym/plasmicdesign.

Using npm.

Installing dependencies:
- react
- react-dom
- next
- 1
- 2
- 3
- 4
- 5
- 6
- 7
- 8
- 9
- 10
- 11
- 12
- 13
- 14
- 15
然后就是全自动的安装过程,不详细说了。
最后出现这行字,说明成功了:
Congrats! We created the Plasmic-connected project at plasmicdesign
- 1
然后根据提示,进入设定目录,并启动服务:
cd plasmicdesign
npm run dev
- 1
- 2
相关链接:Plasmic Studio入门教程
声明:本文内容由网友自发贡献,版权归原作者所有,本站不承担相应法律责任。如您发现有侵权的内容,请联系我们。转载请注明出处:【wpsshop博客】
推荐阅读
相关标签

