热门标签
热门文章
- 1MAC端Git安装以及环境搭建
- 2Android Error:Failed to complete Gradle execution. 错误解决办法_error:failed to complete gradle execution. cause:
- 3关于HTML表单用户信息进行MD5加密_html md5
- 4habor无法登录解决办法_harbor安装成功但是无法登录
- 5键盘指法练习_程序员打字练习网站
- 6《计算机网络实验课程》——Cisco Packet Tracer
- 7Redis集群搭建(基于6.2.6版本)_redis6.2.6集群部署
- 8Python_文本分析_词频_TFIDF统计_python的tfidf中文词频统计
- 9常见的二十种软件测试方法详解(史上最全)
- 10你知道Python GUI编程吗:关于 tkinter 怎么才能写出更好看的界面_python gui之tkinter的皮肤(ttkbootstrap)打造出你的窗口之美(1)_tkinter设计漂亮界面
当前位置: article > 正文
在Visual Studio Code中配置C++编译环境_vscode2010
作者:Guff_9hys | 2024-07-06 15:23:15
赞
踩
vscode2010
一、简介
大学期间用的C++编译环境一直是Visual Studio 2010,最近碰到了一个赛题,需要用C++11的环境,且给了基础代码。基础代码在Visual Studio 2010不能成功运行,显示以下错误:

后经查询,是因为Visual Studio 2010 至 2013这几个版本仅支持部分的C++11特性,所以报错,又想到Visual Studio Code和其都是一家,也有很多人推荐,就想着能不能通过它来实现C++环境的编译,毕竟如果下载高版本的Visual Studio 不仅大不说,开启速度在我的破电脑上也会比较慢。
二、准备工具
-
Visual Studio Code

这个直接从官方网站上下载安装即可 -
Visual Studio Code扩展插件


这两个插件直接通过扩展库搜索安装即可,安装完之后重启生效 -
mingw 编译器

官方下载地址:https://sourceforge.net/projects/mingw-w64/files/mingw-w64/mingw-w64-release/
官方网站上可以下载安装文件形式、也可以直接下载压缩包免安装形式
下载安装完成后,需要将mingw的bin文件夹配置到电脑的环境变量中

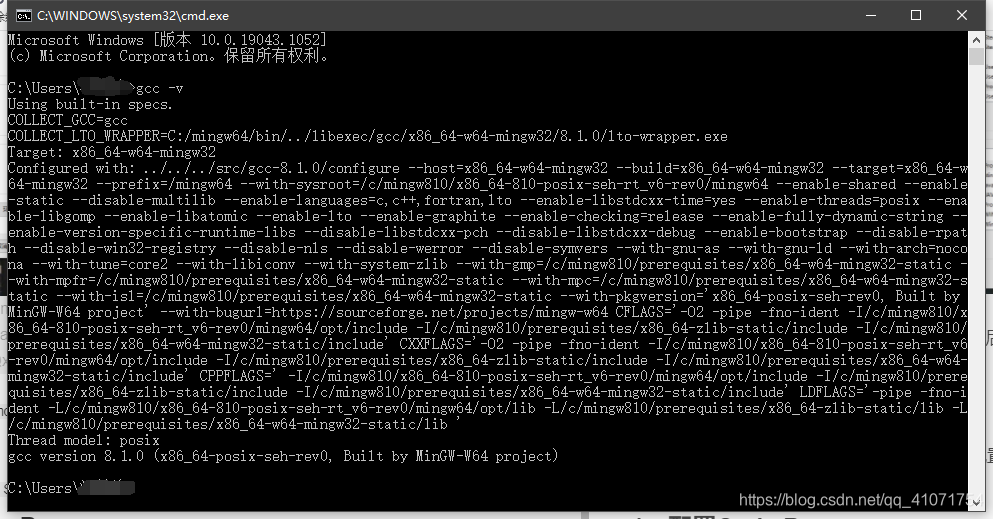
然后通过win+r输入cmd打开命令行,然后输入gcc -v,显示正确版本号即为配置成功

三、配置文件
关于Visual Studio Code对C++环境的配置方法应该有好多种,我这里用到了其中的两种。
1、配置Code Runner
- 找到扩展插件,点击工具图标,找到拓展设置

- 进入到拓展设置,找到
Code-runner: Executor Map进行编辑

- 找到
“cpp”,在指定位置添加-std=c++11

- 然后重启
Visual Studio Code,想运行C++程序时,点击右上方的开始按钮即可


- 在code-runner: run in terminal勾选下方可选项可解决在输出的只读框中输入

2、运行和调试配置

在这里我们需要进行两项配置,一项是配置launch.json,一项是配置tasks.json,都有模板,直接抄模板就可以,只需要改动其中的mingw引用路径即可
launch.json
{
    // Use IntelliSense to learn about possible attributes.
    // Hover to view descriptions of existing attributes.
    // For more information, visit: https://go.microsoft.com/fwlink/?linkid=830387
    "version": "0.2.0",
    "configurations": [

        {
            "name": "C++ (gdb) Launch",
            "preLaunchTask": "g++.exe build active file",
            "type": "cppdbg",//只能为cppdbg
            "request": "launch",
            "program": "${fileDirname}\\${fileBasenameNoExtension}.exe",//调试程序的路径名称
            "args": [],//调试传递参数
            "stopAtEntry": false,
            "cwd": "${workspaceFolder}",
            "environment": [],
            "externalConsole": true,
            "MIMode": "gdb",
            "miDebuggerPath": "C:\\mingw64\\bin\\gdb.exe",
            "setupCommands": [
                {
                    "description": "Enable pretty-printing for gdb",
                    "text": "-enable-pretty-printing",
                    "ignoreFailures": true
                }
            ]
        }
    ]
}
- 1
- 2
- 3
- 4
- 5
- 6
- 7
- 8
- 9
- 10
- 11
- 12
- 13
- 14
- 15
- 16
- 17
- 18
- 19
- 20
- 21
- 22
- 23
- 24
- 25
- 26
- 27
- 28
- 29
- 30
tasks.json
{
	"version": "2.0.0",
	"tasks": [
		{
			"type": "shell",
			"label": "g++.exe build active file",
			"command": "C:\\mingw64\\bin\\g++.exe",
			"args": [
				"-g",
				"${file}",
				"-o",
				"${fileDirname}\\${fileBasenameNoExtension}.exe"
			],
			"options": {
				"cwd": "C:\\mingw64\\bin"
			},
			"problemMatcher": [
				"$gcc"
			],
			"group": {
				"kind": "build",
				"isDefault": true
			}
		}
	]
}
- 1
- 2
- 3
- 4
- 5
- 6
- 7
- 8
- 9
- 10
- 11
- 12
- 13
- 14
- 15
- 16
- 17
- 18
- 19
- 20
- 21
- 22
- 23
- 24
- 25
- 26
- 配置完毕之后,即可通过顶部导航栏上的运行进行调试运行
声明:本文内容由网友自发贡献,转载请注明出处:【wpsshop】
推荐阅读
相关标签


