
热门标签
热门文章
- 1DES加密算法|密码学|网络空间安全_des密码
- 2Spring boot 项目(二十三)——用 Netty+Websocket实现聊天室
- 3【错误记录】GitHub 提交代码失败、获取代码失败、连接超时、权限错误、ping 请求连接超时 ( 查找域名对应 IP | 设置 host 文件 )_泛播github
- 4密码算法原理与实现:DES加密算法_在分组密码设计中用到扩散和混淆的理论。理想的扩散是
- 5python石头剪子布while循环_14.python之石头剪子布
- 6各大互联网公司都有哪些部门?核心部门又是什么?一文全知道!
- 7Mysql数据备份一(简易备份)_mysql 实例备份
- 8学历低能进大厂吗?专科学历我慌了,但是我还是顺利拿到了想要的大厂offer!这不美滋滋?!_专科网络技术能进大厂吗
- 9mac Navicat Premium 16 汉化_navicat16汉化包
- 10Windows 10版本更新指南:探索最新功能和优化_win10升级到20h2版本是质量更新还是功能更新
当前位置: article > 正文
【华为网络-配置-001】-路由器接口、交换机接口 IP 地址配置_华为交换机端口配置ip
作者:IT小白 | 2024-04-21 03:56:13
赞
踩
华为交换机端口配置ip
要求:
1、给路由器和交换机对应接口配置上 IP,使两边可以正常通信。
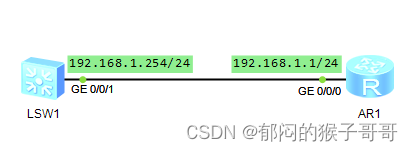
一、路由器配置
路由器接口可以直接配置 IP 地址
进入系统视图
<AR1>system-view

进入物理接口。配置 IP (子网掩码 255.255.255.0 可以用掩码位:24 代替)
[AR1]interface GigabitEthernet 0/0/0
[AR1-GigabitEthernet0/0/0]ip address 192.168.1.1 255.255.255.0
[AR1-GigabitEthernet0/0/0]quit
[AR1]quit

退出后保存配置,不然重启后配置失效。
<AR1>save
- 1
- 2
- 3
- 4
- 5
- 6
- 7
- 8
- 9
- 10
- 11
二、交换机配置
交换机的接口无法直接配置 IP 地址,需要用一个 vlan 模拟配置一个 IP 并绑定物理接口进行通信。
进入系统视图
<LSW1>system-view

创建一个编号为10 的 vlan。一般可选编号为 2-4096,最多 4096 (2的12次方)也是因为报文中字节位数决定。vlan 号 1 是交换机内部使用。
[LSW1]vlan 10

进入 vlan 10 虚拟接口。给虚拟接口配置 IP 地址。配置好后退出。
[LSW1]interface Vlanif 10
[LSW1-Vlanif10]ip address 192.168.1.254 255.255.255.0
[LSW1-Vlanif10]quit

进入需要绑定 IP 的物理接口。把接口模式更改为 access。退出。
[LSW1]interface GigabitEthernet 0/0/1
[LSW1-GigabitEthernet0/0/1]port link-type access
[LSW1-GigabitEthernet0/0/1]port default vlan 10
[LSW1-GigabitEthernet0/0/1]quit
[LSW1]quit

退出后,保存,不保存重启后配置失效。
<LSW1>save

- 1
- 2
- 3
- 4
- 5
- 6
- 7
- 8
- 9
- 10
- 11
- 12
- 13
- 14
- 15
- 16
- 17
- 18
- 19
- 20
- 21
三、测试
交换机上测试
<LSW1>ping 192.168.1.1
  PING 192.168.1.1: 56  data bytes, press CTRL_C to break
    Reply from 192.168.1.1: bytes=56 Sequence=1 ttl=255 time=270 ms
    Reply from 192.168.1.1: bytes=56 Sequence=2 ttl=255 time=30 ms
    Reply from 192.168.1.1: bytes=56 Sequence=3 ttl=255 time=10 ms
    Reply from 192.168.1.1: bytes=56 Sequence=4 ttl=255 time=40 ms
    Reply from 192.168.1.1: bytes=56 Sequence=5 ttl=255 time=50 ms

路由器上测试
<AR1>ping 192.168.1.254
  PING 192.168.1.254: 56  data bytes, press CTRL_C to break
    Reply from 192.168.1.254: bytes=56 Sequence=1 ttl=255 time=20 ms
    Reply from 192.168.1.254: bytes=56 Sequence=2 ttl=255 time=30 ms
    Reply from 192.168.1.254: bytes=56 Sequence=3 ttl=255 time=30 ms
    Reply from 192.168.1.254: bytes=56 Sequence=4 ttl=255 time=10 ms
    Reply from 192.168.1.254: bytes=56 Sequence=5 ttl=255 time=30 ms
- 1
- 2
- 3
- 4
- 5
- 6
- 7
- 8
- 9
- 10
- 11
- 12
- 13
- 14
- 15
- 16
- 17
- 18
声明:本文内容由网友自发贡献,不代表【wpsshop博客】立场,版权归原作者所有,本站不承担相应法律责任。如您发现有侵权的内容,请联系我们。转载请注明出处:https://www.wpsshop.cn/w/IT小白/article/detail/460909
推荐阅读
相关标签

