- 1数据仓库-基础知识(维度建模)_数据仓库维度建模
- 2大数据Flink(五十九):Flink on Yarn的三种部署方式介绍以及注意_flink on yarn安装配置
- 31.AIGC自动化编程讲解_aigc怎么实现数据流自动编排
- 4突发!中国法院初步裁决禁售多款iPhone,高通告赢了苹果?
- 5单字段多内容模糊查sql写法
- 6Runtime详解,一文带你打通Java Runtime类及其相关知识。_java runtime机制
- 7跑python代码过程中遇到的种种bug_runtimeerror: index put requires the source and de
- 8近一个月的面试总结_上一份工作只工作了一个月,在找下一份工作面试的时候,应不应该说这只工作
- 9GitHub无法访问?别慌,让我们一起解决这个问题!_程序员 github打不开
- 10Android硬件通信之 串口通信_手机串口传输文件
CDH整合Flink(CDH6.3.2+Flink1.12.0)_flink cdh
赞
踩
一、准备工作
安装jdk1.8及maven,jdk使用CDH安装包中自带的jdk的rpm包即可
安装完成后添加环境变量
[root@linux201 ~] vim /etc/profile.d/custom.sh
- 1
添加如下内容
# JAVA_HOME
JAVA_HOME=/usr/java/jdk1.8.0_181-cloudera
PATH=$PATH:$JAVA_HOME/bin

# MAVEN_HOME
MAVEN_HOME=/usr/local/maven-3.6.3
PATH=$PATH:$MAVEN_HOME/bin

export PATH JAVA_HOME MAVEN_HOME
- 1
- 2
- 3
- 4
- 5
- 6
- 7
- 8
- 9
然后source /etc/profile刷新环境变量
为了提高下载速度,可以对maven镜像仓库的地址进行配置
[root@linux201 conf] cd $MAVEN_HOME/conf
[root@linux201 conf] vim settings.xml
- 1
- 2
在mirrors标签内添加以下镜像仓库
    <!-- 阿里云仓库 -->
    <mirror>
      <id>alimaven</id>
      <name>aliyun maven</name>
      <url>http://maven.aliyun.com/nexus/content/repositories/central/</url>
      <mirrorOf>central</mirrorOf>
    </mirror>
    <mirror>
      <id>nexus-aliyun</id>
      <name>aliyun maven</name>
      <url>http://maven.aliyun.com/nexus/content/groups/public/</url>
      <mirrorOf>central</mirrorOf>
    </mirror>
    <!-- Maven中央仓库中国镜像 -->
    <mirror>
      <id>maven cn repo</id>
      <name>oneof the central mirrors in china</name>
      <url>http://maven.net.cn/content/groups/public/</url>
      <mirrorOf>central</mirrorOf>
    </mirror>
    <mirror>
      <id>maven repo</id>
      <name>Maven Repository Switchboard</name>
      <url>http://repo1.maven.org/maven2/</url>
      <mirrorOf>central</mirrorOf>
    </mirror>
    <mirror>
      <id>maven repo2</id>
      <mirrorOf>central</mirrorOf>
      <name>Human Readable Name for this Mirror.</name>
      <url>http://repo2.maven.org/maven2/</url>
    </mirror>
- 1
- 2
- 3
- 4
- 5
- 6
- 7
- 8
- 9
- 10
- 11
- 12
- 13
- 14
- 15
- 16
- 17
- 18
- 19
- 20
- 21
- 22
- 23
- 24
- 25
- 26
- 27
- 28
- 29
- 30
- 31
- 32
二、flink相关下载
flink下载地址:
https://archive.apache.org/dist/flink/flink-1.12.0/flink-1.12.0-bin-scala_2.12.tgz
parcel制作工具下载地址(github提供的工具包):
https://github.com/pkeropen/flink-parcel.git
Linux下载httpd服务并开启
[root@linux201 flink-parcel] yum install y httpd
[root@linux201 flink-parcel] systemctl start httpd
[root@linux201 flink-parcel] systemctl enable httpd
- 1
- 2
- 3
在/var/www/html目录下创建flink1.12.0目录,将flink-1.12.0-bin-scala_2.12.tgz置于该目录下
可以登录以下网址查看
http://linux201/flink1.12.0/
- 1

三、制作parcel
parcel制作方式大致有两种,第一种是使用源生的制作方法,制作过程繁琐复杂,第二种是使用广大网友制作好的parcel制作工具,本文使用第二章方式
1.安装必要工具
安装前注意安装必要的Linux工具
[root@linux201 flink-parcel] yum install -y wget git
- 1
2.下载制作工具
直接网页下载后上传到Linux或是通过git下载
[root@linux201 flink-parcel] git clone https://github.com/pkeropen/flink-parcel.git
- 1
3.修改配置文件
进入到flink-parcel目录下
使用修改配置文件
[root@linux201 flink-parcel] cp flink-parcel.properties flink-parcel.properties.bak
[root@linux201 flink-parcel] vim flink-parcel.properties
- 1
- 2
修改如下地址
#FLINK下载地址
#下载flink-1.12.0-bin-scala_2.12.tgz,开启httpd服务且文件已经置于/var/www/html/flink1.12.0目录
FLINK_URL=http://linux201/flink1.12.0/flink-1.12.0-bin-scala_2.12.tgz
#如果没有下载可以使用以下配置
#FLINK_URL=https://archive.apache.org/dist/flink/flink-1.12.0/flink-1.12.0-bin-scala_2.12.tgz

#flink版本号
FLINK_VERSION=1.12.0

#扩展版本号
EXTENS_VERSION=BIN-SCALA_2.12

#操作系统版本,以centos为例
OS_VERSION=7

#CDH 小版本
CDH_MIN_FULL=5.2
CDH_MAX_FULL=6.3.3

#CDH大版本
CDH_MIN=5
CDH_MAX=6
- 1
- 2
- 3
- 4
- 5
- 6
- 7
- 8
- 9
- 10
- 11
- 12
- 13
- 14
- 15
- 16
- 17
- 18
- 19
- 20
- 21
- 22
4.编译所需Flink文件
原文件中build.sh没有执行权限需要**增加执行权限**
chmod u+x build.sh
- 1
然后进行build
./build.sh parcel
- 1
执行过程中可能会报以下错误
fatal: unable to access 'https://github.com/cloudera/cm_ext.git/': Network file descriptor is not connected
- 1

此时查看build.sh源码,定位到第27行,需要将原来的https改为git
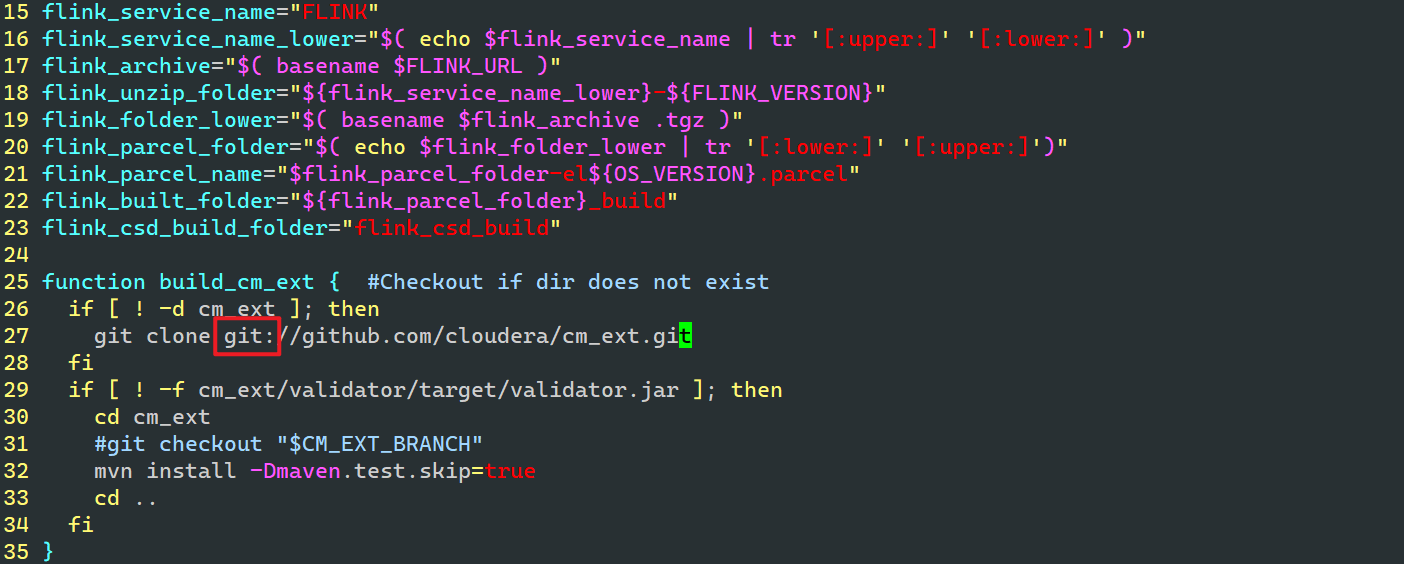
然后再进行build
./build.sh parcel
- 1
下载并打包完成后会在当前目录生成FLINK-1.12.0-BIN-SCALA_2.12_build文件

构建flink-yarn csd包
./build.sh csd_on_yarn
- 1
执行完成后会生成FLINK_ON_YARN-1.12.0.jar

将FLINK-1.12.0-BIN-SCALA_2.12_build打包
tar -cvf ./flink-1.12.0-bin-scala_2.12.tar ./FLINK-1.12.0-BIN-SCALA_2.12_build/
- 1

文件夹下的flink-1.12.0-bin-scala_2.12.tar、FLINK_ON_YARN-1.12.0.jar就是目标包
5.编译flink-shaded版本
1)下载源码包并解压
下载地址:https://flink.apache.org/downloads.html
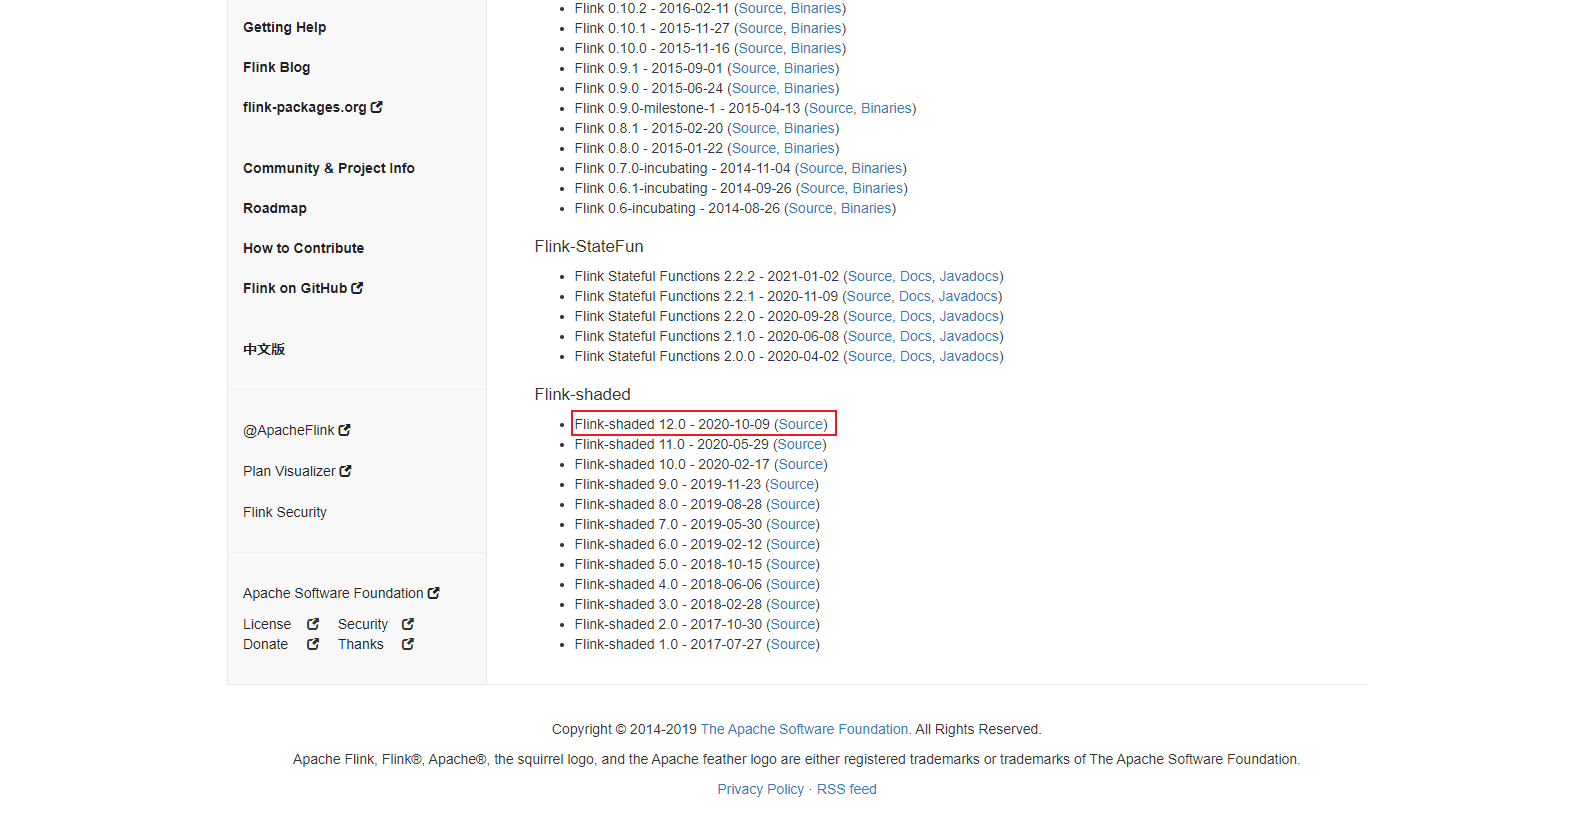
解压到指定目录
[root@localhost flink-shaded-12.0] tar -xvf flink-shaded-12.0-src.tgz -C /usr/local/software/
- 1
目录结构如下

2)修改pom.xml
进入到flink-shaded-12.0目录下修改pom.xml配置文件
[root@localhost flink-shaded-12.0] vim ./pom.xml
- 1
在里面的profiles中添加如下配置参数:
<profile>
    <id>vendor-repos</id>
    <activation>
        <property>
            <name>vendor-repos</name>
        </property>
    </activation>
    <!-- Add vendor maven repositories -->
    <repositories>
        <!-- Cloudera -->
        <repository>
            <id>cloudera-releases</id>
            <url>https://repository.cloudera.com/artifactory/cloudera-repos</url>
            <releases>
                <enabled>true</enabled>
            </releases>
            <snapshots>
                <enabled>false</enabled>
            </snapshots>
        </repository>
        <!-- Hortonworks -->
        <repository>
            <id>HDPReleases</id>
            <name>HDP Releases</name>
            <url>https://repo.hortonworks.com/content/repositories/releases/</url>
            <snapshots><enabled>false</enabled></snapshots>
            <releases><enabled>true</enabled></releases>
        </repository>
        <repository>
            <id>HortonworksJettyHadoop</id>
            <name>HDP Jetty</name>
            <url>https://repo.hortonworks.com/content/repositories/jetty-hadoop</url>
            <snapshots><enabled>false</enabled></snapshots>
            <releases><enabled>true</enabled></releases>
        </repository>
        <!-- MapR -->
        <repository>
            <id>mapr-releases</id>
            <url>https://repository.mapr.com/maven/</url>
            <snapshots><enabled>false</enabled></snapshots>
            <releases><enabled>true</enabled></releases>
        </repository>
    </repositories>
</profile>
- 1
- 2
- 3
- 4
- 5
- 6
- 7
- 8
- 9
- 10
- 11
- 12
- 13
- 14
- 15
- 16
- 17
- 18
- 19
- 20
- 21
- 22
- 23
- 24
- 25
- 26
- 27
- 28
- 29
- 30
- 31
- 32
- 33
- 34
- 35
- 36
- 37
- 38
- 39
- 40
- 41
- 42
- 43
- 44
3)编译flink-shaded
在flink-shaded-12.0目录下进行编译
[root@localhost flink-shaded-12.0] mvn clean install -DskipTests -Pvendor-repos -Dhadoop.version=3.0.0-cdh6.3.2 -Dscala-2.12 -Drat.skip=true -T10C
- 1
耐心等待编译,可能会失败多次,重复执行命令编译就行

4)问题解决
编译后发现并没有目标文件
flink-shaded-hadoop-2-uber 3.0.0-cdh6.3.2-10.0
- 1
网上查资料发现使用flink-shaded-12.0-src.tgz编译后确实没有上述文件,但是flink-shaded-10.0也适配flink1.12环境,于是改用官网提供的flink-shaded-10.0-src.tgz进行编译,编译步骤类似。
编译成功后已经有目标文件,目标文件位置
/usr/local/software/flink-shaded-10.0/flink-shaded-hadoop-2-parent/flink-shaded-hadoop-2-uber/target/flink-shaded-hadoop-2-uber-3.0.0-cdh6.3.2-10.0.jar
- 1

四、集成CM
1.上传编译好的parcel
将编译好的flink-1.12.0-bin-scala_2.12.tar解压到/var/www/html并重命名
# 将flink-1.12.0-bin-scala_2.12.tar解压到/var/www/html
[root@linux201 html] tar -xvf /usr/local/software/flink-parcel/flink-1.12.0-bin-scala_2.12.tar -C /var/www/html/
[root@linux201 html] cd /var/www/html/
# 重命名目录名称
[root@linux201 html] mv FLINK-1.12.0-BIN-SCALA_2.12_build/ flink1.12.0-on-cdh6.3.2
[root@linux201 html] cd flink1.12.0-on-cdh6.3.2
# 创建flink-on-cdh的本地仓库,确保createrepo工具已经安装
[root@linux201 flink1.12.0-on-cdh6.3.2] createrepo .
- 1
- 2
- 3
- 4
- 5
- 6
- 7
- 8
开启httpd服务后,可以通过以下网址查看是否正常上传
http://linux201/flink1.12.0-on-cdh6.3.2/
- 1

配置局域网flink的yum
[root@linux201 test] vim /etc/yum.repos.d/flink-on-cdh.repo
- 1
添加如下配置
[flink-on-cdh]
name=flink-on-cdh
baseurl=http://linux201/flink1.12.0-on-cdh6.3.2/
enabled=1
gpgcheck=0
- 1
- 2
- 3
- 4
- 5
将上述配置repo配置文件**分发到所有节点上**
**所有节点**上清除yum并建立yum缓存
yum clean all
yum makecache
- 1
- 2
在**CM-Server主节点**上,将FLINK_ON_YARN-1.12.0.jar包复制到/opt/cloudera/csd/目录下(目的是让cm识别)
[root@linux201 bin] cp /usr/local/software/flink-parcel/FLINK_ON_YARN-1.12.0.jar /opt/cloudera/csd/
- 1
重启集群的CM-Server及CM-agent
2.配置parcel库
CM页面—>主机—> parcel —> 配置,添加上传的parcel的位置
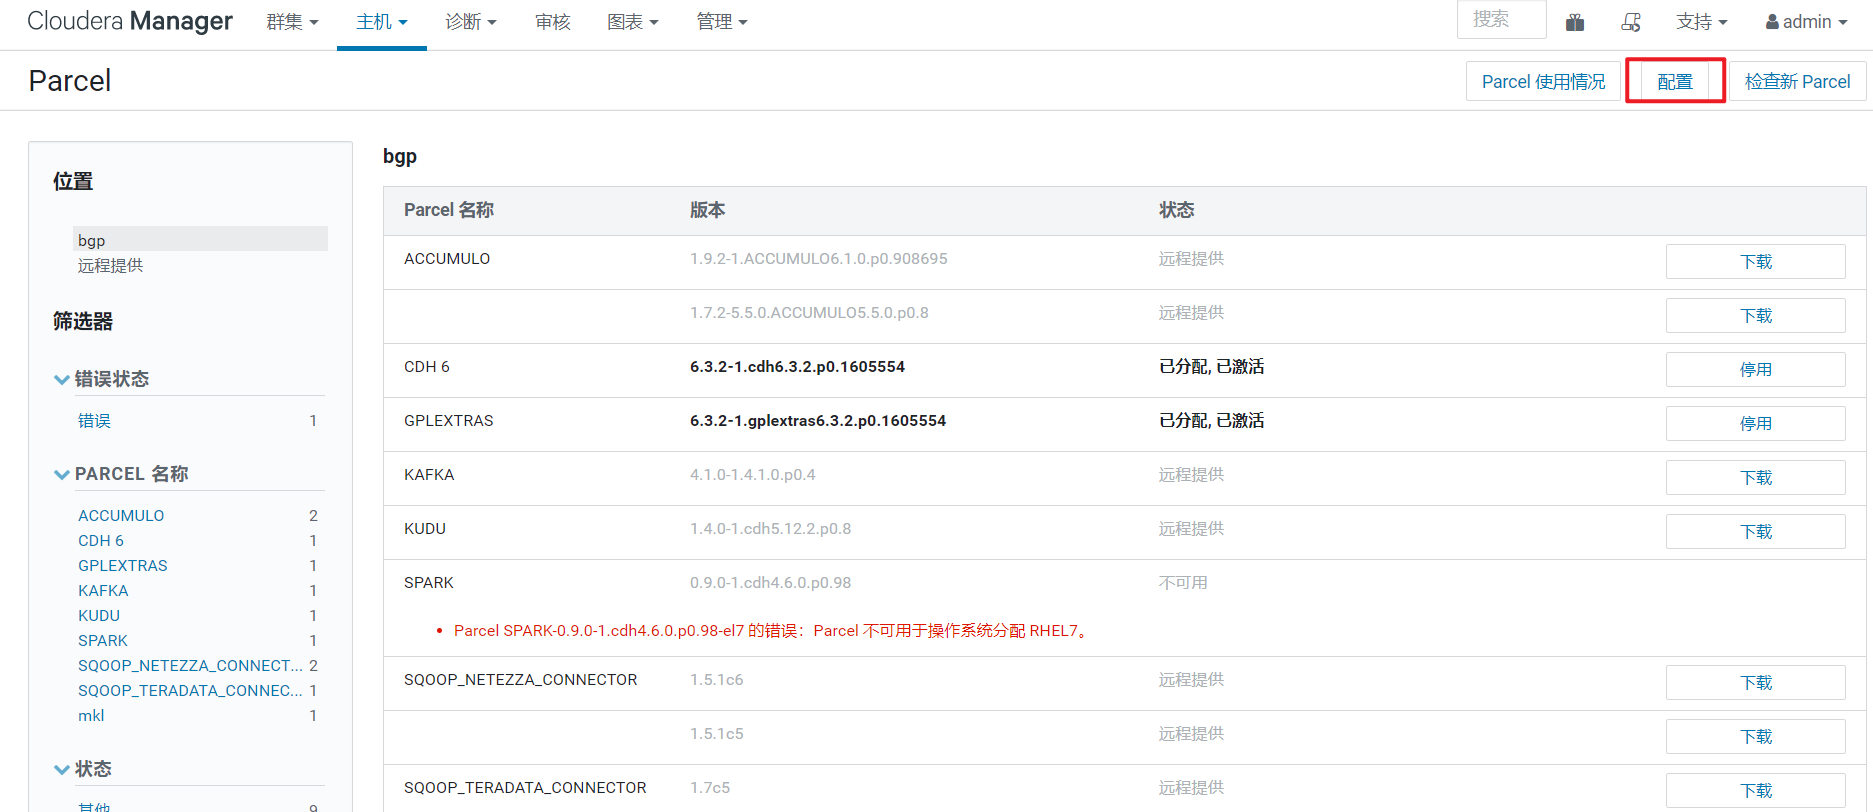
添加上传的parcel的位置
http://linux201/flink1.12.0-on-cdh6.3.2/
- 1
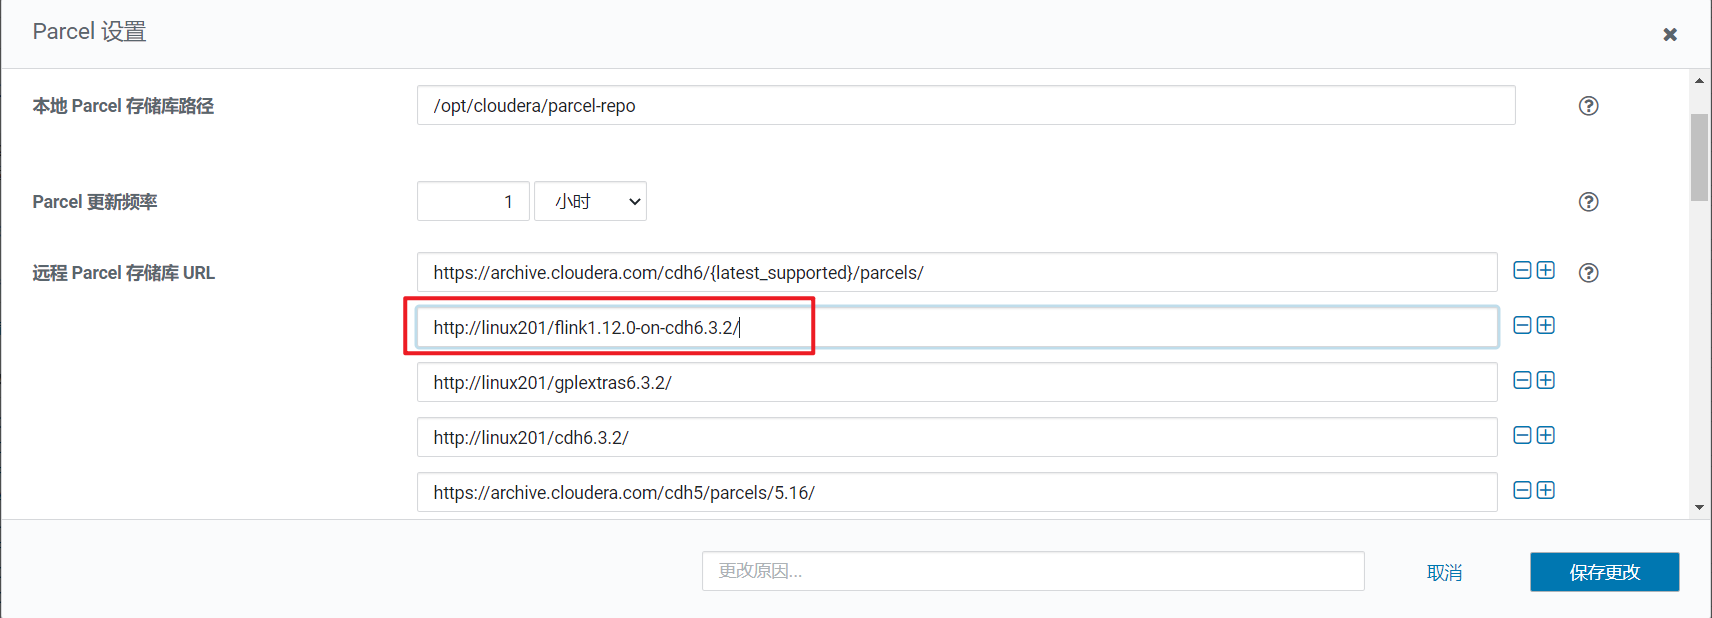
检查新Parcel ,然后下载—>分配—>激活
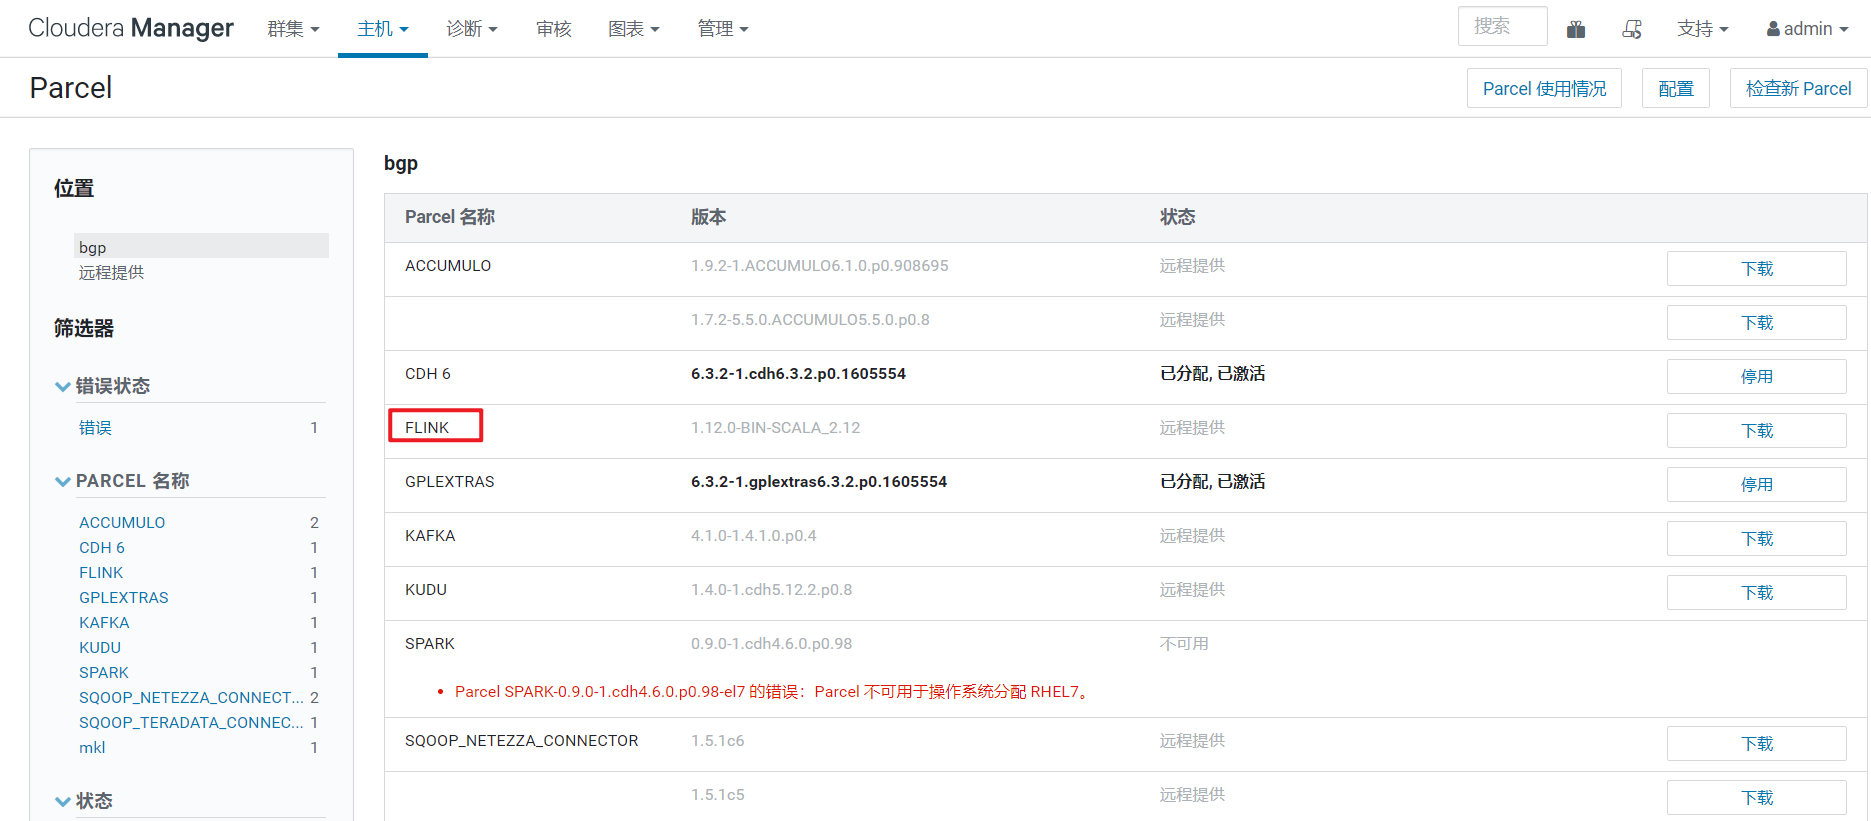
下载后报哈希验证失败错误

先对比文件hash值是否一致,如果不一致就修改一致

查看发现hash码一致,下载仍然报错,需要修改httpd配置文件
[root@linux201 flink1.12.0-on-cdh6.3.2] cp /etc/httpd/conf/httpd.conf /etc/httpd/conf/httpd.conf.bak
[root@linux201 flink1.12.0-on-cdh6.3.2] vim /etc/httpd/conf/httpd.conf
- 1
- 2
在AddType中添加.parcel
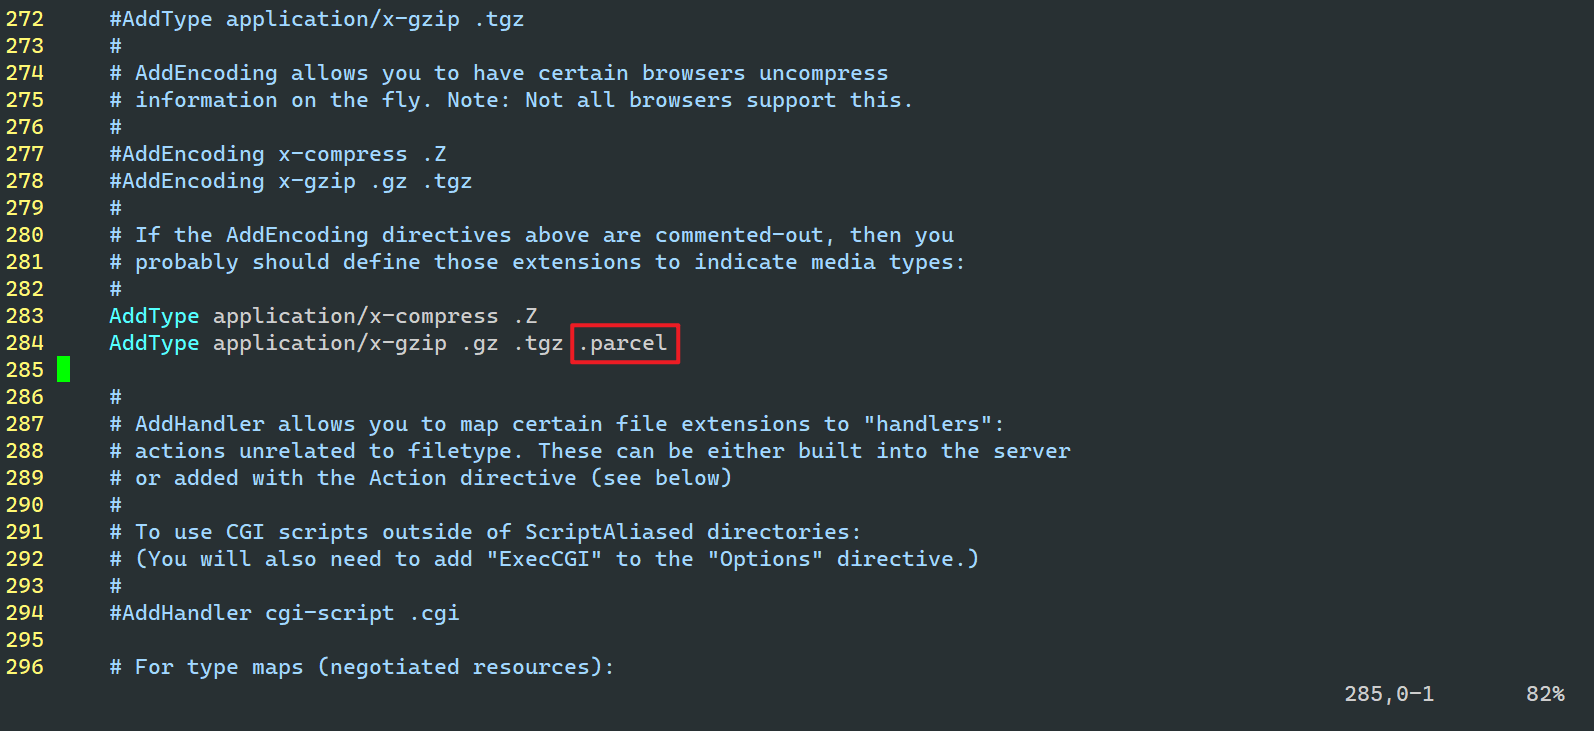
重启httpd服务
[root@linux201 flink1.12.0-on-cdh6.3.2] systemctl restart httpd
- 1
再次下载—>分配—>激活成功
3.部署flink-yarn服务
点击添加服务
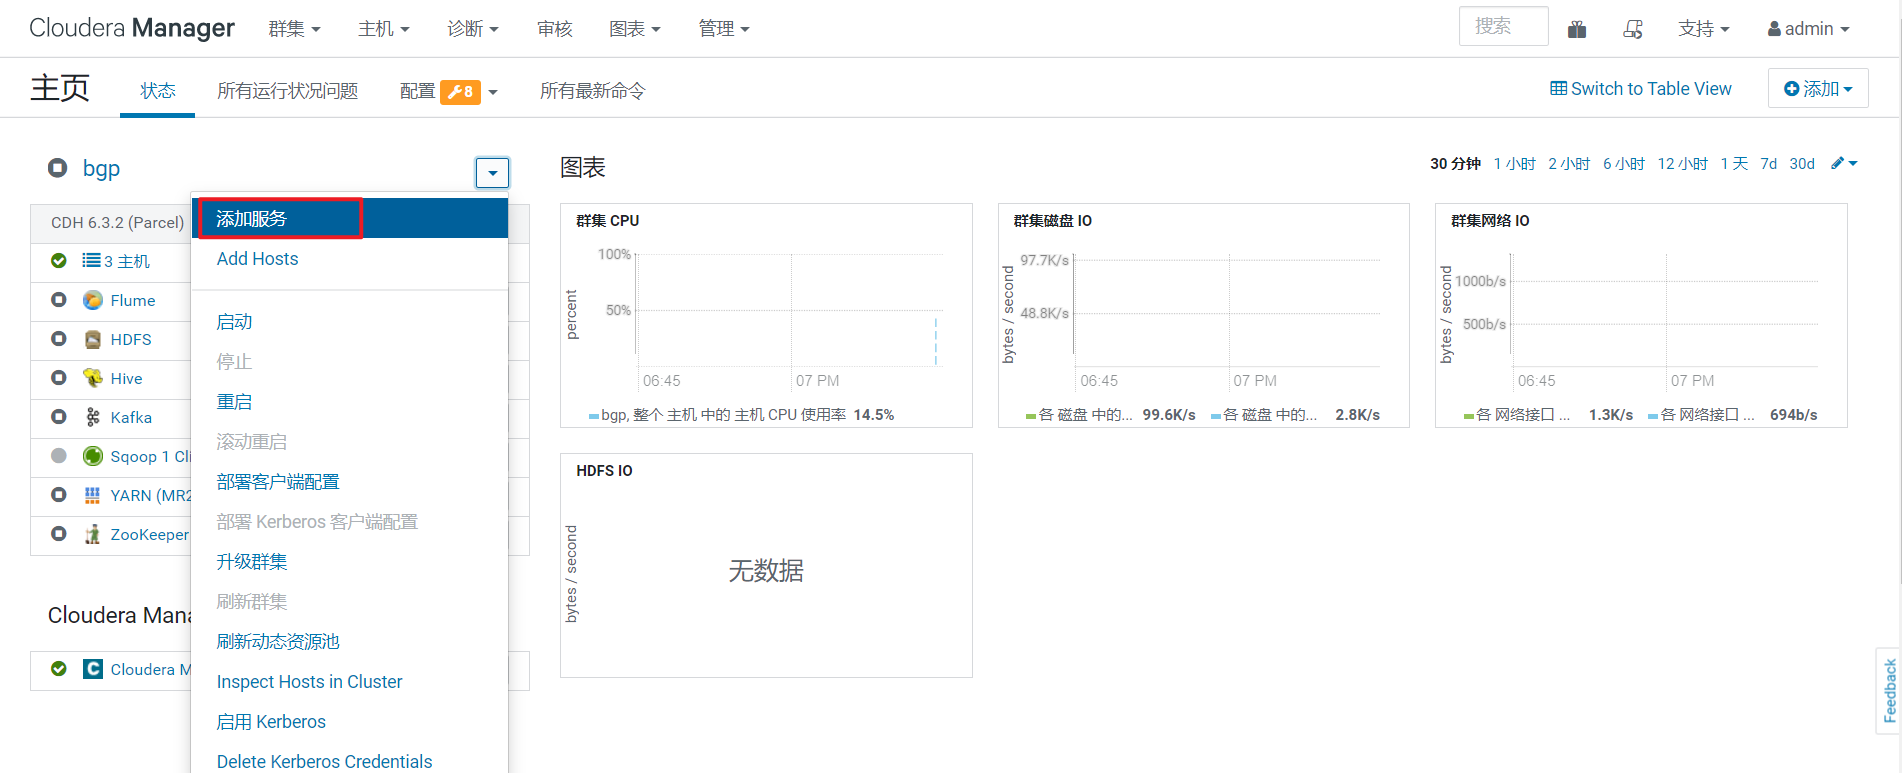
添加Flink-yarn服务
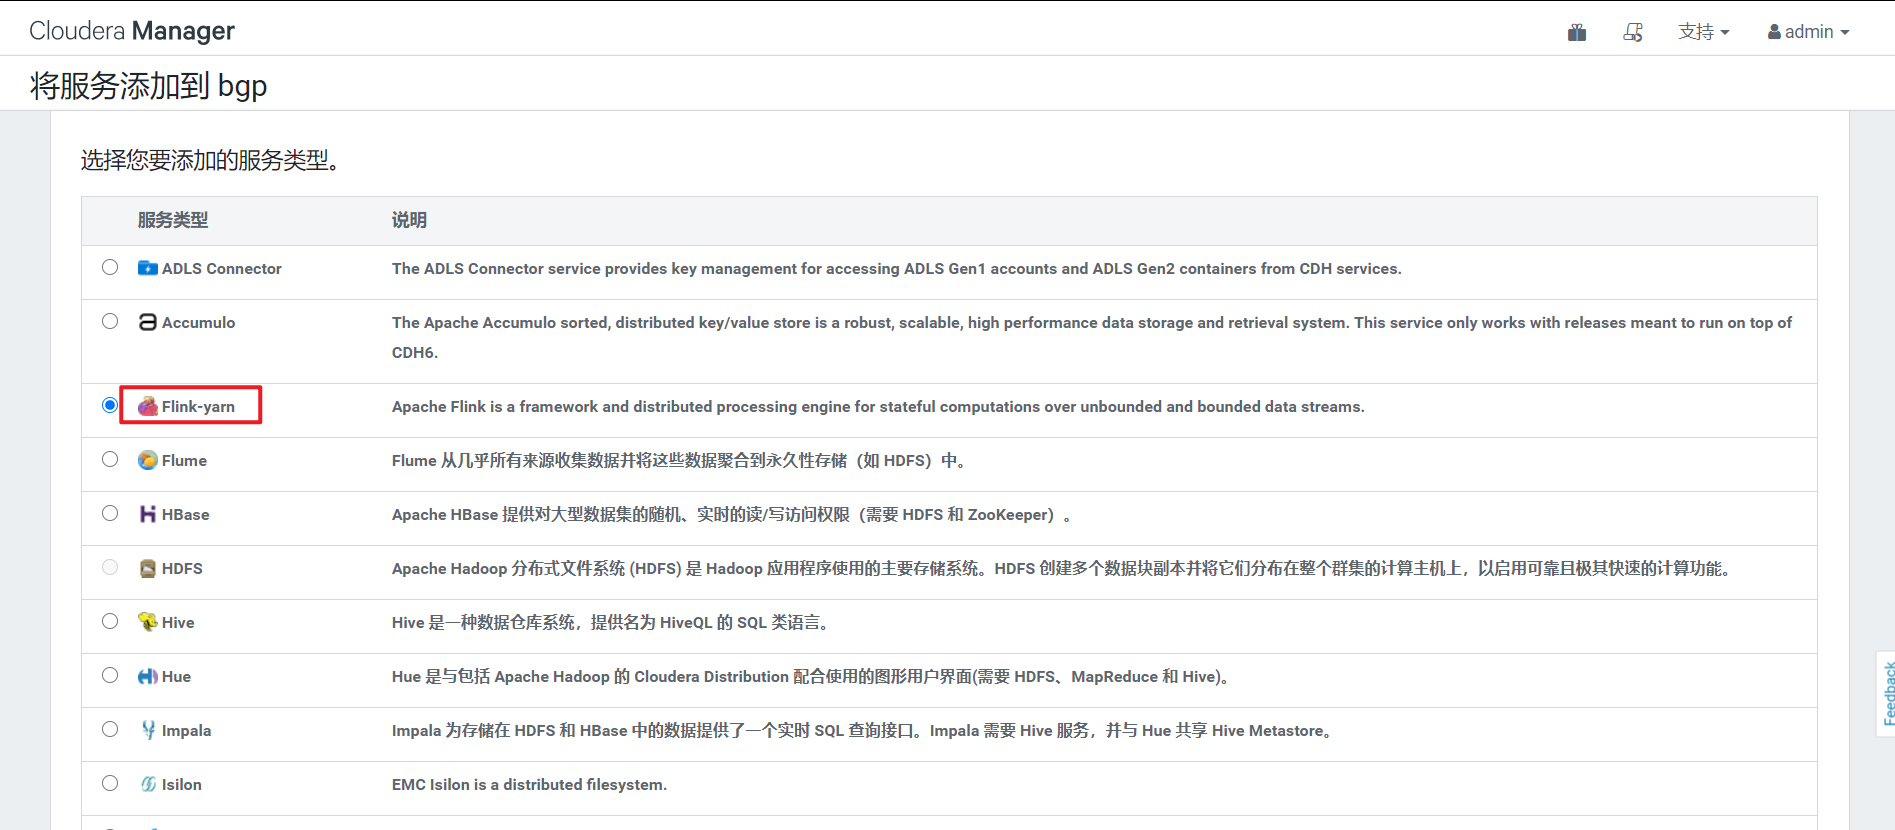
4.启动报错问题解决
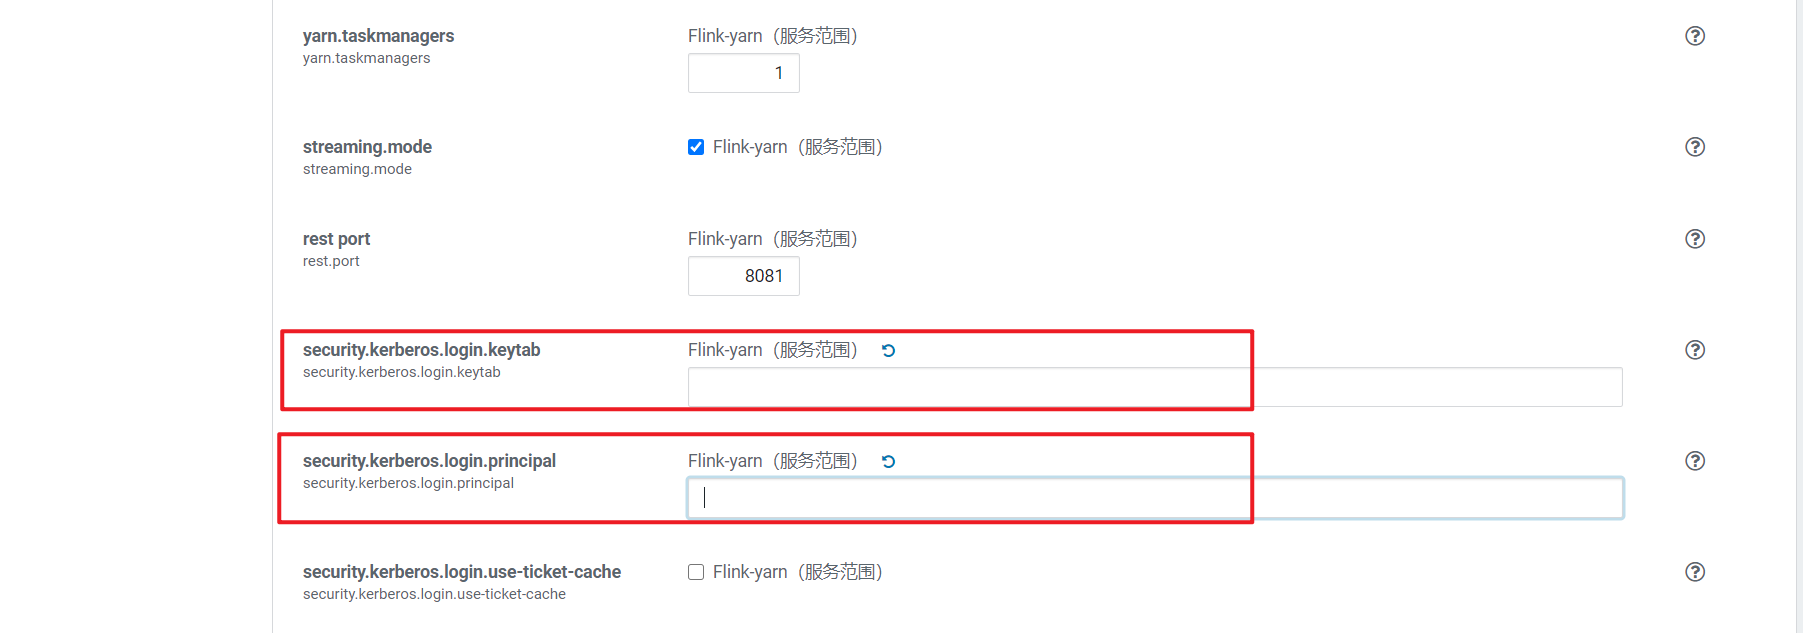
1)kerberos认证错误
如果开启kerberos的话,可能报以下错误
org.apache.flink.configuration.IllegalConfigurationException: Kerberos login configuration is invalid; keytab is unreadable
- 1
需要删除这两项内容,否则启动失败
2)缺少Hadoop依赖包
启动时报以下错误,表示缺少Hadoop依赖
Exception in thread "main" java.lang.NoClassDefFoundError: org/apache/hadoop/yarn/exceptions/YarnException
    at java.lang.Class.getDeclaredMethods0(Native Method)
    at java.lang.Class.privateGetDeclaredMethods(Class.java:2701)
    at java.lang.Class.privateGetMethodRecursive(Class.java:3048)
    at java.lang.Class.getMethod0(Class.java:3018)
    at java.lang.Class.getMethod(Class.java:1784)
    at sun.launcher.LauncherHelper.validateMainClass(LauncherHelper.java:544)
    at sun.launcher.LauncherHelper.checkAndLoadMain(LauncherHelper.java:526)
Caused by: java.lang.ClassNotFoundException: org.apache.hadoop.yarn.exceptions.YarnException
    at java.net.URLClassLoader.findClass(URLClassLoader.java:381)
    at java.lang.ClassLoader.loadClass(ClassLoader.java:424)
    at sun.misc.Launcher$AppClassLoader.loadClass(Launcher.java:349)
    at java.lang.ClassLoader.loadClass(ClassLoader.java:357)
    ... 7 more
- 1
- 2
- 3
- 4
- 5
- 6
- 7
- 8
- 9
- 10
- 11
- 12
- 13
- 14

需要在布置Flink-Yarn的节点上上传flink-shaded-hadoop-2-uber-3.0.0-cdh6.3.2-10.0
将其上传到/opt/cloudera/parcels/FLINK/lib/flink/lib目录下

5.webUI
进入yarn
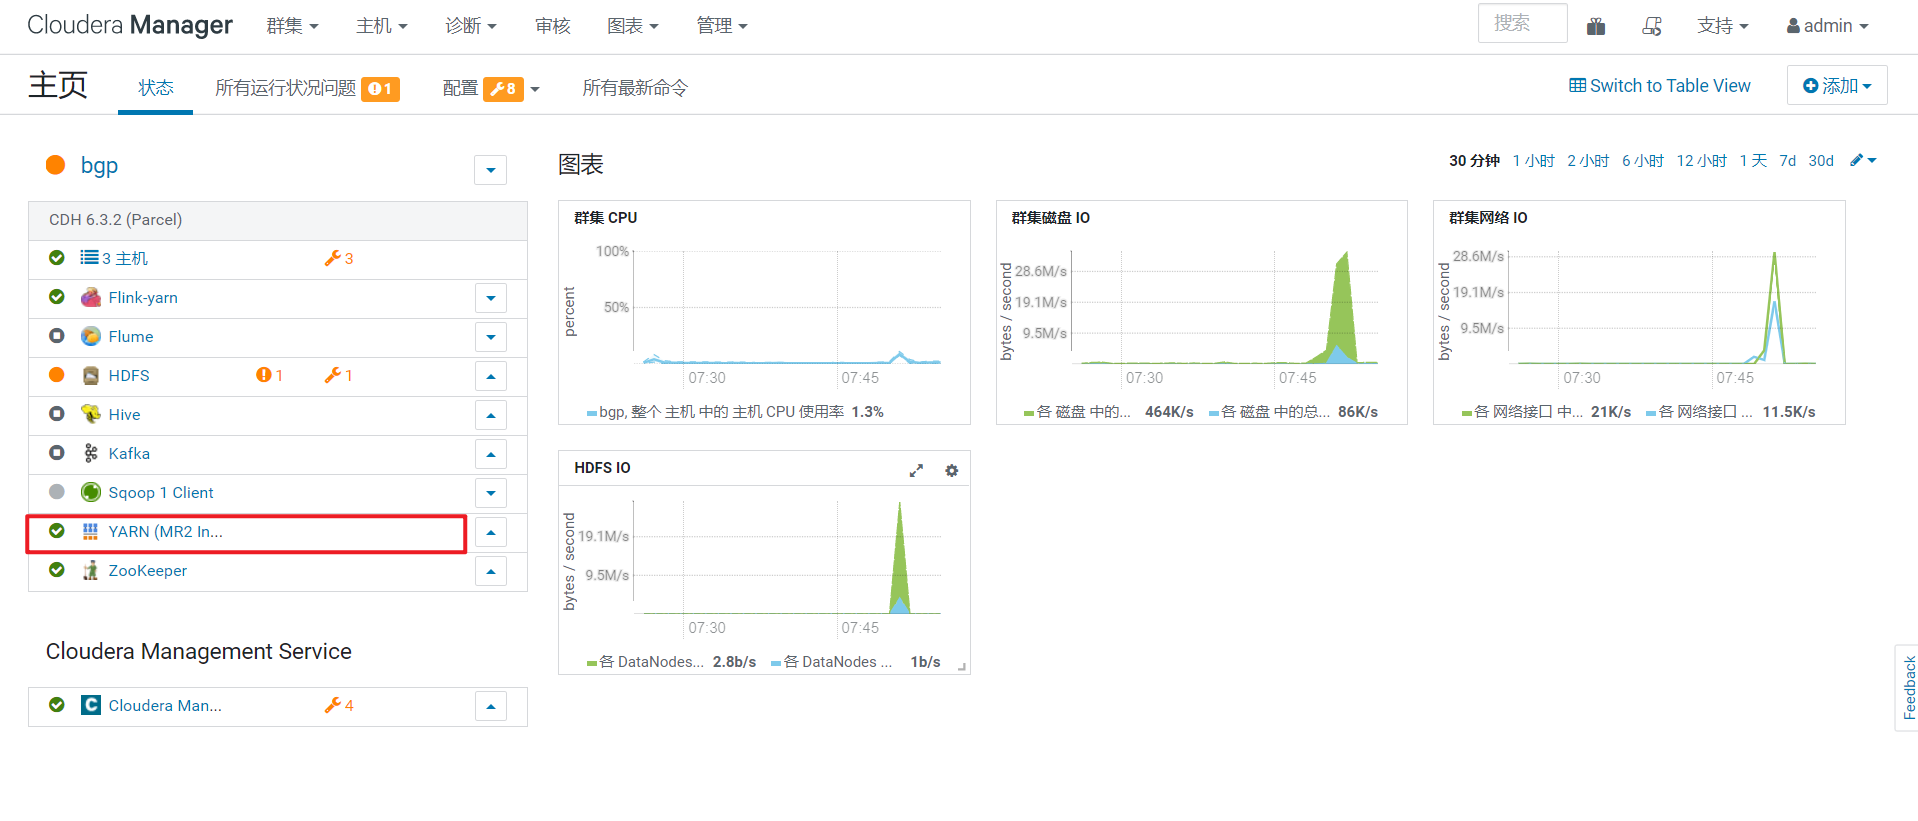
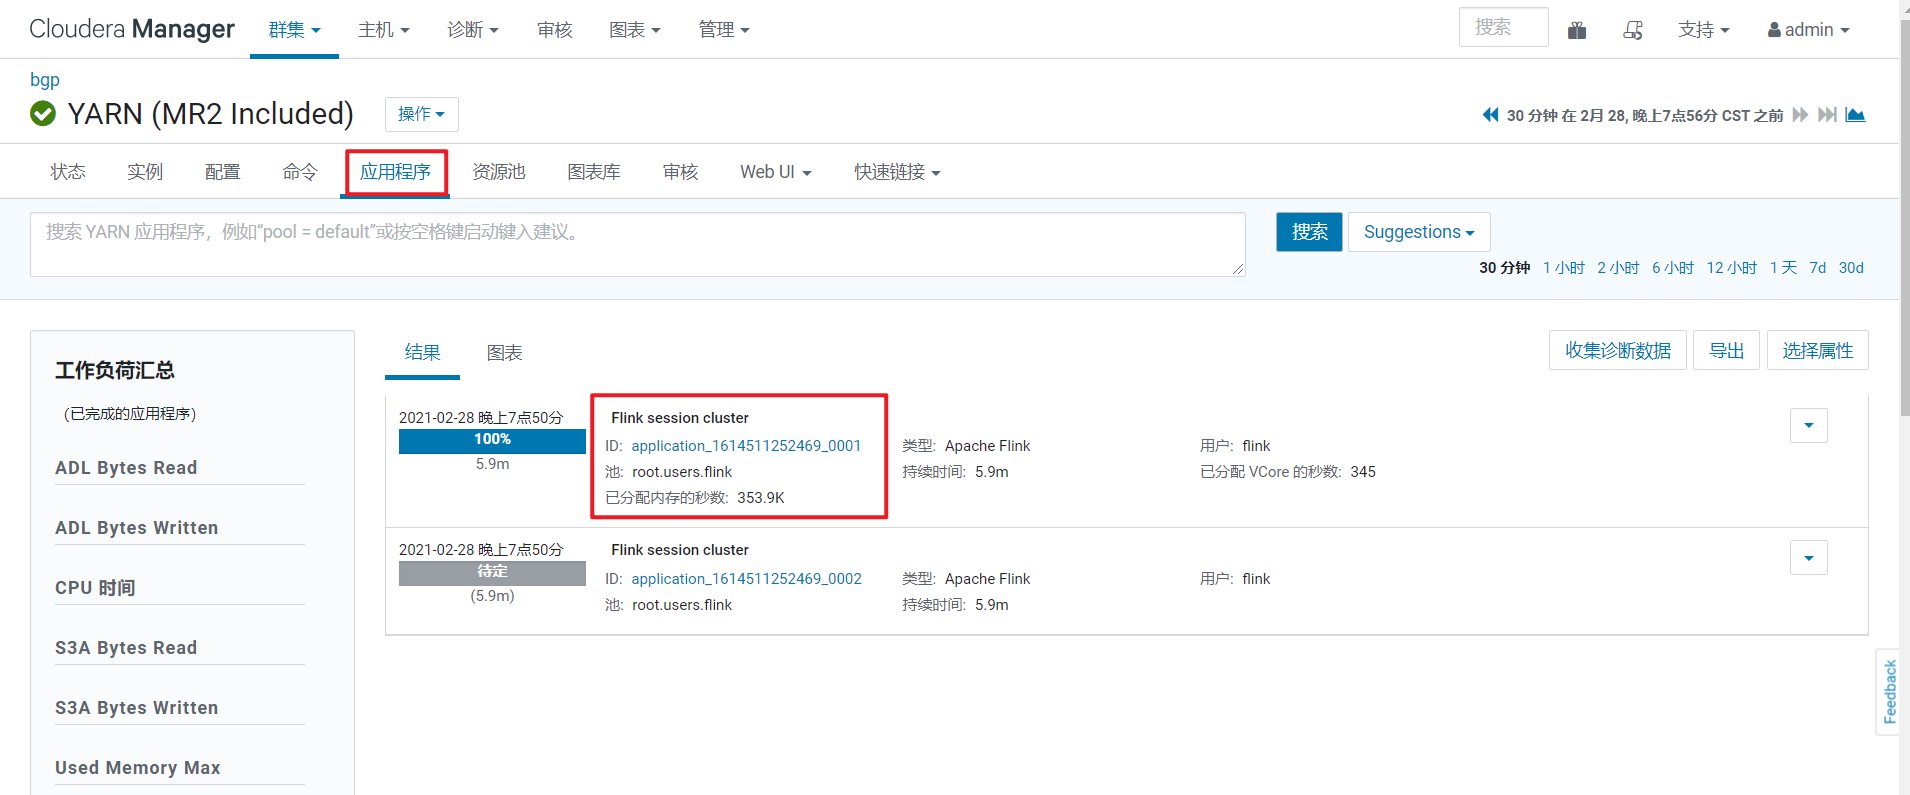
查看应用程序,其中的Flink sessopm cluster即为Flink on yarn进程
参考资料
基于CentOS 7.2的CDH 6.3.2 Flink编译源码


