- 1融合卷积和注意力机制:有效整合它们优势的方法概述
- 2LeetCode刷题day33_root = [1,3,2,5,3,null,9]
- 3PostgreSQL9.6迁移至16.2_only authenticationcleartextpassword and authentic
- 4SpringBoot简介
- 5Linux内核常用调优参数
- 6常用数据结构与经典算法 简单讲解与示例代码_数据结构与算法简单代码
- 7Docker consul 容器服务更新与发现
- 8threejs加载三维字体_threejs 背光字
- 9Python将log日志保存至指定文件_python记录日志并保存到指定文件夹
- 10Android Studio初学者实例:SQLite实验:绿豆通讯录
DogChat:基于SpringBoot+Vue的在线群聊系统设计与实现_vue3+springboot搭建聊天室项目
赞
踩
一、项目简介
1 功能简介
本项目实现了一个在线群聊系统,支持用户注册、用户登录、查看当前在线用户、查看历史消息、发送消息、实时接收消息等功能。
2 技术简介
本项目采用前后端分离架构模式。
前端基于Vue框架,应用Acro Design组件库、Axios等技术开发。
后端基于SpringBoot,应用了MyBatis、MyBatisPlus等框架,为方便开发过程,还引入了Gson、Lombok、Spring Validation等库。
使用WebSocket技术实现后端向前端推送消息的功能。
3 代码仓库地址
https://gitee.com/dk-liu-heng/dog-chat
二、后端设计与实现
1 建表
要实现一个系统,第一步便是分析需求,并建立相关的数据库表。由系统需求可知,需要用户表、聊天记录表两张数据库表。建表语句如下,建表sql文件位于后端项目sql文件夹内。其中用户表复用了标准User表,多余属性未做删减,方便日后对系统进行功能扩展。
# 数据库初始化
# @author heng

-- 创建库
create database if not exists groupchat;

-- 切换库
use groupchat;

-- 创建用户表
drop table if exists user;
create table user
(
    id bigint auto_increment comment 'id' primary key,
    nickname varchar(128) null comment '用户昵称',
    username varchar(128) not null comment '用户账号',
    password varchar(128) not null comment '用户密码',
    gender tinyint null comment '性别',
    phone varchar(128) null comment '用户手机号',
    avatar varchar(512) null comment '用户头像',
    profile varchar(512) null comment '用户简介',
    status int default 0 not null comment '用户状态 0-正常',
    role int default 0 not null comment '用户角色 0-普通用户 1-管理员',
    createTime datetime default CURRENT_TIMESTAMP not null comment '创建时间',
    updateTime datetime default CURRENT_TIMESTAMP not null on update CURRENT_TIMESTAMP comment '更新时间',
    deleted tinyint default 0 not null comment '是否已删除',
    index idx_username (username)
) comment '用户' collate = utf8mb4_unicode_ci;

-- 聊天记录表
drop table if exists chat_record;
create table chat_record
(
    id bigint auto_increment comment 'id' primary key,
    username varchar(128) not null comment '发送消息用户的账号',
    content text comment '消息内容',
    createTime datetime default CURRENT_TIMESTAMP not null comment '创建时间',
    updateTime datetime default CURRENT_TIMESTAMP not null on update CURRENT_TIMESTAMP comment '更新时间'
) comment '聊天记录' collate = utf8mb4_unicode_ci;
- 1
- 2
- 3
- 4
- 5
- 6
- 7
- 8
- 9
- 10
- 11
- 12
- 13
- 14
- 15
- 16
- 17
- 18
- 19
- 20
- 21
- 22
- 23
- 24
- 25
- 26
- 27
- 28
- 29
- 30
- 31
- 32
- 33
- 34
- 35
- 36
- 37
- 38
- 39
2 项目架构
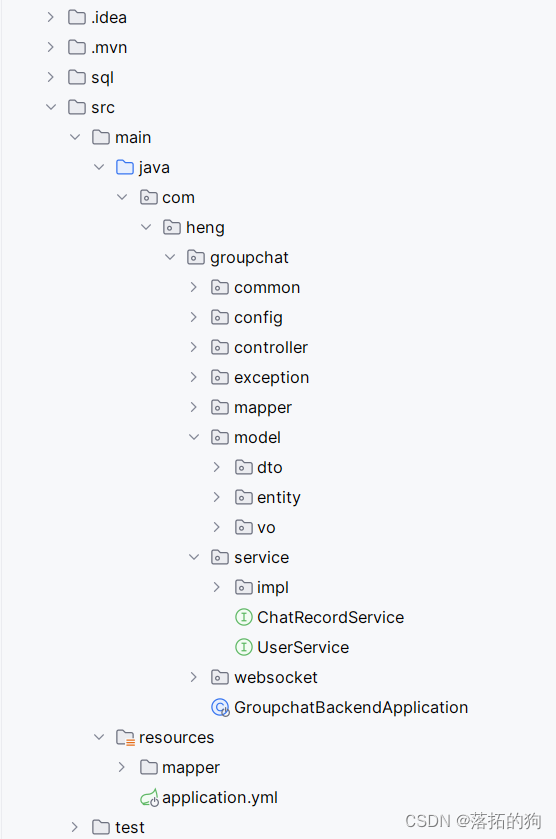
后端项目整体架构如下图所示。对各包作简要说明如下:
- common:公用类包。
- config:配置类包。
- controller:控制层。
- exception:异常类包及全局异常处理器。
- mapper:数据库访问Mapper。
- model:模型包;
- dto:数据转换对象包,存放用于接收前端请求的对象。
- entity:数据库实体对象包。
- vo:视图对象包,存放用于返回给前端的对象。
- service:服务层。
- websocket:存放与websocket相关的类。
3 项目要点:使用WebSocket技术实现消息实时推送
引入依赖
<dependency>
    <groupId>org.springframework.boot</groupId>
    <artifactId>spring-boot-starter-websocket</artifactId>
</dependency>
- 1
- 2
- 3
- 4
WebSocket配置类
package com.heng.groupchat.config;

import org.springframework.context.annotation.Bean;
import org.springframework.context.annotation.Configuration;
import org.springframework.web.socket.server.standard.ServerEndpointExporter;

@Configuration
public class WebSocketConfig {

    @Bean
    public ServerEndpointExporter serverEndpointExporter() {
        return new ServerEndpointExporter();
    }

}
- 1
- 2
- 3
- 4
- 5
- 6
- 7
- 8
- 9
- 10
- 11
- 12
- 13
- 14
- 15
WebSocket初始化与消息推送函数实现
因为需要向所有已连接的前端实时推送消息,我们就要每个连接的Session存储起来,这在onOpen()函数中实现,也就是建立websocket连接的时候。向所有用户发送消息,其实就是遍历存储的Session列表并逐一推送。
package com.heng.groupchat.websocket;

import jakarta.websocket.*;
import jakarta.websocket.server.PathParam;
import jakarta.websocket.server.ServerEndpoint;
import lombok.extern.slf4j.Slf4j;
import org.springframework.stereotype.Component;

import java.util.ArrayList;
import java.util.List;
import java.util.concurrent.CopyOnWriteArraySet;

@Slf4j
@Component
@ServerEndpoint("/websocket/{userId}")
public class WebSocket {

    private Session session;

    private String userId;

    private static final CopyOnWriteArraySet<WebSocket> webSockets =new CopyOnWriteArraySet<>();

    @OnOpen
    public void onOpen(Session session, @PathParam(value="userId")String userId) {
        this.session = session;
        this.userId = userId;
        webSockets.add(this);
        sendAllMessage("{\"user\":\""+userId+"\"}");
    }

    @OnClose
    public void onClose() {
        webSockets.remove(this);
    }

    public void sendAllMessage(String message) {
        for(WebSocket webSocket : webSockets) {
            if(webSocket.session.isOpen()) {
                webSocket.session.getAsyncRemote().sendText(message);
            }
        }
    }

    public List<String> getAllUser() {
        List<String> users = new ArrayList<>();
        for(WebSocket webSocket : webSockets) {
            if(webSocket.session.isOpen()) {
                users.add(webSocket.userId);
            }
        }
        return users;
    }
}
- 1
- 2
- 3
- 4
- 5
- 6
- 7
- 8
- 9
- 10
- 11
- 12
- 13
- 14
- 15
- 16
- 17
- 18
- 19
- 20
- 21
- 22
- 23
- 24
- 25
- 26
- 27
- 28
- 29
- 30
- 31
- 32
- 33
- 34
- 35
- 36
- 37
- 38
- 39
- 40
- 41
- 42
- 43
- 44
- 45
- 46
- 47
- 48
- 49
- 50
- 51
- 52
- 53
- 54
在本系统中,有两处情况需要向用户推送消息。
一是有新用户加入时,因为前端需要实时展示当前在线用户。这里我们只需要在新用户建立websocket连接时调用消息推送函数即可。我们向前端统一推送JSON格式数据,user表示当前推送的是新用户消息。
    @OnOpen
    public void onOpen(Session session, @PathParam(value="userId")String userId) {
        this.session = session;
        this.userId = userId;
        webSockets.add(this);
        sendAllMessage("{\"user\":\""+userId+"\"}");
    }
- 1
- 2
- 3
- 4
- 5
- 6
- 7
第二处是有用户发送新消息时,需要将新消息推送给所有在线用户。这里我们在处理新消息请求的controller层函数中调用消息推送函数。如下,controller层函数先将新消息存入数据库,再将其推送给所有在线用户。
    @GetMapping("/send")
    public BaseResponse<Boolean> sendMessage(String content, HttpServletRequest request) {
        ChatRecord chatRecord = new ChatRecord();
        chatRecord.setUsername(userService.getCurrentUser(request).getUsername());
        chatRecord.setContent(content);
        chatRecordService.save(chatRecord);
        ChatRecordVO recordVO = ChatRecordVO.objToVO(chatRecord);
        log.info(recordVO.toString());
        Gson gson = new Gson();
        String recordVOJson = gson.toJson(recordVO);
        webSocket.sendAllMessage("{\"message\":"+recordVOJson+"}");
        return ResultUtils.success(true);
    }
- 1
- 2
- 3
- 4
- 5
- 6
- 7
- 8
- 9
- 10
- 11
- 12
- 13
4 项目要点:Session机制实现24小时内自动登录
Session与Cookie功能效果基本相同,都用来保存键值对,区别在于Session是保存在服务端的,而Cookie是保存在客户端的。
当浏览器第一次访问服务器时,服务器创建一个Session对象(该对象有一个唯一的id),服务器会将SessionId以Cookie的方式发送给浏览器。当浏览器再次访问服务器时,会将SessionId发送过来,服务器依据SessionId就可以找到对应的Session对象。
要利用Session机制实现自动登录很简单。首先,要确保Session在24小时内不会过期被清除掉,如果Session被清除掉了,那自然就无法保存登录信息。要控制Session的过期时间,只需在配置文件application.yml中进行配置。
# 公共配置文件
spring:
  application:
    name: groupchat-backend

  # session 配置
  session:
    # 24 小时过期
    timeout: 86400

server:
  port: 8081
  servlet:
    session:
      cookie:
        # cookie 24 小时过期
        max-age: 86400
- 1
- 2
- 3
- 4
- 5
- 6
- 7
- 8
- 9
- 10
- 11
- 12
- 13
- 14
- 15
- 16
- 17
接下来,我们在用户成功登录后将登录信息存入Session,关键在于语句request.getSession().setAttribute("USER_LOGIN_STATE", user);。
	/**
     * 用户登录
     *
     * @param userLoginRequest 用户登录请求体
     * @return 用户信息响应体
     */
	@PostMapping("/login")
    public BaseResponse<UserVO> userLogin(
        @NotNull @Valid @RequestBody UserLoginRequest userLoginRequest,
        HttpServletRequest request
    ) {
        String username = userLoginRequest.getUsername();
        String password = userLoginRequest.getPassword();
        User user = userService.getUserByUsername(username);
        if(!user.getPassword().equals(password)) {
            throw new BusinessException(StatusCode.LOGIN_ERROR, "密码错误");
        }
        request.getSession().setAttribute("USER_LOGIN_STATE", user);
        // 返回用户视图
        UserVO userVO = UserVO.objToVO(user);
        return ResultUtils.success(userVO);
    }
- 1
- 2
- 3
- 4
- 5
- 6
- 7
- 8
- 9
- 10
- 11
- 12
- 13
- 14
- 15
- 16
- 17
- 18
- 19
- 20
- 21
- 22
此时,用户的登录信息已经保存到Session中,我们提供一个接口getCurrentUser用于获取当前登录用户。
	/**
     * 获取当前用户
     * @return 用户信息响应体
     */
    @GetMapping("/current")
    public BaseResponse<UserVO> getCurrentUser(HttpServletRequest request) {
        User user = userService.getCurrentUser(request);
        UserVO userVO = UserVO.objToVO(user);
        return ResultUtils.success(userVO);
    }
- 1
- 2
- 3
- 4
- 5
- 6
- 7
- 8
- 9
- 10
Service层实现如下:
	/**
     * 获取当前登录用户
     *
     * @param request HTTP请求
     * @return 当前登录用户
     */
    @Override
    public User getCurrentUser(HttpServletRequest request) {
        Object userObj = request.getSession().getAttribute("USER_LOGIN_STATE");
        User currentUser = (User) userObj;
        if (currentUser == null || currentUser.getId() == null) {
            throw new BusinessException(StatusCode.LOGIN_ERROR, "未登录");
        }
        return currentUser;
    }
- 1
- 2
- 3
- 4
- 5
- 6
- 7
- 8
- 9
- 10
- 11
- 12
- 13
- 14
- 15
在每次进入聊天界面之前,通过getCurrentUser接口就能获取到后端Session中保存的登录信息。这样,我们关闭浏览器后重新打开页面,就能维持登录状态了。
5 其他部分
基于MyBatisPlus框架实现数据库访问
MyBatisPlus对MyBatis进行了进一步封装,使数据库访问更加便捷。
创建mapper.xml
mapper.xml文件一般无需编写任何内容,常用数据库操作MyBatisPlus都已封装好。
<?xml version="1.0" encoding="UTF-8"?>
<!DOCTYPE mapper
        PUBLIC "-//mybatis.org//DTD Mapper 3.0//EN"
        "http://mybatis.org/dtd/mybatis-3-mapper.dtd">
<mapper namespace="com.heng.groupchat.mapper.ChatRecordMapper">

</mapper>
- 1
- 2
- 3
- 4
- 5
- 6
- 7
创建Mapper接口
Mapper接口也无须自己编写内容,只需继承MyBatisPlus的封装类即可。
package com.heng.groupchat.mapper;

import com.baomidou.mybatisplus.core.mapper.BaseMapper;
import com.heng.groupchat.model.entity.ChatRecord;

public interface ChatRecordMapper extends BaseMapper<ChatRecord> {

}
- 1
- 2
- 3
- 4
- 5
- 6
- 7
- 8
- 9
创建Service接口及实现类
Service接口
package com.heng.groupchat.service;

import com.baomidou.mybatisplus.extension.plugins.pagination.Page;
import com.baomidou.mybatisplus.extension.service.IService;
import com.heng.groupchat.model.entity.ChatRecord;
import com.heng.groupchat.model.entity.User;
import com.heng.groupchat.model.vo.ChatRecordVO;

/**
 * 聊天记录服务接口
 *
 * @author heng
 * @description 针对表 chat_record 的数据库操作 Service
 */
public interface ChatRecordService extends IService<ChatRecord> {

}
- 1
- 2
- 3
- 4
- 5
- 6
- 7
- 8
- 9
- 10
- 11
- 12
- 13
- 14
- 15
- 16
- 17
实现类
package com.heng.groupchat.service.impl;

import com.baomidou.mybatisplus.extension.service.impl.ServiceImpl;
import com.heng.groupchat.mapper.ChatRecordMapper;
import com.heng.groupchat.model.entity.ChatRecord;
import com.heng.groupchat.service.ChatRecordService;
import lombok.extern.slf4j.Slf4j;
import org.springframework.stereotype.Service;
import org.springframework.transaction.annotation.Transactional;

/**
 * 聊天记录服务实现类
 *
 * @author heng
 * @description 针对表 chat_record 的数据库操作 Service
 */
@Slf4j
@Service
@Transactional
public class ChatRecordServiceImpl extends ServiceImpl<ChatRecordMapper, ChatRecord>
        implements ChatRecordService {
}
- 1
- 2
- 3
- 4
- 5
- 6
- 7
- 8
- 9
- 10
- 11
- 12
- 13
- 14
- 15
- 16
- 17
- 18
- 19
- 20
- 21
- 22
基于Service CRUD操作示例
注意:此处非ChatController 类完整代码,只是主要保留了Service层使用的一个示例,完整代码可参考代码仓库。
@Slf4j
@RestController
@RequestMapping("/chat")
public class ChatController {

    @Resource
    private ChatRecordService chatRecordService;

    @GetMapping("/get")
    public BaseResponse<List<ChatRecordVO>> getChatRecords() {
        List<ChatRecord> recordList = chatRecordService.list();
        List<ChatRecordVO> recordVOList =
            recordList.stream().map(ChatRecordVO::objToVO).collect(Collectors.toList());
        return ResultUtils.success(recordVOList);
    }
}
- 1
- 2
- 3
- 4
- 5
- 6
- 7
- 8
- 9
- 10
- 11
- 12
- 13
- 14
- 15
- 16
全局异常拦截器
当业务发生异常时,建议通过全局异常拦截器拦截并处理所有异常,以实现解耦,方便项目管理。
package com.heng.groupchat.exception;

import com.heng.groupchat.common.BaseResponse;
import com.heng.groupchat.common.ResultUtils;
import com.heng.groupchat.common.StatusCode;
import lombok.extern.slf4j.Slf4j;
import org.springframework.validation.BindException;
import org.springframework.web.bind.annotation.ExceptionHandler;
import org.springframework.web.bind.annotation.RestControllerAdvice;

/**
 * 全局异常处理器
 *
 * @author heng
 */
@RestControllerAdvice
@Slf4j
public class GlobalExceptionHandler {

    /**
     * 拦截并处理业务异常
     * @param e 业务异常
     * @return 响应类
     */
    @ExceptionHandler(BusinessException.class)
    public BaseResponse<?> businessExceptionHandler(BusinessException e) {
        log.error("businessException: " + e.getMessage(), e);
        return ResultUtils.error(e.getCode(), e.getMessage());
    }

    /**
     * 拦截并处理参数校验异常
     * @param e 参数校验异常
     * @return 响应类
     */
    @ExceptionHandler(BindException.class)
    public BaseResponse<?> bindExceptionHandler(BindException e) {
        log.error("bindException", e);
        return ResultUtils.error(
                StatusCode.PARAMS_ERROR,
                e.getAllErrors().get(0).getDefaultMessage()
        );
    }

    /**
     * 拦截并处理运行时异常
     * @param e 运行时异常
     * @return 响应类
     */
    @ExceptionHandler(RuntimeException.class)
    public BaseResponse<?> runtimeExceptionHandler(RuntimeException e) {
        log.error("runtimeException", e);
        return ResultUtils.error(StatusCode.SYSTEM_ERROR, e.getMessage());
    }
}
- 1
- 2
- 3
- 4
- 5
- 6
- 7
- 8
- 9
- 10
- 11
- 12
- 13
- 14
- 15
- 16
- 17
- 18
- 19
- 20
- 21
- 22
- 23
- 24
- 25
- 26
- 27
- 28
- 29
- 30
- 31
- 32
- 33
- 34
- 35
- 36
- 37
- 38
- 39
- 40
- 41
- 42
- 43
- 44
- 45
- 46
- 47
- 48
- 49
- 50
- 51
- 52
- 53
- 54
- 55
三、前端设计与实现
1 Arco Design
简介
Arco Design 是由字节跳动 UED-火山引擎和架构前端字节云团队联合推出的企业级设计系统。Arco Design 拥有系统的设计规范和资源,同时依据规范提供了丰富的原子组件,覆盖了React、Vue、Mobile 等框架和方向。在原子组件基础上也提供了丰富的定制化工具,包括风格配置平台、物料平台等,也提供了资源平台包括 IconBox、设计资源库、Arco Pro 最佳实践等。旨在帮助设计师与开发者解放双手,提升工作效率。更高效、高质量的打造符合业务规范的中后台应用。
Vue 快速上手
安装
# npm
npm install --save-dev @arco-design/web-vue
# yarn
yarn add --dev @arco-design/web-vue
- 1
- 2
- 3
- 4
完整引入
import { createApp } from 'vue'
import ArcoVue from '@arco-design/web-vue';
import App from './App.vue';
import '@arco-design/web-vue/dist/arco.css';

const app = createApp(App);
app.use(ArcoVue);
app.mount('#app');
- 1
- 2
- 3
- 4
- 5
- 6
- 7
- 8
2 项目要点:通过websocket接收消息推送
有关websocket技术方面,前端需要进行的工作主要是两点:第一是初始化websocket并向后端发起websocket连接请求,第二是当后端推送消息时进行处理。
websocket初始化函数如下:
let websocket;

const initWebSocket = () => {
  const userId = currentUser.username;
  const url = "ws://localhost:8081/websocket/" + userId;
  websocket = new WebSocket(url);
  websocket.onmessage = websocketOnMessage;
};
- 1
- 2
- 3
- 4
- 5
- 6
- 7
- 8
我们在用户进入聊天页面时调用此函数,完成websocket的连接。
onMounted(() => {
    initWebSocket();
  }
});
- 1
- 2
- 3
- 4
在websocket初始化函数中,websocket.onmessage = websocketOnMessage;设置处理后端消息的函数为websocketOnMessage,该函数如下。后端以JSON格式推送消息,当前端收到消息时,首先判断消息类型,是新用户还是新聊天记录,然后做相应的处理。其中,userList与chatRecords均为响应式对象,修改后会体现在页面上。
const websocketOnMessage = (e) => {
  let data = JSON.parse(e.data);
  if (data?.user) {
    if (!userList.includes(data.user)) {
      userList.push(data.user);
    }
  }
  if (data?.message) {
    chatRecords.value.push(data.message);
    const mainContent = document.getElementById("mainContent");
    setTimeout(() => {
      mainContent.scrollTo({ top: mainContent.scrollHeight, left: 100 });
    });
  }
};
- 1
- 2
- 3
- 4
- 5
- 6
- 7
- 8
- 9
- 10
- 11
- 12
- 13
- 14
- 15
3 登录页面的设计
用户进入聊天页面前必须先进行登录,所以在聊天页面挂载时对用户登录状态进行判断,若未登录,则跳转至登录页面。
onMounted(async () => {
  if (currentUser.username === "未登录") {
    await store.dispatch("user/getLoginUser");
    currentUser = store.state.user.currentUser;
  }
  if (currentUser.username === "未登录") {
    await router.push({
      path: "/login",
    });
  } else {
    initWebSocket();
    await loadUserList();
    await loadChatRecords();
  }
});
- 1
- 2
- 3
- 4
- 5
- 6
- 7
- 8
- 9
- 10
- 11
- 12
- 13
- 14
- 15
用户的登录状态使用store存储。
import { StoreOptions } from "vuex";
import axios from "axios";

export default {
  namespaced: true,
  state: () => ({
    currentUser: {
      username: "未登录",
    },
  }),
  actions: {
    async getLoginUser({ commit }) {
      // 从远程请求获取登录信息
      const res = await axios({
        method: "get",
        url: "http://localhost:8081/user/current",
      });
      if (res.data.code === 0) {
        commit("updateUser", res.data.data);
      }
    },
  },
  mutations: {
    updateUser(state, payload) {
      state.currentUser.username = payload.username;
    },
  },
} as StoreOptions<any>;
- 1
- 2
- 3
- 4
- 5
- 6
- 7
- 8
- 9
- 10
- 11
- 12
- 13
- 14
- 15
- 16
- 17
- 18
- 19
- 20
- 21
- 22
- 23
- 24
- 25
- 26
- 27
- 28
登录页面设计如下,用户成功登录后更新store状态,并跳转至聊天页面。
<template>
  <div id="userLoginView">
    <a-space style="margin-bottom: 32px" size="medium">
      <img
        src="../assets/dog-logo.png"
        style="width: 32px"
        class="logo"
        alt="logo"
      />
      <span style="font-family: 'consolas', serif; font-size: 20px">
        Dog Chat
      </span>
    </a-space>
    <a-form
      style="max-width: 360px; margin: 0 auto"
      label-align="left"
      auto-label-width
      :model="form"
      @submit-success="handleSubmit"
    >
      <a-form-item hide-label>
        <span style="font-size: 18px">用户登录</span>
      </a-form-item>
      <a-form-item
        field="username"
        :rules="[{ required: true, message: '账户不能为空' }]"
        hide-asterisk
        hide-label
      >
        <a-input v-model="form.username" placeholder="请输入账号" allow-clear>
          <template #prefix>
            <icon-user />
          </template>
        </a-input>
      </a-form-item>
      <a-form-item
        field="password"
        :rules="[{ required: true, message: '密码不能为空' }]"
        hide-asterisk
        hide-label
      >
        <a-input-password
          v-model="form.password"
          placeholder="请输入密码"
          allow-clear
        >
          <template #prefix>
            <icon-lock />
          </template>
        </a-input-password>
      </a-form-item>
      <a-form-item hide-label>
        <a-col style="width: 100%">
          <a-alert type="error" style="margin-bottom: 20px" v-show="showAlert">
            {{ errorMessage }}
          </a-alert>
          <a-button type="primary" html-type="submit" long>登录</a-button>
        </a-col>
      </a-form-item>
      <a-form-item hide-label>
        <a-row style="width: 100%">
          <a-col :span="12" style="display: flex; justify-content: flex-start">
            <a-link
              style="font-size: small"
              href="/user/password/reset"
              :hoverable="false"
            >
              忘记密码?
            </a-link>
          </a-col>
          <a-col :span="12" style="display: flex; justify-content: flex-end">
            <a-link
              style="font-size: small"
              href="/register"
              :hoverable="false"
            >
              没有账号?立即注册
            </a-link>
          </a-col>
        </a-row>
      </a-form-item>
    </a-form>
  </div>
</template>

<script setup lang="ts">
import { reactive, ref } from "vue";
import { useRouter } from "vue-router";
import { useStore } from "vuex";
import { UserLoginRequest } from "@/models/UserLoginRequest";
import axios from "axios";

/**
 * 表单信息
 */
const form = reactive({
  username: "",
  password: "",
} as UserLoginRequest);

const router = useRouter();
const store = useStore();

const showAlert = ref(false);
const errorMessage = ref("登录失败");

const handleSubmit = async () => {
  const res = await axios({
    method: "post",
    url: "http://localhost:8081/user/login",
    data: form,
  });
  if (res.data.code === 0) {
    await store.dispatch("user/getLoginUser");
    await router.push({
      path: "/",
      replace: true,
    });
  } else {
    errorMessage.value = "登录失败," + res.data.message;
    showAlert.value = true;
  }
};
</script>

<style scoped>
#userLoginView {
  width: 352px;
  margin-top: 128px;
  display: flex;
  flex-direction: column;
  align-items: center;
  border: 1px solid var(--color-neutral-4);
  border-radius: 10px;
  box-shadow: 4px 4px 8px var(--color-neutral-4);
  padding: 24px 32px 32px;
}
</style>
- 1
- 2
- 3
- 4
- 5
- 6
- 7
- 8
- 9
- 10
- 11
- 12
- 13
- 14
- 15
- 16
- 17
- 18
- 19
- 20
- 21
- 22
- 23
- 24
- 25
- 26
- 27
- 28
- 29
- 30
- 31
- 32
- 33
- 34
- 35
- 36
- 37
- 38
- 39
- 40
- 41
- 42
- 43
- 44
- 45
- 46
- 47
- 48
- 49
- 50
- 51
- 52
- 53
- 54
- 55
- 56
- 57
- 58
- 59
- 60
- 61
- 62
- 63
- 64
- 65
- 66
- 67
- 68
- 69
- 70
- 71
- 72
- 73
- 74
- 75
- 76
- 77
- 78
- 79
- 80
- 81
- 82
- 83
- 84
- 85
- 86
- 87
- 88
- 89
- 90
- 91
- 92
- 93
- 94
- 95
- 96
- 97
- 98
- 99
- 100
- 101
- 102
- 103
- 104
- 105
- 106
- 107
- 108
- 109
- 110
- 111
- 112
- 113
- 114
- 115
- 116
- 117
- 118
- 119
- 120
- 121
- 122
- 123
- 124
- 125
- 126
- 127
- 128
- 129
- 130
- 131
- 132
- 133
- 134
- 135
- 136
- 137
- 138
- 139
四、实现效果展示
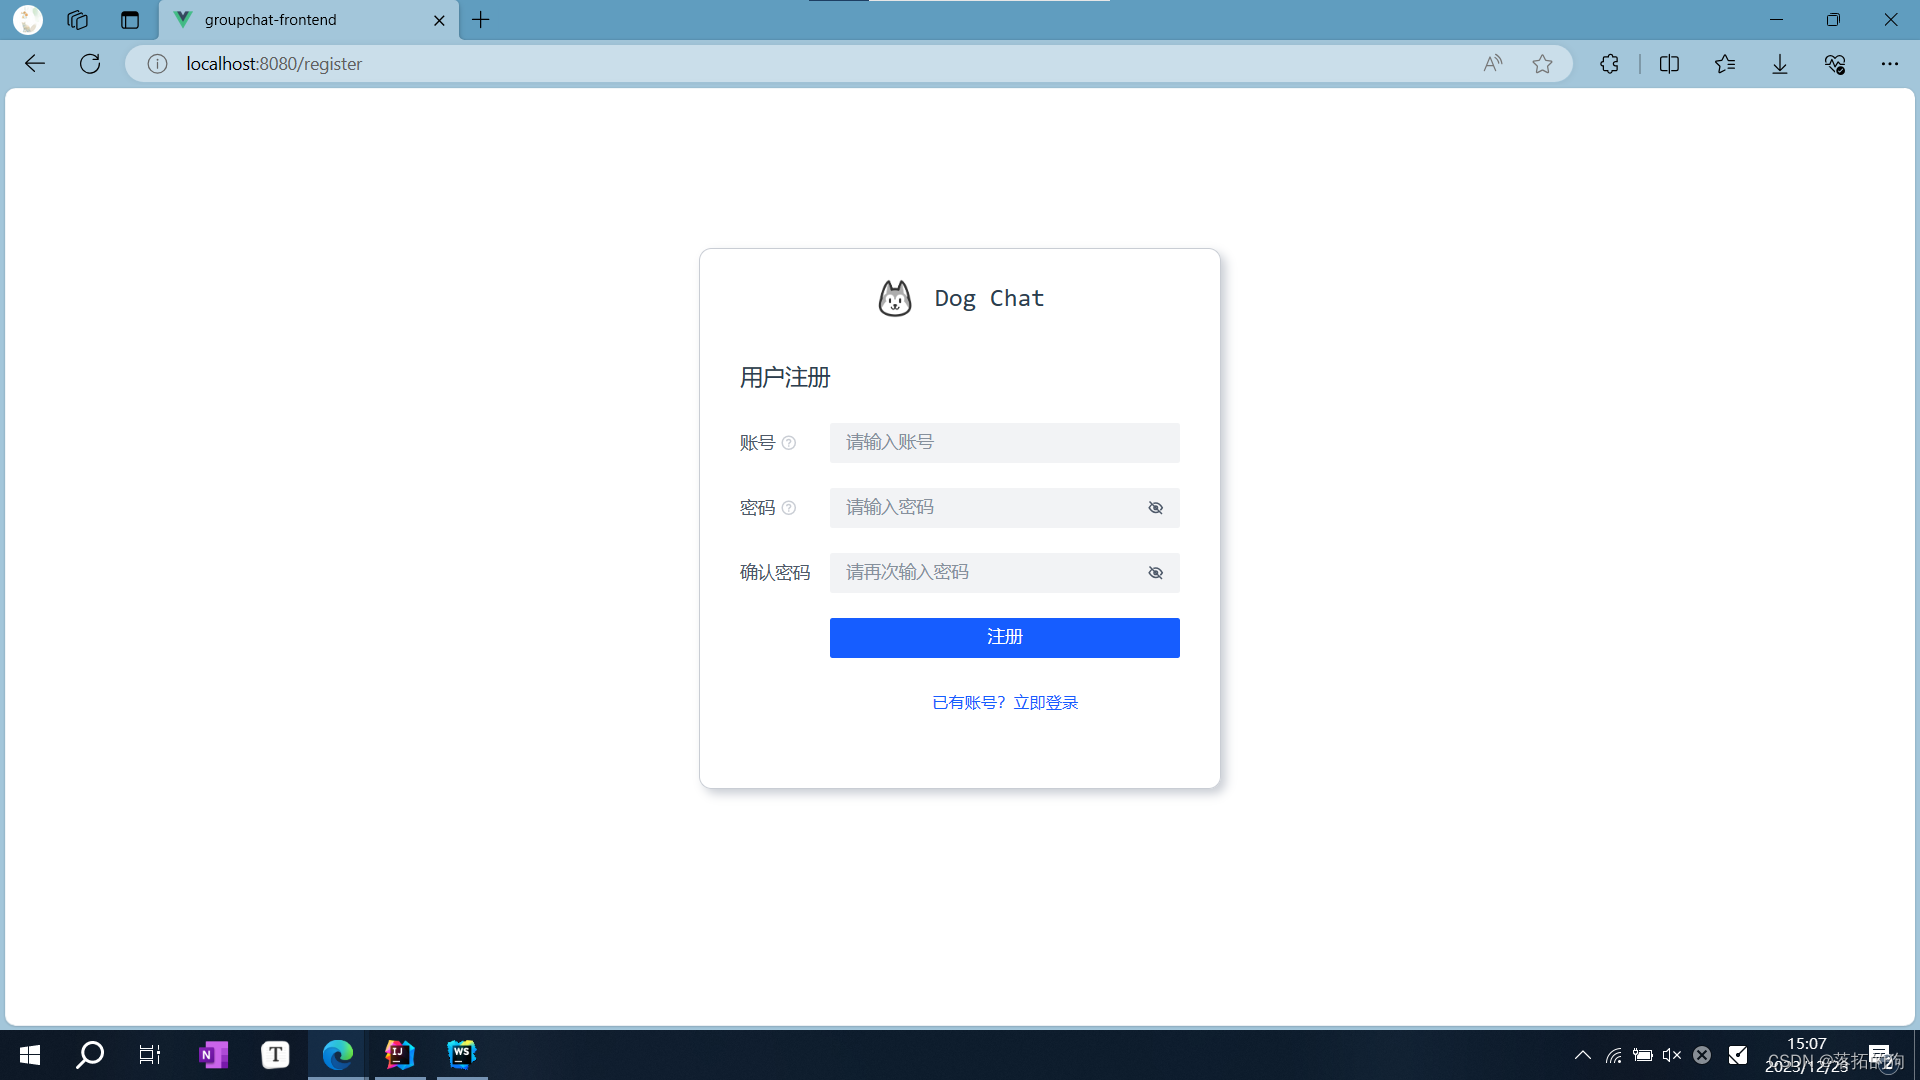
注册页面
注册成功提示与登录页面

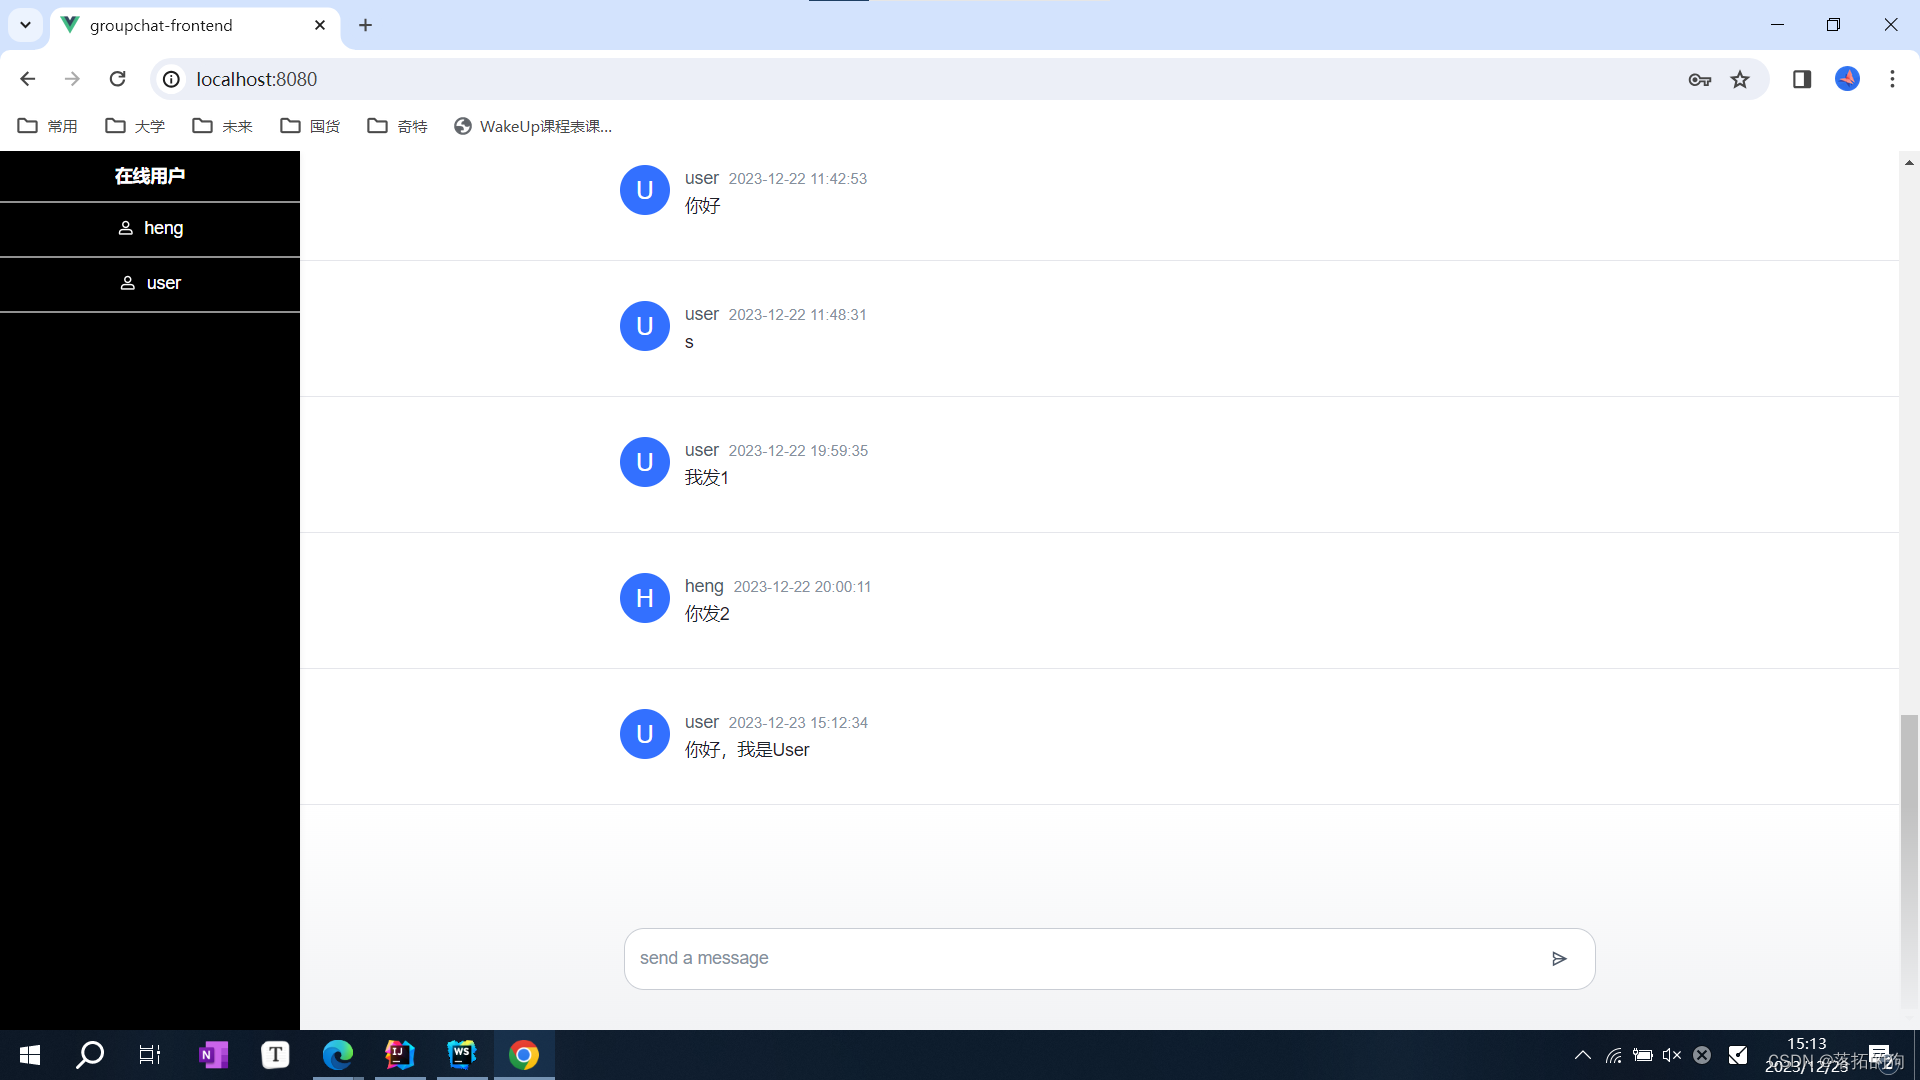
第一位用户user进入聊天页面,此时显示消息为聊天室历史消息。
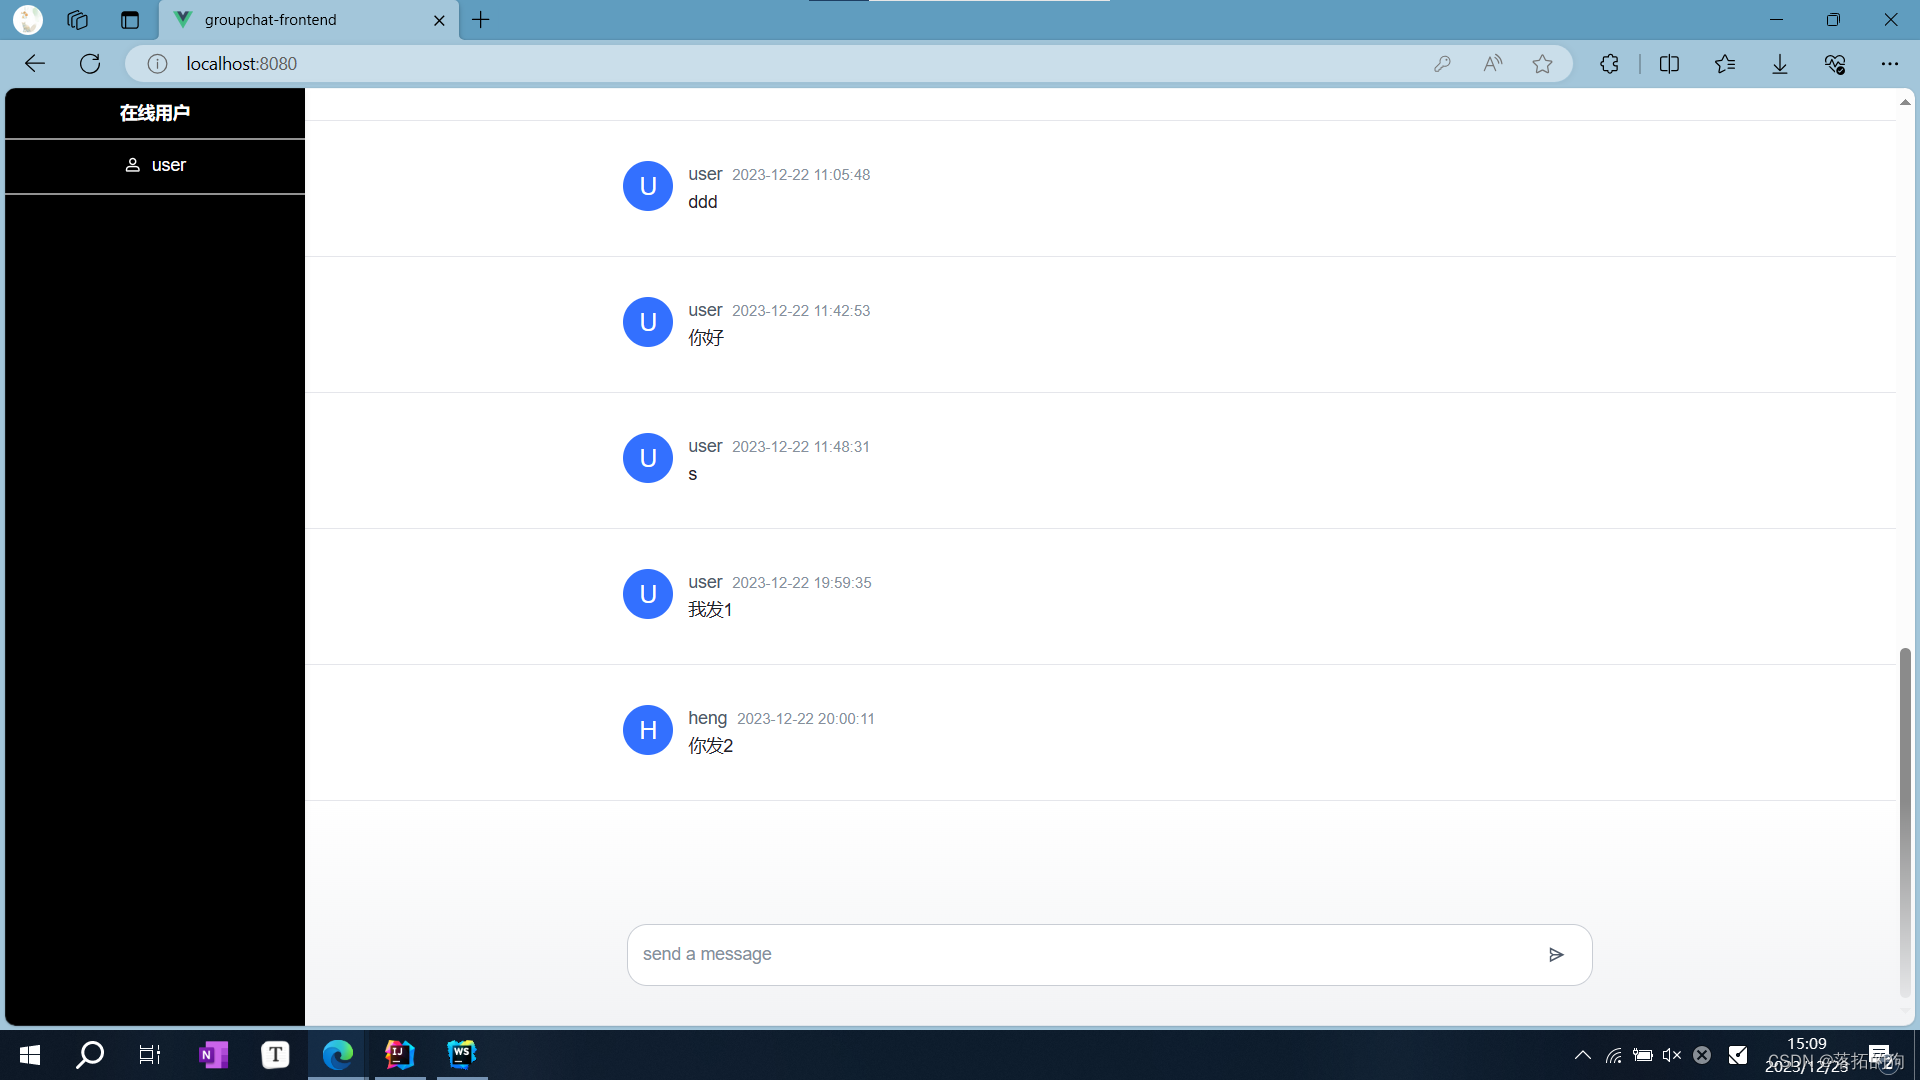
第二位用户heng进入聊天室。
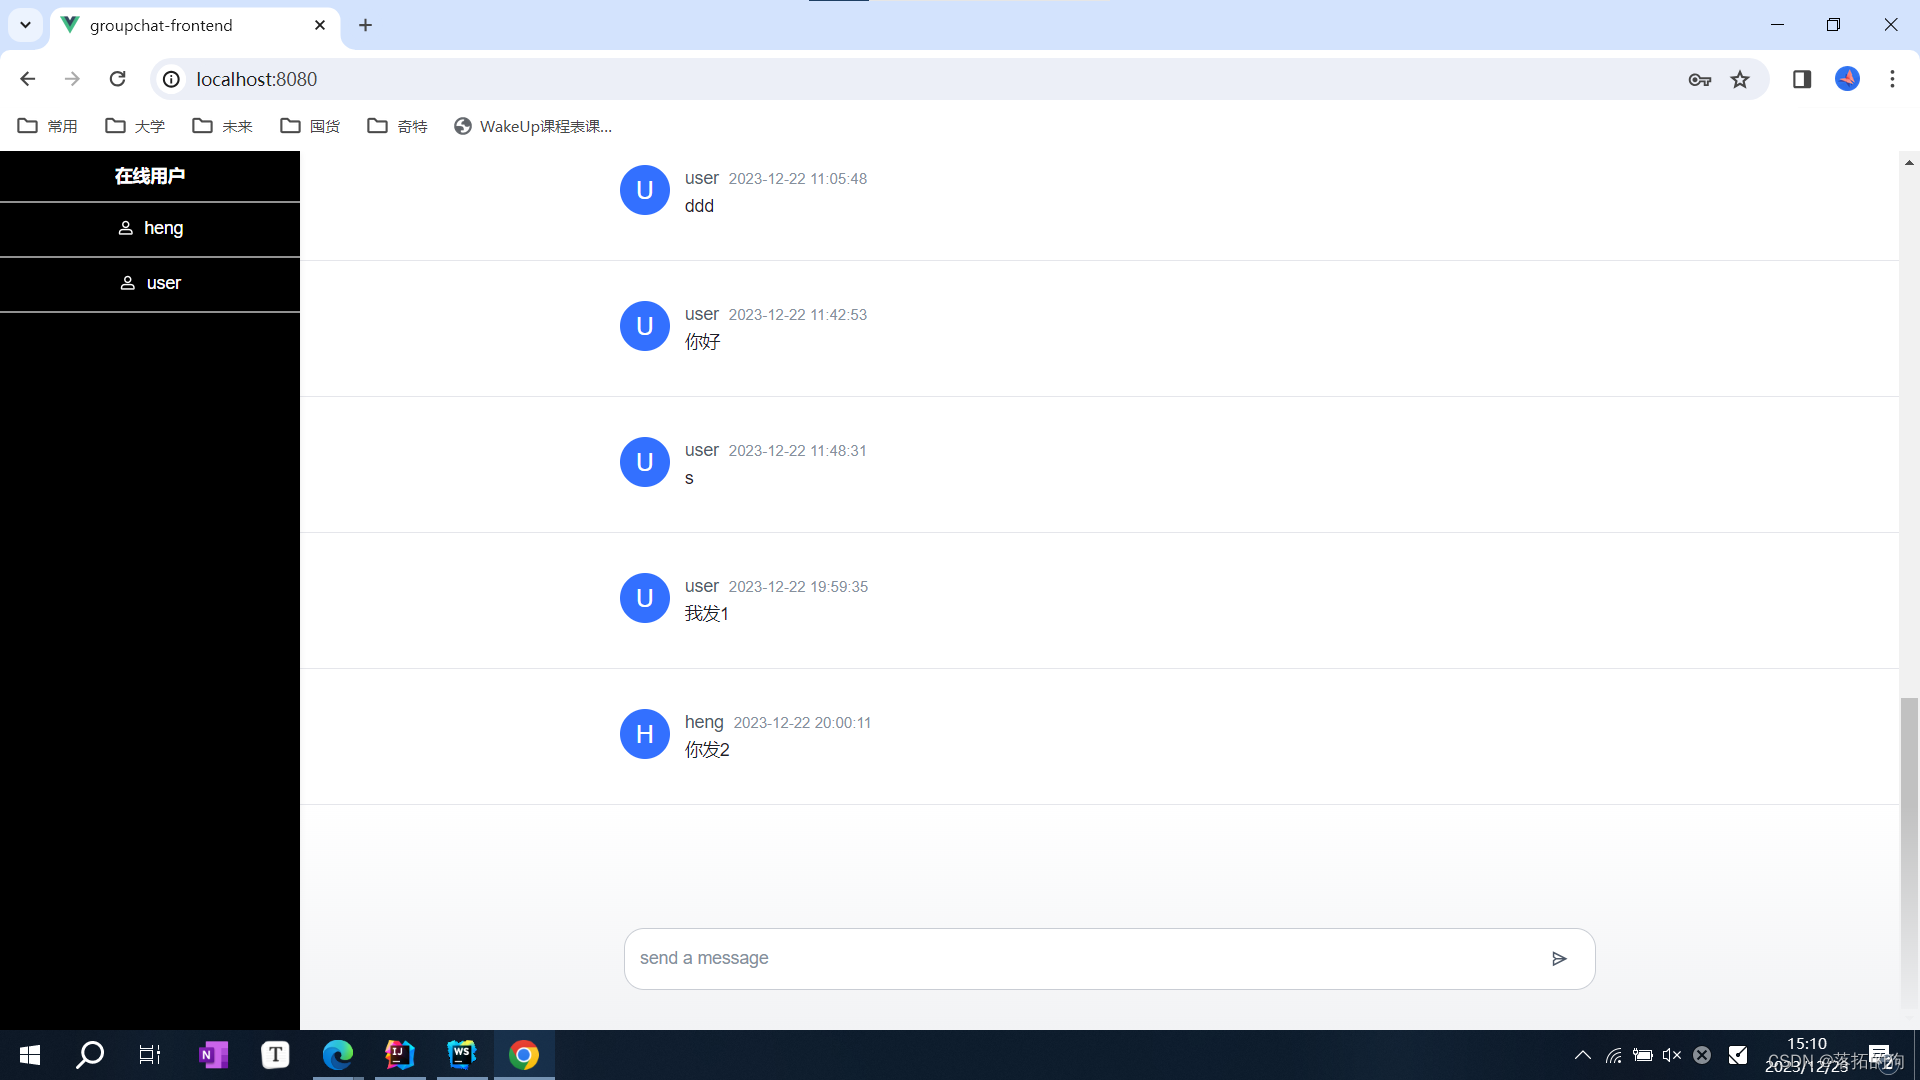
第一位用户user页面上在线用户实时更新
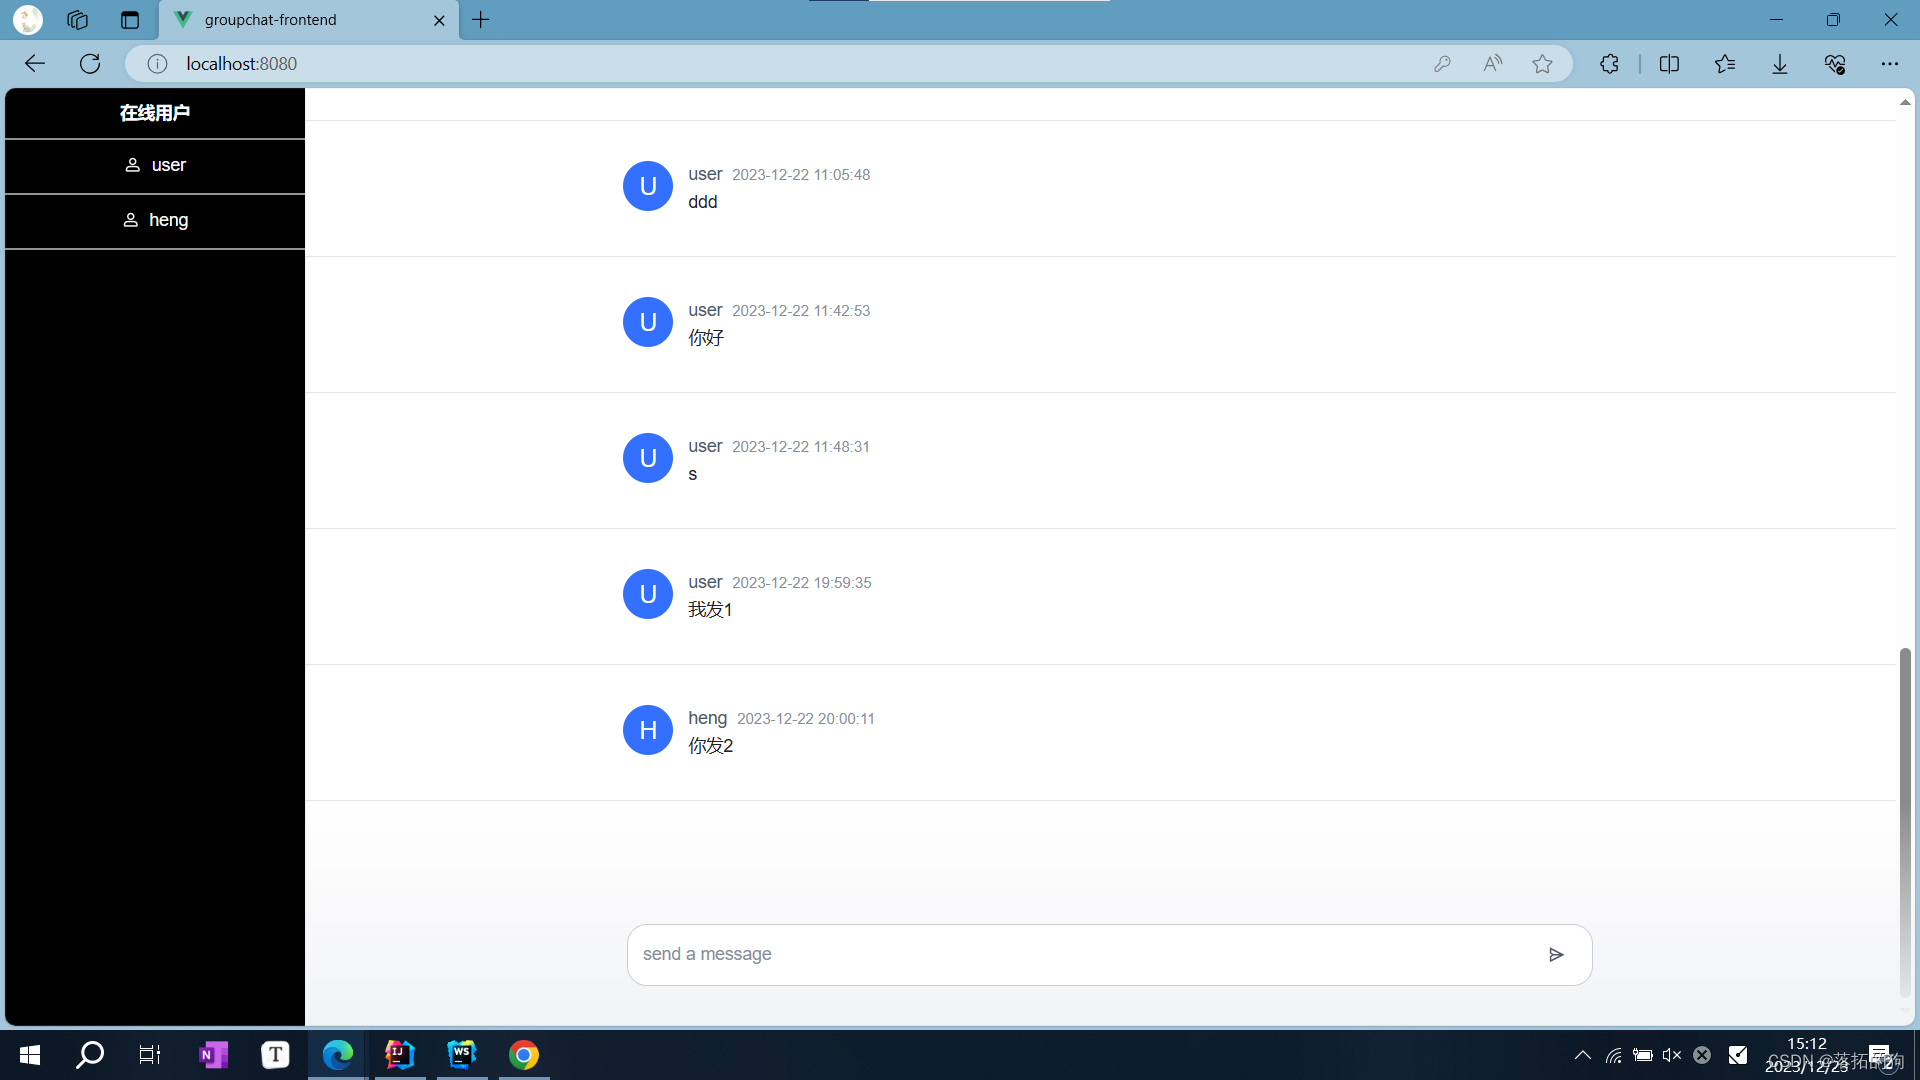
用户user发送新消息
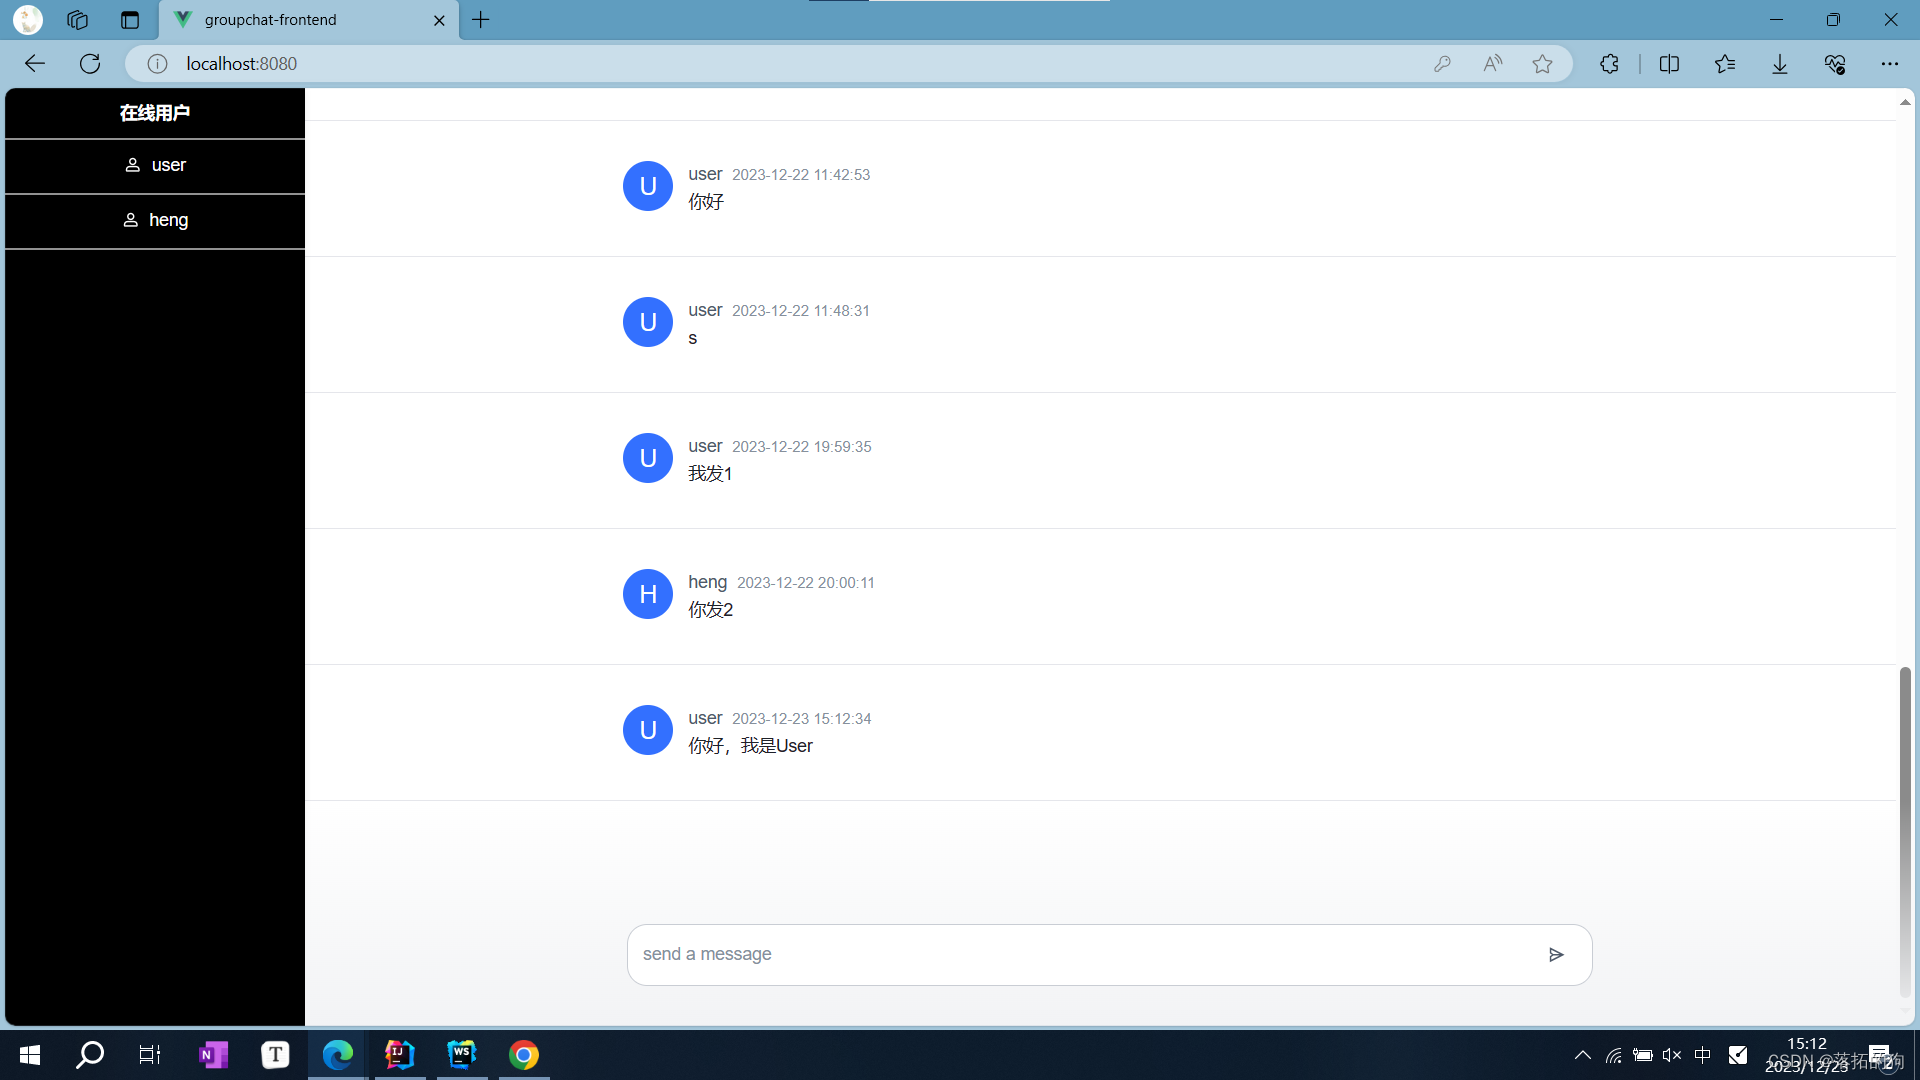
用户heng实时接收到新消息
