- 1SpringBoot项目(百度AI整合)——如何在Springboot中使用文字识别OCR入门_springboot ocr_paddleocrspringboot
- 2基于CUDA编程二维卷积(Conv2)实现_cuda卷积算法
- 3使用讯飞麦克风阵列实现人机对话_讯飞 麦克风阵列 开发
- 4亚马逊AWS IoT_亚马逊iot 查看jobid和thingname情况
- 5秒杀系统设计的 5 个要点:前端三板斧+后端两条路!
- 6Flink开发问题汇总 (持续更新20210219)_cannot instantiate user function
- 7华为OD面试手撕算法-最长不重复子串_od面试算法
- 8python的Dataframe数据,按多列条件筛选行数据_dataframe 多条件筛选
- 9Chat Model聊天模型
- 10简单使用OnlyOffice_onlyoffice使用教程
神器 SpringDoc 横空出世最适合 SpringBoot 的API文档工具来了
赞
踩
之前在SpringBoot项目中一直使用的是SpringFox提供的Swagger库,上了下官网发现已经有接近两年没出新版本了!前几天升级了SpringBoot 2.6.x 版本,发现这个库的兼容性也越来越不好了,有的常用注解属性被废弃了居然都没提供替代!无意中发现了另一款Swagger库SpringDoc,试用了一下非常不错,推荐给大家!
SpringDoc简介
SpringDoc是一款可以结合SpringBoot使用的API文档生成工具,基于OpenAPI 3,目前在Github上已有1.7K+Star,更新发版还是挺勤快的,是一款更好用的Swagger库!值得一提的是SpringDoc不仅支持Spring WebMvc项目,还可以支持Spring WebFlux项目,甚至Spring Rest和Spring Native项目,总之非常强大,下面是一张SpringDoc的架构图。

编辑切换为居中
添加图片注释,不超过 140 字(可选)
使用
接下来我们介绍下SpringDoc的使用,使用的是之前集成SpringFox的mall-tiny-swagger项目,我将把它改造成使用SpringDoc。
集成
首先我们得集成SpringDoc,在pom.xml中添加它的依赖即可,开箱即用,无需任何配置。
<!--springdoc 官方Starter--> <dependency> <groupId>org.springdoc</groupId> <artifactId>springdoc-openapi-ui</artifactId> <version>1.6.6</version> </dependency>
从SpringFox迁移
-
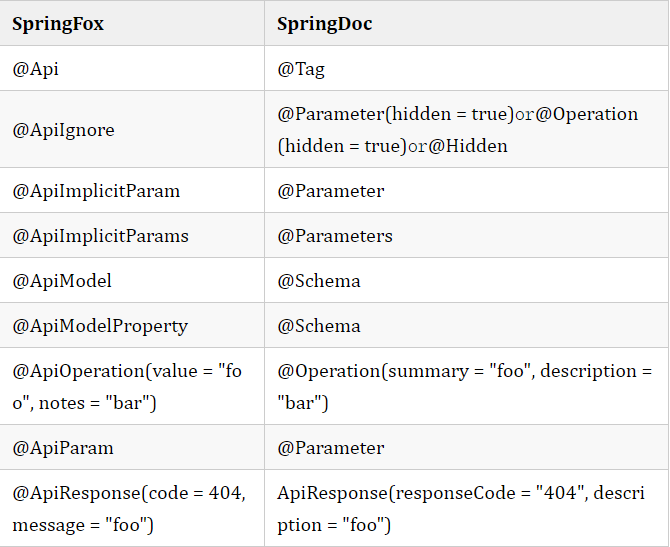
我们先来看下经常使用的Swagger注解,看看SpringFox的和SpringDoc的有啥区别,毕竟对比已学过的技术能该快掌握新技术;
编辑切换为居中
添加图片注释,不超过 140 字(可选)
-
接下来我们对之前Controller中使用的注解进行改造,对照上表即可,之前在@Api注解中被废弃了好久又没有替代的description属性终于被支持了!
/** * 品牌管理Controller * Created by macro on 2019/4/19. */ @Tag(name = "PmsBrandController", description = "商品品牌管理") @Controller @RequestMapping("/brand") public class PmsBrandController { @Autowired private PmsBrandService brandService; private static final Logger LOGGER = LoggerFactory.getLogger(PmsBrandController.class); @Operation(summary = "获取所有品牌列表",description = "需要登录后访问") @RequestMapping(value = "listAll", method = RequestMethod.GET) @ResponseBody public CommonResult<List<PmsBrand>> getBrandList() { return CommonResult.success(brandService.listAllBrand()); } @Operation(summary = "添加品牌") @RequestMapping(value = "/create", method = RequestMethod.POST) @ResponseBody @PreAuthorize("hasRole('ADMIN')") public CommonResult createBrand(@RequestBody PmsBrand pmsBrand) { CommonResult commonResult; int count = brandService.createBrand(pmsBrand); if (count == 1) { commonResult = CommonResult.success(pmsBrand); LOGGER.debug("createBrand success:{}", pmsBrand); } else { commonResult = CommonResult.failed("操作失败"); LOGGER.debug("createBrand failed:{}", pmsBrand); } return commonResult; } @Operation(summary = "更新指定id品牌信息") @RequestMapping(value = "/update/{id}", method = RequestMethod.POST) @ResponseBody @PreAuthorize("hasRole('ADMIN')") public CommonResult updateBrand(@PathVariable("id") Long id, @RequestBody PmsBrand pmsBrandDto, BindingResult result) { CommonResult commonResult; int count = brandService.updateBrand(id, pmsBrandDto); if (count == 1) { commonResult = CommonResult.success(pmsBrandDto); LOGGER.debug("updateBrand success:{}", pmsBrandDto); } else { commonResult = CommonResult.failed("操作失败"); LOGGER.debug("updateBrand failed:{}", pmsBrandDto); } return commonResult; } @Operation(summary = "删除指定id的品牌") @RequestMapping(value = "/delete/{id}", method = RequestMethod.GET) @ResponseBody @PreAuthorize("hasRole('ADMIN')") public CommonResult deleteBrand(@PathVariable("id") Long id) { int count = brandService.deleteBrand(id); if (count == 1) { LOGGER.debug("deleteBrand success :id={}", id); return CommonResult.success(null); } else { LOGGER.debug("deleteBrand failed :id={}", id); return CommonResult.failed("操作失败"); } } @Operation(summary = "分页查询品牌列表") @RequestMapping(value = "/list", method = RequestMethod.GET) @ResponseBody @PreAuthorize("hasRole('ADMIN')") public CommonResult<CommonPage<PmsBrand>> listBrand(@RequestParam(value = "pageNum", defaultValue = "1") @Parameter(description = "页码") Integer pageNum, @RequestParam(value = "pageSize", defaultValue = "3") @Parameter(description = "每页数量") Integer pageSize) { List<PmsBrand> brandList = brandService.listBrand(pageNum, pageSize); return CommonResult.success(CommonPage.restPage(brandList)); } @Operation(summary = "获取指定id的品牌详情") @RequestMapping(value = "/{id}", method = RequestMethod.GET) @ResponseBody @PreAuthorize("hasRole('ADMIN')") public CommonResult<PmsBrand> brand(@PathVariable("id") Long id) { return CommonResult.success(brandService.getBrand(id)); } }
-
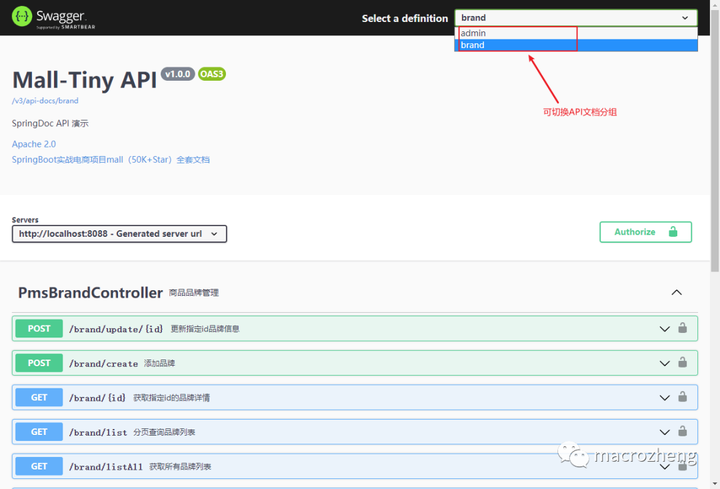
接下来进行SpringDoc的配置,使用OpenAPI来配置基础的文档信息,通过GroupedOpenApi配置分组的API文档,SpringDoc支持直接使用接口路径进行配置。
/** * SpringDoc API文档相关配置 * Created by macro on 2022/3/4. */ @Configuration public class SpringDocConfig { @Bean public OpenAPI mallTinyOpenAPI() { return new OpenAPI() .info(new Info().title("Mall-Tiny API") .description("SpringDoc API 演示") .version("v1.0.0") .license(new License().name("Apache 2.0").url("https://github.com/macrozheng/mall-learning"))) .externalDocs(new ExternalDocumentation() .description("SpringBoot实战电商项目mall(50K+Star)全套文档") .url("http://www.macrozheng.com")); } @Bean public GroupedOpenApi publicApi() { return GroupedOpenApi.builder() .group("brand") .pathsToMatch("/brand/**") .build(); } @Bean public GroupedOpenApi adminApi() { return GroupedOpenApi.builder() .group("admin") .pathsToMatch("/admin/**") .build(); } }
结合SpringSecurity使用
-
由于我们的项目集成了SpringSecurity,需要通过JWT认证头进行访问,我们还需配置好SpringDoc的白名单路径,主要是Swagger的资源路径;
/** * SpringSecurity的配置 * Created by macro on 2018/4/26. */ @Configuration @EnableWebSecurity @EnableGlobalMethodSecurity(prePostEnabled = true) public class SecurityConfig extends WebSecurityConfigurerAdapter { @Override protected void configure(HttpSecurity httpSecurity) throws Exception { httpSecurity.csrf()// 由于使用的是JWT,我们这里不需要csrf .disable() .sessionManagement()// 基于token,所以不需要session .sessionCreationPolicy(SessionCreationPolicy.STATELESS) .and() .authorizeRequests() .antMatchers(HttpMethod.GET, // Swagger的资源路径需要允许访问 "/", "/swagger-ui.html", "/swagger-ui/", "/*.html", "/favicon.ico", "/**/*.html", "/**/*.css", "/**/*.js", "/swagger-resources/**", "/v3/api-docs/**" ) .permitAll() .antMatchers("/admin/login")// 对登录注册要允许匿名访问 .permitAll() .antMatchers(HttpMethod.OPTIONS)//跨域请求会先进行一次options请求 .permitAll() .anyRequest()// 除上面外的所有请求全部需要鉴权认证 .authenticated(); } }
-
然后在OpenAPI对象中通过addSecurityItem方法和SecurityScheme对象,启用基于JWT的认证功能。
/** * SpringDoc API文档相关配置 * Created by macro on 2022/3/4. */ @Configuration public class SpringDocConfig { private static final String SECURITY_SCHEME_NAME = "BearerAuth"; @Bean public OpenAPI mallTinyOpenAPI() { return new OpenAPI() .info(new Info().title("Mall-Tiny API") .description("SpringDoc API 演示") .version("v1.0.0") .license(new License().name("Apache 2.0").url("https://github.com/macrozheng/mall-learning"))) .externalDocs(new ExternalDocumentation() .description("SpringBoot实战电商项目mall(50K+Star)全套文档") .url("http://www.macrozheng.com")) .addSecurityItem(new SecurityRequirement().addList(SECURITY_SCHEME_NAME)) .components(new Components() .addSecuritySchemes(SECURITY_SCHEME_NAME, new SecurityScheme() .name(SECURITY_SCHEME_NAME) .type(SecurityScheme.Type.HTTP) .scheme("bearer") .bearerFormat("JWT"))); } }
测试
-
接下来启动项目就可以访问Swagger界面了,访问地址:http://localhost:8088/swagger-ui.html
编辑切换为居中
添加图片注释,不超过 140 字(可选)
-
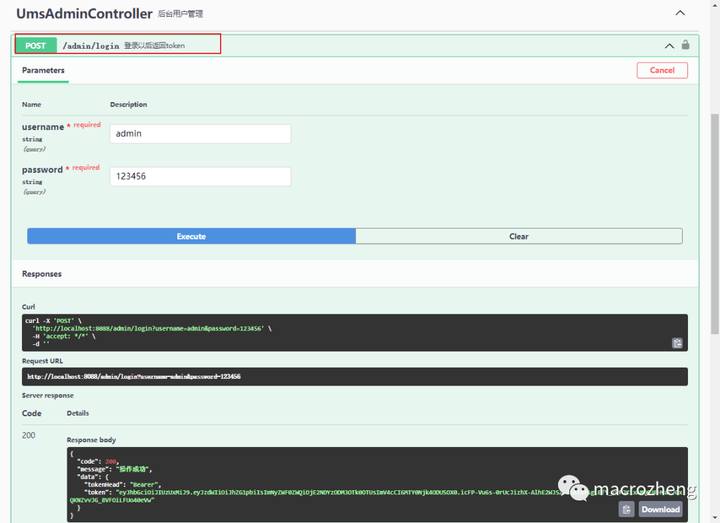
我们先通过登录接口进行登录,可以发现这个版本的Swagger返回结果是支持高亮显示的,版本明显比SpringFox来的新;
编辑切换为居中
添加图片注释,不超过 140 字(可选)
-
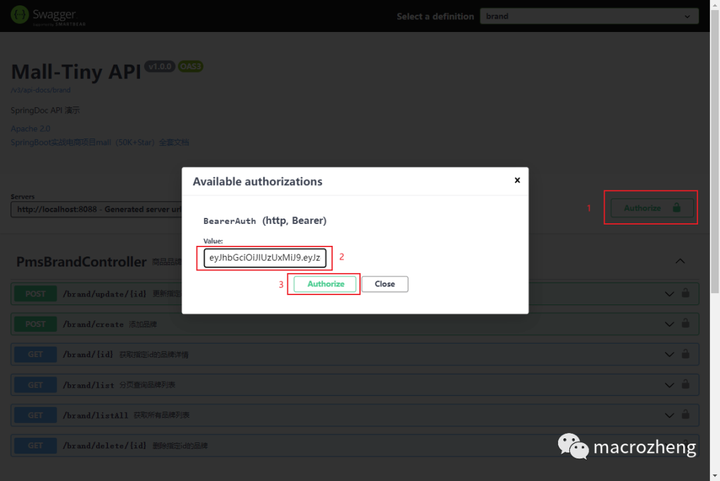
然后通过认证按钮输入获取到的认证头信息,注意这里不用加bearer前缀;
编辑切换为居中
添加图片注释,不超过 140 字(可选)
-
之后我们就可以愉快地访问需要登录认证的接口了;
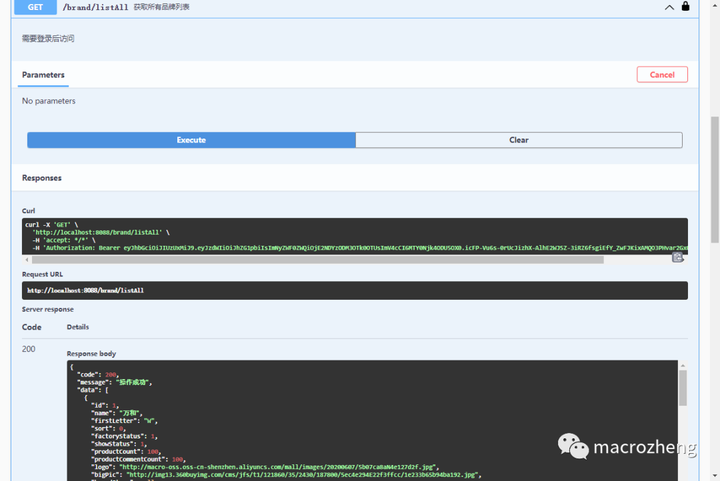
编辑切换为居中
添加图片注释,不超过 140 字(可选)
-
看一眼请求参数的文档说明,还是熟悉的Swagger样式!

编辑切换为居中
添加图片注释,不超过 140 字(可选)
常用配置
SpringDoc还有一些常用的配置可以了解下,更多配置可以参考官方文档。
springdoc: swagger-ui: # 修改Swagger UI路径 path: /swagger-ui.html # 开启Swagger UI界面 enabled: true api-docs: # 修改api-docs路径 path: /v3/api-docs # 开启api-docs enabled: true # 配置需要生成接口文档的扫描包 packages-to-scan: com.macro.mall.tiny.controller # 配置需要生成接口文档的接口路径 paths-to-match: /brand/**,/admin/**
总结
在SpringFox的Swagger库好久不出新版的情况下,迁移到SpringDoc确实是一个更好的选择。今天体验了一把SpringDoc,确实很好用,和之前熟悉的用法差不多,学习成本极低。而且SpringDoc能支持WebFlux之类的项目,功能也更加强大,使用SpringFox有点卡手的朋友可以迁移到它试试!
参考资料
-
项目地址:https://github.com/springdoc/springdoc-openapi
-
官方文档:https://springdoc.org/
项目源码地址
https://github.com/macrozheng/mall-learning/tree/master/mall-tiny-springdoc
资源获取:
大家 点赞、收藏、关注、评论啦 、 查看声明:本文内容由网友自发贡献,不代表【wpsshop博客】立场,版权归原作者所有,本站不承担相应法律责任。如您发现有侵权的内容,请联系我们。转载请注明出处:https://www.wpsshop.cn/w/IT小白/article/detail/616058
Copyright © 2003-2013 www.wpsshop.cn 版权所有,并保留所有权利。


