热门标签
热门文章
- 15 分钟小工具:使用 dive 分析 docker 镜像
- 2浙政钉埋点 -- 稳定性监控代码(Emas)和流量分析代码(A+)_浙政钉bid
- 3PHP代码审计总结
- 4如何写出高性能代码(四)优化数据访问_高性能代码 局部性
- 5Java链表面试题:重新排序链表
- 6再谈数据架构, 探讨 Data 和 AI 结合的新产品形态
- 7安装CUDA失败的情况nsight visual studio edition失败_cuda安装失败
- 8JDBC 课程 雷区记录<动力节点老杜课程>_动力节点老杜spring
- 9JAVA多线程-(十九)Disruptor单机最快的MQ_concurrentarrayqueue
- 10LayaAir3.0最后的Beta版新鲜出炉,众多更新内容,效果提升、易用体验再次升级!...
当前位置: article > 正文
Android开发—布局LinearLayout,布局RelativeLayout常见属性根据父容器定位,兄弟组件定位,FrameLayout帧布局的绘制原理是,TableLayout_android:orientation="vertical
作者:Monodyee | 2024-03-20 03:44:43
赞
踩
android:orientation="vertical
一.LinearLayout
1.常见属性
| 1. orientation | 布局中组件的排列方式 |
| 2. gravity | 控制组件所包含的子元素的对齐方式,可多个组合 |
| 3. layout _ gravity | 控制该组件在父容器里的对其方式 |
| 4. background | 为该组件设置一个背景图片,或者是直接用颜色覆盖 |
| 5. divider | 分割线 |
| 6. showDividers | 设置分割线所在的位置, none (无), beginning (开始), end (结束), middle (每两个组件间) |
| 7.dividerPadding | 设置分割线的 padding |
| 8. layout _ weight | (权重)该属性是用来等比例的划分区域 |
android:orientation="vertical">vertical表示纵向排列,horizontal表示横向排列
- LinearLayout xmlns:android="http://schemas.android.com/apk/res/android"
- android:layout_height="match_parent"
- android:layout_width="match_parent"
- android:divider="@drawable/divider"
- android:showDividers="middle"
- android:dividerPadding="100dp"
- android:orientation="vertical"
- android:gravity="center_vertical">
其中divider ,showDivider, dividerPadding,三个参数为设置分割线的参数

1.1通过设置View也可以实现分割线的操作
- <View
- android:background="#00ff00"
- android:layout_width="match_parent"
- android:layout_height="1dp"/>

2.layout _ weight权重比例划分
2.1语法显示
- <LinearLayout
- android:background="#ff0000"
- android:layout_width="100dp"
- android:layout_height="100dp"/>
- <LinearLayout
- android:background="#ffff00"
- android:layout_width="100dp"
- android:layout_weight="1"
- android:layout_height="100dp"/>
- <LinearLayout
- android:background="#00ffff"
- android:layout_width="100dp"
- android:layout_height="100dp"/>
二.RelativeLayout
2.1常见属性
2.1.1根据父容器定位
| 1. layout _ alignParentLeft | 左对齐 |
| 2. layout _ alignParentRight | 右对齐 |
| 3. layout _ alignParentTop | 顶部对齐 |
| 4. layout _ alignParentBottom | 底部对齐 |
| 5. layout _ centerHorizontal | 水平居中 |
| 6. layout _ centerVertical | 垂直居中 |
| 7. layout _ centerinParent | 中间位置 |
2.1.2根据兄弟组件定位
| 1. layout _ toleftof | 放置于参考组件的左边 |
| 2. layout _ toRightof | 放置于参考组件的右边 |
| 3. layout _ above | 放置于参考组件的上方 |
| 4. layout _ below | 放置于参考组件的下方 |
| 5. layout _ alignTop | 对齐参考组件的上边界 |
| 6. layout _ alignBottom | 对齐参考组件的下边界 |
| 7. layout _ alignLeft | 对齐参考组件的左边界 |
| 8. layout _ alignRight | 对齐参考组件的右边界 |
2.2实现过程
- <RelativeLayout
- xmlns:android="http://schemas.android.com/apk/res/android"
-
- android:layout_width="match_parent"
- android:layout_height="match_parent">
-
- <RelativeLayout
- android:background="#ff0000"
- android:layout_width="100dp"
- android:layout_height="100dp"/>
-
- <RelativeLayout
- android:background="#00ff00"
- android:layout_width="100dp"
- android:layout_height="100dp"/>
-
- </RelativeLayout>
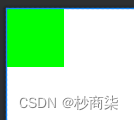
此两个会重合,形成相对布局:后面的会将前面的进行覆盖。

当给第一个RelativeLayout设置好后
android:layout_alignParentRight="true"
相对父容器进行布局
但是相对于兄第组件要设置,兄弟组件有很多,相对于哪个要说明清楚例如:
- <RelativeLayout
- android:id="@+id/rl1"
- android:background="#ff0000"
- android:layout_alignParentRight="true"
- android:layout_width="100dp"
- android:layout_height="100dp"/>
-
- <RelativeLayout
- android:background="#00ff00"
- android:layout_toLeftOf="@+id/rl1"
- android:layout_width="100dp"
- android:layout_height="100dp"/>
实现效果图:
2.2通用属性
2.2.1margin 设置组件与父容器的边距
| 1. layout _ margin | 上下左右偏移 |
| 2. layout _ marginLeft | |
| 3. layout _ marginRight | |
| 4. layout _ marginTop | |
| 5. layout _ margiBottom |
- <RelativeLayout
- android:background="#00ff00"
- android:layout_marginLeft="100dp"
- android:layout_width="100dp"
- android:layout_height="100dp"/>

2.2.2padding 设置组件内部元素的边距
三. FrameLayout
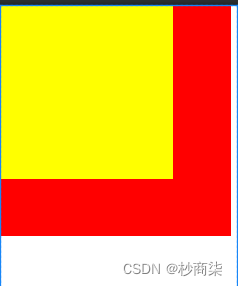
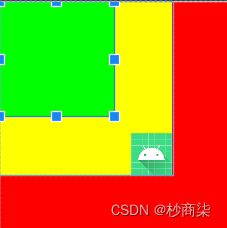
帧布局的绘制原理是:从左上角绘制完成一个红色后,当绘制黄色的时候又是从左上角开始,会形成一个覆盖效果。(一个一个往上堆)
3.1 常见属性
| android : foreground | 设置前景 |
| android : foregroundGravity | 设置前景位置 |
- <FrameLayout
- xmlns:android="http://schemas.android.com/apk/res/android"
-
- android:layout_width="match_parent"
- android:layout_height="match_parent">
-
- <FrameLayout
- android:layout_width="400dp"
- android:layout_height="400dp"
- android:background="#ff0000" />
-
- <FrameLayout
- android:layout_width="300dp"
- android:layout_height="300dp"
- android:background="#ffff00" />
-
- </FrameLayout>

- <FrameLayout
- android:layout_width="300dp"
- android:layout_height="300dp"
- android:foreground="@mipmap/ic_launcher"
- android:foregroundGravity="right|bottom"
- android:background="#ffff00" />
此时背景图片可任意到任何地方

四.TableLayout
在TableLayout中写入控件,会占据一行的大小

若要使想将两个按钮占据一行,使用TableRow
- <TableRow>
- <Button
- android:text="第一个"
- android:layout_width="wrap_content"
- android:layout_height="wrap_content"/>
-
- <Button
- android:text="第二个"
- android:layout_width="wrap_content"
- android:layout_height="wrap_content"/>
- </TableRow>

当超过一行时,不会自动换行,直接会覆盖一部分。
4.1常见属性
| android : collapseColumns | 设置需要被隐藏的列的序号,从 o 开始 |
| android : stretchColumns | 设置允许被拉伸的列的列序号,从0开始 |
| android : shrinkColumns | 设置允许被收缩的列的列序号,从 o 开始 |
4.1.1子控件设置属性
| android : layout _ column | 显示在第几列 |
| android : layout _ span | 横向跨几列 |
实现效果实例:
android:collapseColumns="0"
第一个按钮所在的为第零列
若是隐藏多列时android:collapseColumns="0,1"即可
android:stretchColumns="1"
此时可通过拉伸将其展示,拉伸是占用其剩余空间。
android:shrinkColumns="2"
同理收缩的原理也是一样的,超出的时候收缩才有效果
五.GridLayout
可以把行进行合并,也可以把列进行合并,布局会更加灵活
5.1 常见属性
| android : orientation | 设置水平显示还是垂直显示 |
| android : columnCount | 设置行的显示个数 |
| android : rowCount | 设置列的显示个数 |
5.1.1代码实例展示:
android:orientation="vertical"
将横向排列变换成纵向排列
android:columnCount="3"
一行展示三列,多余的自动换行
android:rowCount="3"
android:orientation="vertical"
一列排列三行
5.2子控件属性
| android : layout _ column | 显示在第几列 |
| android : layout _ columnSpan | 横向跨几列 |
| android : layout _ columnWeight | 横向剩余空间分配方式 |
| android : layout _ gravity | 在网格中的显示位置 |
| android : layout _ row | 显示在第几行 |
| android : layout _ rowSpan | 横向跨几行 |
| android : layout _ rowWeight | 纵向剩余空间分配方式 |
5.2.1属性实现实例
- <Button
- android:text="第一个"
- android:layout_row="1"
- android:layout_column="0"
- android:layout_height="wrap_content"
- android:layout_width="wrap_content"/>
实现效果如图:

设置非常灵活
Button
    android:text="第四个"
    android:layout_columnWeight="1"
    android:layout_height="wrap_content"
    android:layout_width="wrap_content"/>
剩余空间全部由第四个按钮占领
声明:本文内容由网友自发贡献,不代表【wpsshop博客】立场,版权归原作者所有,本站不承担相应法律责任。如您发现有侵权的内容,请联系我们。转载请注明出处:https://www.wpsshop.cn/w/Monodyee/article/detail/270451
推荐阅读
相关标签


