
- 1详解kinectfusion之三位姿估计_kinect 位姿估算
- 2用github教育优惠申请jetbrains学生认证时遇到的问题_jetbrains student from github
- 3女娲智脑-AI系统简介_我国的人工智能系统中有取名女娲的吗
- 42019项目管理大会,人才、赋能、价值是关键词_pmo项目管理赋能人才赋能
- 5全量知识系统 程序详细设计之“ AI操作系统” (百度搜索的Q&A)
- 6opencv+python(通道的分离与合并)笔记
- 7Pytorch实现RNN、LSTM和GRU等经典循环网络模型,简直不能再简单。_利用pytorch实现rnn网络、gru网络和lstm网络
- 8图像中的卷积为何能够提取特征_卷积为什么能提取特征
- 9leetcode:1379. 找出克隆二叉树中的相同节点
- 10VMware Workstation Pro 17虚拟机超级详细搭建(含redis,nacos,docker, rabbitmq,sentinel,elasticsearch....)(二)
1+X云计算平台运维与开发认证(中级)-样卷C_云计算运维与开发中级样题
赞
踩
相关资源:
1+X云计算平台运维与开发认证(中级)-A卷
1+X云计算平台运维与开发认证(中级)-B卷
1+X云计算平台运维与开发认证(中级)-C卷
1+X云计算平台运维与开发认证(中级)-D卷
1+X云计算平台运维与开发认证(中级)-E卷
单选题(200分)
1、下面对项目管理叙述错误的是(10分)
A、项目文档管理是指在一个项目运行过程中将提交的各类文档进行收集管理控制的过程
B、工程项目保存的文档要涵盖项目可研、总体设计、基础设计、详细设计等整个项目周期
C、项目经理可以从项目周期角度去把握项目进展情况(正确答案)
D、项目保存的文档包括项目系统管理、文档版本控制、文档质量管理等管理内容
- 1
- 2
- 3
- 4
2、项目计划阶段不包括(10分)
A、里程碑和基线时间设定
B、人员安排
C、风险预测
D、一份项目工作任务书(正确答案)
- 1
- 2
- 3
- 4
3、以下哪个不是FAT AP的特点 (10分)
A、简单的无线接入
B、自行管理
C、无缝漫游(正确答案)
D、独立提供无线网络
- 1
- 2
- 3
- 4
4、以下哪个不是FIT AP的特点 (10分)
A、可以独立提供无线网络(正确答案)
B、集中管理
C、三层漫游
D、基于用户下发权限
- 1
- 2
- 3
- 4
5、数据库主服务器将更新写入二进制日志文件,并维护文件的一个___来跟踪日志循环。(10分)
A、内容
B、索引(正确答案)
C、编号
D、顺序
- 1
- 2
- 3
- 4
6、在主服务器上执行的SQL语句,在从服务器上执行同样的语句。MySQL默认采用___,效率比较高。(10分)
A、基于索引的复制
B、基于日志的复制
C、基于语句的复制(正确答案)
D、基于主服务器复制
- 1
- 2
- 3
- 4
7、Nginx的启动后台中主进程的作用是什么?(10分)
A、启动需要的进程
B、管理其他主进程
C、与其他进程通信
D、管理工作者进程(正确答案)
- 1
- 2
- 3
- 4
8、操作Nginx时需要与哪个进程进行通讯?(10分)
A、主进程(正确答案)
B、通讯进程
C、网络进程
D、worker进程
- 1
- 2
- 3
- 4
9、OpenStack系统架构中各个组件之间的通信核心组件是?(10分)
A、Mysql
B、Keystone(正确答案)
C、Glance
D、Nova
- 1
- 2
- 3
- 4
10、下列选项当中,哪个是Swift创建容器的命令(10分)
A、swift post(正确答案)
B、swift create
C、swift found
D、swift establish
- 1
- 2
- 3
- 4
11、以下关于Swift服务的描述错误的是?(10分)
A、Swift通过REST API接口来访问数据,可以通过API变成实现文件的存储和管理,使得资源管理实现自动化。
B、Swift提供多重备份机制,拥有极高的数据可靠性,数据存放在高分布式的Swift系统中,几乎不会丢失。
C、Swift通过独立节点来形成存储系统,但在数据量的存储上不能做到无限拓展。(正确答案)
D、Swift的性能可以通过增加Swift集群来实现线性提升,所以Swift很难达到性能瓶颈。
- 1
- 2
- 3
- 4
12、腾讯云使用的计算虚拟化技术是以下哪项?(10分)
A、Xen
B、KVM(正确答案)
C、Citrix
D、VMware
- 1
- 2
- 3
- 4
13、下列哪个不属于客户上云的典型价值?(10分)
A、异地灾备
B、节省投资
C、简化运维
D、增强机房管理(正确答案)
- 1
- 2
- 3
- 4
14、下列腾讯云主机安全组件,描述正确的是?(10分)
A、腾讯云主机安全组件是一系列软件的组成,可提供任何类型的安全防御
B、腾讯云主机安全组件会导致云服务器性能下降
C、腾讯云主机安全组件主要压力在平台上,并不会导致客户云服务器性能大量下降(正确答案)
D、以上皆对
- 1
- 2
- 3
- 4
15、您维护了一个音视频APP,但是您发现用户的连接成功率并不高,您分析后发现连接失败的原因大多数都是因为解析超时或缓慢造成的,您应该如何做才可以解决问题,让APP中的音乐保持流畅?(10分)
A、使用腾讯云监控平台检测服务质量
B、使用腾讯云HttpDNS服务(正确答案)
C、使用腾讯云拔测平台检测全国范围内的服务质量
D、使用腾讯云CDN加速
- 1
- 2
- 3
- 4
16、下面哪个是Docker Swarm中一个部署的最小单元?(10分)
A、Stack
B、Yaml
C、Task(正确答案)
D、Service
- 1
- 2
- 3
- 4
17、下面哪个公司是OpenShift的开发公司?(10分)
A、谷歌
B、微软
C、红帽(正确答案)
D、亚马逊
- 1
- 2
- 3
- 4
18、Shell本身是用哪种语言编写的程序?(10分)
A、Python
B、C语言(正确答案)
C、Java
D、PHP
- 1
- 2
- 3
- 4
19、Ansible是基于_进行工作的。(10分)
A、任务集
B、模块(正确答案)
C、进程
D、框架
- 1
- 2
- 3
- 4
20、Ansible通过_实现配置管理、应用部署、任务执行等功能。(10分)
A、FTP
B、SSH(正确答案)
C、HTTP
D、TCP
- 1
- 2
- 3
- 4
多选题(200分)
1、关于开发阶段叙述正确的是(10分)
A、采用构建工具进行自动化版本构建,避免人为操作失误(正确答案)
B、软件的包、版本进行统一管理,避免不同版本的直接冲突(正确答案)
C、注意各个环境的一致性,保证构建脚本执行成功(正确答案)
D、提高软件工程中模块构建的耦合度,提高软件功能模块构建系统的灵活性
- 1
- 2
- 3
- 4
2、下面对测试人员在设计和执行测试时的重要原则描述正确的是(10分)
A、测试用例需清晰定义对预期的输入和输出;(正确答案)
B、彻底检查每个测试的执行结果(正确答案)
C、测试用例的编写不仅应当根据有效和预料到的输入情况,而且也应当考虑无效和未预料到的输入情况(正确答案)
D、检查程序是否“未做其应该做的”仅是测试的一半,测试的另一半是检查程序是否“做了其不应该做的”(正确答案)
- 1
- 2
- 3
- 4
3、属于无线AP的安全措施的是 (10分)
A、隐藏SSID(正确答案)
B、启用WEP(正确答案)
C、启用MAC地址过滤(正确答案)
D、启用DHCP服务
- 1
- 2
- 3
- 4
4、以上可以工作在2.4GHz频段的无线协议是 (10分)
A、802.11a
B、802.11n(正确答案)
C、802.11g(正确答案)
D、802.11b(正确答案)
- 1
- 2
- 3
- 4
5、网络地址172.16.1.0/24,选择子网掩码为255.255.255.224,以下说法正确的是? (10分)
A、划分了4个有效子网
B、划分了6个有效子网(正确答案)
C、每个子网的有效主机数是30个(正确答案)
D、每个子网的有效主机数是32个
- 1
- 2
- 3
- 4
6、如何在命令行查看一台linux机器的CPU、SWAP分区信息、硬盘信息?(10分)
A、cat /proc/cpuinfo(正确答案)
B、du(正确答案)
C、cat /proc/swaps(正确答案)
D、df -lh
- 1
- 2
- 3
- 4
7、下列哪些是数据库的优化方案?(10分)
A、memcache(正确答案)
B、分表(正确答案)
C、搜索引擎(正确答案)
D、主从分离(正确答案)
- 1
- 2
- 3
- 4
8、kafka有哪些重要的设计思想?(10分)
A、消息持久化(正确答案)
B、消息有效期(正确答案)
C、批量发送(正确答案)
D、分区机制partition(正确答案)
- 1
- 2
- 3
- 4
9、下列提法中,属于ifconfig命令作用范围的是。(10分)
A、配置本地回环地址(正确答案)
B、配置网卡的IP地址(正确答案)
C、激活网络适配器(正确答案)
D、加载网卡到内核中
- 1
- 2
- 3
- 4
10、下列选项当中,哪些说法是正确的(10分)
A、nova start是创建云主机
B、nova restart是重启云主机(正确答案)
C、nova boot是启动云主机
D、nova reset是重建云主机(正确答案)
- 1
- 2
- 3
- 4
11、Neutron网络形式主要包括以下哪些?(10分)
A、Flat(正确答案)
B、VLAN(正确答案)
C、GRE(正确答案)
D、VXLAN(正确答案)
- 1
- 2
- 3
- 4
12、下列选项当中,哪些是典型的私有云平台(10分)
A、3A Cloud(正确答案)
B、OpenStack(正确答案)
C、OATOS(正确答案)
D、Utility
- 1
- 2
- 3
- 4
13、公司业务在选择合适的腾讯云服务器时需要考虑的原则有?(10分)
A、成本(正确答案)
B、计算能力(正确答案)
C、IO时延要求(正确答案)
D、其他需求(正确答案)
- 1
- 2
- 3
- 4
14、创建云主机时,可以购买的网络带宽有哪几个计费标准?(10分)
A、按使用流量计费(正确答案)
B、按带宽计费(正确答案)
C、按时长计费
D、以上皆无
- 1
- 2
- 3
- 4
15、腾讯云 VPC提供了灵活、高性能的 Internet 连接方式包括下列哪些方法?(10分)
A、对端网关
B、VPN 通道
C、弹性 IP(正确答案)
D、NAT 网关(正确答案)
- 1
- 2
- 3
- 4
16、腾讯为什么能提供云服务?(10分)
A、强大的基础设施(正确答案)
B、丰富的大规模管理经验:基于QQ、QQ空间等海量服务考验;经微信、腾讯游戏等海量业务的技术锤炼(正确答案)
C、采购能力及研发能力:可以降低云产品的成本并提供业界领先的计算、网络和存储性能(正确答案)
D、业务能力:基于互联网业务大量的数据沉淀和经验积累后,能够提供了文字识别,图像识别,语音设别和人脸识别等服务能力(正确答案)
- 1
- 2
- 3
- 4
17、下面关于Docker Image的说法,正确的是?(10分)
A、镜像是一个只读模板(正确答案)
B、由Dockerfile文本描述镜像的内容(正确答案)
C、镜像定义类似面向过程的类
D、构建一个镜像实际就是安装、配置和运行的过程(正确答案)
- 1
- 2
- 3
- 4
18、下面属于OpenShift内部的部分核心组件和概念的是(10分)
A、Master Node(正确答案)
B、Scheduler
C、Compute Node(正确答案)
D、Etcd(正确答案)
- 1
- 2
- 3
- 4
19、Ansible任务执行包含以下哪两种模式_。(10分)
A、fixedRate模式
B、ad-hoc模式(正确答案)
C、playbook模式(正确答案)
D、cron模式
- 1
- 2
- 3
- 4
20、Python模块化的优点_。(10分)
A、提高了代码的可维护性(正确答案)
B、效率高(正确答案)
C、避免函数名称和变量名称重复(正确答案)
D、可移植性
- 1
- 2
- 3
- 4
实操题(600分)
1、防火墙管理(40分)
配置防火墙g0/0/2端口添加至trust域,g0/0/1端口添加至untrust域。配置trust域到untrust域规则,放行内部地址172.16.105.0/24网段。配置NAT规则,匹配内部地址172.16.105.0/24网段,使用g0/0/1端口的地址进行转换。(所有配置命令使用完整命令)将上述所有操作命令及返回结果以文本形式提交到答题框。
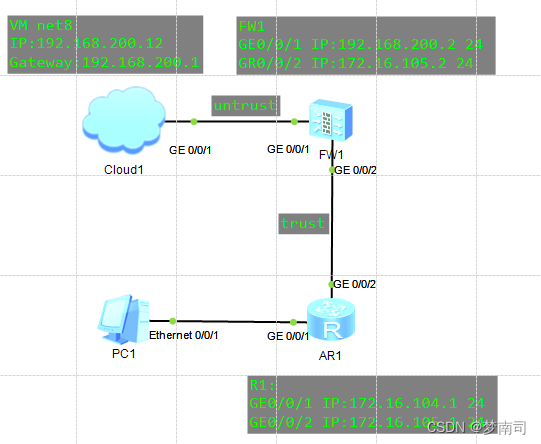
FW1:
<SRG>system-view
[SRG]sysname FW1
[FW1]firewall zone trust
[FW1-zone-trust]add interface GigabitEthernet 0/0/2
[FW1-zone-trust]quit
[FW1]firewall zone untrust
[FW1-zone-untrust]add interface GigabitEthernet 0/0/1
[FW1-zone-untrust]quit
[FW1]policy interzone trust untrust outbound
[FW1-policy-interzone-trust-untrust-outbound]policy 0
[FW1-policy-interzone-trust-untrust-outbound-0]action permit
[FW1-policy-interzone-trust-untrust-outbound-0]policy source 172.16.105.0 0.255.255.255
[FW1-policy-interzone-trust-untrust-outbound-0]quit
[FW1-policy-interzone-trust-untrust-outbound]quit
[FW1]nat-policy interzone trust untrust outbound
[FW1-nat-policy-interzone-trust-untrust-outbound]policy 1
[FW1-nat-policy-interzone-trust-untrust-outbound-1]action source-nat
[FW1-nat-policy-interzone-trust-untrust-outbound-1]policy source 172.16.105.0 0.255.255.255
[FW1-nat-policy-interzone-trust-untrust-outbound-1]easy-ip GigabitEthernet 0/0/1
[FW1-nat-policy-interzone-trust-untrust-outbound-1]quit
[FW1-nat-policy-interzone-trust-untrust-outbound]quit
[FW1]interface GigabitEthernet 0/0/1
[FW1-GigabitEthernet0/0/1]ip address 192.168.200.2 24
[FW1-GigabitEthernet0/0/1]quit
[FW1]interface GigabitEthernet 0/0/2
[FW1-GigabitEthernet0/0/2]ip address 172.16.105.2 24
[FW1-GigabitEthernet0/0/2]quit
[FW1]ospf 1
[FW1-ospf-1]area 0
[FW1-ospf-1-area-0.0.0.0]network 192.168.200.0 0.0.0.255
[FW1-ospf-1-area-0.0.0.0]network 172.16.105.0 0.0.0.255
[FW1-ospf-1-area-0.0.0.0]quit
[FW1-ospf-1]quit
- 1
- 2
- 3
- 4
- 5
- 6
- 7
- 8
- 9
- 10
- 11
- 12
- 13
- 14
- 15
- 16
- 17
- 18
- 19
- 20
- 21
- 22
- 23
- 24
- 25
- 26
- 27
- 28
- 29
- 30
- 31
- 32
- 33
R1:
<Huawei>system-view
[Huawei]sysname R1
[R1]interface GigabitEthernet 0/0/1
[R1-GigabitEthernet0/0/1]ip address 172.16.104.1 24
[R1-GigabitEthernet0/0/1]quit
[R1]interface GigabitEthernet 0/0/2
[R1-GigabitEthernet0/0/2]ip address 172.16.105.1 24
[R1-GigabitEthernet0/0/2]quit
[R1]ospf 1
[R1-ospf-1]area 0
[R1-ospf-1-area-0.0.0.0]network 172.16.104.0 0.0.0.255
[R1-ospf-1-area-0.0.0.0]network 172.16.105.0 0.0.0.255
[R1-ospf-1-area-0.0.0.0]quit
[R1-ospf-1]quit
- 1
- 2
- 3
- 4
- 5
- 6
- 7
- 8
- 9
- 10
- 11
- 12
- 13
- 14
测试:
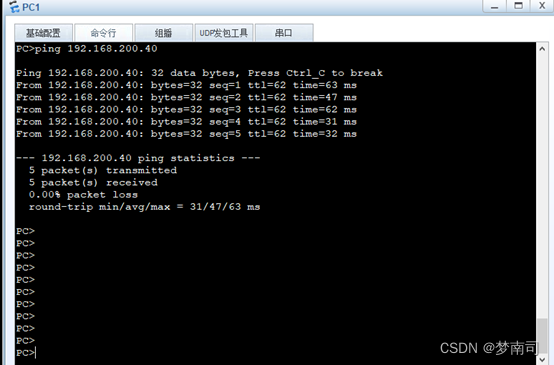
先使用PC1去ping一下Cloud1的地址
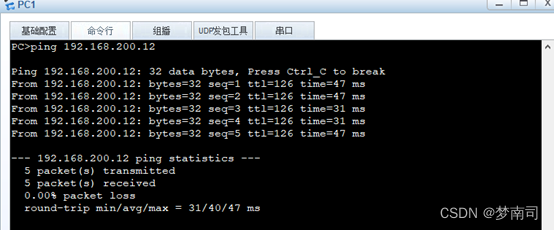
再随便启动一台虚拟机来互相ping
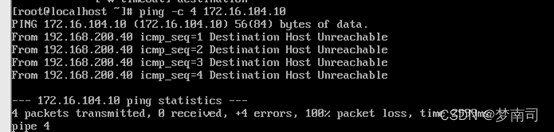
我虚拟机IP:192.168.200.40
PC1:
2、无线AC网络管理(40分)
配置无线AC控制器,设置安全策略Internet,配置安全认证方式为wpa-wpa2,密码为a1234567,设置无线ssid为Internet,创建VAP模板名称为Internet,绑定业务vlan为101,绑定安全策略,绑定SSID模板,创建AP组,名称为ap-group1,绑定vap模板到射频卡0、1上。将上述所有操作命令及返回结果以文本形式提交到答题框。
AC1:
<AC6005>system-view
[AC6005]sysname AC1
[AC1]vlan batch 100 101
[AC1]dhcp enable
[AC1]interface Vlanif 101
[AC1-Vlanif101]description USER
[AC1-Vlanif101]ip address 172.16.20.1 24
[AC1-Vlanif101]dhcp select interface
[AC1-Vlanif101]dhcp server dns-list 114.114.114.114 223.5.5.5
[AC1-Vlanif101]quit
[AC1]interface Vlanif 100
[AC1-Vlanif100]description AP_Manage
[AC1-Vlanif100]ip address 192.168.10.254 24
[AC1-Vlanif100]dhcp select interface
[AC1-Vlanif100]quit
[AC1]capwap source interface Vlanif 100
[AC1]wlan
[AC1-wlan-view]regulatory-domain-profile name office-domain
[AC1-wlan-regulate-domain-office-domain]country-code CN
[AC1-wlan-regulate-domain-office-domain]quit
[AC1-wlan-view]ssid-profile name internet
[AC1-wlan-ssid-prof-internet]ssid internet
[AC1-wlan-ssid-prof-internet]quit
[AC1-wlan-view]security-profile name internet
[AC1-wlan-sec-prof-internet]security wpa-wpa2 psk pass-phrase a1234567 aes
[AC1-wlan-sec-prof-internet]quit
[AC1-wlan-view]vap-profile name internet
[AC1-wlan-vap-prof-internet]forward-mode direct-forward
[AC1-wlan-vap-prof-internet]security-profile internet
[AC1-wlan-vap-prof-internet]ssid-profile internet
[AC1-wlan-vap-prof-internet]service-vlan vlan-id 101
[AC1-wlan-vap-prof-internet]quit
[AC1-wlan-view]ap-group name ap-group1
[AC1-wlan-ap-group-ap-group1]regulatory-domain-profile office-domain
Warning: Modifying the country code will clear channel, power and antenna gain c
onfigurations of the radio and reset the AP. Continue?[Y/N]:y
[AC1-wlan-ap-group-ap-group1]vap-profile internet wlan 1 radio 0
[AC1-wlan-ap-group-ap-group1]vap-profile internet wlan 1 radio 1
[AC1-wlan-ap-group-ap-group1]quit
- 1
- 2
- 3
- 4
- 5
- 6
- 7
- 8
- 9
- 10
- 11
- 12
- 13
- 14
- 15
- 16
- 17
- 18
- 19
- 20
- 21
- 22
- 23
- 24
- 25
- 26
- 27
- 28
- 29
- 30
- 31
- 32
- 33
- 34
- 35
- 36
- 37
- 38
- 39
获取AP的mac(点击设置):
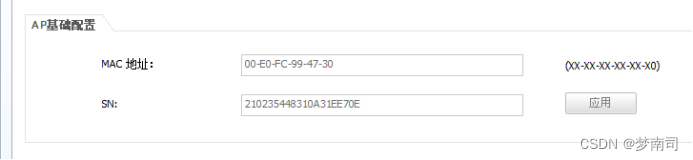
[AC1-wlan-view]ap-id 0 ap-mac 00E0-FC99-4730
[AC1-wlan-ap-0]ap-group ap-group1
Warning: This operation may cause AP reset. If the country code changes, it will
 clear channel, power and antenna gain configurations of the radio, Whether to c
ontinue? [Y/N]:y
Info: This operation may take a few seconds. Please wait for a moment.. done.
[AC1-wlan-ap-0]quit
[AC1-wlan-view]quit
[AC1]interface GigabitEthernet 0/0/1
[AC1-GigabitEthernet0/0/1]port link-type trunk
[AC1-GigabitEthernet0/0/1]port trunk allow-pass vlan 100 101
[AC1-GigabitEthernet0/0/1]quit
- 1
- 2
- 3
- 4
- 5
- 6
- 7
- 8
- 9
- 10
- 11
- 12
SW1:
<Huawei>system-view
[Huawei]sysname SW1
[SW1]vlan batch 100 101
[SW1]interface GigabitEthernet 0/0/24
[SW1-GigabitEthernet0/0/24]description to_AC
[SW1-GigabitEthernet0/0/24]port link-type trunk
[SW1-GigabitEthernet0/0/24]port trunk allow-pass vlan 100 101
[SW1-GigabitEthernet0/0/24]quit
[SW1]interface GigabitEthernet 0/0/1
[SW1-GigabitEthernet0/0/1]description to_AP
[SW1-GigabitEthernet0/0/1]port link-type trunk
[SW1-GigabitEthernet0/0/1]port trunk pvid vlan 100
[SW1-GigabitEthernet0/0/1]port trunk allow-pass vlan 100 101
[SW1-GigabitEthernet0/0/1]quit
- 1
- 2
- 3
- 4
- 5
- 6
- 7
- 8
- 9
- 10
- 11
- 12
- 13
- 14
结果(随便点个连接WiFi的机子查IP):
发现主机以及获得地址了

3、YUM源管理(40分)
假设当前有一个centos7.2-1511.iso的镜像文件,使用这个文件配置yum源,要求将这个镜像文件挂载在/opt/centos目录。还存在一个ftp源,IP地址为192.168.100.200,ftp配置文件中配置为anon_root=/opt,/opt目录中存在一个iaas目录(该目录下存在一个repodata目录)请问如何配置自己的local.repo文件,使得可以使用这两个地方的软件包,安装软件。请将local.repo文件的内容以文本形式提交到答题框。
- 该题是假设有这些资源,配置写对即可,或者使用一个xserver1做vsftpd服务,将centos7.2-1511.iso上传到xserver2
Xserver2:
[root@xserver2 ~]# systemctl stop firewalld
[root@xserver2 ~]# systemctl disable firewalld
# 注释:selinux防火墙,设置访问模式(得重启才生效):
[root@xserver2 ~]# vim /etc/selinux/config
# 注释:将SELINUX=enforcing改成SELINUX=Permissive
SELINUX=Permissive
# 注释:配置临时访问模式(无需重启):
[root@xserver2 ~]# setenforce 0
[root@xserver2 ~]# getenforce
Permissive
[root@xserver2 ~]# mount  -o loop CentOS-7-x86_64-DVD-1511.iso /opt/centos/
mount: /dev/loop0 is write-protected, mounting read-only
[root@xserver2 ~]# cat /etc/yum.repos.d/local.repo
[centos]
name=centos
baseurl=file:///opt/centos
enabled=1
gpgcheck=0
[iaas]
name=iaas
baseurl=ftp://192.168.100.200/iaas
enabled=1
gpgcheck=0
- 1
- 2
- 3
- 4
- 5
- 6
- 7
- 8
- 9
- 10
- 11
- 12
- 13
- 14
- 15
- 16
- 17
- 18
- 19
- 20
- 21
- 22
- 23
4、KVM管理(40分)
使用提供的虚拟机和软件包,完成KVM服务的安装与KVM虚拟机的启动。使用提供的cirros镜像与qemu-ifup-NAT脚本启动虚拟机,启动完毕后登录,登录有执行ip addr list命令,将该命令的返回结果以文本形式提交到答题框。
- 将kvm_yum上传到root目录,将qemu-ifup-NAT.txt重命名为qemu-ifup-NAT.sh
[root@localhost ~]# vim /etc/yum.repos.d/local.repo
[centos]
name=centos
baseurl=file:///opt/centos
enabled=1
gpgcheck=0
[kvm]
name=kvm
baseurl=file:///root/kvm_yum
enabled=1
gpgcheck=0
[root@localhost ~]# yum install  -y  qemu-kvm  openssl libvirt
[root@localhost ~]# systemctl restart libvirtd
[root@localhost ~]# ln  -sv  /usr/libexec/qemu-kvm /usr/bin/qemu-kvm
‘/usr/bin/qemu-kvm’ -> ‘/usr/libexec/qemu-kvm’
[root@localhost ~]# mv qemu-ifup-NAT.txt qemu-ifup-NAT.sh
[root@localhost ~]# chmod +x qemu-ifup-NAT.sh
[root@localhost ~]# qemu-kvm -m 1024 -drive file=/root/cirros-0.3.4-x86_64-disk.img,if=virtio  -net nic,model=virtio  -net tap,script=qemu-ifup-NAT.sh  -nographic
Could not access KVM kernel module: No such file or directory
failed to initialize KVM: No such file or directory
Back to tcg accelerator.
Warning:dnsmasq is already running. No need to run it again.

SeaBIOS (version 1.11.0-2.el7)

iPXE (http://ipxe.org) 00:03.0 C980 PCI2.10 PnP PMM+3FF94780+3FED4780 C980

Booting from Hard Disk...
GRUB Loading stage1.5.

GRUB loading, please wait...
Starting up ..
[    0.000000] Initializing cgroup subsys cpuset
[    0.000000] Initializing cgroup subsys cpu
[    0.000000] Linux version 3.2.0-80-virtual (buildd@batsu) (gcc version 4.6.3 (Ubuntu/Linaro 4.6.3-1)
[    0.000000] Command line: LABEL=cirros-rootfs ro console=tty1 console=ttyS0
[    0.000000] KERNEL supported cpus:
[    0.000000]   Intel GenuineIntel
[    0.000000]   AMD AuthenticAMD
[    0.000000]   Centaur CentaurHauls
[    0.000000] BIOS-provided physical RAM map:
[    0.000000]  BIOS-e820: 0000000000000000 - 000000000009fc00 (usable)
[    0.000000]  BIOS-e820: 000000000009fc00 - 00000000000a0000 (reserved)
[    0.000000]  BIOS-e820: 00000000000f0000 - 0000000000100000 (reserved)
[    0.000000]  BIOS-e820: 0000000000100000 - 000000003fffc000 (usable)
[    0.000000]  BIOS-e820: 000000003fffc000 - 0000000040000000 (reserved)
[    0.000000]  BIOS-e820: 00000000fffc0000 - 0000000100000000 (reserved)
[    0.000000] NX (Execute Disable) protection: active
[    0.000000] SMBIOS 2.4 present.
[    0.000000] No AGP bridge found
[    0.000000] last_pfn = 0x3fffc max_arch_pfn = 0x400000000
[    0.000000] x86 PAT enabled: cpu 0, old 0x7040600070406, new 0x7010600070106
[    0.000000] found SMP MP-table at [ffff8800000f63b0] f63b0
[    0.000000] init_memory_mapping: 0000000000000000-000000003fffc000
[    0.000000] RAMDISK: 37c92000 - 37ff0000
[    0.000000] ACPI: RSDP 00000000000f6210 00014 (v00 BOCHS )
[    0.000000] ACPI: RSDT 000000003ffffad7 00030 (v01 BOCHS  BXPCRSDT 00000001 BXPC 00000001)
[    0.000000] ACPI: FACP 000000003ffff177 00074 (v01 BOCHS  BXPCFACP 00000001 BXPC 00000001)
[    0.000000] ACPI: DSDT 000000003fffe040 01137 (v01 BOCHS  BXPCDSDT 00000001 BXPC 00000001)
[    0.000000] ACPI: FACS 000000003fffe000 00040
[    0.000000] ACPI: SSDT 000000003ffff1eb 00874 (v01 BOCHS  BXPCSSDT 00000001 BXPC 00000001)
[    0.000000] ACPI: APIC 000000003ffffa5f 00078 (v01 BOCHS  BXPCAPIC 00000001 BXPC 00000001)
[    0.000000] No NUMA configuration found
[    0.000000] Faking a node at 0000000000000000-000000003fffc000
[    0.000000] Initmem setup node 0 0000000000000000-000000003fffc000
[    0.000000]   NODE_DATA [000000003fff7000 - 000000003fffbfff]
[    0.000000] Zone PFN ranges:
[    0.000000]   DMA      0x00000010 -> 0x00001000
[    0.000000]   DMA32    0x00001000 -> 0x00100000
[    0.000000]   Normal   empty
[    0.000000] Movable zone start PFN for each node
[    0.000000] early_node_map[2] active PFN ranges
[    0.000000]     0: 0x00000010 -> 0x0000009f
[    0.000000]     0: 0x00000100 -> 0x0003fffc
[    0.000000] ACPI: PM-Timer IO Port: 0x608
[    0.000000] ACPI: LAPIC (acpi_id[0x00] lapic_id[0x00] enabled)
[    0.000000] ACPI: LAPIC_NMI (acpi_id[0xff] dfl dfl lint[0x1])
[    0.000000] ACPI: IOAPIC (id[0x00] address[0xfec00000] gsi_base[0])
[    0.000000] IOAPIC[0]: apic_id 0, version 17, address 0xfec00000, GSI 0-23
[    0.000000] ACPI: INT_SRC_OVR (bus 0 bus_irq 0 global_irq 2 dfl dfl)
[    0.000000] ACPI: INT_SRC_OVR (bus 0 bus_irq 5 global_irq 5 high level)
[    0.000000] ACPI: INT_SRC_OVR (bus 0 bus_irq 9 global_irq 9 high level)
[    0.000000] ACPI: INT_SRC_OVR (bus 0 bus_irq 10 global_irq 10 high level)
[    0.000000] ACPI: INT_SRC_OVR (bus 0 bus_irq 11 global_irq 11 high level)
[    0.000000] Using ACPI (MADT) for SMP configuration information
[    0.000000] SMP: Allowing 1 CPUs, 0 hotplug CPUs
[    0.000000] PM: Registered nosave memory: 000000000009f000 - 00000000000a0000
[    0.000000] PM: Registered nosave memory: 00000000000a0000 - 00000000000f0000
[    0.000000] PM: Registered nosave memory: 00000000000f0000 - 0000000000100000
[    0.000000] Allocating PCI resources starting at 40000000 (gap: 40000000:bffc0000)
[    0.000000] Booting paravirtualized kernel on bare hardware
[    0.000000] setup_percpu: NR_CPUS:64 nr_cpumask_bits:64 nr_cpu_ids:1 nr_node_ids:1
[    0.000000] PERCPU: Embedded 27 pages/cpu @ffff88003fc00000 s78848 r8192 d23552 u2097152
[    0.000000] Built 1 zonelists in Node order, mobility grouping on.  Total pages: 257926
[    0.000000] Policy zone: DMA32
[    0.000000] Kernel command line: LABEL=cirros-rootfs ro console=tty1 console=ttyS0
[    0.000000] PID hash table entries: 4096 (order: 3, 32768 bytes)
[    0.000000] Checking aperture...
[    0.000000] No AGP bridge found
[    0.000000] Memory: 1012360k/1048560k available (6576k kernel code, 452k absent, 35748k reserved, 6)
[    0.000000] SLUB: Genslabs=15, HWalign=64, Order=0-3, MinObjects=0, CPUs=1, Nodes=1
[    0.000000] Hierarchical RCU implementation.
[    0.000000] 	RCU dyntick-idle grace-period acceleration is enabled.
[    0.000000] NR_IRQS:4352 nr_irqs:256 16
[    0.000000] Console: colour VGA+ 80x25
[    0.000000] console [tty1] enabled
[    0.000000] console [ttyS0] enabled
[    0.000000] allocated 8388608 bytes of page_cgroup
[    0.000000] please try 'cgroup_disable=memory' option if you don't want memory cgroups
[    0.000000] Fast TSC calibration failed
[    0.000000] TSC: Unable to calibrate against PIT
[    0.000000] TSC: using PMTIMER reference calibration
[    0.000000] Detected 3390.935 MHz processor.
[    0.028662] Calibrating delay loop (skipped), value calculated using timer frequency.. 6781.87 Bogo)
[    0.029371] pid_max: default: 32768 minimum: 301
[    0.032001] Security Framework initialized
[    0.033556] AppArmor: AppArmor initialized
[    0.033685] Yama: becoming mindful.
[    0.036002] Dentry cache hash table entries: 131072 (order: 8, 1048576 bytes)
[    0.036002] Inode-cache hash table entries: 65536 (order: 7, 524288 bytes)
[    0.036002] Mount-cache hash table entries: 256
[    0.036002] Initializing cgroup subsys cpuacct
[    0.036002] Initializing cgroup subsys memory
[    0.036002] Initializing cgroup subsys devices
[    0.036002] Initializing cgroup subsys freezer
[    0.036002] Initializing cgroup subsys blkio
[    0.036002] Initializing cgroup subsys perf_event
[    0.036002] mce: CPU supports 10 MCE banks
[    0.036002] SMP alternatives: switching to UP code
[    0.085713] Freeing SMP alternatives: 24k freed
[    0.086261] ACPI: Core revision 20110623
[    0.102019] ftrace: allocating 26610 entries in 105 pages
[    0.118594] ..TIMER: vector=0x30 apic1=0 pin1=2 apic2=-1 pin2=-1
[    0.156009] CPU0: AMD QEMU Virtual CPU version 1.5.3 stepping 03
[    0.156009] APIC calibration not consistent with PM-Timer: 139ms instead of 100ms
[    0.156009] APIC delta adjusted to PM-Timer: 6249992 (8743536)
[    0.156009] Performance Events: Broken PMU hardware detected, using software events only.
[    0.156492] NMI watchdog disabled (cpu0): hardware events not enabled
[    0.156993] Brought up 1 CPUs
[    0.157131] Total of 1 processors activated (6781.87 BogoMIPS).
[    0.166195] devtmpfs: initialized
[    0.179266] EVM: security.selinux
[    0.179359] EVM: security.SMACK64
[    0.179427] EVM: security.capability
[    0.187359] print_constraints: dummy:
[    0.188202] RTC time: 10:13:19, date: 05/22/20
[    0.189085] NET: Registered protocol family 16
[    0.192172] ACPI: bus type pci registered
[    0.193548] PCI: Using configuration type 1 for base access
[    0.202485] bio: create slab <bio-0> at 0
[    0.204800] ACPI: Added _OSI(Module Device)
[    0.204908] ACPI: Added _OSI(Processor Device)
[    0.204996] ACPI: Added _OSI(3.0 _SCP Extensions)
[    0.205084] ACPI: Added _OSI(Processor Aggregator Device)
[    0.226640] ACPI: Interpreter enabled
[    0.226764] ACPI: (supports S0 S5)
[    0.227204] ACPI: Using IOAPIC for interrupt routing
[    0.248481] ACPI: No dock devices found.
[    0.248617] HEST: Table not found.
[    0.248734] PCI: Using host bridge windows from ACPI; if necessary, use "pci=nocrs" and report a bug
[    0.250625] ACPI: PCI Root Bridge [PCI0] (domain 0000 [bus 00-ff])
[    0.252569] pci_root PNP0A03:00: host bridge window [io  0x0000-0x0cf7]
[    0.252759] pci_root PNP0A03:00: host bridge window [io  0x0d00-0xffff]
[    0.252901] pci_root PNP0A03:00: host bridge window [mem 0x000a0000-0x000bffff]
[    0.253036] pci_root PNP0A03:00: host bridge window [mem 0x40000000-0xfebfffff]
[    0.258912] pci 0000:00:01.3: quirk: [io  0x0600-0x063f] claimed by PIIX4 ACPI
[    0.259224] pci 0000:00:01.3: quirk: [io  0x0700-0x070f] claimed by PIIX4 SMB
[    0.284776]  pci0000:00: Unable to request _OSC control (_OSC support mask: 0x1e)
[    0.297311] ACPI: PCI Interrupt Link [LNKA] (IRQs 5 *10 11)
[    0.297999] ACPI: PCI Interrupt Link [LNKB] (IRQs 5 *10 11)
[    0.298483] ACPI: PCI Interrupt Link [LNKC] (IRQs 5 10 *11)
[    0.298952] ACPI: PCI Interrupt Link [LNKD] (IRQs 5 10 *11)
[    0.299238] ACPI: PCI Interrupt Link [LNKS] (IRQs *9)
[    0.301682] vgaarb: device added: PCI:0000:00:02.0,decodes=io+mem,owns=io+mem,locks=none
[    0.301984] vgaarb: loaded
[    0.302057] vgaarb: bridge control possible 0000:00:02.0
[    0.303180] i2c-core: driver [aat2870] using legacy suspend method
[    0.303331] i2c-core: driver [aat2870] using legacy resume method
[    0.304483] SCSI subsystem initialized
[    0.305723] usbcore: registered new interface driver usbfs
[    0.306042] usbcore: registered new interface driver hub
[    0.306686] usbcore: registered new device driver usb
[    0.308657] PCI: Using ACPI for IRQ routing
[    0.313022] NetLabel: Initializing
[    0.313105] NetLabel:  domain hash size = 128
[    0.313177] NetLabel:  protocols = UNLABELED CIPSOv4
[    0.313905] NetLabel:  unlabeled traffic allowed by default
[    0.369076] AppArmor: AppArmor Filesystem Enabled
[    0.369652] pnp: PnP ACPI init
[    0.369833] ACPI: bus type pnp registered
[    0.375223] pnp: PnP ACPI: found 6 devices
[    0.375341] ACPI: ACPI bus type pnp unregistered
[    0.394684] Switching to clocksource acpi_pm
[    0.395149] NET: Registered protocol family 2
[    0.406185] IP route cache hash table entries: 32768 (order: 6, 262144 bytes)
[    0.410624] TCP established hash table entries: 131072 (order: 9, 2097152 bytes)
[    0.412790] TCP bind hash table entries: 65536 (order: 8, 1048576 bytes)
[    0.413739] TCP: Hash tables configured (established 131072 bind 65536)
[    0.413889] TCP reno registered
[    0.414060] UDP hash table entries: 512 (order: 2, 16384 bytes)
[    0.414254] UDP-Lite hash table entries: 512 (order: 2, 16384 bytes)
[    0.415193] NET: Registered protocol family 1
[    0.415484] pci 0000:00:00.0: Limiting direct PCI/PCI transfers
[    0.415638] pci 0000:00:01.0: PIIX3: Enabling Passive Release
[    0.415842] pci 0000:00:01.0: Activating ISA DMA hang workarounds
[    0.422966] Trying to unpack rootfs image as initramfs...
[    0.429911] audit: initializing netlink socket (disabled)
[    0.430417] type=2000 audit(1590142399.428:1): initialized
[    0.561790] HugeTLB registered 2 MB page size, pre-allocated 0 pages
[    0.578889] VFS: Disk quotas dquot_6.5.2
[    0.579617] Dquot-cache hash table entries: 512 (order 0, 4096 bytes)
[    0.589481] fuse init (API version 7.17)
[    0.590323] msgmni has been set to 1977
[    0.613806] Block layer SCSI generic (bsg) driver version 0.4 loaded (major 253)
[    0.614254] io scheduler noop registered
[    0.614375] io scheduler deadline registered (default)
[    0.614735] io scheduler cfq registered
[    0.615718] pci_hotplug: PCI Hot Plug PCI Core version: 0.5
[    0.616355] pciehp: PCI Express Hot Plug Controller Driver version: 0.4
[    0.618371] input: Power Button as /devices/LNXSYSTM:00/LNXPWRBN:00/input/input0
[    0.618865] ACPI: Power Button [PWRF]
[    0.634672] ERST: Table is not found!
[    0.634790] GHES: HEST is not enabled!
[    0.636666] ACPI: PCI Interrupt Link [LNKC] enabled at IRQ 11
[    0.636902] virtio-pci 0000:00:03.0: PCI INT A -> Link[LNKC] -> GSI 11 (level, high) -> IRQ 11
[    0.725351] ACPI: PCI Interrupt Link [LNKD] enabled at IRQ 10
[    0.725602] virtio-pci 0000:00:04.0: PCI INT A -> Link[LNKD] -> GSI 10 (level, high) -> IRQ 10
[    0.726699] Serial: 8250/16550 driver, 32 ports, IRQ sharing enabled
[    0.748340] serial8250: ttyS0 at I/O 0x3f8 (irq = 4) is a 16550A
[    0.805971] 00:05: ttyS0 at I/O 0x3f8 (irq = 4) is a 16550A
[    0.834595] Linux agpgart interface v0.103
[    0.849149] brd: module loaded
[    0.861034] loop: module loaded
[    0.874798]  vda: vda1
[    0.894087] Freeing initrd memory: 3448k freed
[    0.896830] scsi0 : ata_piix
[    0.897847] scsi1 : ata_piix
[    0.898286] ata1: PATA max MWDMA2 cmd 0x1f0 ctl 0x3f6 bmdma 0xc060 irq 14
[    0.898422] ata2: PATA max MWDMA2 cmd 0x170 ctl 0x376 bmdma 0xc068 irq 15
[    0.901392] Fixed MDIO Bus: probed
[    0.901708] tun: Universal TUN/TAP device driver, 1.6
[    0.901797] tun: (C) 1999-2004 Max Krasnyansky <maxk@qualcomm.com>
[    0.908111] PPP generic driver version 2.4.2
[    0.909758] ehci_hcd: USB 2.0 'Enhanced' Host Controller (EHCI) Driver
[    0.910003] ohci_hcd: USB 1.1 'Open' Host Controller (OHCI) Driver
[    0.910201] uhci_hcd: USB Universal Host Controller Interface driver
[    0.910680] usbcore: registered new interface driver libusual
[    0.911227] i8042: PNP: PS/2 Controller [PNP0303:KBD,PNP0f13:MOU] at 0x60,0x64 irq 1,12
[    0.913292] serio: i8042 KBD port at 0x60,0x64 irq 1
[    0.913554] serio: i8042 AUX port at 0x60,0x64 irq 12
[    0.914713] mousedev: PS/2 mouse device common for all mice
[    0.916900] input: AT Translated Set 2 keyboard as /devices/platform/i8042/serio0/input/input1
[    0.918165] rtc_cmos 00:01: RTC can wake from S4
[    0.919431] rtc_cmos 00:01: rtc core: registered rtc_cmos as rtc0
[    0.919785] rtc0: alarms up to one day, 114 bytes nvram
[    0.920627] device-mapper: uevent: version 1.0.3
[    0.922066] device-mapper: ioctl: 4.22.0-ioctl (2011-10-19) initialised: dm-devel@redhat.com
[    0.922602] cpuidle: using governor ladder
[    0.922717] cpuidle: using governor menu
[    0.922791] EFI Variables Facility v0.08 2004-May-17
[    0.924595] TCP cubic registered
[    0.925278] NET: Registered protocol family 10
[    0.931603] NET: Registered protocol family 17
[    0.931764] Registering the dns_resolver key type
[    0.934698] registered taskstats version 1
[    1.013651]   Magic number: 4:873:224
[    1.014233] rtc_cmos 00:01: setting system clock to 2020-05-22 10:13:20 UTC (1590142400)
[    1.014437] powernow-k8: Processor cpuid 6d3 not supported
[    1.015351] BIOS EDD facility v0.16 2004-Jun-25, 0 devices found
[    1.015464] EDD information not available.
[    1.064256] ata2.00: ATAPI: QEMU DVD-ROM, 1.5.3, max UDMA/100
[    1.065808] ata2.00: configured for MWDMA2
[    1.070890] scsi 1:0:0:0: CD-ROM            QEMU     QEMU DVD-ROM     1.5. PQ: 0 ANSI: 5
[    1.074738] sr0: scsi3-mmc drive: 4x/4x cd/rw xa/form2 tray
[    1.074937] cdrom: Uniform CD-ROM driver Revision: 3.20
[    1.077154] sr 1:0:0:0: Attached scsi generic sg0 type 5
[    1.086555] Freeing unused kernel memory: 928k freed
[    1.102980] Write protecting the kernel read-only data: 12288k
[    1.128858] Freeing unused kernel memory: 1596k freed
[    1.147351] Freeing unused kernel memory: 1184k freed
info: initramfs: up at 1.23
NOCHANGE: partition 1 is size 64260. it cannot be grown
info: initramfs loading root from /dev/vda1
info: /etc/init.d/rc.sysinit: up at 1.90
info: container: none
Starting logging: OK
modprobe: module virtio_blk not found in modules.dep
modprobe: module virtio_net not found in modules.dep
WARN: /etc/rc3.d/S10-load-modules failed
Initializing random number generator... done.
Starting acpid: OK
cirros-ds 'local' up at 2.91
no results found for mode=local. up 3.16. searched: nocloud configdrive ec2
Starting network...
udhcpc (v1.20.1) started
Sending discover...
Sending select for 192.168.122.89...
Lease of 192.168.122.89 obtained, lease time 3600
cirros-ds 'net' up at 6.76
checking http://169.254.169.254/2009-04-04/instance-id
failed 1/20: up 7.00. request failed
failed 2/20: up 19.34. request failed
failed 3/20: up 31.84. request failed
failed 4/20: up 44.06. request failed
failed 5/20: up 56.30. request failed
failed 6/20: up 68.69. request failed
failed 7/20: up 81.10. request failed
failed 8/20: up 93.30. request failed
failed 9/20: up 105.62. request failed
failed 10/20: up 117.91. request failed
failed 11/20: up 130.15. request failed
failed 12/20: up 142.46. request failed
failed 13/20: up 154.73. request failed
failed 14/20: up 167.19. request failed
failed 15/20: up 179.45. request failed
failed 16/20: up 191.85. request failed
failed 17/20: up 204.14. request failed
failed 18/20: up 216.41. request failed
failed 19/20: up 228.79. request failed
failed 20/20: up 241.07. request failed
failed to read iid from metadata. tried 20
no results found for mode=net. up 253.35. searched: nocloud configdrive ec2
failed to get instance-id of datasource
Starting dropbear sshd: generating rsa key... generating dsa key... OK
=== system information ===
Platform: Red Hat KVM
Container: none
Arch: x86_64
CPU(s): 1 @ 3390.935 MHz
Cores/Sockets/Threads: 1/1/1
Virt-type: AMD-V
RAM Size: 995MB
Disks:
NAME MAJ:MIN       SIZE LABEL         MOUNTPOINT
vda  253:0     41126400
vda1 253:1     32901120 cirros-rootfs /
sr0   11:0   1073741312
=== sshd host keys ===
-----BEGIN SSH HOST KEY KEYS-----
ssh-rsa AAAAB3NzaC1yc2EAAAADAQABAAAAgl4Xw51xDUhlJtF6/Yw9tjhW4yvcVKZaqXGS4GpyenRqnuJxqkpsDD4QFehMHOV+yjs
ssh-dss AAAAB3NzaC1kc3MAAACBAMuvp15NiGynOnim7Fk/P8jd2+sZMMQNm4aNiqFkARD/wgIBrFNTvapQWoJBGZNKeMafPKzueys
-----END SSH HOST KEY KEYS-----
=== network info ===
if-info: lo,up,127.0.0.1,8,::1
if-info: eth0,up,192.168.122.89,24,fe80::5054:ff:fe12:3456
ip-route:default via 192.168.122.1 dev eth0
ip-route:192.168.122.0/24 dev eth0  src 192.168.122.89
=== datasource: None None ===
=== cirros: current=0.3.4 uptime=255.67 ===
  ____               ____  ____
 / __/ __ ____ ____ / __ \/ __/
/ /__ / // __// __// /_/ /\ \
\___//_//_/  /_/   \____/___/
   http://cirros-cloud.net
login as 'cirros' user. default password: 'cubswin:)'. use 'sudo' for root.
cirros login: cirros
Password:
$ ip addr list
1: lo: <LOOPBACK,UP,LOWER_UP> mtu 16436 qdisc noqueue
    link/loopback 00:00:00:00:00:00 brd 00:00:00:00:00:00
    inet 127.0.0.1/8 scope host lo
    inet6 ::1/128 scope host
       valid_lft forever preferred_lft forever
2: eth0: <BROADCAST,MULTICAST,UP,LOWER_UP> mtu 1500 qdisc pfifo_fast qlen 1000
    link/ether 52:54:00:12:34:56 brd ff:ff:ff:ff:ff:ff
    inet 192.168.122.89/24 brd 192.168.122.255 scope global eth0
    inet6 fe80::5054:ff:fe12:3456/64 scope link
       valid_lft forever preferred_lft forever
$ route  -n
Kernel IP routing table
Destination     Gateway         Genmask         Flags Metric Ref    Use Iface
0.0.0.0         192.168.122.1   0.0.0.0         UG    0      0        0 eth0
192.168.122.0   0.0.0.0         255.255.255.0   U     0      0        0 eth0
# 备注:退出进入的系统(先按Ctrl+A,再按X):
- 1
- 2
- 3
- 4
- 5
- 6
- 7
- 8
- 9
- 10
- 11
- 12
- 13
- 14
- 15
- 16
- 17
- 18
- 19
- 20
- 21
- 22
- 23
- 24
- 25
- 26
- 27
- 28
- 29
- 30
- 31
- 32
- 33
- 34
- 35
- 36
- 37
- 38
- 39
- 40
- 41
- 42
- 43
- 44
- 45
- 46
- 47
- 48
- 49
- 50
- 51
- 52
- 53
- 54
- 55
- 56
- 57
- 58
- 59
- 60
- 61
- 62
- 63
- 64
- 65
- 66
- 67
- 68
- 69
- 70
- 71
- 72
- 73
- 74
- 75
- 76
- 77
- 78
- 79
- 80
- 81
- 82
- 83
- 84
- 85
- 86
- 87
- 88
- 89
- 90
- 91
- 92
- 93
- 94
- 95
- 96
- 97
- 98
- 99
- 100
- 101
- 102
- 103
- 104
- 105
- 106
- 107
- 108
- 109
- 110
- 111
- 112
- 113
- 114
- 115
- 116
- 117
- 118
- 119
- 120
- 121
- 122
- 123
- 124
- 125
- 126
- 127
- 128
- 129
- 130
- 131
- 132
- 133
- 134
- 135
- 136
- 137
- 138
- 139
- 140
- 141
- 142
- 143
- 144
- 145
- 146
- 147
- 148
- 149
- 150
- 151
- 152
- 153
- 154
- 155
- 156
- 157
- 158
- 159
- 160
- 161
- 162
- 163
- 164
- 165
- 166
- 167
- 168
- 169
- 170
- 171
- 172
- 173
- 174
- 175
- 176
- 177
- 178
- 179
- 180
- 181
- 182
- 183
- 184
- 185
- 186
- 187
- 188
- 189
- 190
- 191
- 192
- 193
- 194
- 195
- 196
- 197
- 198
- 199
- 200
- 201
- 202
- 203
- 204
- 205
- 206
- 207
- 208
- 209
- 210
- 211
- 212
- 213
- 214
- 215
- 216
- 217
- 218
- 219
- 220
- 221
- 222
- 223
- 224
- 225
- 226
- 227
- 228
- 229
- 230
- 231
- 232
- 233
- 234
- 235
- 236
- 237
- 238
- 239
- 240
- 241
- 242
- 243
- 244
- 245
- 246
- 247
- 248
- 249
- 250
- 251
- 252
- 253
- 254
- 255
- 256
- 257
- 258
- 259
- 260
- 261
- 262
- 263
- 264
- 265
- 266
- 267
- 268
- 269
- 270
- 271
- 272
- 273
- 274
- 275
- 276
- 277
- 278
- 279
- 280
- 281
- 282
- 283
- 284
- 285
- 286
- 287
- 288
- 289
- 290
- 291
- 292
- 293
- 294
- 295
- 296
- 297
- 298
- 299
- 300
- 301
- 302
- 303
- 304
- 305
- 306
- 307
- 308
- 309
- 310
- 311
- 312
- 313
- 314
- 315
- 316
- 317
- 318
- 319
- 320
- 321
- 322
- 323
- 324
- 325
- 326
- 327
- 328
- 329
- 330
- 331
- 332
- 333
- 334
- 335
- 336
- 337
- 338
- 339
- 340
- 341
- 342
- 343
- 344
- 345
- 346
- 347
- 348
- 349
- 350
- 351
- 352
- 353
- 354
- 355
- 356
- 357
- 358
- 359
- 360
- 361
- 362
- 363
- 364
- 365
- 366
- 367
- 368
- 369
- 370
- 371
- 372
- 373
- 374
- 375
5、主从数据库管理(40分)
使用提供的两台虚拟机,在虚拟机上安装mariadb数据库,并配置为主从数据库,实现两个数据库的主从同步。配置完毕后,请在从节点上的数据库中执行“show slave status \G”命令查询从节点复制状态,将查询到的结果以文本形式提交到答题框。
- 上传gpmall-repo中有mariadb子文件的文件到/root目录下
mysql1:
[root@xiandian ~]# hostnamectl set-hostname mysql1
[root@mysql1 ~]# login
[root@mysql1 ~]# vim /etc/hosts
127.0.0.1   localhost localhost.localdomain localhost4 localhost4.localdomain4
::1         localhost localhost.localdomain localhost6 localhost6.localdomain6
192.168.1.111    mysql1
192.168.1.112    mysql2
[root@mysql1 ~]# systemctl stop firewalld
[root@mysql1 ~]# systemctl disable firewalld
[root@mysql1 ~]# setenforce 0
[root@mysql1 ~]# vim /etc/selinux/config
SELINUX=Permissive
[root@mysql1~]# vim /etc/yum.repos.d/local.repo
[centos]
name=centos
baseurl=file:///opt/centos
enabled=1
gpgcheck=0
[mariadb]
name=mariadb
baseurl=file:///root/gpmall-repo
enabled=1
gpgcheck=0
[root@mysql1 ~]# yum install -y mariadb mariadb-server
[root@mysql1 ~]# systemctl restart mariadb
[root@mysql1 ~]# mysql_secure_installation
[root@mysql1 ~]# vim /etc/my.cnf
# 注释:在[mysqld]下添加:
log_bin = mysql-bin
binlog_ignore_db = mysql
server_id = 10
[root@mysql1 ~]# mysql -uroot -p000000
Welcome to the MariaDB monitor.  Commands end with ; or \g.
Your MariaDB connection id is 3
Server version: 5.5.65-MariaDB MariaDB Server

Copyright (c) 2000, 2018, Oracle, MariaDB Corporation Ab and others.

Type 'help;' or '\h' for help. Type '\c' to clear the current input statement.

MariaDB [(none)]> grant all privileges on *.* to 'root'@'%' identified by '000000';
Query OK, 0 rows affected (0.00 sec)

# 注释:如果你不想配置上面的host文件可以不使用主机名mysql2的形式,可以直接打IP地址,用户可以随意指定,只是一个用于连接的而已
MariaDB [(none)]> grant replication slave on *.* to 'user'@'mysql2' identified by '000000';
Query OK, 0 rows affected (0.00 sec)
- 1
- 2
- 3
- 4
- 5
- 6
- 7
- 8
- 9
- 10
- 11
- 12
- 13
- 14
- 15
- 16
- 17
- 18
- 19
- 20
- 21
- 22
- 23
- 24
- 25
- 26
- 27
- 28
- 29
- 30
- 31
- 32
- 33
- 34
- 35
- 36
- 37
- 38
- 39
- 40
- 41
- 42
- 43
- 44
- 45
- 46
mysql2:
[root@xiandian ~]# hostnamectl set-hostname mysql2
[root@mysql2 ~]# login
[root@mysql2 ~]# vim /etc/hosts
127.0.0.1   localhost localhost.localdomain localhost4 localhost4.localdomain4
::1         localhost localhost.localdomain localhost6 localhost6.localdomain6
192.168.1.111   mysql1
192.168.1.112   mysql2
[root@mysql2 ~]# systemctl stop firewalld
[root@mysql2 ~]# systemctl disable firewalld
[root@mysql2 ~]# setenforce 0
[root@mysql2 ~]# vim /etc/selinux/config
SELINUX=Permissive
[root@mysql2~]# vim /etc/yum.repos.d/local.repo
[centos]
name=centos
baseurl=file:///opt/centos
enabled=1
gpgcheck=0
[mariadb]
name=mariadb
baseurl=file:///root/gpmall-repo
enabled=1
gpgcheck=0
[root@mysql2 ~]# yum install -y mariadb mariadb-server
[root@mysql2 ~]# systemctl restart mariadb
[root@mysql2 ~]# mysql_secure_installation
[root@mysql2 ~]# vim /etc/my.cnf
# 注释:在[mysqld]下添加:
log_bin = mysql-bin
binlog_ignore_db = mysql
server_id = 20
[root@mysql2 ~]# mysql -uroot -p000000
Welcome to the MariaDB monitor.  Commands end with ; or \g.
Your MariaDB connection id is 3
Server version: 5.5.65-MariaDB MariaDB Server

Copyright (c) 2000, 2018, Oracle, MariaDB Corporation Ab and others.

Type 'help;' or '\h' for help. Type '\c' to clear the current input statement.

# 注释:如果你不想配置上面的host文件可以不使用主机名mysql1的形式,可以直接打IP地址,这里的用户,密码必须和上面mysql1配置的user一致
MariaDB [(none)]> change master to master_host='mysql1',master_user='user',master_password='000000';
Query OK, 0 rows affected (0.02 sec)
MariaDB [(none)]> start slave;
MariaDB [(none)]> show slave status\G
*************************** 1. row ***************************
Slave_IO_State: Waiting for master to send event
Master_Host: mysql1
Master_User: user
Master_Port: 3306
Connect_Retry: 60
Master_Log_File: mysql-bin.000003
Read_Master_Log_Pos: 245
Relay_Log_File: mariadb-relay-bin.000005
Relay_Log_Pos: 529
Relay_Master_Log_File: mysql-bin.000003
Slave_IO_Running: Yes
Slave_SQL_Running: Yes
Replicate_Do_DB:
Replicate_Ignore_DB:
Replicate_Do_Table:
Replicate_Ignore_Table:
Replicate_Wild_Do_Table:
Replicate_Wild_Ignore_Table:
Last_Errno: 0
Last_Error:
Skip_Counter: 0
Exec_Master_Log_Pos: 245
Relay_Log_Space: 1256
Until_Condition: None
Until_Log_File:
Until_Log_Pos: 0
Master_SSL_Allowed: No
Master_SSL_CA_File:
Master_SSL_CA_Path:
Master_SSL_Cert:
Master_SSL_Cipher:
Master_SSL_Key:
Seconds_Behind_Master: 0
Master_SSL_Verify_Server_Cert: No
Last_IO_Errno: 0
Last_IO_Error:
Last_SQL_Errno: 0
Last_SQL_Error:
Replicate_Ignore_Server_Ids:
Master_Server_Id: 30
1 row in set (0.00 sec)
- 1
- 2
- 3
- 4
- 5
- 6
- 7
- 8
- 9
- 10
- 11
- 12
- 13
- 14
- 15
- 16
- 17
- 18
- 19
- 20
- 21
- 22
- 23
- 24
- 25
- 26
- 27
- 28
- 29
- 30
- 31
- 32
- 33
- 34
- 35
- 36
- 37
- 38
- 39
- 40
- 41
- 42
- 43
- 44
- 45
- 46
- 47
- 48
- 49
- 50
- 51
- 52
- 53
- 54
- 55
- 56
- 57
- 58
- 59
- 60
- 61
- 62
- 63
- 64
- 65
- 66
- 67
- 68
- 69
- 70
- 71
- 72
- 73
- 74
- 75
- 76
- 77
- 78
- 79
- 80
- 81
- 82
- 83
- 84
- 85
- 86
- 87
验证结果(主从是否同步):
mysql1:
[root@mysql1 ~]# mysql -uroot -p000000
Welcome to the MariaDB monitor.  Commands end with ; or \g.
Your MariaDB connection id is 26
Server version: 5.5.65-MariaDB MariaDB Server

Copyright (c) 2000, 2018, Oracle, MariaDB Corporation Ab and others.

Type 'help;' or '\h' for help. Type '\c' to clear the current input statement.

MariaDB [(none)]> create database test;
Query OK, 0 rows affected (0.00 sec)
MariaDB [(none)]> use test;
Database changed
MariaDB [test]> create table demotables(id int not null primary key,name varchar(10),addr varchar(20));
Query OK, 0 rows affected (0.01 sec)
MariaDB [test]> insert into demotables values(1,'zhangsan','lztd');
Query OK, 0 rows affected (0.00 sec)
MariaDB [test]> select * from demotables;
+----+----------+------+
| id | name     | addr |
+----+----------+------+
|  1 | zhangsan | lztd |
+----+----------+------+
1 rows in set (0.00 sec)
- 1
- 2
- 3
- 4
- 5
- 6
- 7
- 8
- 9
- 10
- 11
- 12
- 13
- 14
- 15
- 16
- 17
- 18
- 19
- 20
- 21
- 22
- 23
- 24
- 25
mysql2:
[root@mysql2 ~]# mysql -uroot -p000000
Welcome to the MariaDB monitor.  Commands end with ; or \g.
Your MariaDB connection id is 24
Server version: 5.5.65-MariaDB MariaDB Server

Copyright (c) 2000, 2018, Oracle, MariaDB Corporation Ab and others.

Type 'help;' or '\h' for help. Type '\c' to clear the current input statement.

MariaDB [(none)]> show databases;
+--------------------+
| Database           |
+--------------------+
| information_schema |
| mysql              |
| performance_schema |
| test               |
+--------------------+
4 rows in set (0.00 sec)
MariaDB [(none)]> use test;
Reading table information for completion of table and column names
You can turn off this feature to get a quicker startup with -A
Database changed
MariaDB [test]> show tables;
+----------------+
| Tables_in_test |
+----------------+
| demotables     |
+----------------+
1 row in set (0.00 sec)
MariaDB [test]> select * from demotables;
+----+----------+------+
| id | name     | addr |
+----+----------+------+
|  1 | zhangsan | lztd |
+----+----------+------+
1 rows in set (0.00 sec)
- 1
- 2
- 3
- 4
- 5
- 6
- 7
- 8
- 9
- 10
- 11
- 12
- 13
- 14
- 15
- 16
- 17
- 18
- 19
- 20
- 21
- 22
- 23
- 24
- 25
- 26
- 27
- 28
- 29
- 30
- 31
- 32
- 33
- 34
- 35
- 36
- 37
6、应用商城系统(40分)
使用提供的软件包和提供的虚拟机,完成单节点应用系统部署。部署完成后,进行登录,(订单中填写的收货地址填写自己学校的地址,收货人填写自己的实际联系方式)最后使用curl命令去获取商城首页的返回信息,将curl http://你自己的商城IP/#/home获取到的结果以文本形式提交到答题框。
这是gpmall上传的开源项目,如果想了解的更加深入的可以访问这个地址 https://gitee.com/mic112/gpmall
- 将所需的zookeeper,kafka和gpmall-repo的包上传到mall虚拟机
[root@mall ~]# vim /etc/hosts
127.0.0.1   localhost localhost.localdomain localhost4 localhost4.localdomain4
::1         localhost localhost.localdomain localhost6 localhost6.localdomain6
192.168.1.111   mall
192.168.1.111   kafka.mall
192.168.1.111   redis.mall
192.168.1.111   mysql.mall
192.168.1.111   zookeeper.mall
[root@mall ~]# vim /etc/yum.repos.d/local.repo
[centos]
name=centos
baseurl=file:///opt/centos
enabled=1
gpgcheck=0
[gpmall]
name=gpmall
baseurl=file:///root/gpmall-repo
enabled=1
gpgcheck=0
[root@mall ~]# yum install -y java-1.8.0-openjdk java-1.8.0-openjdk-devel
[root@mall ~]# java -version
openjdk version "1.8.0_252"
OpenJDK Runtime Environment (build 1.8.0_252-b09)
OpenJDK 64-Bit Server VM (build 25.252-b09, mixed mode)
[root@mall ~]# yum install -y redis
[root@mall ~]# yum install -y nginx
[root@mall ~]# yum install -y mariadb mariadb-server
[root@mall ~]# tar -zvxf zookeeper-3.4.14.tar.gz
[root@mall ~]# cd zookeeper-3.4.14/conf
[root@mall conf]# mv zoo_sample.cfg zoo.cfg
[root@mall conf]# cd /root/zookeeper-3.4.14/bin/
[root@mall bin]# ./zkServer.sh start
[root@mall bin]# ./zkServer.sh status
ZooKeeper JMX enabled by default
Using config: /root/zookeeper-3.4.14/bin/../conf/zoo.cfg
Mode: standalone
[root@mall bin]# cd
[root@mall ~]# tar -zvxf kafka_2.11-1.1.1.tgz
[root@mall ~]# cd kafka_2.11-1.1.1/bin/
[root@mall bin]# ./kafka-server-start.sh -daemon ../config/server.properties
[root@mall bin]# jps
7249 Kafka
17347 Jps
6927 QuorumPeerMain
[root@mall bin]# cd
[root@mall ~]# vim /etc/my.cnf
# This group is read both both by the client and the server
# use it for options that affect everything
#
[client-server]
#
# include all files from the config directory
#
!includedir /etc/my.cnf.d
[mysqld]
init_connect='SET collation_connection = utf8_unicode_ci'
init_connect='SET NAMES utf8'
character-set-server=utf8
collation-server=utf8_unicode_ci
skip-character-set-client-handshake
[root@mall ~]# systemctl restart mariadb
[root@mall ~]# systemctl enable mariadb
[root@mall ~]# mysqladmin -uroot password 123456
[root@mall ~]# mysql -uroot -p123456
Welcome to the MariaDB monitor.  Commands end with ; or \g.
Your MariaDB connection id is 9
Server version: 10.3.18-MariaDB MariaDB Server

Copyright (c) 2000, 2018, Oracle, MariaDB Corporation Ab and others.

Type 'help;' or '\h' for help. Type '\c' to clear the current input statement.
MariaDB [(none)]> create database gpmall;
Query OK, 1 row affected (0.002 sec)
MariaDB [(none)]> grant all privileges on *.* to root@localhost identified by '123456' with grant option;
Query OK, 0 rows affected (0.001 sec)
MariaDB [(none)]> grant all privileges on *.* to root@'%' identified by '123456' with grant option;
Query OK, 0 rows affected (0.001 sec)
MariaDB [(none)]> use gpmall;
Database changed
MariaDB [gpmall]> source /root/gpmall-xiangmubao-danji/gpmall.sql
MariaDB [gpmall]> Ctrl-C -- exit!
[root@mall ~]# vim /etc/redis.conf
将bind 127.0.0.1这一行注释掉;将protected-mode yes 改为 protected-mode no
#bind 127.0.0.1
Protected-mode no
[root@mall ~]# systemctl restart redis
[root@mall ~]# systemctl enable redis
Created symlink from /etc/systemd/system/multi-user.target.wants/redis.service to /usr/lib/systemd/system/redis.service.
[root@mall ~]# rm -rf /usr/share/nginx/html/*
[root@mall ~]# cp -rf gpmall-xiangmubao-danji/dist/* /usr/share/nginx/html/
[root@mall ~]# vim /etc/nginx/conf.d/default.conf
# 注释:在server块中添加三个location块
server {
...
    location /user {
        proxy_pass http://127.0.0.1:8082;
    }

    location /shopping {
        proxy_pass http://127.0.0.1:8081;
    }

    location /cashier {
        proxy_pass http://127.0.0.1:8083;
    }
...
}
[root@mall ~]# systemctl restart nginx
[root@mall ~]# systemctl enable nginx
Created symlink from /etc/systemd/system/multi-user.target.wants/nginx.service to /usr/lib/systemd/system/nginx.service.
[root@mall ~]# cd gpmall-xiangmubao-danji/
[root@mall gpmall-xiangmubao-danji]# nohup java -jar shopping-provider-0.0.1-SNAPSHOT.jar &
[1] 3531
[root@mall gpmall-xiangmubao-danji]# nohup: ignoring input and appending output to ‘nohup.out’

[root@mall gpmall-xiangmubao-danji]# nohup java -jar user-provider-0.0.1-SNAPSHOT.jar &
[2] 3571
[root@mall gpmall-xiangmubao-danji]# nohup: ignoring input and appending output to ‘nohup.out’

[root@mall gpmall-xiangmubao-danji]# nohup java -jar gpmall-shopping-0.0.1-SNAPSHOT.jar &
[3] 3639
[root@mall gpmall-xiangmubao-danji]# nohup: ignoring input and appending output to ‘nohup.out’

[root@mall gpmall-xiangmubao-danji]# nohup java -jar gpmall-user-0.0.1-SNAPSHOT.jar &
[4] 3676
[root@mall gpmall-xiangmubao-danji]# nohup: ignoring input and appending output to ‘nohup.out’

[root@mall gpmall-xiangmubao-danji]# jobs
[1]   Running          nohup java -jar shopping-provider-0.0.1-SNAPSHOT.jar &
[2]   Running          nohup java -jar user-provider-0.0.1-SNAPSHOT.jar &
[3]-   Running          nohup java -jar gpmall-shopping-0.0.1-SNAPSHOT.jar &
[4]+  Running          nohup java -jar gpmall-user-0.0.1-SNAPSHOT.jar &
[root@mall gpmall-xiangmubao-danji]# curl http://192.168.1.111/#/home
<!DOCTYPE html><html><head><meta charset=utf-8><title>1+x-示例项目</title><meta name=keywords content=""><meta name=description content=""><meta http-equiv=X-UA-Compatible content="IE=Edge"><meta name=wap-font-scale content=no><link rel="shortcut icon " type=images/x-icon href=/static/images/favicon.ico><link href=/static/css/app.8d4edd335a61c46bf5b6a63444cd855a.css rel=stylesheet></head><body><div id=app></div><script type=text/javascript src=/static/js/manifest.2d17a82764acff8145be.js></script><script type=text/javascript src=/static/js/vendor.4f07d3a235c8a7cd4efe.js></script><script type=text/javascript src=/static/js/app.81180cbb92541cdf912f.js></script></body></html><style>body{
min-width:1250px;}</style>
- 1
- 2
- 3
- 4
- 5
- 6
- 7
- 8
- 9
- 10
- 11
- 12
- 13
- 14
- 15
- 16
- 17
- 18
- 19
- 20
- 21
- 22
- 23
- 24
- 25
- 26
- 27
- 28
- 29
- 30
- 31
- 32
- 33
- 34
- 35
- 36
- 37
- 38
- 39
- 40
- 41
- 42
- 43
- 44
- 45
- 46
- 47
- 48
- 49
- 50
- 51
- 52
- 53
- 54
- 55
- 56
- 57
- 58
- 59
- 60
- 61
- 62
- 63
- 64
- 65
- 66
- 67
- 68
- 69
- 70
- 71
- 72
- 73
- 74
- 75
- 76
- 77
- 78
- 79
- 80
- 81
- 82
- 83
- 84
- 85
- 86
- 87
- 88
- 89
- 90
- 91
- 92
- 93
- 94
- 95
- 96
- 97
- 98
- 99
- 100
- 101
- 102
- 103
- 104
- 105
- 106
- 107
- 108
- 109
- 110
- 111
- 112
- 113
- 114
- 115
- 116
- 117
- 118
- 119
- 120
- 121
- 122
- 123
- 124
- 125
- 126
- 127
- 128
- 129
- 130
- 131
- 132
- 133
- 134
- 135
7、swift管理(40分)
登录“all-in-one”云主机。使用swift相关命令,查询swift对象存储服务可以存储的单个文件大小的最大值,依次将操作命令及返回结果以文本形式提交到答题框。
[root@xiandian ~]# swift capabilities |grep max_file_size
max_file_size: 5368709122
- 1
- 2
8、cinder管理(40分)
登录“all-in-one”云主机,使用命令查看当前卷组信息,使用lvcreate命令,创建名称为BlockVloume,大小为2G的lvm逻辑卷,查询该逻辑卷详细信息,依次将操作命令及返回结果以文本形式提交到答题框。
[root@controller ~]# vgs
  VG             #PV #LV #SN Attr   VSize  VFree
  centos           1   2   0 wz--n- 39.00g 4.00m
  cinder-volumes   1   0   0 wz--n-  5.00g 5.00g
[root@controller ~]# lvcreate -L +2G -n BlockVolume cinder-volumes
  Logical volume "BlockVolume" created.
[root@controller ~]# lvs
  LV          VG             Attr       LSize  Pool Origin Data%  Meta%  Move Log Cpy%Sync Convert
  root        centos         -wi-ao---- 35.00g
  swap        centos         -wi-ao----  4.00g
  BlockVolume cinder-volumes -wi-a-----  2.00g
[root@controller ~]# lvdisplay /dev/mapper/cinder--volumes-BlockVolume
  --- Logical volume ---
  LV Path                /dev/cinder-volumes/BlockVolume
  LV Name                BlockVolume
  VG Name                cinder-volumes
  LV UUID                Ifbpgh-QOe5-3EjU-YHcH-avNW-KLYd-D8AD9M
  LV Write Access        read/write
  LV Creation host, time controller, 2023-11-27 23:38:51 -0400
  LV Status              available
  # open                 0
  LV Size                2.00 GiB
  Current LE             512
  Segments               1
  Allocation             inherit
  Read ahead sectors     auto
  - currently set to     8192
  Block device           253:2
- 1
- 2
- 3
- 4
- 5
- 6
- 7
- 8
- 9
- 10
- 11
- 12
- 13
- 14
- 15
- 16
- 17
- 18
- 19
- 20
- 21
- 22
- 23
- 24
- 25
- 26
- 27
- 28
9、Ceilometer管理(40分)
登录“all-in-one”云主机。使用ceilometer相关命令,查询测量值的列表信息。依次将操作命令及返回结果以文本形式提交到答题框。
[root@controller ~]# ceilometer meter-list
+---------------------------------+------------+-----------+-----------------------------------------------------------------------+----------------------------------+----------------------------------+
| Name                            | Type       | Unit      | Resource ID                                                           | User ID                          | Project ID                       |
+---------------------------------+------------+-----------+-----------------------------------------------------------------------+----------------------------------+----------------------------------+
| compute.instance.booting.time   | gauge      | sec       | e1e52ae3-1f3e-4d62-bc21-d8b19055ab5c                                  | 0befa70f767848e39df8224107b71858 | f9ff39ba9daa4e5a8fee1fc50e2d2b34 |
| cpu                             | cumulative | ns        | e1e52ae3-1f3e-4d62-bc21-d8b19055ab5c                                  | 0befa70f767848e39df8224107b71858 | f9ff39ba9daa4e5a8fee1fc50e2d2b34 |
| cpu.delta                       | delta      | ns        | e1e52ae3-1f3e-4d62-bc21-d8b19055ab5c                                  | 0befa70f767848e39df8224107b71858 | f9ff39ba9daa4e5a8fee1fc50e2d2b34 |
| cpu_util                        | gauge      | %         | e1e52ae3-1f3e-4d62-bc21-d8b19055ab5c                                  | 0befa70f767848e39df8224107b71858 | f9ff39ba9daa4e5a8fee1fc50e2d2b34 |
| disk.allocation                 | gauge      | B         | e1e52ae3-1f3e-4d62-bc21-d8b19055ab5c                                  | 0befa70f767848e39df8224107b71858 | f9ff39ba9daa4e5a8fee1fc50e2d2b34 |
| disk.capacity                   | gauge      | B         | e1e52ae3-1f3e-4d62-bc21-d8b19055ab5c                                  | 0befa70f767848e39df8224107b71858 | f9ff39ba9daa4e5a8fee1fc50e2d2b34 |
| disk.device.allocation          | gauge      | B         | e1e52ae3-1f3e-4d62-bc21-d8b19055ab5c-vda                              | 0befa70f767848e39df8224107b71858 | f9ff39ba9daa4e5a8fee1fc50e2d2b34 |
| disk.device.capacity            | gauge      | B         | e1e52ae3-1f3e-4d62-bc21-d8b19055ab5c-vda                              | 0befa70f767848e39df8224107b71858 | f9ff39ba9daa4e5a8fee1fc50e2d2b34 |
| disk.device.read.bytes          | cumulative | B         | e1e52ae3-1f3e-4d62-bc21-d8b19055ab5c-vda                              | 0befa70f767848e39df8224107b71858 | f9ff39ba9daa4e5a8fee1fc50e2d2b34 |
| disk.device.read.bytes.rate     | gauge      | B/s       | e1e52ae3-1f3e-4d62-bc21-d8b19055ab5c-vda                              | 0befa70f767848e39df8224107b71858 | f9ff39ba9daa4e5a8fee1fc50e2d2b34 |
| disk.device.read.requests       | cumulative | request   | e1e52ae3-1f3e-4d62-bc21-d8b19055ab5c-vda                              | 0befa70f767848e39df8224107b71858 | f9ff39ba9daa4e5a8fee1fc50e2d2b34 |
| disk.device.read.requests.rate  | gauge      | request/s | e1e52ae3-1f3e-4d62-bc21-d8b19055ab5c-vda                              | 0befa70f767848e39df8224107b71858 | f9ff39ba9daa4e5a8fee1fc50e2d2b34 |
| disk.device.usage               | gauge      | B         | e1e52ae3-1f3e-4d62-bc21-d8b19055ab5c-vda                              | 0befa70f767848e39df8224107b71858 | f9ff39ba9daa4e5a8fee1fc50e2d2b34 |
| disk.device.write.bytes         | cumulative | B         | e1e52ae3-1f3e-4d62-bc21-d8b19055ab5c-vda                              | 0befa70f767848e39df8224107b71858 | f9ff39ba9daa4e5a8fee1fc50e2d2b34 |
| disk.device.write.bytes.rate    | gauge      | B/s       | e1e52ae3-1f3e-4d62-bc21-d8b19055ab5c-vda                              | 0befa70f767848e39df8224107b71858 | f9ff39ba9daa4e5a8fee1fc50e2d2b34 |
| disk.device.write.requests      | cumulative | request   | e1e52ae3-1f3e-4d62-bc21-d8b19055ab5c-vda                              | 0befa70f767848e39df8224107b71858 | f9ff39ba9daa4e5a8fee1fc50e2d2b34 |
| disk.device.write.requests.rate | gauge      | request/s | e1e52ae3-1f3e-4d62-bc21-d8b19055ab5c-vda                              | 0befa70f767848e39df8224107b71858 | f9ff39ba9daa4e5a8fee1fc50e2d2b34 |
| disk.ephemeral.size             | gauge      | GB        | e1e52ae3-1f3e-4d62-bc21-d8b19055ab5c                                  | 0befa70f767848e39df8224107b71858 | f9ff39ba9daa4e5a8fee1fc50e2d2b34 |
| disk.read.bytes                 | cumulative | B         | e1e52ae3-1f3e-4d62-bc21-d8b19055ab5c                                  | 0befa70f767848e39df8224107b71858 | f9ff39ba9daa4e5a8fee1fc50e2d2b34 |
| disk.read.bytes.rate            | gauge      | B/s       | e1e52ae3-1f3e-4d62-bc21-d8b19055ab5c                                  | 0befa70f767848e39df8224107b71858 | f9ff39ba9daa4e5a8fee1fc50e2d2b34 |
| disk.read.requests              | cumulative | request   | e1e52ae3-1f3e-4d62-bc21-d8b19055ab5c                                  | 0befa70f767848e39df8224107b71858 | f9ff39ba9daa4e5a8fee1fc50e2d2b34 |
| disk.read.requests.rate         | gauge      | request/s | e1e52ae3-1f3e-4d62-bc21-d8b19055ab5c                                  | 0befa70f767848e39df8224107b71858 | f9ff39ba9daa4e5a8fee1fc50e2d2b34 |
| disk.root.size                  | gauge      | GB        | e1e52ae3-1f3e-4d62-bc21-d8b19055ab5c                                  | 0befa70f767848e39df8224107b71858 | f9ff39ba9daa4e5a8fee1fc50e2d2b34 |
| disk.usage                      | gauge      | B         | e1e52ae3-1f3e-4d62-bc21-d8b19055ab5c                                  | 0befa70f767848e39df8224107b71858 | f9ff39ba9daa4e5a8fee1fc50e2d2b34 |
| disk.write.bytes                | cumulative | B         | e1e52ae3-1f3e-4d62-bc21-d8b19055ab5c                                  | 0befa70f767848e39df8224107b71858 | f9ff39ba9daa4e5a8fee1fc50e2d2b34 |
| disk.write.bytes.rate           | gauge      | B/s       | e1e52ae3-1f3e-4d62-bc21-d8b19055ab5c                                  | 0befa70f767848e39df8224107b71858 | f9ff39ba9daa4e5a8fee1fc50e2d2b34 |
| disk.write.requests             | cumulative | request   | e1e52ae3-1f3e-4d62-bc21-d8b19055ab5c                                  | 0befa70f767848e39df8224107b71858 | f9ff39ba9daa4e5a8fee1fc50e2d2b34 |
| disk.write.requests.rate        | gauge      | request/s | e1e52ae3-1f3e-4d62-bc21-d8b19055ab5c                                  | 0befa70f767848e39df8224107b71858 | f9ff39ba9daa4e5a8fee1fc50e2d2b34 |
| image                           | gauge      | image     | 90707f15-f87c-44a4-b916-5a06306a5c88                                  | None                             | f9ff39ba9daa4e5a8fee1fc50e2d2b34 |
| image                           | gauge      | image     | 935a7ac5-a6dd-4cb4-94b3-941d1b2ddd23                                  | None                             | f9ff39ba9daa4e5a8fee1fc50e2d2b34 |
| image.download                  | delta      | B         | 90707f15-f87c-44a4-b916-5a06306a5c88                                  | None                             | f9ff39ba9daa4e5a8fee1fc50e2d2b34 |
| image.serve                     | delta      | B         | 90707f15-f87c-44a4-b916-5a06306a5c88                                  | None                             | f9ff39ba9daa4e5a8fee1fc50e2d2b34 |
| image.size                      | gauge      | B         | 90707f15-f87c-44a4-b916-5a06306a5c88                                  | None                             | f9ff39ba9daa4e5a8fee1fc50e2d2b34 |
| image.size                      | gauge      | B         | 935a7ac5-a6dd-4cb4-94b3-941d1b2ddd23                                  | None                             | f9ff39ba9daa4e5a8fee1fc50e2d2b34 |
| instance                        | gauge      | instance  | e1e52ae3-1f3e-4d62-bc21-d8b19055ab5c                                  | 0befa70f767848e39df8224107b71858 | f9ff39ba9daa4e5a8fee1fc50e2d2b34 |
| ip.floating                     | gauge      | ip        | 00a17375-f37c-4cf4-a183-e8bbc39d8075                                  | None                             | f9ff39ba9daa4e5a8fee1fc50e2d2b34 |
| ip.floating                     | gauge      | ip        | 9d2da4df-e2a9-4cc2-837c-eb0196b65fe1                                  | None                             | f9ff39ba9daa4e5a8fee1fc50e2d2b34 |
| memory                          | gauge      | MB        | e1e52ae3-1f3e-4d62-bc21-d8b19055ab5c                                  | 0befa70f767848e39df8224107b71858 | f9ff39ba9daa4e5a8fee1fc50e2d2b34 |
| memory.resident                 | gauge      | MB        | e1e52ae3-1f3e-4d62-bc21-d8b19055ab5c                                  | 0befa70f767848e39df8224107b71858 | f9ff39ba9daa4e5a8fee1fc50e2d2b34 |
| memory.usage                    | gauge      | MB        | e1e52ae3-1f3e-4d62-bc21-d8b19055ab5c                                  | 0befa70f767848e39df8224107b71858 | f9ff39ba9daa4e5a8fee1fc50e2d2b34 |
| network.incoming.bytes          | cumulative | B         | instance-00000001-e1e52ae3-1f3e-4d62-bc21-d8b19055ab5c-tap92e5f34b-5a | 0befa70f767848e39df8224107b71858 | f9ff39ba9daa4e5a8fee1fc50e2d2b34 |
| network.incoming.bytes.rate     | gauge      | B/s       | instance-00000001-e1e52ae3-1f3e-4d62-bc21-d8b19055ab5c-tap92e5f34b-5a | 0befa70f767848e39df8224107b71858 | f9ff39ba9daa4e5a8fee1fc50e2d2b34 |
| network.incoming.packets        | cumulative | packet    | instance-00000001-e1e52ae3-1f3e-4d62-bc21-d8b19055ab5c-tap92e5f34b-5a | 0befa70f767848e39df8224107b71858 | f9ff39ba9daa4e5a8fee1fc50e2d2b34 |
| network.incoming.packets.rate   | gauge      | packet/s  | instance-00000001-e1e52ae3-1f3e-4d62-bc21-d8b19055ab5c-tap92e5f34b-5a | 0befa70f767848e39df8224107b71858 | f9ff39ba9daa4e5a8fee1fc50e2d2b34 |
| network.outgoing.bytes          | cumulative | B         | instance-00000001-e1e52ae3-1f3e-4d62-bc21-d8b19055ab5c-tap92e5f34b-5a | 0befa70f767848e39df8224107b71858 | f9ff39ba9daa4e5a8fee1fc50e2d2b34 |
| network.outgoing.bytes.rate     | gauge      | B/s       | instance-00000001-e1e52ae3-1f3e-4d62-bc21-d8b19055ab5c-tap92e5f34b-5a | 0befa70f767848e39df8224107b71858 | f9ff39ba9daa4e5a8fee1fc50e2d2b34 |
| network.outgoing.packets        | cumulative | packet    | instance-00000001-e1e52ae3-1f3e-4d62-bc21-d8b19055ab5c-tap92e5f34b-5a | 0befa70f767848e39df8224107b71858 | f9ff39ba9daa4e5a8fee1fc50e2d2b34 |
| network.outgoing.packets.rate   | gauge      | packet/s  | instance-00000001-e1e52ae3-1f3e-4d62-bc21-d8b19055ab5c-tap92e5f34b-5a | 0befa70f767848e39df8224107b71858 | f9ff39ba9daa4e5a8fee1fc50e2d2b34 |
| storage.objects                 | gauge      | object    | c88f5a1b7619420dadb4309743e53f1a                                      | 0f980d5fefa6448a9c52f5c0ae5813a5 | c88f5a1b7619420dadb4309743e53f1a |
| storage.objects                 | gauge      | object    | e14b3dabf5594684913f3868669f35af                                      | 0f980d5fefa6448a9c52f5c0ae5813a5 | c88f5a1b7619420dadb4309743e53f1a |
| storage.objects                 | gauge      | object    | f9ff39ba9daa4e5a8fee1fc50e2d2b34                                      | 0f980d5fefa6448a9c52f5c0ae5813a5 | c88f5a1b7619420dadb4309743e53f1a |
| storage.objects.containers      | gauge      | container | c88f5a1b7619420dadb4309743e53f1a                                      | 0f980d5fefa6448a9c52f5c0ae5813a5 | c88f5a1b7619420dadb4309743e53f1a |
| storage.objects.containers      | gauge      | container | e14b3dabf5594684913f3868669f35af                                      | 0f980d5fefa6448a9c52f5c0ae5813a5 | c88f5a1b7619420dadb4309743e53f1a |
| storage.objects.containers      | gauge      | container | f9ff39ba9daa4e5a8fee1fc50e2d2b34                                      | 0f980d5fefa6448a9c52f5c0ae5813a5 | c88f5a1b7619420dadb4309743e53f1a |
| storage.objects.outgoing.bytes  | delta      | B         | c88f5a1b7619420dadb4309743e53f1a                                      | 0f980d5fefa6448a9c52f5c0ae5813a5 | c88f5a1b7619420dadb4309743e53f1a |
| storage.objects.outgoing.bytes  | delta      | B         | e14b3dabf5594684913f3868669f35af                                      | 0f980d5fefa6448a9c52f5c0ae5813a5 | c88f5a1b7619420dadb4309743e53f1a |
| storage.objects.outgoing.bytes  | delta      | B         | f9ff39ba9daa4e5a8fee1fc50e2d2b34                                      | 0f980d5fefa6448a9c52f5c0ae5813a5 | c88f5a1b7619420dadb4309743e53f1a |
| storage.objects.size            | gauge      | B         | c88f5a1b7619420dadb4309743e53f1a                                      | 0f980d5fefa6448a9c52f5c0ae5813a5 | c88f5a1b7619420dadb4309743e53f1a |
| storage.objects.size            | gauge      | B         | e14b3dabf5594684913f3868669f35af                                      | 0f980d5fefa6448a9c52f5c0ae5813a5 | c88f5a1b7619420dadb4309743e53f1a |
| storage.objects.size            | gauge      | B         | f9ff39ba9daa4e5a8fee1fc50e2d2b34                                      | 0f980d5fefa6448a9c52f5c0ae5813a5 | c88f5a1b7619420dadb4309743e53f1a |
| vcpus                           | gauge      | vcpu      | e1e52ae3-1f3e-4d62-bc21-d8b19055ab5c                                  | 0befa70f767848e39df8224107b71858 | f9ff39ba9daa4e5a8fee1fc50e2d2b34 |
+---------------------------------+------------+-----------+-----------------------------------------------------------------------+----------------------------------+----------------------------------+
- 1
- 2
- 3
- 4
- 5
- 6
- 7
- 8
- 9
- 10
- 11
- 12
- 13
- 14
- 15
- 16
- 17
- 18
- 19
- 20
- 21
- 22
- 23
- 24
- 25
- 26
- 27
- 28
- 29
- 30
- 31
- 32
- 33
- 34
- 35
- 36
- 37
- 38
- 39
- 40
- 41
- 42
- 43
- 44
- 45
- 46
- 47
- 48
- 49
- 50
- 51
- 52
- 53
- 54
- 55
- 56
- 57
- 58
- 59
- 60
- 61
- 62
- 63
- 64
- 65
- 66
10、Docker安装(40分)
使用提供的虚拟机和软件包,自行配置YUM源,安装docker-ce服务。安装完毕后执行docker info命令的返回结果以文本形式提交到答题框。
先上传Docker.tar.gz到/root目录,并解压
[root@xiandian ~]# tar -zvxf Docker.tar.gz
[root@xiandian ~]# vim /etc/yum.repos.d/local.repo
[centos]
name=centos
baseurl=file:///opt/centos
enabled=1
gpgcheck=0
[docker]
name=docker
baseurl=file:///root/Docker
enabled=1
gpgcheck=0
[root@xiandian ~]# iptables -F
[root@xiandian ~]# iptables -X
[root@xiandian ~]# iptables -Z
[root@xiandian ~]# iptables-save
# Generated by iptables-save v1.4.21 on Fri May 15 02:00:29 2020
*filter
:INPUT ACCEPT [20:1320]
:FORWARD ACCEPT [0:0]
:OUTPUT ACCEPT [11:1092]
COMMIT
# Completed on Fri May 15 02:00:29 2020
[root@xiandian ~]# vim /etc/selinux/config
SELINUX=disabled
# 注释:关闭交换分区:
[root@xiandian ~]# vim /etc/fstab
#/dev/mapper/centos-swap swap            swap    defaults        0 0
[root@xiandian ~]# free -m
              total        used        free      shared  buff/cache   available
Mem:           1824          95        1591           8         138        1589
Swap:             0           0           0
# 注释:在配置路由转发前,先升级系统并重启,不然会有两条规则可能报错:
[root@xiandian ~]# yum upgrade -y
[root@xiandian ~]# reboot
[root@xiandian ~]# vim /etc/sysctl.conf
net.ipv4.ip_forward = 1
net.bridge.bridge-nf-call-ip6tables = 1
net.bridge.bridge-nf-call-iptables = 1
[root@xiandian ~]# modprobe br_netfilter
[root@xiandian ~]# sysctl -p
net.ipv4.ip_forward = 1
net.bridge.bridge-nf-call-ip6tables = 1
net.bridge.bridge-nf-call-iptables = 1
[root@xiandian ~]# yum install -y yum-utils device-mapper-persistent-data
[root@xiandian ~]# yum install -y docker-ce-18.09.6 docker-ce-cli-18.09.6 containerd.io
[root@xiandian ~]# systemctl daemon-reload
[root@xiandian ~]# systemctl restart docker
[root@xiandian ~]# systemctl enable docker
Created symlink from /etc/systemd/system/multi-user.target.wants/docker.service to /usr/lib/systemd/system/docker.service.
[root@xiandian ~]# docker info
Containers: 0
 Running: 0
 Paused: 0
 Stopped: 0
Images: 0
Server Version: 18.09.6
Storage Driver: devicemapper
 Pool Name: docker-253:0-100765090-pool
 Pool Blocksize: 65.54kB
 Base Device Size: 10.74GB
 Backing Filesystem: xfs
 Udev Sync Supported: true
 Data file: /dev/loop0
 Metadata file: /dev/loop1
 Data loop file: /var/lib/docker/devicemapper/devicemapper/data
 Metadata loop file: /var/lib/docker/devicemapper/devicemapper/metadata
 Data Space Used: 11.73MB
 Data Space Total: 107.4GB
 Data Space Available: 24.34GB
 Metadata Space Used: 17.36MB
 Metadata Space Total: 2.147GB
 Metadata Space Available: 2.13GB
 Thin Pool Minimum Free Space: 10.74GB
 Deferred Removal Enabled: true
 Deferred Deletion Enabled: true
 Deferred Deleted Device Count: 0
 Library Version: 1.02.164-RHEL7 (2019-08-27)
Logging Driver: json-file
Cgroup Driver: cgroupfs
Plugins:
 Volume: local
 Network: bridge host macvlan null overlay
 Log: awslogs fluentd gcplogs gelf journald json-file local logentries splunk syslog
Swarm: inactive
Runtimes: runc
Default Runtime: runc
Init Binary: docker-init
containerd version: b34a5c8af56e510852c35414db4c1f4fa6172339
runc version: 3e425f80a8c931f88e6d94a8c831b9d5aa481657
init version: fec3683
Security Options:
 seccomp
  Profile: default
Kernel Version: 3.10.0-1127.8.2.el7.x86_64
Operating System: CentOS Linux 7 (Core)
OSType: linux
Architecture: x86_64
CPUs: 2
Total Memory: 1.777GiB
Name: xiandian
ID: OUR6:6ERV:3UCH:WJCM:TDLL:5ATV:E7IQ:HLAR:JKQB:OBK2:HZ7G:JC3Q
Docker Root Dir: /var/lib/docker
Debug Mode (client): false
Debug Mode (server): false
Registry: https://index.docker.io/v1/
Labels:
Experimental: false
Insecure Registries:
 127.0.0.0/8
Live Restore Enabled: false
Product License: Community Engine
WARNING: the devicemapper storage-driver is deprecated, and will be removed in a future release.
WARNING: devicemapper: usage of loopback devices is strongly discouraged for production use.
         Use `--storage-opt dm.thinpooldev` to specify a custom block storage device.
- 1
- 2
- 3
- 4
- 5
- 6
- 7
- 8
- 9
- 10
- 11
- 12
- 13
- 14
- 15
- 16
- 17
- 18
- 19
- 20
- 21
- 22
- 23
- 24
- 25
- 26
- 27
- 28
- 29
- 30
- 31
- 32
- 33
- 34
- 35
- 36
- 37
- 38
- 39
- 40
- 41
- 42
- 43
- 44
- 45
- 46
- 47
- 48
- 49
- 50
- 51
- 52
- 53
- 54
- 55
- 56
- 57
- 58
- 59
- 60
- 61
- 62
- 63
- 64
- 65
- 66
- 67
- 68
- 69
- 70
- 71
- 72
- 73
- 74
- 75
- 76
- 77
- 78
- 79
- 80
- 81
- 82
- 83
- 84
- 85
- 86
- 87
- 88
- 89
- 90
- 91
- 92
- 93
- 94
- 95
- 96
- 97
- 98
- 99
- 100
- 101
- 102
- 103
- 104
- 105
- 106
- 107
- 108
- 109
- 110
- 111
- 112
- 113
- 114
- 115
11、Docker Harbor安装(40分)
使用提供的虚拟机与软件包,部署Docker Harbor镜像仓库服务。安装完毕后,将执行./install.sh --with-notary --with-clair命令返回结果中的[step4]的内容以文本形式提交到答题框。
之前安装docker-cd时解压Docker.tar.gz时会产生有一个image.sh的脚本(是一个自动上传镜像到本地仓库的脚本)
[root@zookeeper1 ~]# ./image.sh
[root@zookeeper1 ~]# mkdir  -p  /data/ssl
[root@zookeeper1 ~]# cd /data/ssl/
[root@zookeeper1 ssl]# which openssl
/usr/bin/openssl
[root@zookeeper1 ssl]# openssl  req  -newkey rsa:4096  -nodes  -sha256  -keyout ca.key  -x509  -days 2.235  -out  ca.crt
Generating a 4096 bit RSA private key
...................................................................................................................++
............................................................................................................................................++
writing new private key to 'ca.key'
-----
You are about to be asked to enter information that will be incorporated
into your certificate request.
What you are about to enter is what is called a Distinguished Name or a DN.
There are quite a few fields but you can leave some blank
For some fields there will be a default value,
If you enter '.', the field will be left blank.
-----
Country Name (2 letter code) [XX]:CN		# 国家
State or Province Name (full name) []:Guangxi	# 地区(州或省名)
Locality Name (eg, city) [Default City]:Liuzhou 	# 城市
Organization Name (eg, company) [Default Company Ltd]:lztd	# 公司名称
Organizational Unit Name (eg, section) []:xxjsxy	# 单位名称
Common Name (eg, your name or your server's hostname) []:	# 服务器主机名,域名
Email Address []:		# 邮箱地址
[root@zookeeper1 ssl]# openssl req -newkey rsa:4096 -nodes -sha256 -keyout www.yidaoyun.com.key  -out www.yidaoyun.com.csr
Generating a 4096 bit RSA private key
.........................................................++
......++
writing new private key to 'www.yidaoyun.com.key'
-----
You are about to be asked to enter information that will be incorporated
into your certificate request.
What you are about to enter is what is called a Distinguished Name or a DN.
There are quite a few fields but you can leave some blank
For some fields there will be a default value,
If you enter '.', the field will be left blank.
-----
Country Name (2 letter code) [XX]:CN		# 国家
State or Province Name (full name) []:LGuangxi	# 地区(州或省名)
Locality Name (eg, city) [Default City]:Liuzhou 	# 城市
Organization Name (eg, company) [Default Company Ltd]:lztd	# 公司名称
Organizational Unit Name (eg, section) []:xxjsxy	# 单位名称
Common Name (eg, your name or your server's hostname) []:www.yidaoyun.com	# 服务器主机名,域名
Email Address []:		# 邮箱地址

Please enter the following 'extra' attributes
to be sent with your certificate request
A challenge password []:
An optional company name []:
[root@zookeeper1 ssl]# openssl x509  -req  -days 2.235  -in  www.yidaoyun.com.csr -CA ca.crt -CAkey ca.key -CAcreateserial -out www.yidaoyun.com.crt
Signature ok
subject=/C=CN/ST=Guangxi/L=Liuzhou/O=lztd/OU=xxjsxy/CN=www.yidaoyun.com
Getting CA Private Key
[root@zookeeper1 ssl]# cp -rvf www.yidaoyun.com.crt /etc/pki/ca-trust/source/anchors/
‘www.yidaoyun.com.crt’ -> ‘/etc/pki/ca-trust/source/anchors/www.yidaoyun.com.crt’
[root@zookeeper1 ssl]# update-ca-trust enable
[root@zookeeper1 ssl]# update-ca-trust extract
# 注释:上传docker-compose-Linux-x86_64.64并重命名docker-compose:
[root@zookeeper1 ~]# mv docker-compose-Linux-x86_64.64  /usr/local/bin/
[root@zookeeper1 ~]# mv /usr/local/bin/docker-compose-Linux-x86_64.64 /usr/local/bin/docker-compose
[root@zookeeper1 ~]# chmod +x /usr/local/bin/docker-compose
[root@zookeeper1 ~]# docker-compose --version
docker-compose version 1.26.0-rc4, build d279b7a8
[root@zookeeper1 opt]# tar  -zvxf  harbor-offline-installer-v1.5.3.tgz  -C  /opt/
[root@zookeeper1 opt]# ll
total 1097260
drwxr-xr-x. 8 root root       4096 May 14 08:03 centos
drwx--x--x  4 root root         26 May 19 23:16 containerd
-rw-r--r--. 1 root root 1123583789 May 15 04:26 Docker.tar.gz
drwxr-xr-x  4 root root       4096 May 20 03:55 harbor
[root@zookeeper1 opt]# cd harbor/
[root@zookeeper1 harbor]# ll
total 895708
drwxr-xr-x 3 root root        22 May 20 03:55 common
-rw-r--r-- 1 root root      1185 Sep 12  2018 docker-compose.clair.yml
-rw-r--r-- 1 root root      1725 Sep 12  2018 docker-compose.notary.yml
-rw-r--r-- 1 root root      3596 Sep 12  2018 docker-compose.yml
drwxr-xr-x 3 root root       150 Sep 12  2018 ha
-rw-r--r-- 1 root root      6956 Sep 12  2018 harbor.cfg
-rw-r--r-- 1 root root 915878468 Sep 12  2018 harbor.v1.5.3.tar.gz
-rwxr-xr-x 1 root root      5773 Sep 12  2018 install.sh
-rw-r--r-- 1 root root     10764 Sep 12  2018 LICENSE
-rw-r--r-- 1 root root       482 Sep 12  2018 NOTICE
-rw-r--r-- 1 root root   1247461 Sep 12  2018 open_source_license
-rwxr-xr-x 1 root root     27840 Sep 12  2018 prepare
[root@zookeeper1 harbor]# vim harbor.cfg
# 注释:修改配置文件内容:
hostname = 192.168.1.111
ui_url_protocol = https
ssl_cert = /data/ssl/www.yidaoyun.com.crt
ssl_cert_key = /data/ssl/www.yidaoyun.com.key
harbor_admin_password = 000000
[root@zookeeper1 harbor]# ./prepare
Generated and saved secret to file: /data/secretkey
Generated configuration file: ./common/config/nginx/nginx.conf
Generated configuration file: ./common/config/adminserver/env
Generated configuration file: ./common/config/ui/env
Generated configuration file: ./common/config/registry/config.yml
Generated configuration file: ./common/config/db/env
Generated configuration file: ./common/config/jobservice/env
Generated configuration file: ./common/config/jobservice/config.yml
Generated configuration file: ./common/config/log/logrotate.conf
Generated configuration file: ./common/config/jobservice/config.yml
Generated configuration file: ./common/config/ui/app.conf
Generated certificate, key file: ./common/config/ui/private_key.pem, cert file: ./common/config/registry/root.crt
The configuration files are ready, please use docker-compose to start the service.
[root@zookeeper1 harbor]# ./install.sh --with-notary --with-clair
[Step 0]: checking installation environment ...
Note: docker version: 18.09.6
Note: docker-compose version: 1.26.0

[Step 1]: loading Harbor images ...
dba693fc2701: Loading layer  133.4MB/133.4MB
5773887c4c41: Loading layer  30.09MB/30.09MB
6fc2abbcae42: Loading layer  15.37MB/15.37MB
d85f176a11ec: Loading layer  15.37MB/15.37MB
Loaded image: vmware/harbor-adminserver:v1.5.3
462b14c85230: Loading layer  410.1MB/410.1MB
c2e0c8cb2903: Loading layer  9.216kB/9.216kB
11bdb24cded2: Loading layer  9.216kB/9.216kB
5d8f974b49ef: Loading layer   7.68kB/7.68kB
ee04f13f4147: Loading layer  1.536kB/1.536kB
799db4dfe41a: Loading layer  11.78kB/11.78kB
f7d813585bdd: Loading layer   2.56kB/2.56kB
6300bbdbd7ab: Loading layer  3.072kB/3.072kB
Loaded image: vmware/harbor-db:v1.5.3
1d7516778a05: Loading layer  30.09MB/30.09MB
f7ec8d1b47d0: Loading layer  20.91MB/20.91MB
22b0ad749c21: Loading layer  20.91MB/20.91MB
Loaded image: vmware/harbor-jobservice:v1.5.3
2d449d67c05a: Loading layer  89.58MB/89.58MB
0bfd4e706575: Loading layer  3.072kB/3.072kB
6100e173c230: Loading layer   59.9kB/59.9kB
86fe093d1358: Loading layer  61.95kB/61.95kB
Loaded image: vmware/redis-photon:v1.5.3
Loaded image: photon:1.0
3bf3086a6569: Loading layer  30.09MB/30.09MB
641d0f77d675: Loading layer  10.95MB/10.95MB
89efbaabea87: Loading layer   17.3MB/17.3MB
1276e51f4dc2: Loading layer  15.87kB/15.87kB
49e187d04e78: Loading layer  3.072kB/3.072kB
e62fbfea411d: Loading layer  28.24MB/28.24MB
Loaded image: vmware/notary-signer-photon:v0.5.1-v1.5.3
Loaded image: vmware/mariadb-photon:v1.5.3
201f6ade61d8: Loading layer  102.5MB/102.5MB
81221fbb5879: Loading layer  6.656kB/6.656kB
2268e3c9e521: Loading layer  2.048kB/2.048kB
9fca06f4b193: Loading layer   7.68kB/7.68kB
Loaded image: vmware/postgresql-photon:v1.5.3
11d6e8a232c9: Loading layer  30.09MB/30.09MB
42650b04d53d: Loading layer  24.41MB/24.41MB
a1cd8af19e29: Loading layer  7.168kB/7.168kB
4b1cda90ba19: Loading layer  10.56MB/10.56MB
1351f0f3006a: Loading layer   24.4MB/24.4MB
Loaded image: vmware/harbor-ui:v1.5.3
e335f4c3af7d: Loading layer  79.93MB/79.93MB
2aea487bc2c4: Loading layer  3.584kB/3.584kB
d2efec3de68b: Loading layer  3.072kB/3.072kB
d0d71a5ce1dd: Loading layer  4.096kB/4.096kB
19930367abf0: Loading layer  3.584kB/3.584kB
03e5b7640db5: Loading layer  9.728kB/9.728kB
Loaded image: vmware/harbor-log:v1.5.3
5aebe8cc938c: Loading layer  11.97MB/11.97MB
Loaded image: vmware/nginx-photon:v1.5.3
ede6a57cbd7e: Loading layer  30.09MB/30.09MB
4d6dd4fc1d87: Loading layer   2.56kB/2.56kB
c86a69f49f60: Loading layer   2.56kB/2.56kB
0cf6e04c5927: Loading layer  2.048kB/2.048kB
6fbff4fe9739: Loading layer   22.8MB/22.8MB
6f527a618092: Loading layer   22.8MB/22.8MB
Loaded image: vmware/registry-photon:v2.6.2-v1.5.3
e29a8834501b: Loading layer  12.16MB/12.16MB
aaf67f1da2c7: Loading layer   17.3MB/17.3MB
8d5718232133: Loading layer  15.87kB/15.87kB
fc89aca1dd12: Loading layer  3.072kB/3.072kB
076eb5a76f6d: Loading layer  29.46MB/29.46MB
Loaded image: vmware/notary-server-photon:v0.5.1-v1.5.3
454c81edbd3b: Loading layer  135.2MB/135.2MB
e99db1275091: Loading layer  395.4MB/395.4MB
051e4ee23882: Loading layer  9.216kB/9.216kB
6cca4437b6f6: Loading layer  9.216kB/9.216kB
1d48fc08c8bc: Loading layer   7.68kB/7.68kB
0419724fd942: Loading layer  1.536kB/1.536kB
543c0c1ee18d: Loading layer  655.2MB/655.2MB
4190aa7e89b8: Loading layer  103.9kB/103.9kB
Loaded image: vmware/harbor-migrator:v1.5.0
45878c64fc3c: Loading layer  165.3MB/165.3MB
fc3d407ce98f: Loading layer  10.93MB/10.93MB
d7a0785bb902: Loading layer  2.048kB/2.048kB
a17e0f23bc84: Loading layer  48.13kB/48.13kB
57c7181f2336: Loading layer  10.97MB/10.97MB
Loaded image: vmware/clair-photon:v2.0.5-v1.5.3

[Step 2]: preparing environment ...
Clearing the configuration file: ./common/config/adminserver/env
Clearing the configuration file: ./common/config/ui/env
Clearing the configuration file: ./common/config/ui/app.conf
Clearing the configuration file: ./common/config/ui/private_key.pem
Clearing the configuration file: ./common/config/db/env
Clearing the configuration file: ./common/config/jobservice/env
Clearing the configuration file: ./common/config/jobservice/config.yml
Clearing the configuration file: ./common/config/registry/config.yml
Clearing the configuration file: ./common/config/registry/root.crt
Clearing the configuration file: ./common/config/nginx/cert/www.yidaoyun.com.crt
Clearing the configuration file: ./common/config/nginx/cert/www.yidaoyun.com.key
Clearing the configuration file: ./common/config/nginx/nginx.conf
Clearing the configuration file: ./common/config/log/logrotate.conf
loaded secret from file: /data/secretkey
Generated configuration file: ./common/config/nginx/nginx.conf
Generated configuration file: ./common/config/adminserver/env
Generated configuration file: ./common/config/ui/env
Generated configuration file: ./common/config/registry/config.yml
Generated configuration file: ./common/config/db/env
Generated configuration file: ./common/config/jobservice/env
Generated configuration file: ./common/config/jobservice/config.yml
Generated configuration file: ./common/config/log/logrotate.conf
Generated configuration file: ./common/config/jobservice/config.yml
Generated configuration file: ./common/config/ui/app.conf
Generated certificate, key file: ./common/config/ui/private_key.pem, cert file: ./common/config/registry/root.crt
Copying sql file for notary DB
Generated certificate, key file: ./cert_tmp/notary-signer-ca.key, cert file: ./cert_tmp/notary-signer-ca.crt
Generated certificate, key file: ./cert_tmp/notary-signer.key, cert file: ./cert_tmp/notary-signer.crt
Copying certs for notary signer
Copying notary signer configuration file
Generated configuration file: ./common/config/notary/server-config.json
Copying nginx configuration file for notary
Generated configuration file: ./common/config/nginx/conf.d/notary.server.conf
Generated and saved secret to file: /data/defaultalias
Generated configuration file: ./common/config/notary/signer_env
Generated configuration file: ./common/config/clair/postgres_env
Generated configuration file: ./common/config/clair/config.yaml
Generated configuration file: ./common/config/clair/clair_env
The configuration files are ready, please use docker-compose to start the service.

[Step 3]: checking existing instance of Harbor ...

[Step 4]: starting Harbor ...
Creating network "harbor_harbor" with the default driver
Creating network "harbor_harbor-clair" with the default driver
Creating network "harbor_harbor-notary" with the default driver
Creating network "harbor_notary-mdb" with the default driver
Creating network "harbor_notary-sig" with the default driver
Creating harbor-log ... done
Creating redis              ... done
Creating clair-db           ... done
Creating notary-db          ... done
Creating harbor-db          ... done
Creating registry           ... done
Creating harbor-adminserver ... done
Creating notary-signer      ... done
Creating clair              ... done
Creating harbor-ui          ... done
Creating notary-server      ... done
Creating nginx              ... done
Creating harbor-jobservice  ... done
✔ ----Harbor has been installed and started successfully.----
Now you should be able to visit the admin portal at https://192.168.1.111.
For more details, please visit https://github.com/vmware/harbor .
- 1
- 2
- 3
- 4
- 5
- 6
- 7
- 8
- 9
- 10
- 11
- 12
- 13
- 14
- 15
- 16
- 17
- 18
- 19
- 20
- 21
- 22
- 23
- 24
- 25
- 26
- 27
- 28
- 29
- 30
- 31
- 32
- 33
- 34
- 35
- 36
- 37
- 38
- 39
- 40
- 41
- 42
- 43
- 44
- 45
- 46
- 47
- 48
- 49
- 50
- 51
- 52
- 53
- 54
- 55
- 56
- 57
- 58
- 59
- 60
- 61
- 62
- 63
- 64
- 65
- 66
- 67
- 68
- 69
- 70
- 71
- 72
- 73
- 74
- 75
- 76
- 77
- 78
- 79
- 80
- 81
- 82
- 83
- 84
- 85
- 86
- 87
- 88
- 89
- 90
- 91
- 92
- 93
- 94
- 95
- 96
- 97
- 98
- 99
- 100
- 101
- 102
- 103
- 104
- 105
- 106
- 107
- 108
- 109
- 110
- 111
- 112
- 113
- 114
- 115
- 116
- 117
- 118
- 119
- 120
- 121
- 122
- 123
- 124
- 125
- 126
- 127
- 128
- 129
- 130
- 131
- 132
- 133
- 134
- 135
- 136
- 137
- 138
- 139
- 140
- 141
- 142
- 143
- 144
- 145
- 146
- 147
- 148
- 149
- 150
- 151
- 152
- 153
- 154
- 155
- 156
- 157
- 158
- 159
- 160
- 161
- 162
- 163
- 164
- 165
- 166
- 167
- 168
- 169
- 170
- 171
- 172
- 173
- 174
- 175
- 176
- 177
- 178
- 179
- 180
- 181
- 182
- 183
- 184
- 185
- 186
- 187
- 188
- 189
- 190
- 191
- 192
- 193
- 194
- 195
- 196
- 197
- 198
- 199
- 200
- 201
- 202
- 203
- 204
- 205
- 206
- 207
- 208
- 209
- 210
- 211
- 212
- 213
- 214
- 215
- 216
- 217
- 218
- 219
- 220
- 221
- 222
- 223
- 224
- 225
- 226
- 227
- 228
- 229
- 230
- 231
- 232
- 233
- 234
- 235
- 236
- 237
- 238
- 239
- 240
- 241
- 242
- 243
- 244
- 245
- 246
- 247
- 248
- 249
- 250
- 251
- 252
- 253
- 254
- 255
- 256
- 257
- 258
- 259
12、Docker Compose安装(40分)
使用提供的虚拟机和软件包,安装docker compose服务,安装完毕后,使用命令查看docker compose的版本信息,将查询版本信息的命令与返回结果已文本形式提交到答题框。
上传docker-compose-Linux-x86_64.64并重命名docker-compose
[root@zookeeper1 ~]# mv docker-compose-Linux-x86_64.64 /usr/local/bin/
[root@zookeeper1 ~]# mv /usr/local/bin/docker-compose-Linux-x86_64.64 /usr/local/bin/docker-compose
[root@zookeeper1 ~]# chmod +x /usr/local/bin/docker-compose
[root@zookeeper1 ~]# docker-compose --version
docker-compose version 1.26.0-rc4, build d279b7a8
- 1
- 2
- 3
- 4
- 5
13、Dockerfile编写(40分)
自定义Dockerfile,要求Dockerfile主要完成以下工作:
①构建一个基于Python 3.5的镜像。
②把当前目录添加到镜像中的/code路径下。
③把工作路径设置成/code。
④设置容器的默认命令为python app.py。
将Dockerfile文件以文本形式提交到答题框。
[root@localhost ~]# mkdir jr
[root@localhost ~]# cd jr/
[root@localhost jr]# vim Dockerfile
# 注释:构建时用到的基础镜像
FROM python:3.5-alpine
# 注释:将该目录下的所有文件(点表示当前工作路径,也可以写路径)复制到/code下
ADD . /code
# 注释:切换工作目录为/code
WORKDIR /code
# 注释:在容器启动时执行的命令
CMD ["python", "app.py"]
- 1
- 2
- 3
- 4
- 5
- 6
- 7
- 8
- 9
- 10
- 11
- 构建Dockerfile的镜像(注意后面有个点,表示文件路径我就在这个文件里面了所有用点表示,当然也可以把点换成路径)
[root@localhost jr]# docker build -t test .
Sending build context to Docker daemon  2.048kB
Step 1/4 : FROM python:3.5-alpine
3.5-alpine: Pulling from library/python
cbdbe7a5bc2a: Pull complete
26ebcd19a4e3: Pull complete
5040824fb16c: Pull complete
ee2aa99e2e5f: Pull complete
09d2ba251239: Pull complete
Digest: sha256:add585692cb3ed53427cd423b6e87c976c3a760e00165026f038a5822c1e22fd
Status: Downloaded newer image for python:3.5-alpine
 ---> 5f618d8888ec
Step 2/4 : ADD . /code
 ---> 60a93c53612e
Step 3/4 : WORKDIR	/code
 ---> Running in 67ee14645e5c
Removing intermediate container 67ee14645e5c
 ---> 6fc0e4a0d1d1
Step 4/4 : CMD ["python", "app.py"]
 ---> Running in 797dfc62af22
Removing intermediate container 797dfc62af22
 ---> 3a92c182aca3
Successfully built 3a92c182aca3
Successfully tagged test:latest
- 1
- 2
- 3
- 4
- 5
- 6
- 7
- 8
- 9
- 10
- 11
- 12
- 13
- 14
- 15
- 16
- 17
- 18
- 19
- 20
- 21
- 22
- 23
- 24
14、Shell脚本补全(40分)
下面有一段脚本,作用是自动配置mysql服务,由于工程师的失误,将脚本中的某些代码删除了,但注释还在,请根据注释,填写代码。最后将填写的代码按照顺序以文本形式提交至答题框。 脚本如下所示:
mariadb(){
cd
#在数据库的my.cnf文件添加内容如下
(此处需填写)
[mysqld]
init_connect='SET collation_connection = utf8_unicode_ci'
init_connect='SET NAMES utf8'
character-set-server=utf8
collation-server=utf8_unicode_ci
skip-character-set-client-handshake
EOF
#启动数据库
systemctl start mariadb
#设置数据库root的密码为123456
mysqladmin -uroot password 123456
#创建gpmall数据库,并将gpmall.sql文件导入
mysql -uroot -p123456 << EOF
(此处需填写)
use gpmall
source /root/gpmall.sql
EOF
#设置开机自启数据库
systemctl enable mariadb
#重启数据库服务
systemctl restart mariadb
#检查数据库是否重启成功
if [ $? -eq 0 ]
then
sleep 3
echo -e "\033[36m==========maridb启动成功=========\033[0m"
else
echo -e "\033[31m**********mariadb启动失败,请检查**********\033[0m"
exit 1
fi
sleep 2
}
- 1
- 2
- 3
- 4
- 5
- 6
- 7
- 8
- 9
- 10
- 11
- 12
- 13
- 14
- 15
- 16
- 17
- 18
- 19
- 20
- 21
- 22
- 23
- 24
- 25
- 26
- 27
- 28
- 29
- 30
- 31
- 32
- 33
- 34
- 35
- 36
作答:
cat >> /etc/my.cnf << EOF
create database gpmall;
- 1
- 2
15、Python脚本补全(40分)
下面有一段Python脚本,由于工程师的失误,将脚本中的某些代码删除了,但注释还在,请根据注释,填写代码。最后将填写的代码按照顺序以文本形式提交至答题框。 Python脚本如下:
def get_html(url, encoding='utf-8'):
# 定义headers
headers = { 'User-Agent': 'Mozilla/5.0 (Windows NT 6.1; WOW64) AppleWebKit/537.36 (KHTML, like Gecko) Chrome/67.0.3396.99 Safari/537.36' }
# 调用requests依赖包的get方法,请求该网址,返回response
(此处需填写)
# 设置response字符为utf-8
(此处需填写)
# 返回response的文本
return response.text
- 1
- 2
- 3
- 4
- 5
- 6
- 7
- 8
- 9
作答:
response = requests.get(url, headers=headers)
response.encoding = encoding
- 1
- 2


