
热门标签
热门文章
- 1IDEA中没有GIT(IDEA中添加GIT)_idea 没有git
- 2数据结构一:顺序表(C/C++实现)_顺序表c++代码
- 3技术分享 | Spring Boot 异常处理
- 4从零到专业!OpenAI Sora怎么用?
- 514 Java常用API && 包装类 (详细版)_jdk14 api文档 csdn
- 6公网环境下Ubuntu系统SSH远程树莓派_ubuntu ssh 公网连接
- 7前端vue uni-app使用Vue和ECharts构建交互式树形结构图_uniapp 树形表格
- 8深度解析Java JDK 1.8中Stream流的源码实现:带你探寻数据流的奥秘_stream源码
- 9C++ Qt TCP协议,处理粘包、拆包问题,加上数据头来处理_qt如何解决网络粘包问题
- 10一篇文章带你了解国企程序员--超详细版_交通银行软开社招题目
当前位置: article > 正文
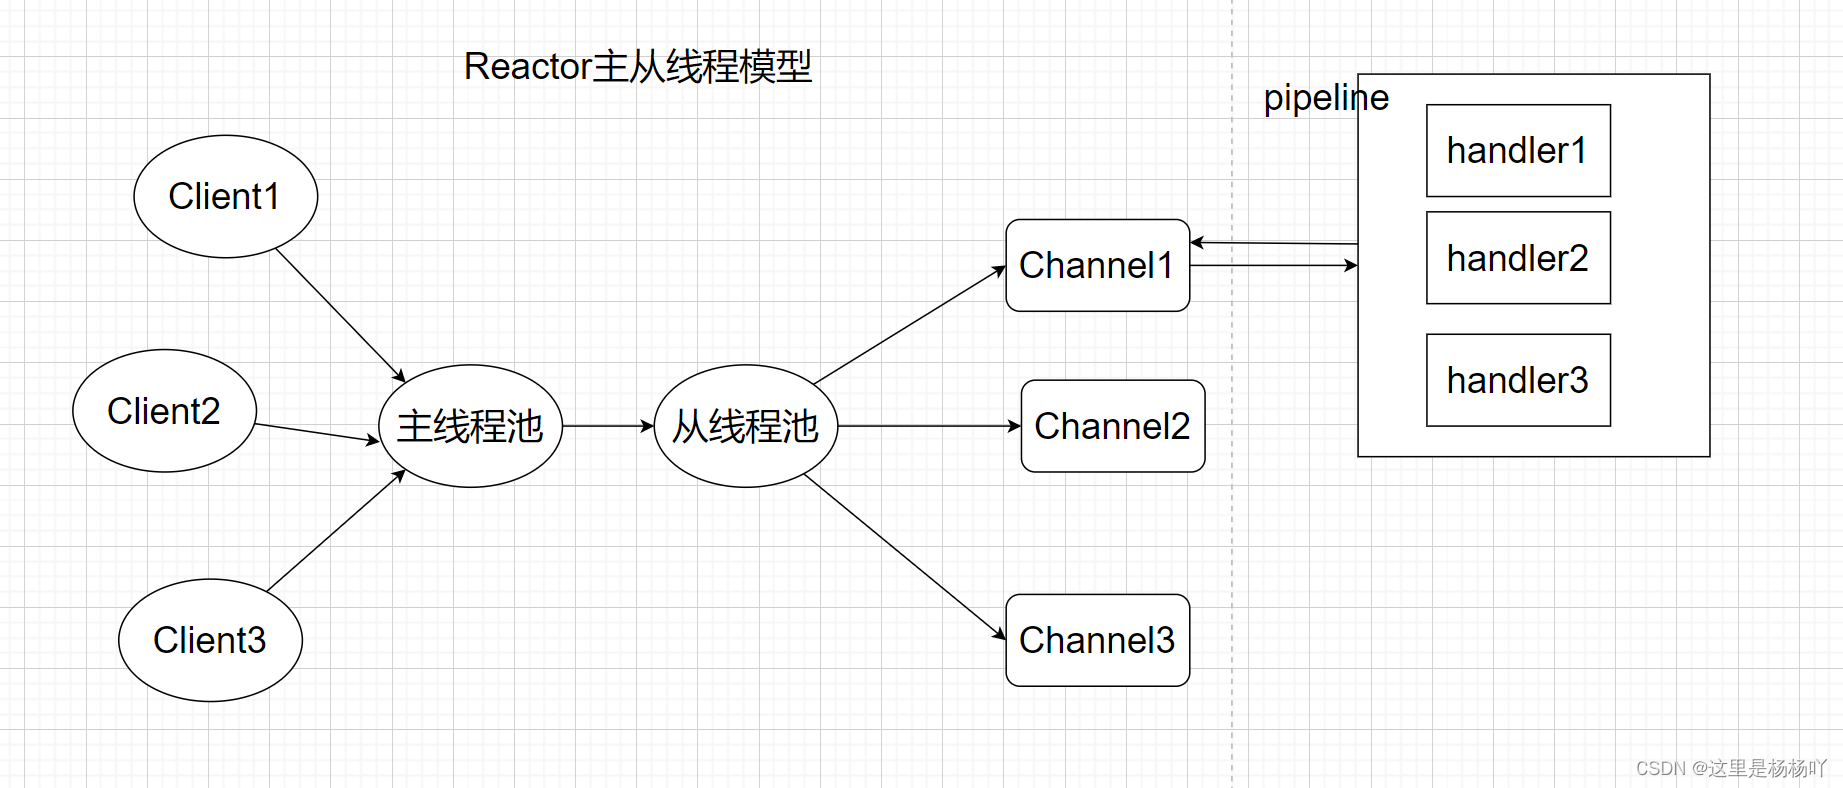
SpringBoot+Netty+WebSocket实现简单的在线聊天小功能_springboot集成netty实现webbsocket
作者:Monodyee | 2024-04-11 09:42:01
赞
踩
springboot集成netty实现webbsocket
效果演示视频和教学讲解视频地址:演示地址
注意:先启动SpringBoot项目,再启动WebSocketServer!!!
代码:
1.pom.xml代码:
<?xml version="1.0" encoding="UTF-8"?>

<project xmlns="http://maven.apache.org/POM/4.0.0" xmlns:xsi="http://www.w3.org/2001/XMLSchema-instance"
  xsi:schemaLocation="http://maven.apache.org/POM/4.0.0 http://maven.apache.org/xsd/maven-4.0.0.xsd">
  <modelVersion>4.0.0</modelVersion>

  <parent>
    <groupId>org.springframework.boot</groupId>
    <artifactId>spring-boot-starter-parent</artifactId>
    <version>2.2.5.RELEASE</version><!--2.3.3.RELEASE-->
    <relativePath/> <!-- lookup parent from repository -->
  </parent>

  <groupId>com.yjq.programmer</groupId>
  <artifactId>ChatDemo</artifactId>
  <version>1.0-SNAPSHOT</version>

  <name>ChatDemo</name>
  <!-- FIXME change it to the project's website -->
  <url>http://www.example.com</url>

  <properties>
    <project.build.sourceEncoding>UTF-8</project.build.sourceEncoding>
    <maven.compiler.source>1.8</maven.compiler.source>
    <maven.compiler.target>1.8</maven.compiler.target>
  </properties>

  <dependencies>
    <!-- 整合web开发依赖 -->
    <dependency>
      <groupId>org.springframework.boot</groupId>
      <artifactId>spring-boot-starter-web</artifactId>
    </dependency>
    <!-- 整合netty开发依赖 -->
    <dependency>
      <groupId>io.netty</groupId>
      <artifactId>netty-all</artifactId>
      <version>4.1.42.Final</version>
    </dependency>
  </dependencies>

  <build>
    <pluginManagement><!-- lock down plugins versions to avoid using Maven defaults (may be moved to parent pom) -->
      <plugins>

        <plugin>
          <groupId>org.springframework.boot</groupId>
          <artifactId>spring-boot-maven-plugin</artifactId>
        </plugin>


      </plugins>
    </pluginManagement>
  </build>
</project>

- 1
- 2
- 3
- 4
- 5
- 6
- 7
- 8
- 9
- 10
- 11
- 12
- 13
- 14
- 15
- 16
- 17
- 18
- 19
- 20
- 21
- 22
- 23
- 24
- 25
- 26
- 27
- 28
- 29
- 30
- 31
- 32
- 33
- 34
- 35
- 36
- 37
- 38
- 39
- 40
- 41
- 42
- 43
- 44
- 45
- 46
- 47
- 48
- 49
- 50
- 51
- 52
- 53
- 54
- 55
2.WebSocketServer代码:
package com.yjq.programmer.websocket;

import com.yjq.programmer.netty.HelloServerInitializer;
import io.netty.bootstrap.ServerBootstrap;
import io.netty.channel.ChannelFuture;
import io.netty.channel.EventLoopGroup;
import io.netty.channel.nio.NioEventLoopGroup;
import io.netty.channel.socket.nio.NioServerSocketChannel;

/**
 * @author 杨杨吖
 * @QQ 823208782
 * @WX yjqi12345678
 * @create 2022-10-03 8:28
 */
public class WebSocketServer {

    public static void main(String[] args) throws Exception {
        // 定义一对线程组  主线程组  用于接收客户端的连接请求,不做任何处理
        EventLoopGroup bossGroup = new NioEventLoopGroup();
        // 定义一对线程组  从线程组  主线程组会把任务丢给从线程组,让从线程组去处理
        EventLoopGroup workerGroup = new NioEventLoopGroup();
        try {
            // netty服务器的创建,ServerBootstrap是一个启动类
            ServerBootstrap serverBootstrap = new ServerBootstrap();
            serverBootstrap.group(bossGroup, workerGroup) // 设置主从线程组
                    .channel(NioServerSocketChannel.class) // 设置NIO双向通道类型
                    .childHandler(new WebSocketServerInitializer()); // 子处理器,用于处理workerGroup

            // 启动server,绑定8088端口启动,并且同步等待方式启动
            ChannelFuture channelFuture = serverBootstrap.bind(8088).sync();

            // 监听关闭的channel, 设置为同步的方式
            channelFuture.channel().closeFuture().sync();
        } finally {
            // 关闭我们的主线程组和从线程组
            bossGroup.shutdownGracefully();
            workerGroup.shutdownGracefully();
        }

    }
}
- 1
- 2
- 3
- 4
- 5
- 6
- 7
- 8
- 9
- 10
- 11
- 12
- 13
- 14
- 15
- 16
- 17
- 18
- 19
- 20
- 21
- 22
- 23
- 24
- 25
- 26
- 27
- 28
- 29
- 30
- 31
- 32
- 33
- 34
- 35
- 36
- 37
- 38
- 39
- 40
- 41
- 42
3.WebSocketServerInitializer代码:
package com.yjq.programmer.websocket;

import io.netty.channel.ChannelInitializer;
import io.netty.channel.ChannelPipeline;
import io.netty.channel.socket.SocketChannel;
import io.netty.handler.codec.http.HttpObjectAggregator;
import io.netty.handler.codec.http.HttpServerCodec;
import io.netty.handler.codec.http.websocketx.WebSocketServerProtocolHandler;
import io.netty.handler.stream.ChunkedWriteHandler;

/**
 * @author 杨杨吖
 * @QQ 823208782
 * @WX yjqi12345678
 * @create 2022-10-03 8:34
 */
public class WebSocketServerInitializer extends ChannelInitializer<SocketChannel> {

    @Override
    protected void initChannel(SocketChannel channel) throws Exception {
        // 通过SocketChannel去获取对应的管道pipeline
        ChannelPipeline pipeline = channel.pipeline();
        // 通过管道,添加handler  HttpServerCodec是netty自己提供的助手类
        // 当请求到服务端时候,我们需要做解码,响应到客户端时候需要做编码
        pipeline.addLast("HttpServerCodec", new HttpServerCodec());
        // 对写大数据流的支持
        pipeline.addLast("ChunkedWriteHandler", new ChunkedWriteHandler());
        // 对HttpMessage进行聚合 聚合成FullHttpRequest或FullHttpResponse
        // 几乎在netty的编程中,都会用到这个handler
        pipeline.addLast("HttpObjectAggregator", new HttpObjectAggregator(1024*64));

        // 以上用于支持http协议

        // websocket服务器处理的协议  并且用于指定给客户端连接访问的路由:/ws
        pipeline.addLast("WebSocketServerProtocolHandler", new WebSocketServerProtocolHandler("/ws"));
        // 自定义的handler
        pipeline.addLast(new ChatHandler());
    }
}
- 1
- 2
- 3
- 4
- 5
- 6
- 7
- 8
- 9
- 10
- 11
- 12
- 13
- 14
- 15
- 16
- 17
- 18
- 19
- 20
- 21
- 22
- 23
- 24
- 25
- 26
- 27
- 28
- 29
- 30
- 31
- 32
- 33
- 34
- 35
- 36
- 37
- 38
- 39
4.ChatHandler代码:
package com.yjq.programmer.websocket;

import io.netty.channel.Channel;
import io.netty.channel.ChannelHandlerContext;
import io.netty.channel.SimpleChannelInboundHandler;
import io.netty.channel.group.ChannelGroup;
import io.netty.channel.group.DefaultChannelGroup;
import io.netty.handler.codec.http.websocketx.TextWebSocketFrame;
import io.netty.util.concurrent.GlobalEventExecutor;

/**
 * @author 杨杨吖
 * @QQ 823208782
 * @WX yjqi12345678
 * @create 2022-10-03 8:50
 */

/**
 * 处理消息的handler
 * TextWebSocketFrame:在netty中,是用于为websocket专门处理文本的对象,frame是消息的载体
 */
public class ChatHandler extends SimpleChannelInboundHandler<TextWebSocketFrame> {

    // 用于记录和管理所有客户端的ChannelGroup
    private static ChannelGroup clients = new DefaultChannelGroup(GlobalEventExecutor.INSTANCE);

    @Override
    protected void channelRead0(ChannelHandlerContext ctx, TextWebSocketFrame msg) throws Exception {
        // 获取客户端传输过来的消息
        String content = msg.text();
        System.out.println("接收到的数据:" + content);

        for(Channel channel : clients) {
            // 不能直接writeAndFlush收到的content字符串信息,必须封装到frame载体中输出
            channel.writeAndFlush(new TextWebSocketFrame("系统消息:" + content));
        }
        // clients.writeAndFlush(new TextWebSocketFrame("系统消息:" + content));

    }

    @Override
    public void handlerAdded(ChannelHandlerContext ctx) throws Exception {
        // 当客户端连接服务端之后,获取客户端的channel,并且放到ChannelGroup中去进行管理
        clients.add(ctx.channel());
    }

    @Override
    public void handlerRemoved(ChannelHandlerContext ctx) throws Exception {
        // 这步是多余的,当断开连接时候ChannelGroup会自动移除对应的channel
        clients.remove(ctx.channel());
        System.out.println(ctx.channel().id().asLongText());
    }
}
- 1
- 2
- 3
- 4
- 5
- 6
- 7
- 8
- 9
- 10
- 11
- 12
- 13
- 14
- 15
- 16
- 17
- 18
- 19
- 20
- 21
- 22
- 23
- 24
- 25
- 26
- 27
- 28
- 29
- 30
- 31
- 32
- 33
- 34
- 35
- 36
- 37
- 38
- 39
- 40
- 41
- 42
- 43
- 44
- 45
- 46
- 47
- 48
- 49
- 50
- 51
- 52
- 53
5.index.html代码:
<!DOCTYPE html>
<html xmlns="http://www.w3.org/1999/xhtml">
<head>
    <meta http-equiv="Content-Type" content="text/html; charset=utf-8" />
    <title>Netty-Websocket</title>
    <script type="text/javascript">
        let socket;
        if(window.WebSocket){
            socket = new WebSocket("ws://localhost:8088/ws");
            socket.onmessage = function(event){
                let textarea = document.getElementById('responseText');
                textarea.value += event.data+"\r\n";
            };
            socket.onopen = function(event){
                let textarea = document.getElementById('responseText');
                textarea.value = "Netty-WebSocket服务器。。。。。。连接  \r\n";
            };
            socket.onclose = function(event){
                let textarea = document.getElementById('responseText');
                textarea.value = "Netty-WebSocket服务器。。。。。。关闭 \r\n";
            };
        } else {
            alert("您的浏览器不支持WebSocket协议!");
        }

        function send(){
            if(!window.WebSocket){return;}
            if(socket.readyState === WebSocket.OPEN) {
                let message = document.getElementById('message').value;
                socket.send(message);
            } else {
                alert("WebSocket 连接没有建立成功!");
            }

        }

    </script>
</head>
<body>
<form onSubmit="return false;">
    <label>文本</label><input type="text" id="message" name="message" placeholder="这里输入消息" /> <br />
    <br /> <input type="button" value="发送ws消息"
                  onClick="send()" />
    <hr color="black" />
    <h3>服务端返回的应答消息</h3>
    <textarea id="responseText" style="width: 1024px;height: 300px;"></textarea>
</form>
</body>
</html>
- 1
- 2
- 3
- 4
- 5
- 6
- 7
- 8
- 9
- 10
- 11
- 12
- 13
- 14
- 15
- 16
- 17
- 18
- 19
- 20
- 21
- 22
- 23
- 24
- 25
- 26
- 27
- 28
- 29
- 30
- 31
- 32
- 33
- 34
- 35
- 36
- 37
- 38
- 39
- 40
- 41
- 42
- 43
- 44
- 45
- 46
- 47
- 48
- 49
6.项目结构及配置文件:
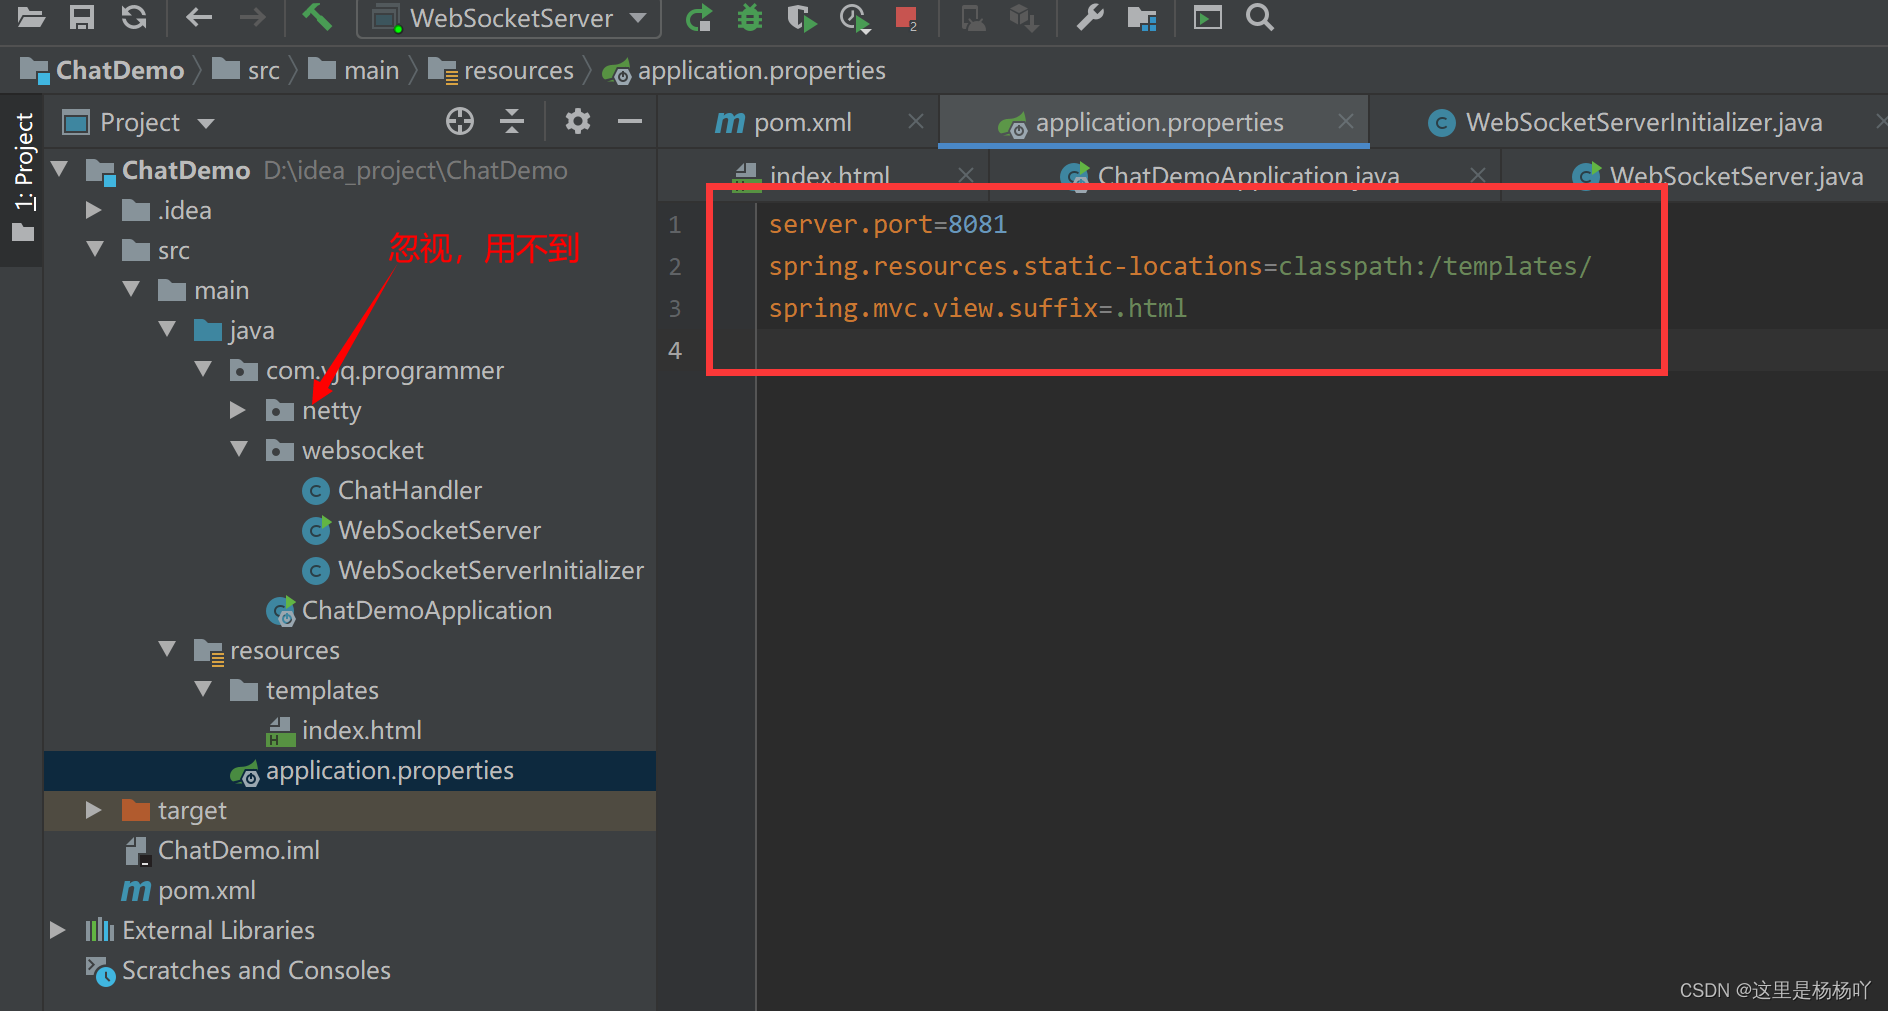
完整的配套代码资料获取请关注公众号:杨杨吖知识库,回复关键词:配套代码资料
声明:本文内容由网友自发贡献,不代表【wpsshop博客】立场,版权归原作者所有,本站不承担相应法律责任。如您发现有侵权的内容,请联系我们。转载请注明出处:https://www.wpsshop.cn/w/Monodyee/article/detail/404212?site
推荐阅读
相关标签

