
- 1网络防御保护笔记
- 2在云服务器上搭建个人版chatGPT及后端Spring Boot集成chat GPT_如何架设服务器转发访问chatgpt
- 37个顶级开源数据集来训练自然语言处理(NLP)和文本模型_开源nlp工具排名
- 4windows 一键更新 当前文件夹下的多个git项目_windows更新文件夹下多个git仓库
- 5百度机器学习算法春招一二三面面经
- 6【C++】stack与queue(相关接口介绍、容器适配器、deque、模拟实现)
- 7UDP用户数据报协议、TCP传输控制协议_tcp报文首部长度udp
- 8训练自己的个性化Stable diffusion模型,LORA_sd-trainer
- 9单片机Proteus仿真与开发实例 - LCD1602显示屏仿真 物联网_lcd1602在仿真软件上叫什么
- 10mysql mysqldumpslow 如何配置_开启mysql慢查询日志并使用mysqldumpslow命令查看
大数据技术-Hive学习笔记_hive.metastore.event.db.notification.api.auth
赞
踩
目录
Hive官网地址:
http://hive.apache.org/
文档查看地址https://cwiki.apache.org/confluence/display/Hive/GettingStarted
下载地址https://github.com/apache/hive
Hive-安装部署
解压hive到指安装目录下
tar -zxvf apache-hive-3.1.2-bin.tar.gz -C /opt/module/
- 1
配置hive环境变量
# HIVE_HOME
export HIVE_HOME=/opt/module/hive
export PATH=$PATH:$HIVE_HOME/bin
- 1
- 2
- 3
解决日志jar包冲突(一般不用)
mv $HIVE_HOME/lib/log4j-slf4j-impl-2.10.0.jar $HIVE_HOME/lib/log4j-slf4j-impl-2.10.0.bak
- 1
初始化元数据库
bin/schematool -dbType derby -initSchema
- 1
报错解决如下

原因:hadoop和hive的两个guava.jar版本不一致,删除低版本的那个,将高版本的复制到低版本目录下
hive所在位置:/opt/module/hive/lib/
hadoop所在位置:/opt/module/hadoop-3.1.3/share/hadoop/common/lib
再次执行初始化命令bin/schematool -dbType derby -initSchema

Hive启动
在hive目录下执行
bin/hive
- 1
Hive默认使用的元数据库为derby,开启Hive之后就会占用元数据库,且不与其他客户端共享数据,所以需要将Hive的元数据地址改为MySQL
报错解决如下

需要先启动hadoop
Hive-配置元数据库MetaStore
Hive默认使用的元数据库为derby,开启Hive之后就会占用元数据库,且不与其他客户端共享数据,所以需要将Hive的元数据地址配置到外部系统
配置MetaStore到MySQL
hive/conf创建配置文件hive-site.xml
<?xml version="1.0"?>
<?xml-stylesheet type="text/xsl" href="configuration.xsl"?>
<configuration>
     <!-- jdbc 连接的 URL -->
    <property>
        <name>javax.jdo.option.ConnectionURL</name>
        <value>jdbc:mysql://hadoop102:3306/metastore?useSSL=false</value>
    </property>
     <!-- jdbc 连接的 Driver-->
    <property>
        <name>javax.jdo.option.ConnectionDriverName</name>
        <value>com.mysql.jdbc.Driver</value>
    </property>
    <!-- jdbc 连接的 username-->
 	<property>
        <name>javax.jdo.option.ConnectionUserName</name>
        <value>root</value>
    </property>
     <!-- jdbc 连接的 password -->
    <property>
        <name>javax.jdo.option.ConnectionPassword</name>
        <value>root</value>
    </property>
     <!-- Hive 元数据存储版本的验证 -->
    <property>
        <name>hive.metastore.schema.verification</name>
        <value>false</value>
    </property>
     <!--元数据存储授权-->
    <property>
        <name>hive.metastore.event.db.notification.api.auth</name>
        <value>false</value>
    </property>
     <!-- Hive 默认在 HDFS 的工作目录 -->
    <property>
        <name>hive.metastore.warehouse.dir</name>
        <value>/user/hive/warehouse</value>
    </property>
</configuration>

- 1
- 2
- 3
- 4
- 5
- 6
- 7
- 8
- 9
- 10
- 11
- 12
- 13
- 14
- 15
- 16
- 17
- 18
- 19
- 20
- 21
- 22
- 23
- 24
- 25
- 26
- 27
- 28
- 29
- 30
- 31
- 32
- 33
- 34
- 35
- 36
- 37
- 38
- 39
登录MySQL创建Hive元数据库
mysql -uroot -proot;
mysql> create database metastore;
mysql> quit;
- 1
- 2
- 3
初始化Hive元数据库
schematool -initSchema -dbType mysql -verbose
- 1
启动Hive
bin/hive
- 1
使用元数据服务的方式访问Hive
在hive-site.xml文件中添加如下配置信息
<!-- 指定存储元数据要连接的地址 -->
<property>
    <name>hive.metastore.uris</name>
    <value>thrift://hadoop102:9083</value>
</property>
- 1
- 2
- 3
- 4
- 5
启动metastore,启动后窗口不能再操作,需打开一个新的shell窗口做别的操作
bin/hive --service metastore
- 1
启动hive
bin/hive
- 1
说明:当配置了这种方式之后,就必须先启动元数据服务再启动hive了,即使本机启动hive也要开服务,否则会报错

metastore元数据服务是提供给第三方服务查询hive的数据信息的,如果不需要只是在本地做hive的验证测试,为了方便,可以注掉该配置
使用JDBC方式访问Hive
前置要求:metastore元数据服务要先启动,因为hiveserver2使用jdbc方式去连接metastore元数据服务
在 hive-site.xml 文件中添加如下配置信息
<!-- 指定 hiveserver2 连接的 host -->
<property>
 	<name>hive.server2.thrift.bind.host</name>
    <value>hadoop102</value>
</property>
<!-- 指定 hiveserver2 连接的端口号 -->
<property>
    <name>hive.server2.thrift.port</name>
    <value>10000</value>
</property>
- 1
- 2
- 3
- 4
- 5
- 6
- 7
- 8
- 9
- 10
查看端口是否被占用
netstat -anp|grep 10000
- 1
启动hiveserver2
bin/hive --service hiveserver2
- 1
等待hiveserver2启动完成
通过netstat -anp|grep 10000查看hiveserver2是否启动,在启动的时候保证端口没被占用,启动之后10000端口会有显示,在启动查端口前,没有查到占用就说明hiveserver2没有启动,hiveserver2会显示七八个Hive Session ID之后,才会真正启动,这要等个几分钟

或者查看hive的运行日志,在/tmp/用户名/hive.log
启动beeline客户端
bin/beeline -u jdbc:hive2://hadoop102:10000 -n root
- 1
看到如下界面表示成功
Connecting to jdbc:hive2://hadoop102:10000
Connected to: Apache Hive (version 3.1.2)
Driver: Hive JDBC (version 3.1.2)
Transaction isolation: TRANSACTION_REPEATABLE_READ
Beeline version 3.1.2 by Apache Hive
0: jdbc:hive2://hadoop102:10000>
- 1
- 2
- 3
- 4
- 5
- 6
启动报错解决如下

解决方式:在hadoop的配置文件core-site.xml增加如下配置,重启hdfs,其中“xxx”是连接beeline的用户,将“xxx”替换成自己的用户名即可。一定要重启hadoop,否则不会生效的还是报错!
*表示可通过超级代理xxx操作hadoop的用户、用户组和主机
<property>
    <name>hadoop.proxyuser.xxx.hosts</name>
    <value>*</value>
</property>
<property>
    <name>hadoop.proxyuser.xxx.groups</name>
    <value>*</value>
</property>
- 1
- 2
- 3
- 4
- 5
- 6
- 7
- 8
后台启动
前台启动的方式导致需要打开多个shell窗口,可以使用如下方式后台方式启动
- nohup: 放在命令开头,表示不挂起,也就是关闭终端进程也继续保持运行状态
- /dev/null:是Linux文件系统中的一个文件,被称为黑洞,所有写入改文件的内容都会被自动丢弃
- 2>&1 : 表示将错误重定向到标准输出上
- &: 放在命令结尾,表示后台运行
- 一般会组合使用
nohup [xxx 命令操作]> file 2>&1 &,表示将xxx命令运行的结果输出到file中,并保持命令启动的进程在后台运行
nohup hive --service metastore 2>&1 &

nohup hive --service hiveserver2 2>&1 &
- 1
- 2
- 3
编写脚本启动hive
vim $HIVE_HOME/bin/hiveservices.sh
- 1
#!/bin/bash
HIVE_LOG_DIR=$HIVE_HOME/logs
if [ ! -d $HIVE_LOG_DIR ]
then
mkdir -p $HIVE_LOG_DIR
fi
#检查进程是否运行正常,参数 1 为进程名,参数 2 为进程端口
function check_process()
{
pid=$(ps -ef 2>/dev/null | grep -v grep | grep -i $1 | awk '{print $2}')
ppid=$(netstat -nltp 2>/dev/null | grep $2 | awk '{print $7}' | cut -d '/' -f 1)
echo $pid
[[ "$pid" =~ "$ppid" ]] && [ "$ppid" ] && return 0 || return 1
}
function hive_start()
{
metapid=$(check_process HiveMetastore 9083)
cmd="nohup hive --service metastore >$HIVE_LOG_DIR/metastore.log 2>&1 &"
[ -z "$metapid" ] && eval $cmd || echo "Metastroe 服务已启动"
server2pid=$(check_process HiveServer2 10000)
cmd="nohup hiveserver2 >$HIVE_LOG_DIR/hiveServer2.log 2>&1 &"
[ -z "$server2pid" ] && eval $cmd || echo "HiveServer2 服务已启动"
}
function hive_stop()
{
metapid=$(check_process HiveMetastore 9083)
[ "$metapid" ] && kill $metapid || echo "Metastore 服务未启动"
server2pid=$(check_process HiveServer2 10000)
[ "$server2pid" ] && kill $server2pid || echo "HiveServer2 服务未启动"
}
case $1 in
"start")
hive_start
;;
"stop")
hive_stop
;;
"restart")
hive_stop
sleep 2
hive_start
;;
"status")
check_process HiveMetastore 9083 >/dev/null && echo "Metastore 服务运行正常" || echo "Metastore 服务运行异常"
check_process HiveServer2 10000 >/dev/null && echo "HiveServer2 服务运行正常" || echo "HiveServer2 服务运行异常"
;;
*)
echo Invalid Args!
echo 'Usage: '$(basename $0)' start|stop|restart|status'
;;
esac
- 1
- 2
- 3
- 4
- 5
- 6
- 7
- 8
- 9
- 10
- 11
- 12
- 13
- 14
- 15
- 16
- 17
- 18
- 19
- 20
- 21
- 22
- 23
- 24
- 25
- 26
- 27
- 28
- 29
- 30
- 31
- 32
- 33
- 34
- 35
- 36
- 37
- 38
- 39
- 40
- 41
- 42
- 43
- 44
- 45
- 46
- 47
- 48
- 49
- 50
- 51
chmod +x $HIVE_HOME/bin/hiveservices.sh
- 1
hiveservices.sh start
- 1
Hive-常用SHELL命令
Hive常用交互命令
-e:不进入hive的交互窗口执行sql语句
bin/hive -e "select id from test;"
- 1
-f:执行脚本中sql语句
创建sql脚本hive.sql
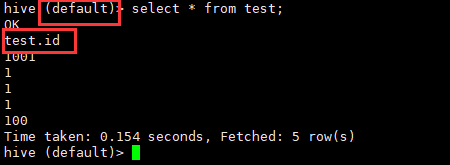
select * from test;
- 1
执行脚本
bin/hive -f data/hive.sql > data/result.txt
- 1
Hive常用命令
退出hive窗口
hive> exit;
hive> quit;
- 1
- 2
在hive客户端命令窗口查看hdfs文件系统
hive> dfs -ls /;
- 1
查看在hive中输入的所有历史命令
进入到当前用户的根目录cd ~,查看.hivehistory文件
cat .hivehistory
- 1
Hive运行日志信息配置
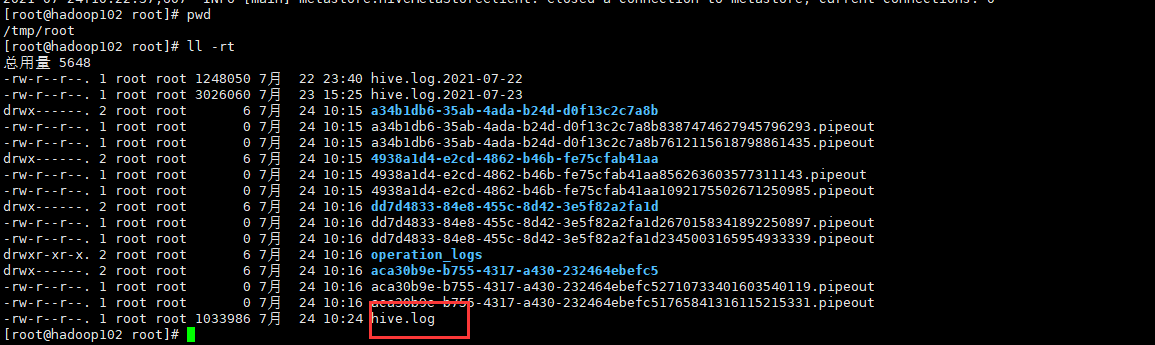
Hive的log 默认存放在/tmp/当前用户名/hive.log 目录下
Hive常见属性配置
Hive运行日志信息配置
Hive的log默认存放在/tmp/xxx/hive.log 目录下(xxx当前用户名下)
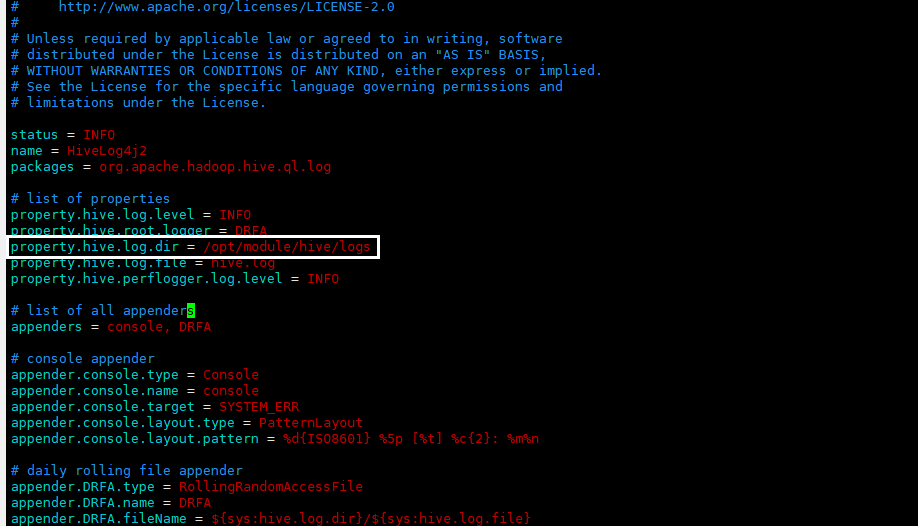
修改hive的log存放日志存放路径
第一步:修改hive/conf/hive-log4j2.properties.template文件名称为hive-log4j2.properties
第二步:在hive-log4j2.properties文件中修改log存放位置
打印当前库和表头
在hive-site.xml中加入如下两个配置
<property>
    <name>hive.cli.print.header</name>
    <value>true</value>
</property>
<property>
    <name>hive.cli.print.current.db</name>
    <value>true</value>
</property>
- 1
- 2
- 3
- 4
- 5
- 6
- 7
- 8
Hive参数配置方式
全部的配置信息在${HIVE_HOME}/conf/hive-default.xml.template

查看当前所有的配置信息
hive> set
- 1
配置文件声明方式
默认配置文件:hive-default.xml
用户自定义配置文件:hive-site.xml
用户自定义配置会覆盖默认配置,另外Hive也会读入Hadoop的配置,因为Hive是作为Hadoop的客户端启动的,Hive的配置会覆盖Hadoop的配置。配置文件的设定对本机启动的所有Hive进程都有效
命令行参数方式
启动Hive时,可以在命令行添加-hiveconf param=value来设定参数,仅对本次hive启动有效
bin/hive -hiveconf mapred.reduce.tasks=10;
- 1
查看参数设置
hive> set mapred.reduce.tasks;
- 1

参数声明方式
可以在HQL中使用SET关键字设定参数
hive> set mapred.reduce.tasks=100;
- 1
上述三种设定方式的优先级依次递增。即配置文件<命令行参数<参数声明。注意某些系统级的参数,例如log4j相关的设定,必须用前两种方式设定,因为那些参数的读取在会话建立以前已经完成了
Hive-数据类型
基本数据类型
| Hive数据类型 | Java数据类型 | 长度 | 例子 |
|---|---|---|---|
| TINYINT | byte | 1byte有符号整数 | 20 |
| SMALINT | short | 2byte有符号整数 | 20 |
| INT | int | 4byte有符号整数 | 20 |
| BIGINT | long | 8byte有符号整数 | 20 |
| BOOLEAN | boolean | 布尔类型,true或者false | TRUE FALSE |
| FLOAT | float | 单精度浮点数 | 3.14159 |
| DOUBLE | double | 双精度浮点数 | 3.14159 |
| STRING | string | 字符系列,可以指定字符集,可以使用单引号或者双引号。 | hive |
| TIMESTAMP | 时间类型 | ||
| BINARY | 字节数组 |
对于Hive的String类型相当于数据库的varchar类型,该类型是一个可变的字符串,不过它不能声明其中最多能存储多少个字符,理论上它可以存储2GB的字符数
集合数据类型
| 数据类型 | 描述 | 语法示例 |
|---|---|---|
| STRUCT | 和c语言中的struct类似,都可以通过“点”符号访问元素内容。例如,如果某个列的数据类型是STRUCT{first STRING, last STRING},那么第1个元素可以通过字段.first来引用 | struct() |
| MAP | MAP是一组键-值对元组集合,使用数组表示法可以访问数据。例如,如果某个列的数据类型是MAP,其中键 ->值对是’first’->’John’和’last’->’Doe’,那么可以通过字段名[‘last’]获取最后一个元素 | map() |
| ARRAY | 数组是一组具有相同类型和名称的变量的集合。这些变量称为数组的元素,每个数组元素都有一个编号,编号从 零开始。例如,数组值为[‘John’, ‘Doe’],那么第2个元素可以通过数组名[1]进行引用 | Array() |
Hive有三种复杂数据类型ARRAY、MAP和STRUCT。ARRAY和MAP与Java中的Array和Map类似,而STRUCT与C语言中的Struct类似,它封装了一个命名字段集合,复杂数据类型允许任意层次的嵌套
集合数据操作
{
 	"name": "czs",
 	"friends": ["qhh" , "xyx"] , //列表 Array,
 	"children": { //键值 Map,
 	"czs age": 18 ,
 	"qhh age": 19
 	}
 	"address": { //结构 Struct,
 	"street": "tkk",
 	"city": "xujc"
 	}
}
- 1
- 2
- 3
- 4
- 5
- 6
- 7
- 8
- 9
- 10
- 11
- 12
创建数据库
create table stu
(
name string,
friends array<string>,
children map<string,int>,
address struct<street:string,city:string>
)
row format delimited fields terminated by ','
collection items terminated by '_'
map keys terminated by ':'
lines terminated by '\n';
- 1
- 2
- 3
- 4
- 5
- 6
- 7
- 8
- 9
- 10
- 11
row format delimited fields terminated by ',':列分隔符
collection items terminated by '_' :MAP STRUCT和ARRAY的分隔符(数据分割符号)
map keys terminated by ':':MAP中的key与value的分隔符
lines terminated by '\n';:行分隔符
创建数据
数据繁多,可以通过外部文件方式导入数据
czs,qhh_xyx,czs age:18_qhh age:19,tkk_xujc
- 1
导入文本数据到测试表
load data local inpath '/hive/datas/test.txt' into table test;
- 1
访问数据
select friends[1],children['czs age'],address.city from test where name="czs";
- 1
Hive-DDL数据定义
数据库操作
显示数据库
show databases
- 1
过滤显示查询的数据库
show databases like 'db_hive*'
- 1
显示数据库信息
desc database db_hive
- 1
显示数据库详细信息
desc database extended db_hive
- 1
切换当前数据库
use db_hive
- 1
描述数据库属性信息
alter database db_hive set dbproperties('createauth'='czs')
- 1
if exists避免要删除的空数据库不存在错误
drop database if exists db_hive
- 1
cascade强制删除数据不为空的数据库
drop database db_hive cascade
- 1
if not exists避免要创建的数据库已存在错误
create database db_hive if not exists db_hive
- 1
指定数据库存放位置创建数据库
create database db_hive location '/db_hive.db'
- 1
内部表
默认创建的表都是所谓的管理表,有时也被称为内部表。因为这种表Hive会或多或少地控制着数据的生命周期。Hive默认情况下会将这些表的数据存储在由配置项hive.metastore.warehouse.dir所定义的目录的子目录下
创建普通表
create table if not exists student(
id int, name string
)
row format delimited fields terminated by '\t'
stored as textfile
location '/user/hive/warehouse/student';
- 1
- 2
- 3
- 4
- 5
- 6
根据查询结果创建表
create table if not exists student2 as select id, name from student;
- 1
根据已存在的表结构创建表
create table if not exists student3 like student;
- 1
外部表
因为表是外部表,所以Hive并非认为其完全拥有这份数据。删除该表并不会删除掉这份数据,不过描述表的元数据信息会被删除掉,外部表删除后hdfs中的数据还在,但是metadata中的元数据已被删除
创建外部表
create external table if not exists dept(
deptno int,
dname string,
loc int
)
row format delimited fields terminated by '\t';
- 1
- 2
- 3
- 4
- 5
- 6
管理表与外部表的互相转换
修改内部表为外部表
alter table student set tblproperties('EXTERNAL'='TRUE');
- 1
修改外部表为内部表
alter table student set tblproperties('EXTERNAL'='FALSE');
- 1
数据表操作
查看表信息
desc formatted score;
- 1
查看表字段信息
desc student;
- 1
修改表
alter table student rename to stu
- 1
删除表
drop table dept;
- 1
增加列信息
alter table dept add columns(deptdesc string);
- 1
修改列信息
alter table dept change column deptdesc desc string;
- 1
替换列信息
alter table dept replace columns(deptno string, dnamestring, loc string);
- 1
Hive-DML数据操作
load-向表中装载数据
load data [local] inpath '数据的path' [overwrite] into table student [partition (partcol1=val1,…)];
- 1
load data:表示加载数据
local:表示从本地加载数据到hive表;否则HDFS加载数据到 hive 表
inpath:表示加载数据的路径
overwrite:表示覆盖表中已有数据,否则表示追加
into table:表示加载到哪张表
student:表示具体的表
partition:表示上传到指定分区
加载本地文件到hive
load data local inpath '/hive/datas/student.txt' into table default.student;
- 1
加载hdfs数据到hive
load data inpath '/user/hive/student.txt' into table default.student;
- 1
insert-通过查询语句向表中插入数据
- insert into:以追加数据的方式插入到表或分区,原有数据不会删除
- insert overwrite:会覆盖表中已存在的数据
insert into table student values(1,'xyx'),(2,'czs');
insert overwrite table student select id, name from student where name='czs';
- 1
- 2
as select-查询语句中创建表并加载数据
create table if not exists student as select id, name from student;
- 1
import-导入数据到hive表
import table student from '/hive/export/student';
- 1
insert-导出数据
insert overwrite local directory '/hive/data/export/student' select * from student;
- 1
truncate-清除表中数据
truncate table student;
- 1
Hive-查询操作
内连接:只有进行连接的两个表中都存在与连接条件相匹配的数据才会被保留下来
select e.empno, e.ename, d.deptno from emp e join dept d on e.deptno = d.deptno;
- 1
左外连接:JOIN操作符左边表中符合WHERE子句的所有记录将会被返回
select e.empno, e.ename, d.deptno from emp e left join dept d on e.deptno = d.deptno;
- 1
右外连接:JOIN操作符右边表中符合WHERE子句的所有记录将会被返回
select e.empno, e.ename, d.deptno from emp e right join dept d on e.deptno = d.deptno;
- 1
满外连接:将会返回所有表中符合WHERE语句条件的所有记录。如果任一表的指定字段没有符合条件的值的话,那么就使用NULL值替代
select e.empno, e.ename, d.deptno from emp e full join dept d on e.deptno = d.deptno;
- 1
Like,Rlike:Like运算选择类似的值%代表任意字符,_代表一个字符,Rlike可以通过正则表达式的方式指定匹配条件
# 查找名字以 A 开头的员工信息
select * from emp where ename LIKE 'A%';
# 查找名字中第二个字母为 A 的员工信息
select * from emp where ename LIKE '_A%';
# 查找名字中带有 A 的员工信息
select * from emp where ename RLIKE '[A]';
- 1
- 2
- 3
- 4
- 5
- 6
GroupBy:和聚合函数一起使用,按照一个或者多个列队结果进行分组,然后对每个组执行聚合操作
# 计算 emp 表每个部门的平均工资
select t.deptno, avg(t.sal) avg_sal from emp t group by t.deptno;
- 1
- 2
Having:只用于group by分组统计语句
# 求每个部门的平均薪水大于 2000 的部门
select deptno, avg(sal) avg_sal from emp group by deptno having avg_sal > 2000;
- 1
- 2
Order By:全局排序,只有一个Reducer,ASC默认升序,DESC降序
select ename, deptno, sal from emp order by deptno, sal;
- 1
Sort By:局部排序,为每个reducer产生一个排序文件。每个Reducer内部进行排序,对全局结果集来说不是排序
# 设置reducer个数
set mapreduce.job.reduces=3;
# 查看reducer个数
set mapreduce.job.reduces
# 将查询结果导入到文件中
insert overwrite local directory '/opt/module/data/sortby-result' select * from emp sort by deptno desc;
- 1
- 2
- 3
- 4
- 5
- 6
Distribute By:分区,控制某个特定行应该到哪个reducer, 类似MR中partition自定义分区,结合Sort By使用,分区规则是根据分区字段的hash码与reduce的个数进行模除后,余数相同的分到一个区
set mapreduce.job.reduces=3;
# 先按照部门编号分区,再按照员工编号降序排序。
insert overwrite local directory '/opt/module/data/distribute-result' select * from emp distribute by deptno sort by empno desc;
- 1
- 2
- 3
Cluster By:当distribute by和sorts by字段相同时,可以使用cluster by方式,但是排序只能是升序排序的方式
# 等价
select * from emp cluster by deptno;
select * from emp distribute by deptno sort by deptno;
- 1
- 2
- 3
Hive-分区表
分区表实际上就是对应一个HDFS文件系统上的独立的文件夹,该文件夹下是该分区所有的数据文件。Hive中的分区就是分目录,把一个大的数据集根据业务需要分割成小的数据集。在查询时通过WHERE子句中的表达式选择查询所需要的指定的分区,这样的查询效率会提高很多
load data local inpath '/opt/module/hive/datas/dept_20200401.log' into table dept_partition partition(day='20200401');
load data local inpath '/opt/module/hive/datas/dept_20200402.log' into table dept_partition partition(day='20200402');
load data local inpath '/opt/module/hive/datas/dept_20200403.log' into table dept_partition partition(day='20200403');
- 1
- 2
- 3

查询分区中的数据
# 单分区查询
select * from dept_partition where day='20200401';
# 多分区查询
select * from dept_partition where day='20200401'
union
select * from dept_partition where day='20200402'
union
select * from dept_partition where day='20200403';
- 1
- 2
- 3
- 4
- 5
- 6
- 7
- 8
增加分区
# 创建单分区
alter table dept_partition add partition(day='20200404');
# 创建多分区
alter table dept_partition add partition(day='20200405') partition(day='20200406');
- 1
- 2
- 3
- 4
删除分区
# 删除单分区
alter table dept_partition drop partition (day='20200406');
# 删除多分区
alter table dept_partition drop partition (day='20200404'), partition(day='20200405');
- 1
- 2
- 3
- 4
查看分区
# 查看有多少分区
show partitions dept_partition;
# 查看分区表结构
desc formatted dept_partition;
- 1
- 2
- 3
- 4
二级分区
创建二级分区
create table dept_partition2(
deptno int, dname string, loc string
)
partitioned by (day string, hour string)
row format delimited fields terminated by ' ';
- 1
- 2
- 3
- 4
- 5
导入分区数据
load data local inpath '/root/dept.log' into table dept_partition2 partition(day='20200401', hour='12');
- 1

查询分区数据
select * from dept_partition2 where day='20200401' and hour='12';
- 1
数据直接上传到分区目录三种方式
上传数据后修复
# 上传数据
hive (default)> dfs -mkdir -p /user/hive/warehouse/mydb.db/dept_partition2/day=20200401/hour=13;
hive (default)> dfs -put /opt/module/datas/dept_20200401.log /user/hive/warehouse/mydb.db/dept_partition2/day=20200401/hour=13;
# 查询数据(查询不到刚上传的数据)
hive (default)> select * from dept_partition2 where day='20200401' and hour='13';
# 执行修复命令
hive> msck repair table dept_partition2;
# 再次查询
hive (default)> select * from dept_partition2 where day='20200401' and hour='13';
- 1
- 2
- 3
- 4
- 5
- 6
- 7
- 8
- 9
上传数据后添加分区
# 上传数据
hive (default)> dfs -mkdir -p /user/hive/warehouse/mydb.db/dept_partition2/day=20200401/hour=13;
hive (default)> dfs -put /opt/module/datas/dept_20200401.log /user/hive/warehouse/mydb.db/dept_partition2/day=20200401/hour=13;
# 添加分区
hive (default)> alter table dept_partition2 add partition(day='20200401',hour='14');
# 查询数据
hive (default)> select * from dept_partition2 where day='20200401' and hour='14';
- 1
- 2
- 3
- 4
- 5
- 6
- 7
创建文件夹后load数据到分区
# 创建目录
hive (default)> dfs -mkdir -p /user/hive/warehouse/mydb.db/dept_partition2/day=20200401/hour=15;
# 上传数据
hive (default)> load data local inpath '/opt/module/hive/datas/dept.log' into table dept_partition2 partition(day='20200401',hour='15');
# 查询数据
hive (default)> select * from dept_partition2 where day='20200401' and hour='15';
- 1
- 2
- 3
- 4
- 5
- 6
动态分区
关系型数据库中,对分区表Insert数据时候,数据库自动会根据分区字段的值,将数据插入到相应的分区中,Hive中也提供了类似的机制,即动态分区(DynamicPartition),只不过,使用Hive的动态分区,需要进行相应的配置。
开启动态分区
# 默认开启
hive.exec.dynamic.partition=true
- 1
- 2
设置非严格模式
设置为非严格模式,动态分区的模式,默认strict,表示必须指定至少一个分区为静态分区,nonstrict模式表示允许所有的分区字段都可以使用动态分区
hive.exec.dynamic.partition.mode=nonstrict
- 1
设置最大分区数
在所有执行MR的节点上,最大一共可以创建多少个动态分区。默认1000
hive.exec.max.dynamic.partitions=1000
- 1
设置单个节点最大分区数
在每个执行MR的节点上,最大可以创建多少个动态分区。该参数需要根据实际的数据来设定。比如:源数据中包含了一年的数据,即day字段有365个值,那么该参数就需要设置成大于365,如果使用默认值100,则会报错
hive.exec.max.dynamic.partitions.pernode=100
- 1
设置最大创建文件数
整个MR Job中,最大可以创建多少个HDFS文件。默认100000
hive.exec.max.created.files=100000
- 1
设置空分区不抛出异常
当有空分区生成时,是否抛出异常。一般不需要设置。默认 false
hive.error.on.empty.partition=false
- 1
动态分区
# 创建目标动态分区表
create table dept_partition_dy(id int, name string) partitioned by (loc int) row format delimited fields terminated by '\t';
# 设置动态分区
set hive.exec.dynamic.partition.mode = nonstrict;
hive (default)> insert into table dept_partition_dy partition(loc) select deptno, dname, loc from dept;
# 查看目标分区表的分区情况
hive (default)> show partitions dept_partition;
- 1
- 2
- 3
- 4
- 5
- 6
- 7

Hive-分桶表
分区提供一个隔离数据和优化查询的便利方式。不过,并非所有的数据集都可形成合理的分区。对于一张表或者分区,Hive可以进一步组织成桶,也就是更为细粒度的数据范围划分。分桶是将数据集分解成更容易管理的若干部分的另一个技术。分区针对的是数据的存储路径;分桶针对的是数据文件
分桶规则:Hive的分桶采用对分桶字段的值进行哈希,然后除以桶的个数求余的方式决定该条记录存放在哪个桶当中
# 创建分桶表
create table stu_buck(id int, name string)
clustered by(id)
into 4 buckets
row format delimited fields terminated by '\t';
# 查看表结构
hive (default)> desc formatted stu_buck;
Num Buckets: 4
# 导入数据到分桶表中,load 的方式
hive (default)> load data inpath '/student.txt' into table stu_buck;
# 查看分桶的数据
hive(default)> select * from stu_buck;
- 1
- 2
- 3
- 4
- 5
- 6
- 7
- 8
- 9
- 10
- 11
- 12

注意事项
- reduce的个数设置为-1,让Job自行决定需要用多少个reduce或者将reduce的个数设置为大于等于分桶表的桶数
- 从hdfs中load数据到分桶表中,避免本地文件找不到问题
- 不要使用本地模式
Hive-函数
SELECT [ALL | DISTINCT] select_expr, select_expr, ...
FROM table_reference
[WHERE where_condition]
[GROUP BY col_list]
[ORDER BY col_list]
[CLUSTER BY col_list
| [DISTRIBUTE BY col_list] [SORT BY col_list]
]
[LIMIT number]
- 1
- 2
- 3
- 4
- 5
- 6
- 7
- 8
- 9
常用函数
| 函数 | 作用 |
|---|---|
| count | 求总行数 |
| max | 求最大值 |
| min | 求最小值 |
| sum | 求总和 |
| avg | 求平均值 |
select count(*) cnt from emp;
select max(sal) max_sal from emp;
select min(sal) min_sal from emp;
select sum(sal) sum_sal from emp;
select avg(sal) avg_sal from emp;
- 1
- 2
- 3
- 4
- 5
行转列
CONCAT:返回输入字符串连接后的结果,支持任意个输入字符串;
CONCAT_WS:按指定分隔符连接
COLLECT_SET:将某字段的值进行去重汇总,产生Array类型字段
SELECT
t1.c_b,
CONCAT_WS("|",collect_set(t1.name))
FROM (
SELECT
NAME,
CONCAT_WS(',',constellation,blood_type) c_b
FROM person_info
)t1
GROUP BY t1.c_b
- 1
- 2
- 3
- 4
- 5
- 6
- 7
- 8
- 9
- 10
列转行
EXPLODE:将hive一列中复杂的Array或者Map结构拆分成多行
用法:LATERAL VIEW udtf(expression) tableAlias AS columnAlias
用于和split,explode等UDTF一起使用,它能够将一列数据拆成多行数据,在此基础上可以对拆分后的数据进行聚合
SELECT
movie,
category_name
FROM
movie_info
lateral VIEW explode(split(category,",")) movie_info_tmp AS category_name;
- 1
- 2
- 3
- 4
- 5
- 6
窗口函数
over() 此时每一行的窗口都是所有的行
SELECT id,name,num,
sum(num) over() sum1 from aa
- 1
- 2
over(order by id) id=1的窗口只有一行,id=2的窗口包括id=1,id=2
SELECT id,name,num,
sum(num) over(order by id) sum1 from aa
- 1
- 2
over(partition by name) 每一行根据name来区分窗口
SELECT id,name,num,
sum(num) over(partition by name) sum1 from aa
- 1
- 2
over(partition by name order by id) 每一行根据name来区分窗口,再根据order by取具体的范围
SELECT id,name,num,
sum(num) over(partition by name order by id) sum1 from aa
- 1
- 2
over( order by id range between 1 preceding and 1 following ) range 代表范围 preceding 向前 following 向后 窗口范围当前行前后一行
SELECT id,name,num,
sum(num) over( order by id range between 1 preceding and 1 following ) sum1 from aa
- 1
- 2
over( order by id range between CURRENT ROW AND 1 following ) 窗口范围当前行和后面一行
SELECT id,name,num,
sum(num) over( order by id range between CURRENT ROW AND  1 following ) sum1 from aa
- 1
- 2
自定义UDF
将自定义函数打包之后,将jar包添加到hive的classpath路径下
hive (default)> add jar /opt/module/hive/data/myudtf.jar;
- 1
创建临时函数与开发好的java class关联
hive (default)> create temporary function myudtf as "czs.study.hive.MyUDTF";
- 1
使用自定义的函数
select myudtf("hello,world,hadoop,hive",",");
- 1

