
- 1同款爱心Python代码版来了_爱心代码编程python可复制
- 2git的命令&与atom结合的使用_atom 推送代码到git
- 3springcloud学习总结_你对springcloud 有什么使用心得嘛
- 4耗时3个月终于整理完了“Java八股文背诵版“,堪称2023八股文天花板!_java八股文要背到什么程度
- 5GitCode上手使用体验
- 6OFDM系统信道估计误码率matlab仿真,对比LS,LMMSE,LR-LMMSE三种信道估计算法_lr_lmmse_err_ber
- 7FPGA学习笔记之UART_uart fpga
- 8从周赛中学算法-2023上_punishmentnumber(self, n: int) -> int:
- 9Java常用实现八种排序算法与代码实现_java排序算法代码
- 10Ansible总结-基础部分(ansible-doc与常用模块)
Ubuntu20.04重装系统+常用软件安装_did not find lua >= 5.2.
赞
踩
1.Ubuntu20.04重装系统
Index of /ubuntu-releases/20.04/
1.1 双系统安装
1) 首先从官网上下载Ubuntu20.04镜像,下载最好从官网上下载(Download Ubuntu Desktop | Download | Ubuntu
Ubuntu 20.04.6 LTS (Focal Fossa)
如下图:

2) 下载好Ubuntu 20.04镜像后,我们需要进行U盘的制作或者光盘的刻录,我们先看一下U盘启动项的制作,
刻录U盘或者光盘,我们需要一款刻录软件、本人所用的是UltraISO软通牒刻录软件,这款软件网上都可以找到,下载安装就可以,这里只示范U盘刻录。示例如下:
安装好的UltraISO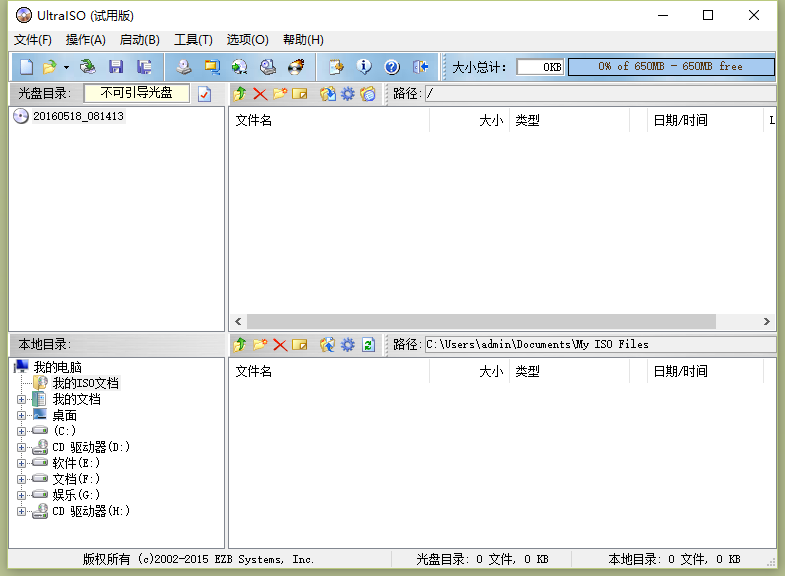
这里选择下载好的ISO,点击文件项下的打开将ISO添加进来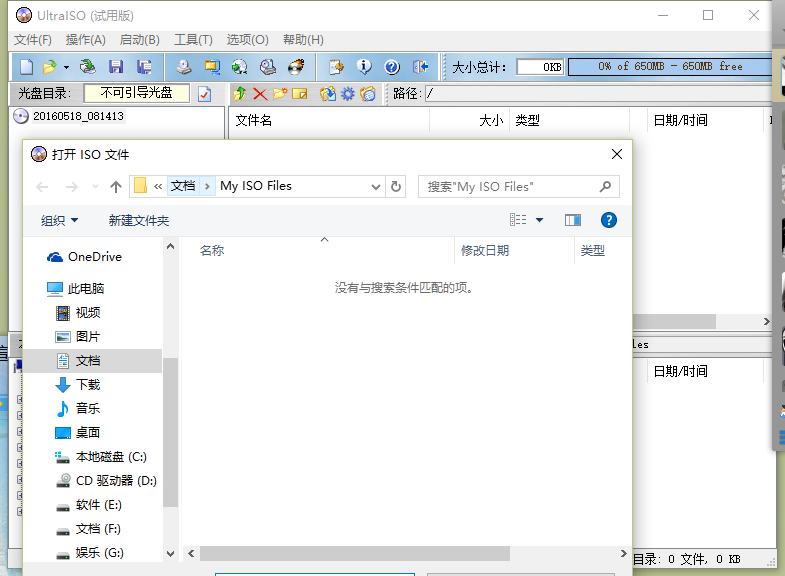
选择启动项下的写入硬盘镜像,写入硬盘镜像下的参数、默认的就可以,所用不需要修改。如果为了验证的话,把刻录校验选择上就可以。最后点击写入、等待完成。最后,一款随身携带的U盘安装Ubuntu16.04就完成了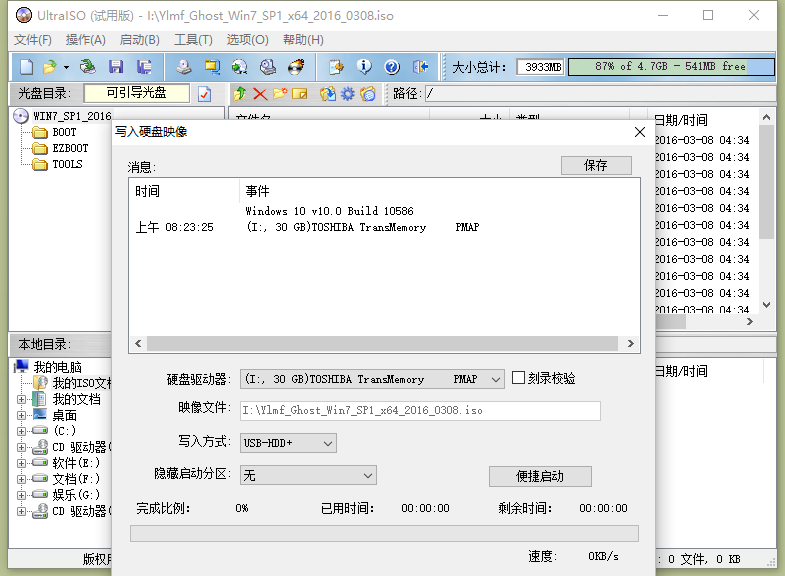
3) 光盘的刻录、还是在我们的UltraISO中,将我们ISO加载进来。如下图:
选择工具项下的刻录光盘镜像,切记,这里最好刻录的是干净的光盘,之后点击刻录就OK了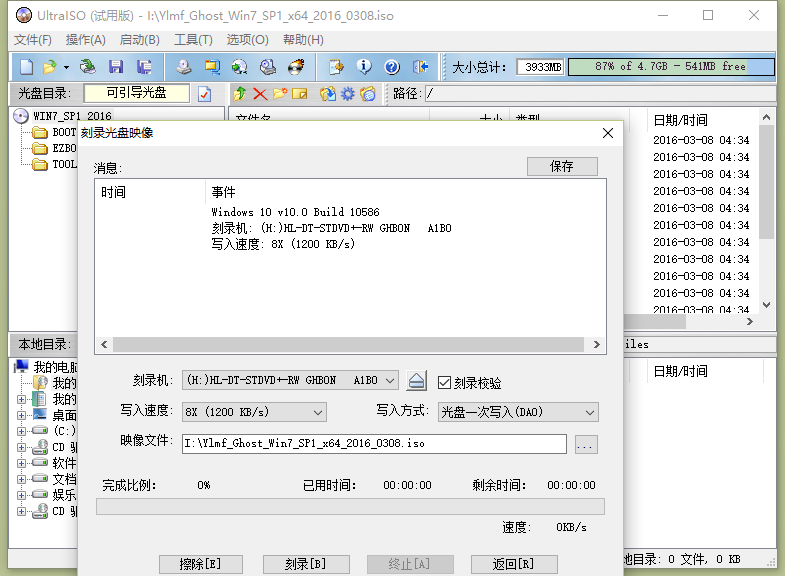
最后,我们的U盘安装启动项和光盘刻录完成了,可以直接安装系统了!
1.1.2 安装过程
进行U盘安装系统之前,还需要设置BIOS boot启动选项,默认的是硬盘启动,需要设置为U盘启动
不同的主板设置U盘启动的方式也不同,因此小编就不详述怎么更改BIOS设置,大家查找自己的主板型号然后在网上找相关的设置教程即可完成BIOS设置后就可以插入U盘重启电脑就可以使用U盘进行Ubuntu操作系统的安装了
参考https://jingyan.baidu.com/article/3c48dd348bc005e10be358eb.html
1.1.3 分区
法一:
Swap(相当于电脑内存):逻辑分区、大小设置为电脑内存大小,2G,4G;
/boot(引导分区):主分区:大小设置为200M;
/home(用户存储数据用):逻辑分区,要尽可能大,100G空间可以设置为85G,留10G给主分区即可。
/.(主分区):主分区,用于存放系统,相当于win7的C盘,10G即可。
法二:
/.(主分区):主分区,只分这一个区,将所有空闲空间(free space)都分给主分区。
法三:
Swap(相当于电脑内存):逻辑分区、大小设置为电脑内存大小的两倍;
/.(主分区):主分区,用于存放系统和其他(包括/home等),其他剩余空间都分给主分区,避免分区过多导致主分区空间太小.
小结:
1) 三种方法都同样适用,推荐第三种方法(swap 32G ; /. 主分区 200G);
2) 当分给linux的硬盘比较小时,可以选择法二。
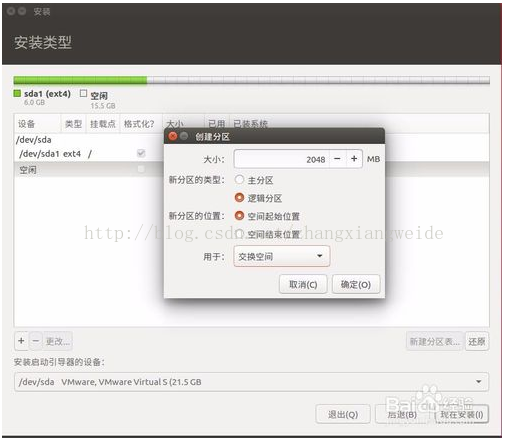
创建主分区:
5G 主分区 空间起始位置 Ext4日志文件系统 /
创建swap分区:
2048MB 逻辑分区 空间起始位置 交换空间
创建boot分区:
200MB 逻辑分区 空间起始位置 Ext4日志文件系统 /boot
创建home分区:
剩余的空间 逻辑分区 空间起始位置 Ext4日志文件系统 /home


1.1.4 网卡驱动
intel NUC 安装ubuntu20.04使用网卡AX211无法找到wifi问题_ubuntu20.04 ax211-CSDN博客
1.2 系统升级方式
Y7000P 双系统安装ubuntu18.04和ubuntu20.04均出现错误,ubuntu16.04成功.
固态硬盘已经确认gpt模式并且全盘格式话,多次测试重装依然出现同样问题,可能是镜像的ext4 file creation功能和BIOS或者硬盘冲突,暂时无法解决,只能通过系统升级绕过该问题。
linux是文件系统,并且官方也推荐dist-upgrade,升级和直接装应该差别不打。
系统升级
方法一:官方推荐的Softwre &Updates
https://ubuntu.com/tutorials/upgrading-ubuntu-desktop#3-check-for-updates
方法二:命令行
- #
- sudo apt update && sudo apt upgrade
- sudo apt autoremove
- sudo apt dist-upgrade
- sudo do-release-upgrade
-
- #桌面版
- #sudo do-release-upgrade -m desktop -d
系统升级完成后要 kernel升级
1 :获取最新的内核的:sudo apt list | grep linux-generic*
2:直接安装:sudo apt-get install linux-generic-hwe20.04-edge
3:Reboot重启4:check安装是否成功:sudo uname -r
1.5 安装显卡驱动
查看显卡设备和显卡驱动
ubuntu-drivers devices会给你显示recommended的显卡驱动
自动安装合适的显卡驱动
sudo ubuntu-drivers autoinstall这个时候先不要着急重启,在应用里打开 软件与更新,检查一下有没有需要更新的软件,更新一下。
更新以后重启。
重启之后,在设置->详细信息里可以看到此时的显卡已经切换为Nvidia。
1.3 虚拟机安装
VMware 下载安装Ubuntu20.04详细图文教程_vmware17安装ubuntu 20.04-CSDN博客
1)新建虚拟机向导,可选择安装iso方式:
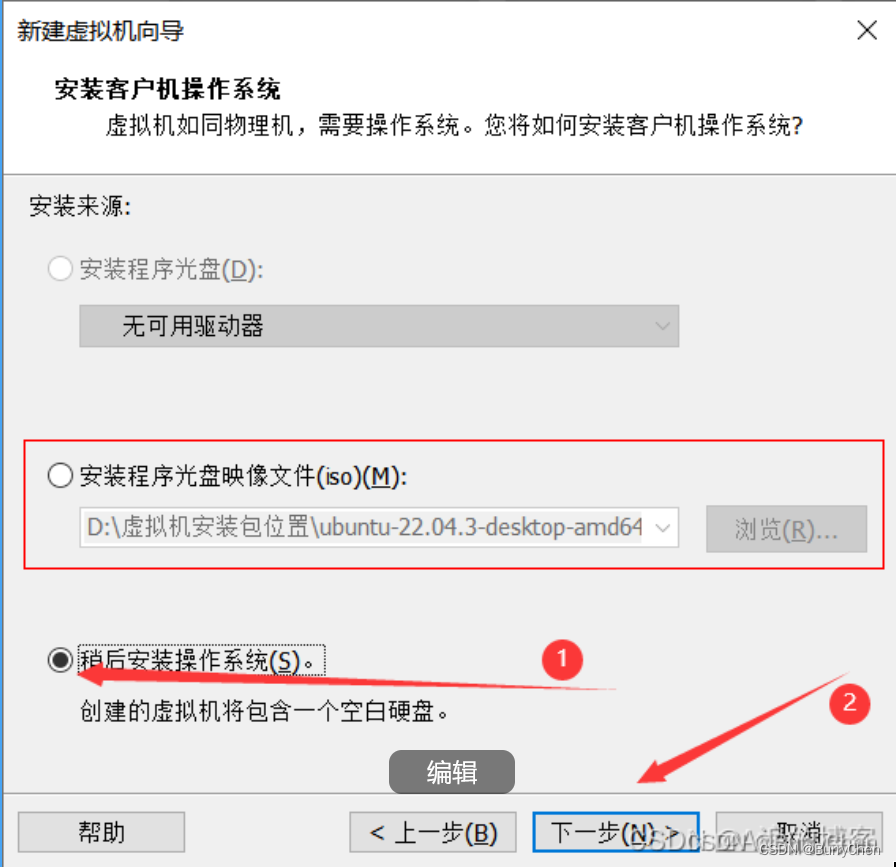
2)对于网络连不上的问题:a) 建议网线连接安装,b)还原虚拟网络编辑器,网络适配器配置选自定义,尝试解决


2. 常用软件安装
2.1 install_base_tools.sh
- sudo apt update
- sudo apt upgrade
- sudo apt-get install \
- vim \
- gedit \
- cmake \
- git \
- curl
2.2 应用商店直接搜索的软件:gitkraken,vscode
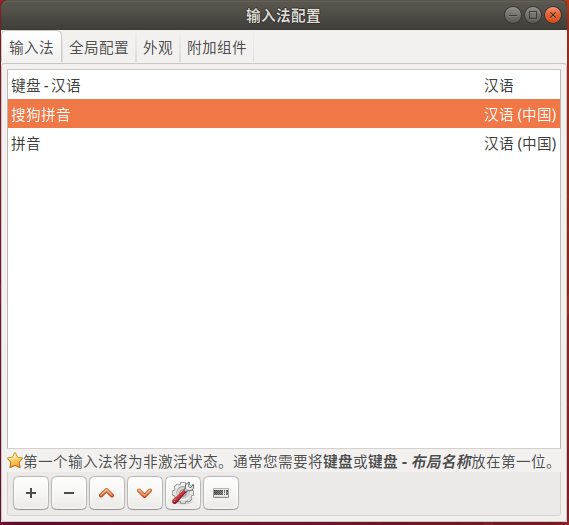
2.3 Ubuntu搜狗输入法安装指南
20.04 与搜狗输入法冲突,推荐自带拼音输入法
安装完成重启Ubuntu。
重启后,点击右上角小键盘-设置,调整一下输入法顺序。熟悉的输入感觉就来了。
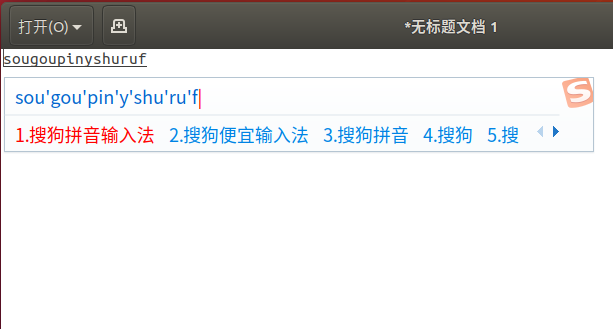
更改设置,点击输入操作条上的扳手按钮,可以设置皮肤,设置熟悉的习惯,还可以登录个人中心,同步个人词库。
2.4 Ubuntu install of ROS Noetic
https://www.cnblogs.com/chenjian688/p/13796546.html
官网的源太慢的话切换源
- #1、设置软件源
- sudo sh -c '. /etc/lsb-release && echo "deb http://mirrors.tuna.tsinghua.edu.cn/ros/ubuntu/ `lsb_release -cs` main" > /etc/apt/sources.list.d/ros-latest.list'
- #2、添加秘钥
- sudo apt-key adv --keyserver 'hkp://keyserver.ubuntu.com:80' --recv-key C1CF6E31E6BADE8868B172B4F42ED6FBAB17C654
- #3、更新源列表并安装
- sudo apt update
- sudo apt install ros-noetic-desktop-full
- #4、设置环境变量
- echo "source /opt/ros/noetic/setup.bash" >> ~/.bashrc
- source ~/.bashrc
-
- #注:ROS节点权限问题,运行某些节点需要管理员权限(涉及硬件),则也要在root用户中设置环境变量
- #1、切换root 用户,添加环境变量
- sudo su
- echo "source /opt/ros/noetic/setup.bash" >> ~/.bashrc
- source ~/.bashrc

2.3 IDE
vscode
VScode 搭建ROS开发环境并调试_tasks: configure tasks-CSDN博客
2.4 v*皮×N
fnff.one
在 Linux 下使用 Clash for Windows GUI | Clash for Windows 代理工具使用说明
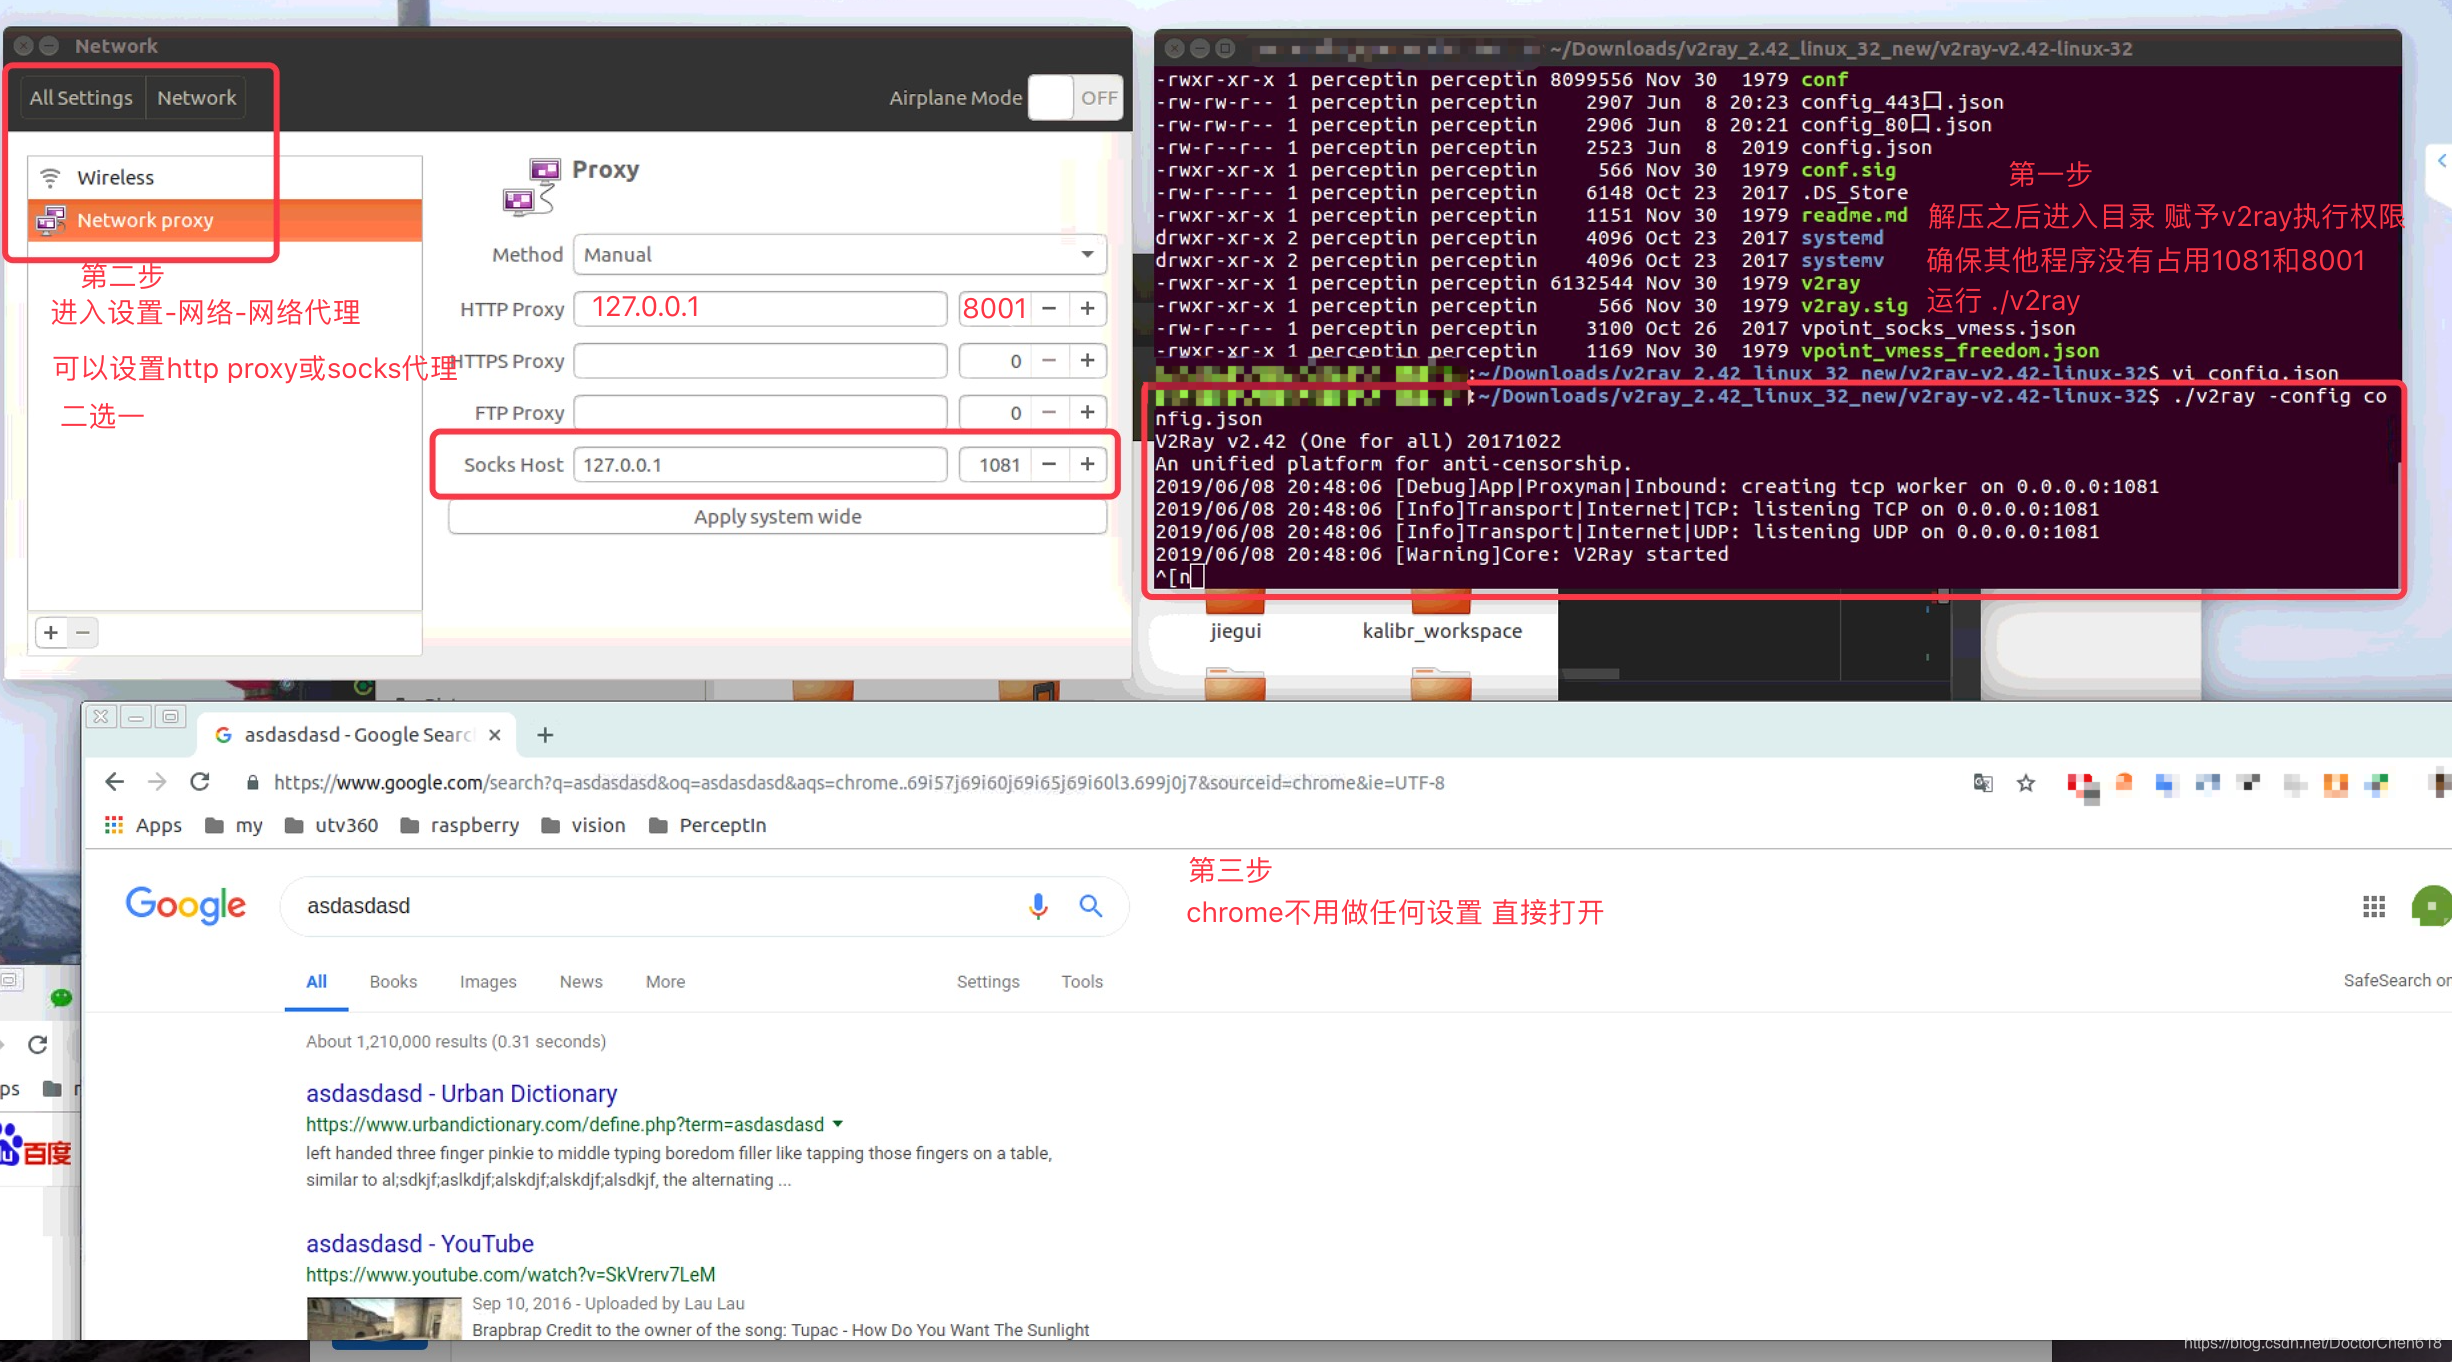
如果上述设置没有对terminal的env起作用,需要命令行再次设置,也可以直接写到.zshrc中
- env | grep -i proxy
- export http_proxy="http://127.0.0.1:8001";export https_proxy="http://127.0.0.1:8001"
-
- #取消代理
- unset http_proxy
- unset https_proxy
- # 如遇到apt不能使用代理的问题
- sudo https_proxy="http://127.0.0.1:8001" apt-get update
2.7 cloudcompare
1)安装
方式1:官网Ubuntu 的安装方法,建议
snap install cloudcompare方式2:源码编译安装
- git clone --recursive https://github.com/cloudcompare/trunk.git
- cd trunk
- mkdir build
- cd build
- cmake ..
- #cmake -DCATKIN_DEVEL_PREFIX=../devel -DCMAKE_INSTALL_PREFIX=../install ..
- make -j8
- sudo make install
CloudCompare - Open Source project
GitHub - CloudCompare/CloudCompare: CloudCompare main repository
https://blog.csdn.net/fangjin_kl/article/details/7891495
不能打开.pcd的解决方案:在 ccmake .. 后开启 INSTALL_QPCL_PLUGIN选项
2)cloudcompare 不能打开pcd文件,解决方案:
cmake 后,在build/CMakeCache.txt文件中,开启 INSTALL_QPCL_PLUGIN选项,然后make install 编译安装。
具体如下,打开build/CMakeCache.txt文件,317行"OFF"改为"ON"
- //Check to install qPCL plugin
- INSTALL_QPCL_PLUGIN:BOOL=OFF
修改为
- //Check to install qPCL plugin
- INSTALL_QPCL_PLUGIN:BOOL=ON
需要选取其他plugin,也可以对应开启
sudo hwclock --localtime --systohc2.10 Ubuntu 20.04 安装zsh/Oh My Zsh
- #查看当前shell
- echo $SHELL
- #安装zsh shell
- sudo apt install zsh
- #切换shell
- chsh -s /bin/zsh
- #安装oh-my-zsh
- sh -c "$(curl -fsSL https://raw.github.com/robbyrussell/oh-my-zsh/master/tools/install.sh)"
- #下载 zsh-syntax-highlighting 语法高亮插件
- git clone https://github.com/zsh-users/zsh-syntax-highlighting.git ${ZSH_CUSTOM:-~/.oh-my-zsh}/plugins/zsh-syntax-highlighting
- #下载 zsh-autosuggestions 自动提示插件
- git clone https://github.com/zsh-users/zsh-autosuggestions ${ZSH_CUSTOM:-~/.oh-my-zsh}/plugins/zsh-autosuggestions
- #配置.zshrc文件
- gedit ~/.zshrc
- #.zshrc中输入
- plugins=(git zsh-syntax-highlighting zsh-autosuggestions)
Ubuntu 18.04 安装配置Oh My Zsh 主题设置
- sudo apt install -y zsh
- wget https://github.com/robbyrussell/oh-my-zsh/raw/master/tools/install.sh -O - | sh
- # ubuntu18.04
- chsh -s /usr/bin/zsh
wps
sudo dpkg -i wps-office_10.1.0.5672~a21_amd64.debWPS for Linux(ubuntu)字体缺失解决办法(转)
2.11 matlab
Linux下安装Matlab R2017a超详细安装教程(带图文)
选择激活的license文件(install_path/licensesicense_standalone.lic)
2.12 usb抓包
- sudo modprobe usbmon
- sudo usbtop
2.13 mount
- cd /media/chenshoubin
- sudo mkdir nfs_data
- sudo chmod -R 777 nfs_data
- sudo busybox mount -o nolock -t nfs 10.10.20.190:/volume1/研究院/数据集/低速无人驾驶 /media/chenshoubin/nfs_data
-
- sudo mkdir nfs_home
- sudo chmod -R 777 nfs_home
- sudo busybox mount -o nolock -t nfs 10.10.20.190:/volume1/homes/xuanweizi /media/chenshoubin/nfs_home
2.21其他
gcc安装
命令:sudo apt-get install build-essential
http://www.cnblogs.com/zero1665/archive/2009/11/03/1595510.html
Adobe flash player
sudo apt-get install flashplugin-installer
qt
sudo apt-get install qt4-dev-tools #开发包 sudo apt-get install qtcreator #IDE sudo apt-get install qt4-doc #开发帮助文档 (可以省略) sudo apt-get install qt4-qtconfig #配置工具 sudo apt-get install qt4-demos #DEMO源码 QT (可以省略)
meshlab
装qt。在主页找到linux下meshlab的安装包,然后再按安装压缩包中的readme文件去做。可执行文件meshlab在目录meshlab/src/distrib下
subversion(svn)
$ sudo apt-get install subversion $ sudo apt-get install libapache2-svn
teamviewer Ubuntu 16.04 安装teamviewer
sudo apt install f
sudo apt install teamviewer_13.0.9865_amd64.deb
3. System settings 及小工具
3.1 camera LUMIX 硬盘连接
sudo apt-get install exfat-fuse exfat-utils
参考:
1. https://jingyan.baidu.com/article/3c48dd348bc005e10be358eb.html
2. https://blog.csdn.net/zhangxiangweide/article/details/74779652
3. https://blog.csdn.net/IT_Java8/article/details/51440993
3.2 usb带宽使用情况
- sudo modprobe usbmon
- sudo usbtop
3.3 录屏
- sudo apt install kazam
- kazam
3.4 Linux下多窗口分屏式终端--Terminator
sudo apt-get install terminator常用快捷键
Ctrl+Shift+E 垂直分割窗口
Ctrl+Shift+O 水平分割窗口
F11 全屏
Ctrl+Shift+C 复制
Ctrl+Shift+V 粘贴
Ctrl+Shift+N 或者 Ctrl+Tab 在分割的各窗口之间切换
Ctrl+Shift+X 将分割的某一个窗口放大至全屏使用
Ctrl+Shift+Z 从放大至全屏的某一窗口回到多窗格界面
- #1、添加源
- sudo add-apt-repository ppa:fossfreedom/indicator-sysmonitor
- #2、更新源
- sudo apt-get update
- #3、安装sysmonitior
- sudo apt-get install indicator-sysmonitor
- #终端执行:
- indicator-sysmonitor &
4. 代码开发工作空间
4.1 空间管理
1) 创建工作空间
- #创建一个catkin工作空间:
- mkdir -p ~/catkin_ws/src
- cd ~/catkin_ws/src
- catkin_init_workspace
-
- #即使这个工作空间是空的,你仍然可以“编译”这个工作空间:
- cd ~/catkin_ws/
- catkin_make
-
- source devel/setup.bash
2) 把对应源码copy 或者未git clone到src文件中
3) cmake 或 kDE 编译
- cd /home/account/slam_ws/build/xsens_node
-
- # cmake ..
- cmake -DCMAKE_BUILD_TYPE=Release -DCATKIN_DEVEL_PREFIX=/home/account/slam_ws/devel -DCMAKE_INSTALL_PREFIX=/home/account/slam_ws/install /home/account/slam_ws/src/xsens_node/
- make -j8
- # make install -j8
或 catkin_make
- cd /home/account/slam_ws
-
- #catkin_make -DCATKIN_WHITELIST_PACKAGES="xsens_node" --build='/home/chenshoubin/slam_ws/build/xsens_node'
- catkin_make -DCATKIN_WHITELIST_PACKAGES="xsens_node" --build='/home/chenshoubin/slam_ws/build/xsens_node' -DCATKIN_DEVEL_PREFIX=/home/chenshoubin/slam_ws/devel -DCMAKE_INSTALL_PREFIX=/home/chenshoubin/slam_ws/install install
-
- #lv_slam
- catkin_make -DCATKIN_WHITELIST_PACKAGES="lv_slam" --build='/home/chenshoubin/slam_ws/build/lv_slam' -DCATKIN_DEVEL_PREFIX=/home/chenshoubin/slam_ws/devel -DCMAKE_INSTALL_PREFIX=/home/chenshoubin/slam_ws/install install
https://www.cnblogs.com/qixianyu/p/6605830.html
4.2 debug gdb
1. launch 文件中 使用 launch-prefix="xterm -e gdb --args"
<node pkg="loam_velodyne" type="multiScanRegistration" name="multiScanRegistration" output="screen" launch-prefix="xterm -e gdb --args" />
[1] gdb调试ros node
[2] GDB基本命令(整合)
[3]GDB十分钟教程
5. 第三方依赖库lib
5.1 lv_slam lib
sudo apt-get install ros-noetic-geodesy ros-noetic-nmea-msgs
1) g2o
源代码文件组织不规范,一定安装在默认路径下才能便于工程的cmakelist.txt查找库.
master 一直在维护更新,要注意使用旧版本.
- sudo apt-get install cmake libeigen3-dev libsuitesparse-dev qtdeclarative5-dev qt5-qmake libqglviewer-dev-qt5 libcxsparse3 libcholmod3
- # install to a default path
- git clone https://github.com/RainerKuemmerle/g2o.git
- cd g2o
- git checkout a48ff8c
- mkdir build && cd build
- cmake .. -DCMAKE_BUILD_TYPE=RELEASE
- make -j8
- sudo make install
2) DBoW3
DBoW3 only requires OpenCV.
- # install to a gived path
- git clone https://github.com/rmsalinas/DBow3
- cd DBow3
- mkdir build && cd build
- cmake -DCMAKE_BUILD_TYPE=Release -DCATKIN_DEVEL_PREFIX=../devel -DCMAKE_INSTALL_PREFIX=../install ..
- make -j8
- sudo make install
如果遇到如下错误:
/usr/bin/ld: /home/chenshoubin/tools/DBow3/install/lib/libDBoW3.a(Database.cpp.o): relocation R_X86_64_PC32 against symbol `_ZTVN5DBoW38DatabaseE' can not be used when making a shared object; recompile with -fPIC
/usr/bin/ld: final link failed: Bad value
collect2: error: ld returned 1 exit status
解决方法如下:
将DBoW3/CMakeLists.txt源码文件下的代码:
- PROJECT(DBoW3)
- set(PROJECT_VERSION "0.0.1")
修改为:
- PROJECT(DBoW3)
- set(CMAKE_CXX_FLAGS "-fPIC")
- set(CMAKE_C_FLAGS "-fPIC")
- set(PROJECT_VERSION "0.0.1")
重新编译DBoW3
3) Sophus
GitHub - strasdat/Sophus: C++ implementation of Lie Groups using Eigen.
早期为非模板的Sophus库,只提供双精度的李群李代数类. 后续版本写成了模板类,如最新的master.注意区分.
基于Eigen开发,不需要额外依赖库.
- # install to a gived path
- git clone https://github.com/strasdat/Sophus.git
- cd Sophus
- # 非模板类的库
- git checkout a621ff2
- mkdir build && cd build
- cmake -DCMAKE_BUILD_TYPE=Release -DCATKIN_DEVEL_PREFIX=../devel -DCMAKE_INSTALL_PREFIX=../install ..
- make -j8
- sudo make install
在终端中执行make后,出现以下错误: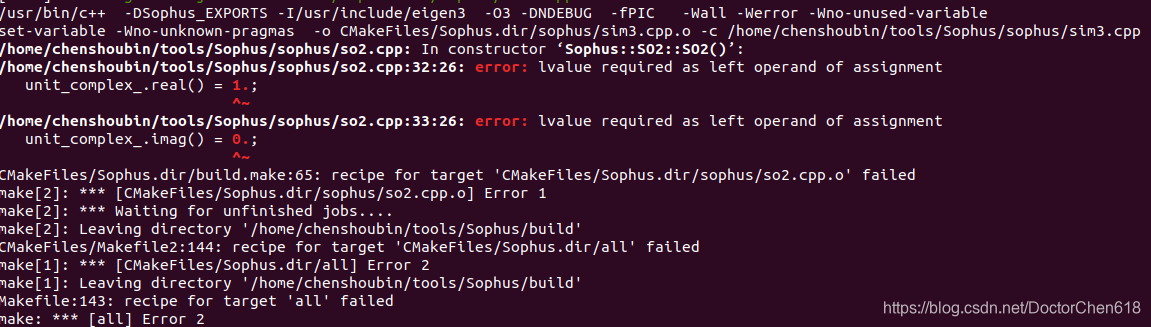
即出现错误:
/home/xq/Sophus/sophus/so2.cpp:32:26: error: lvalue required as left operand of assignment
unit_complex_.real() = 1.;
/home/xq/Sophus/sophus/so2.cpp:33:26: error: lvalue required as left operand of assignment
unit_complex_.imag() = 0.;
解决方法如下:
将so2.cpp源码文件下的代码:
SO2::SO2()
{
unit_complex_.real() = 1.;
unit_complex_.imag() = 0.;
}
修改为:
SO2::SO2()
{
//unit_complex_.real() = 1.;
//unit_complex_.imag() = 0.;
unit_complex_.real(1.);
unit_complex_.imag(0.);
}
重新编译Sophus4
4)PCL
ros安装时自带PCL,neotic 对应v1.10,可能出现错误:
/usr/include/pcl-1.10/pcl/pcl_config.h:7:4: error: #error PCL requires C++14 or above
![]()
在工作空间下的CMakeLists.txt文件中添加以下指令即可:![]()
操作后继而造成boost函数错误,gicp_omp.h中添加boost头文件: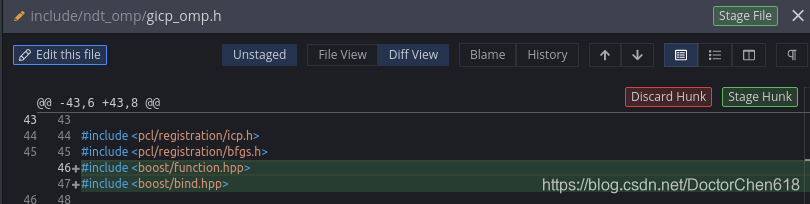
5.2 其他
1. ceres
http://www.ceres-solver.org/installation.html#linux 下载 ceres-solver-1.14.0.tar.gz并解压
install all the dependencies.
- # CMake
- sudo apt-get install cmake
- # google-glog + gflags
- sudo apt-get install libgoogle-glog-dev
- # BLAS & LAPACK
- sudo apt-get install libatlas-base-dev
- # Eigen3
- sudo apt-get install libeigen3-dev
- # SuiteSparse and CXSparse (optional)
- # - If you want to build Ceres as a *static* library (the default)
- # you can use the SuiteSparse package in the main Ubuntu package
- # repository:
- sudo apt-get install libsuitesparse-dev
- # - However, if you want to build Ceres as a *shared* library, you must
- # add the following PPA:
- sudo add-apt-repository ppa:bzindovic/suitesparse-bugfix-1319687
- sudo apt-get update
- sudo apt-get install libsuitesparse-dev
install Ceres.
- # install to a gived path
- cd ceres-solver-1.14.0
- mkdir build && cd build
- cmake -DCMAKE_BUILD_TYPE=Release -DCATKIN_DEVEL_PREFIX=../devel -DCMAKE_INSTALL_PREFIX=../install ..
- make -j8
- sudo make install
2. opencv
根据需要选取版本
- # install to a gived path
- cd ~/<my_working_directory>
- git clone https://github.com/opencv/opencv.git
- git clone https://github.com/opencv/opencv_contrib.git
- # or download from https://opencv.org/releases
- cd opencv
- mkdir build && cd build
- cmake -DCMAKE_BUILD_TYPE=Release -DCATKIN_DEVEL_PREFIX=../devel -DCMAKE_INSTALL_PREFIX=../install ..
- make -j12
- sudo make install
6. sensor driver
6.1 RS-LiDAR-16 ROS Package
1) 下载并安装 libpcap-dev.用于抓包,RS-LiDAR-16 ROS Package的依赖库
- sudo apt-get update
- sudo apt-get install flex bison byacc
-
- // 官网下载 http://www.tcpdump.org源码包并解压
- // 或者 git clone https://github.com/the-tcpdump-group/libpcap.git
- cd libpcap-x.x.x
- ./configure
- make
- sudo make install
问题:error while loading shared libraries: libpcap.so.1: cannot open shared object file: No such file or directory
通过搜索在/usr/local/lib目录下有 libpcap.so.1文件。同时可以搜索到ubunut20.04系统自带/usr/lib/x86_64-linux-gnu/libpcap.so.1.9.1,但是使用自带的所在路径并不能成功。
解决方法:
- sudo gedit /etc/ld.so.conf
- #添加两行
- /usr/local/lib
- /usr/lib
- #然后在终端下执行从新加载配置的命令:
- ldconfig
2) 编译 RS-LiDAR-16 ROS Package
- cd /home/account/slam_ws/src
- git clone https://github.com/RoboSense-LiDAR/ros_rslidar
-
- cd /home/account/slam_ws
- catkin_make --build='/home/chenshoubin/slam_ws/build/ros_rslidar' -DCATKIN_DEVEL_PREFIX=/home/chenshoubin/slam_ws/devel -DCMAKE_INSTALL_PREFIX=/home/chenshoubin/slam_ws/install install
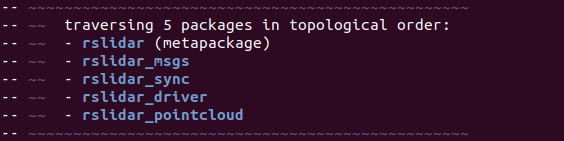
3) 注意:因为rslidar里面含有5个子工程包(如下图),使用cmake逐个编译太麻烦,因此使用了catkin_make一起编译.
问题是catkin_make可能会编译src下的其他packages.
解决方法1,暂时把其他packages转移出src,编译安装完再移回去.
解决方法2,指定编译白名单
catkin_make -DCATKIN_WHITELIST_PACKAGES="rslidar;rslidar_msgs;rslidar_sync;rslidar_driver;rslidar_pointcloud" --build='/home/chenshoubin/slam_ws/build/ros_rslidar' -DCATKIN_DEVEL_PREFIX=/home/chenshoubin/slam_ws/devel -DCMAKE_INSTALL_PREFIX=/home/chenshoubin/slam_ws/install install4)配置网络IP,启动ros节点
roslaunch rslidar_pointcloud rs_lidar_16.launch6.2 Azure_Kinect_ROS_Driver
1)下载libdepthengine.so.2.0文件
到网站中下载libk4a1.4里的deb文件 https://packages.microsoft.com/ubuntu/18.04/prod/pool/main/libk/
解压缩deb文件,获得libdepthengine.so.2.0,然后把libdepthengine.so.2.0复制到/usr/lib/x86_64-linux-gnu/文件夹中
2) Azure-Kinect-Sensor-SDK
命令行安装或者源码安装,推荐源码安装.
Azure Kinect 传感器 SDK 下载 | Microsoft Learn
ubuntu16.04\18.04安装Azure Kinect SDK+配置ros版 超全详细踩坑记录_failed to open k4a device at index 0-CSDN博客
- git clone https://github.com/microsoft/Azure-Kinect-Sensor-SDK.git
-
- cd Azure-Kinect-Sensor-SDK
- git checkout v1.4.1
- sudo ./scripts/bootstrap-ubuntu.sh ##有错误时可以手动install
- mkdir build
- cd build
- cmake .. -GNinja ##git clone 文件.gitmodules中的文件失败时打开网络代理
- ninja
- sudo ninja install
遇到git clone失败的情况,可以设置git代理
- // git 设置和取消代理
- git config --global http.proxy 'socks5://127.0.0.1:1080'
- git config --global https.proxy 'socks5://127.0.0.1:1080'
-
- git config --global --unset http.proxy
- git config --global --unset https.proxy
-
- # npm config delete proxy
3) 进入Azure Kinect sdk 源码根目录中 scripts 文件夹,复制99-k4a.rules文件至/etc/udev/rules.d/
- cp scripts/99-k4a.rules /etc/udev/rules.d/.
-
- #[ERROR] [1564506111.686955539]: Failed to open K4A device at index 0
- #修改文件权限
- sudo chmod 777 '/etc/udev/rules.d/99-k4a.rules'
-
- # launch
- k4aviewer
4)Azure_Kinect_ROS_Driver
- git clone https://github.com/microsoft/Azure_Kinect_ROS_Driver.git
- cd ..
- # slam_ws
- catkin_make -DCATKIN_WHITELIST_PACKAGES="azure_kinect_ros_driver" --build='/home/chenshoubin/slam_ws/build/azure_kinect_ros_driver' -DCATKIN_DEVEL_PREFIX=/home/chenshoubin/slam_ws/devel -DCMAKE_INSTALL_PREFIX=/home/chenshoubin/slam_ws/install
5) 启动ros node
- roslaunch azure_kinect_ros_driver driver.launch
- # 多相机同步
- roslaunch azure_kinect_ros_driver driver_sync.launch
driver.launch 中的<node name="robot_state_publisher" pkg="robot_state_publisher" type="state_publisher" />有error,改为
<node name="robot_state_publisher" pkg="robot_state_publisher" type="robot_state_publisher" />
新固件下载地址
https://github.com/microsoft/Azure-Kinect-Sensor-SDK/blob/develop/docs/usage.md
6.3 Autolaber 驱动包
1)驱动包和键盘控制包
官网http://www.autolabor.com.cn/download 下载驱动包和键盘控制包

http://www.autolabor.com.cn/lib/detail/12 视频介绍在 ROS 中使用 Autolabor ROS 键盘控制包,控制Autolabor Pro1行走。
- sudo chmod 777 /dev/ttyUSB0
- roslaunch autolabor_pro1_driver driver.launch
- #键盘控制
- roslaunch autolabor_pro1_driver keyboard_move.launch
- #1.安装joy package:
- sudo apt install ros-noetic-joy
-
- #2. 连接蓝牙,查看手柄
- ls -l /dev/input
- #查看手柄权限
- ls -l /dev/input/jsX
- #修改手柄权限,一次即可
- sudo chmod 777 /dev/input/jsX
-
- #3. 测试手柄节点
- #启动节点及查看消息
- rosrun joy joy_node
- rostopic echo joy
- #测试和校准
- sudo apt install jstest-gtk
- jstest-gtk
-
3)joy_to_twist 编译安装
可以根据按键操作习惯修改src源码
- git clone https:
- cd ..
- # slam_ws
- catkin_make -DCATKIN_WHITELIST_PACKAGES="joy_to_twist" --build='/home/chenshoubin/slam_ws/build/joy_to_twist' -DCATKIN_DEVEL_PREFIX=/home/chenshoubin/slam_ws/devel -DCMAKE_INSTALL_PREFIX=/home/chenshoubin/slam_ws/install
4)上位机手柄驱动Autolaber
Autolaber USB连接上位机,上位机蓝牙连接手柄,执行以下命令
- sudo chmod 777 /dev/ttyUSB0
- roslaunch autolabor_pro1_driver joystick_move.launch
7 cartographer
7.1 cartographer-ros
Compiling Cartographer ROS — Cartographer ROS documentation
1)ERROR 1
CMake Error at cmake/modules/FindLuaGoogle.cmake:217 (MESSAGE):
Did not find Lua >= 5.2.
sudo apt install liblua5.2-dev2)ERROR 2
如遇到python版本问题请切换
7.2 rplidar
rplidar Tutorial: Home · robopeak/rplidar_ros Wiki · GitHub

