
热门标签
热门文章
- 1自己对蓝桥杯的一点认识以及如何备赛总结_大三参加蓝桥杯晚吗
- 2QQ/微信防撤回插件
- 3idea集成Gitee详细步骤_idea整合gitee
- 4vscode找回代码
- 5模拟集成电路设计:Bandgap电路设计及版图实现
- 6Ubuntu 22.04 下安装 MySQL 8.0.30 以及 MySQL Workbench连接等问题_mysql-workbench-community-dbgsym
- 7常用的python库_textfilter 怎样使用
- 8python软件哪个版本好用,python哪个版本用得最多_python更新到哪个版本了
- 9实验室安全 考试 题库_如果得知有火,实验指导教师
- 10idea的这款代码提示插件爱了_idea ai代码提示插件
当前位置: article > 正文
【深度学习】YOLOv5,金属表面的缺陷检测,GC10-DET数据集
作者:Monodyee | 2024-04-27 07:21:08
赞
踩
【深度学习】YOLOv5,金属表面的缺陷检测,GC10-DET数据集
目录:
数据集
数据集地址:
https://github.com/lvxiaoming2019/GC10-DET-Metallic-Surface-Defect-Datasets
数据集下载方式:
Download link:https://pan.baidu.com/s/1Zrd-gzfVhG6oKdVSa9zoPQ Verify Code:cdyt
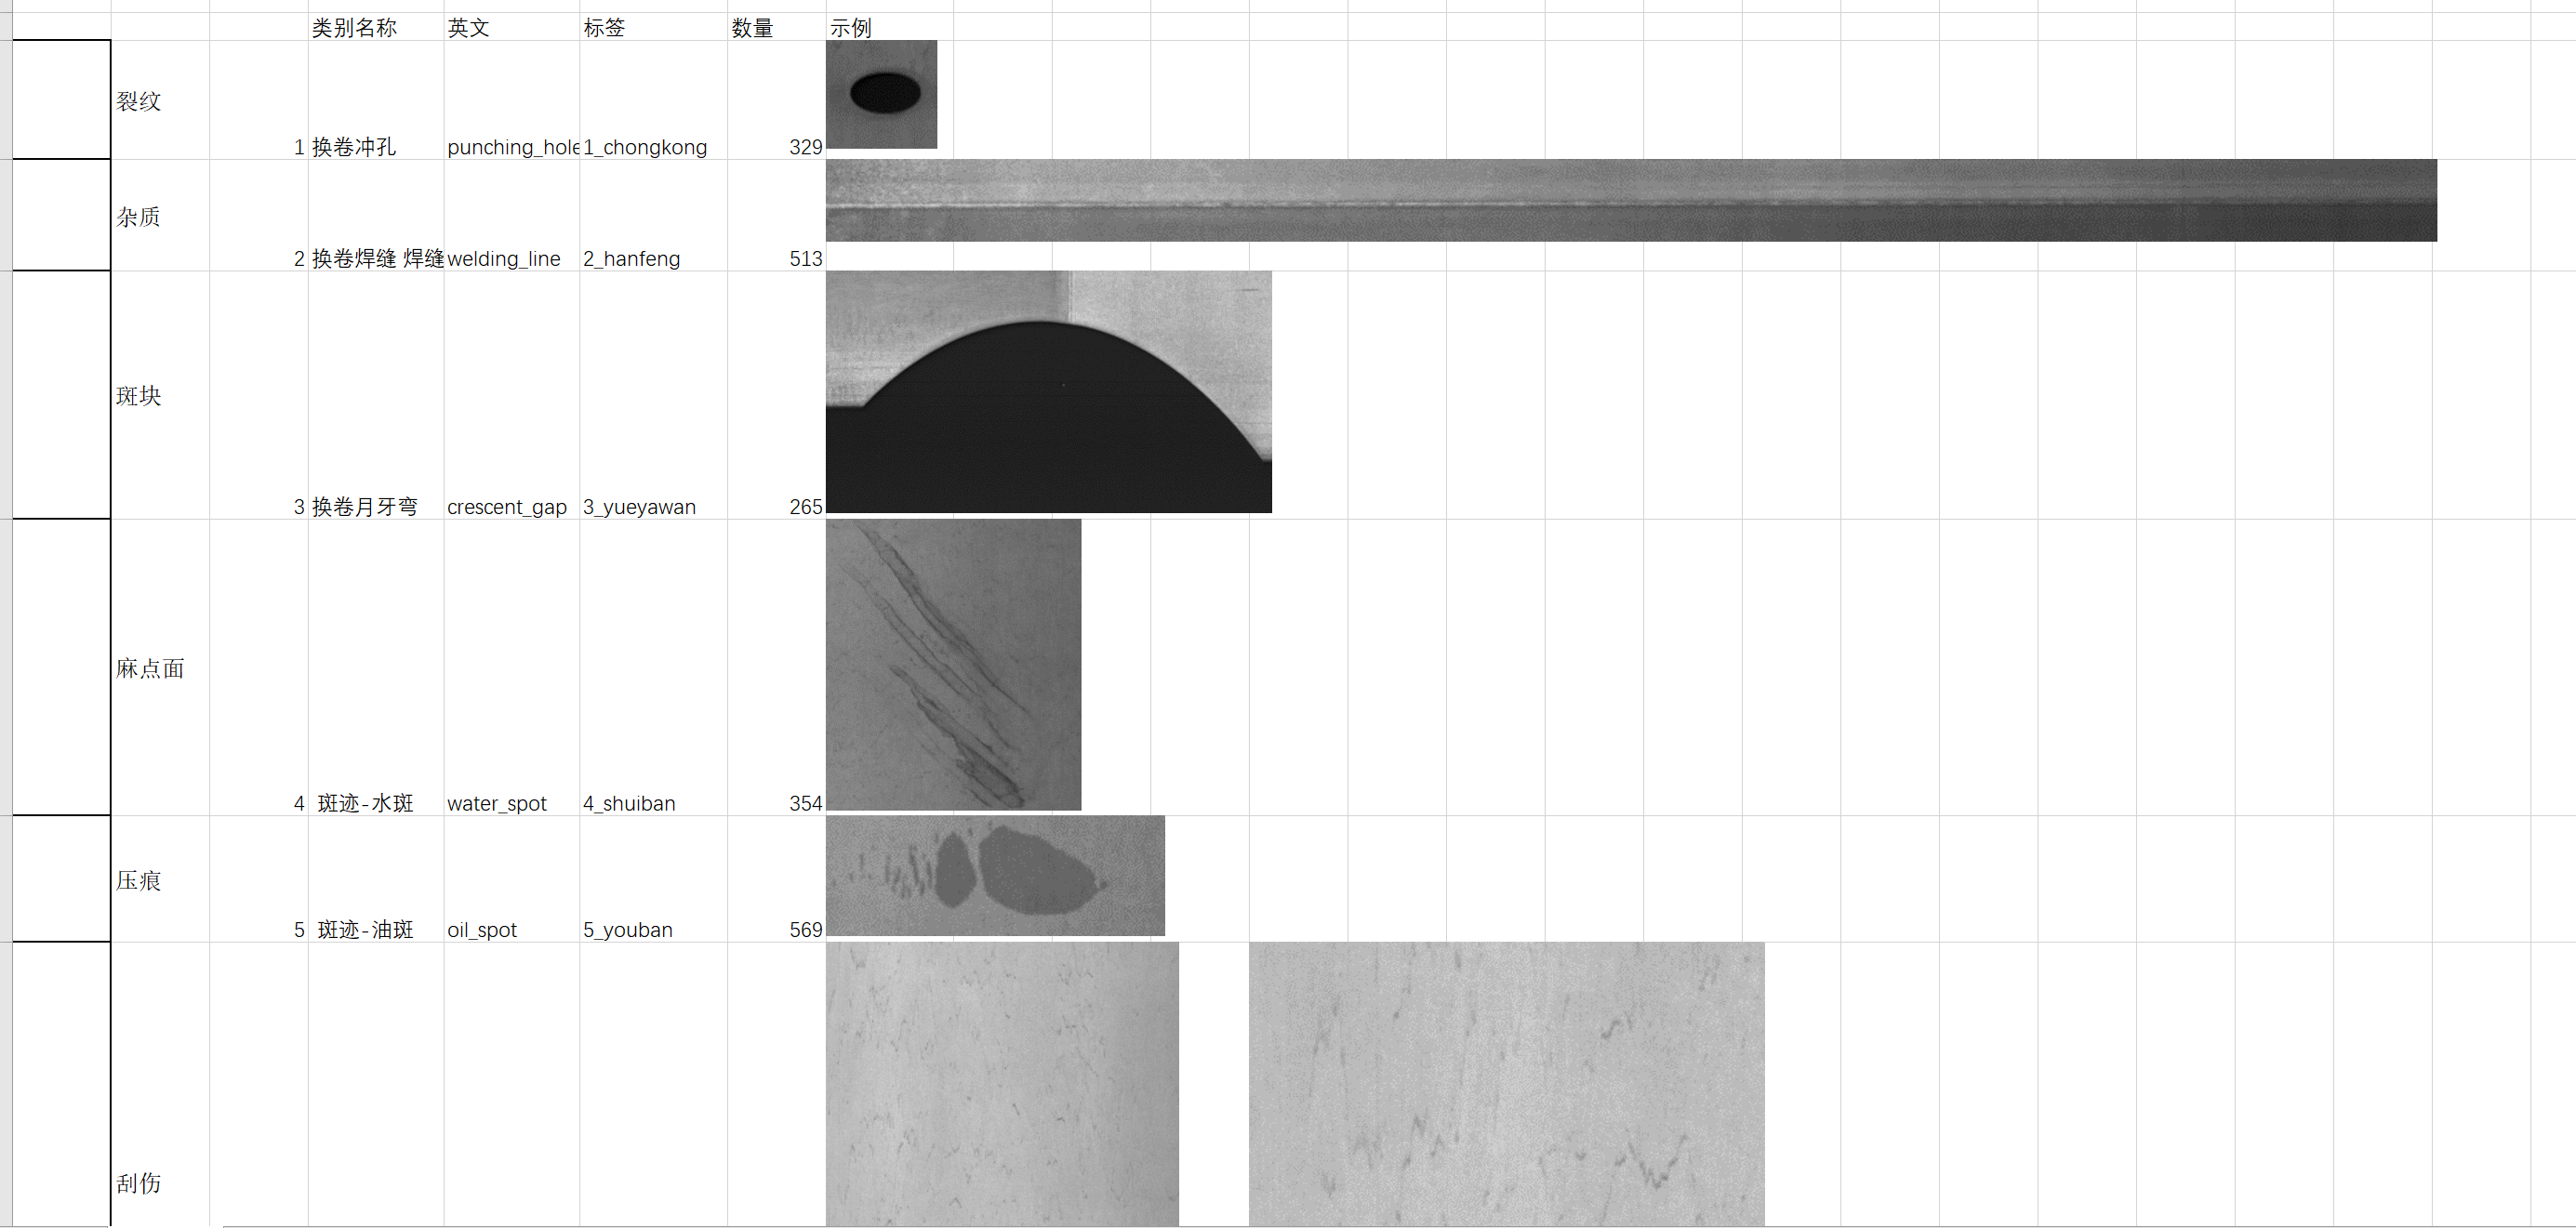
其中有个excel,写了介绍:此数据集一共10种金属缺陷,每一种有多少张图也写在excel了:
数据集转换
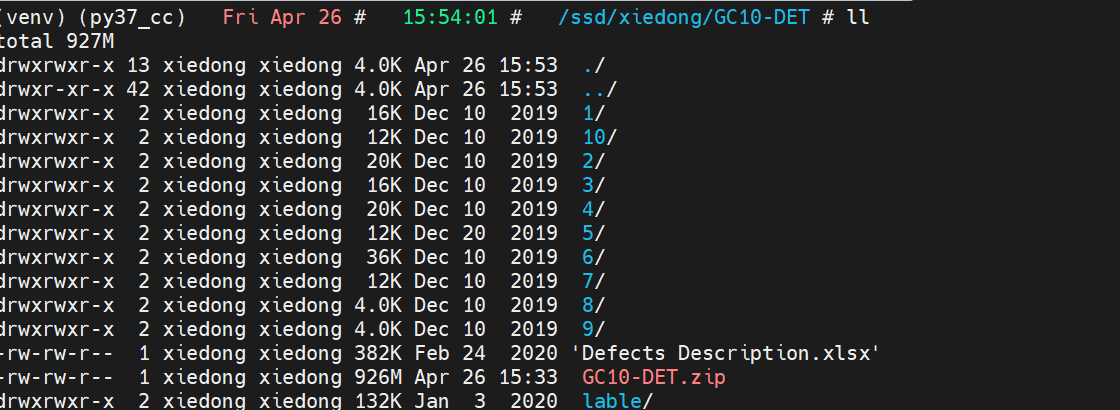
数据集的lable文件夹下是每个图片的框和类别标记,是xml格式。
运行下面这个代码,可以直接将数据集直接转为yolov5格式:
import os
import shutil


def listPathAllfiles(dirname):
    result = []
    for maindir, subdir, file_name_list in os.walk(dirname):
        for filename in file_name_list:
            apath = os.path.join(maindir, filename)
            result.append(apath)
    return result


# 所有label文件转换后给到labels文件夹,txt文件
import xml.etree.ElementTree as ET
import os
import shutil
import random
import cv2

classes = """1_chongkong
2_hanfeng
3_yueyawan
4_shuiban
5_youban
6_siban
7_yiwu
8_yahen
9_zhehen
10_yaozhe""".split("\n")

xmldir = r"/ssd/xiedong/GC10-DET/lable"
img_src_dir = r"/ssd/xiedong/GC10-DET"

txtdir = r"/ssd/xiedong/GC10-DET_yolov5/labels"
imgdir = r"/ssd/xiedong/GC10-DET_yolov5/images"
os.system("rm -rf " + txtdir)
os.system("rm -rf " + imgdir)
os.makedirs(txtdir, exist_ok=True)
os.makedirs(imgdir, exist_ok=True)


def convert_annotation(img_id_filename):
    image_id = img_id_filename.split(".")[0]

    # in_file = open(xmldir + '%s.xml' % (image_id), encoding='UTF-8')
    in_file = open(os.path.join(xmldir, '%s.xml' % (image_id)), encoding='UTF-8')
    # out_file = open(txtdir + '%s.txt' % (image_id), 'w', encoding='UTF-8')
    out_file = open(os.path.join(txtdir, '%s.txt' % (image_id)), 'w', encoding='UTF-8')
    tree = ET.parse(in_file)
    root = tree.getroot()
    size = root.find('size')
    size_width = int(size.find('width').text)
    size_height = int(size.find('height').text)
    ix = 0
    for obj in root.iter('object'):
        difficult = obj.find('difficult').text
        cls = obj.find('name').text
        if cls not in classes or int(difficult) == 1:
            continue
        cls_id = classes.index(cls)
        xmlbox = obj.find('bndbox')
        b = [float(xmlbox.find('xmin').text), float(xmlbox.find('xmax').text), float(xmlbox.find('ymin').text),
             float(xmlbox.find('ymax').text)]
        if size_width == 0 or size_height == 0:
            print("不合理的图,程序会删除这张图", image_id)
            continue

        # 标注越界修正
        if b[1] > size_width:
            b[1] = size_width
        if b[3] > size_height:
            b[3] = size_height
        txt_data = [((b[0] + b[1]) / 2.0 - 1) / size_width, ((b[2] + b[3]) / 2.0 - 1) / size_height,
                    (b[1] - b[0]) / size_width, (b[3] - b[2]) / size_height]
        out_file.write(str(cls_id) + " " + " ".join([str(a) for a in txt_data]) + '\n')

    in_file.close()
    out_file.close()


xmllist = os.listdir(xmldir)
for img_id in xmllist:
    convert_annotation(img_id)

img_sub_list_all = []
for i in range(1, 11):
    img_src_sub_dir = os.path.join(img_src_dir, str(i))
    img_sub_list = os.listdir(img_src_sub_dir)
    img_sub_list_all.extend(img_sub_list)

all_imgs = listPathAllfiles(img_src_dir)
textlist = os.listdir(txtdir)
print(len(textlist))
for x in textlist:
    x1 = x.split(".")[0] + ".jpg"
    if x1 not in img_sub_list_all:
        print("不可能打印我")
        continue
    for x2 in all_imgs:
        if x1 in x2:
            shutil.copy(x2, imgdir)

imgdir_files = os.listdir(imgdir)
print(len(imgdir_files))
- 1
- 2
- 3
- 4
- 5
- 6
- 7
- 8
- 9
- 10
- 11
- 12
- 13
- 14
- 15
- 16
- 17
- 18
- 19
- 20
- 21
- 22
- 23
- 24
- 25
- 26
- 27
- 28
- 29
- 30
- 31
- 32
- 33
- 34
- 35
- 36
- 37
- 38
- 39
- 40
- 41
- 42
- 43
- 44
- 45
- 46
- 47
- 48
- 49
- 50
- 51
- 52
- 53
- 54
- 55
- 56
- 57
- 58
- 59
- 60
- 61
- 62
- 63
- 64
- 65
- 66
- 67
- 68
- 69
- 70
- 71
- 72
- 73
- 74
- 75
- 76
- 77
- 78
- 79
- 80
- 81
- 82
- 83
- 84
- 85
- 86
- 87
- 88
- 89
- 90
- 91
- 92
- 93
- 94
- 95
- 96
- 97
- 98
- 99
- 100
- 101
- 102
- 103
- 104
- 105
- 106
下载yolov5
下载yolov5
git clone https://github.com/ultralytics/yolov5.git
cd yolov5/
- 1
- 2
创建环境:
conda create -n py310_yolov5 python=3.10 -y
conda activate py310_yolov5
- 1
- 2
- 3
装一个可以用的torch:
# CUDA 11.8
conda install pytorch==2.1.2 torchvision==0.16.2 torchaudio==2.1.2 pytorch-cuda=11.8 -c pytorch -c nvidia
- 1
- 2
- 3
- 4
取消这2个:

然后安装一些别的包:
pip install -r requirements.txt # install
- 1
随后更多内容参考官网这里的训练指导:
https://docs.ultralytics.com/zh/yolov5/tutorials/train_custom_data/#before-you-start
创建 dataset.yaml
创建文件:
cd yolov5/data
cp coco128.yaml jinshu.yaml
- 1
- 2
- 3
将fire_smoke.yaml修改为这样:
path: /ssd/xiedong/GC10-DET_yolov5
train: images
val: images
test: # test images (optional)

# Classes
names:
  0: 1_chongkong
  1: 2_hanfeng
  2: 3_yueyawan
  3: 4_shuiban
  4: 5_youban
  5: 6_siban
  6: 7_yiwu
  7: 8_yahen
  8: 9_zhehen
  9: 10_yaozhe
- 1
- 2
- 3
- 4
- 5
- 6
- 7
- 8
- 9
- 10
- 11
- 12
- 13
- 14
- 15
- 16
- 17
- 18
训练参数
使用python train.py --help查看训练参数:
# python train.py --help
警告 ⚠️ Ultralytics 设置已重置为默认值。这可能是由于您的设置存在问题或最近 Ultralytics 包更新导致的。
使用 'yolo settings' 命令或查看 '/home/xiedong/.config/Ultralytics/settings.yaml' 文件来查看设置。
使用 'yolo settings key=value' 命令来更新设置,例如 'yolo settings runs_dir=path/to/dir'。更多帮助请参考 https://docs.ultralytics.com/quickstart/#ultralytics-settings。
用法: train.py [-h] [--weights WEIGHTS] [--cfg CFG] [--data DATA] [--hyp HYP] [--epochs EPOCHS] [--batch-size BATCH_SIZE] [--imgsz IMGSZ] [--rect] [--resume [RESUME]]
                [--nosave] [--noval] [--noautoanchor] [--noplots] [--evolve [EVOLVE]] [--evolve_population EVOLVE_POPULATION] [--resume_evolve RESUME_EVOLVE]
                [--bucket BUCKET] [--cache [CACHE]] [--image-weights] [--device DEVICE] [--multi-scale] [--single-cls] [--optimizer {SGD,Adam,AdamW}] [--sync-bn]
                [--workers WORKERS] [--project PROJECT] [--name NAME] [--exist-ok] [--quad] [--cos-lr] [--label-smoothing LABEL_SMOOTHING] [--patience PATIENCE]
                [--freeze FREEZE [FREEZE ...]] [--save-period SAVE_PERIOD] [--seed SEED] [--local_rank LOCAL_RANK] [--entity ENTITY] [--upload_dataset [UPLOAD_DATASET]]
                [--bbox_interval BBOX_INTERVAL] [--artifact_alias ARTIFACT_ALIAS] [--ndjson-console] [--ndjson-file]

选项:
  -h, --help            显示帮助信息并退出
  --weights WEIGHTS     初始权重路径
  --cfg CFG             模型配置文件路径
  --data DATA           数据集配置文件路径
  --hyp HYP             超参数路径
  --epochs EPOCHS       总训练轮数
  --batch-size BATCH_SIZE
                        所有 GPU 的总批量大小,-1 表示自动批处理
  --imgsz IMGSZ, --img IMGSZ, --img-size IMGSZ
                        训练、验证图像大小(像素)
  --rect                矩形训练
  --resume [RESUME]     恢复最近的训练
  --nosave              仅保存最终检查点
  --noval               仅验证最终轮次
  --noautoanchor        禁用 AutoAnchor
  --noplots             不保存绘图文件
  --evolve [EVOLVE]     为 x 代演进超参数
  --evolve_population EVOLVE_POPULATION
                        加载种群的位置
  --resume_evolve RESUME_EVOLVE
                        从上一代演进恢复
  --bucket BUCKET       gsutil 存储桶
  --cache [CACHE]       图像缓存 ram/disk
  --image-weights       在训练时使用加权图像选择
  --device DEVICE       cuda 设备,例如 0 或 0,1,2,3 或 cpu
  --multi-scale         图像大小变化范围为 +/- 50%
  --single-cls          将多类数据作为单类训练
  --optimizer {SGD,Adam,AdamW}
                        优化器
  --sync-bn             使用 SyncBatchNorm,仅在 DDP 模式下可用
  --workers WORKERS     最大数据加载器工作进程数(每个 DDP 模式中的 RANK)
  --project PROJECT     保存到项目/名称
  --name NAME           保存到项目/名称
  --exist-ok            存在的项目/名称正常,不增加
  --quad                四通道数据加载器
  --cos-lr              余弦学习率调度器
  --label-smoothing LABEL_SMOOTHING
                        标签平滑 epsilon
  --patience PATIENCE   EarlyStopping 耐心(未改善的轮次)
  --freeze FREEZE [FREEZE ...]
                        冻结层:backbone=10, first3=0 1 2
  --save-period SAVE_PERIOD
                        每 x 轮保存检查点(如果 < 1 则禁用)
  --seed SEED           全局训练种子
  --local_rank LOCAL_RANK
                        自动 DDP 多 GPU 参数,不要修改
  --entity ENTITY       实体
  --upload_dataset [UPLOAD_DATASET]
                        上传数据,"val" 选项
  --bbox_interval BBOX_INTERVAL
                        设置边界框图像记录间隔
  --artifact_alias ARTIFACT_ALIAS
                        要使用的数据集 artifact 版本
  --ndjson-console      将 ndjson 记录到控制台
  --ndjson-file         将 ndjson 记录到文件
- 1
- 2
- 3
- 4
- 5
- 6
- 7
- 8
- 9
- 10
- 11
- 12
- 13
- 14
- 15
- 16
- 17
- 18
- 19
- 20
- 21
- 22
- 23
- 24
- 25
- 26
- 27
- 28
- 29
- 30
- 31
- 32
- 33
- 34
- 35
- 36
- 37
- 38
- 39
- 40
- 41
- 42
- 43
- 44
- 45
- 46
- 47
- 48
- 49
- 50
- 51
- 52
- 53
- 54
- 55
- 56
- 57
- 58
- 59
- 60
- 61
- 62
- 63
- 64
- 65
- 66
- 67
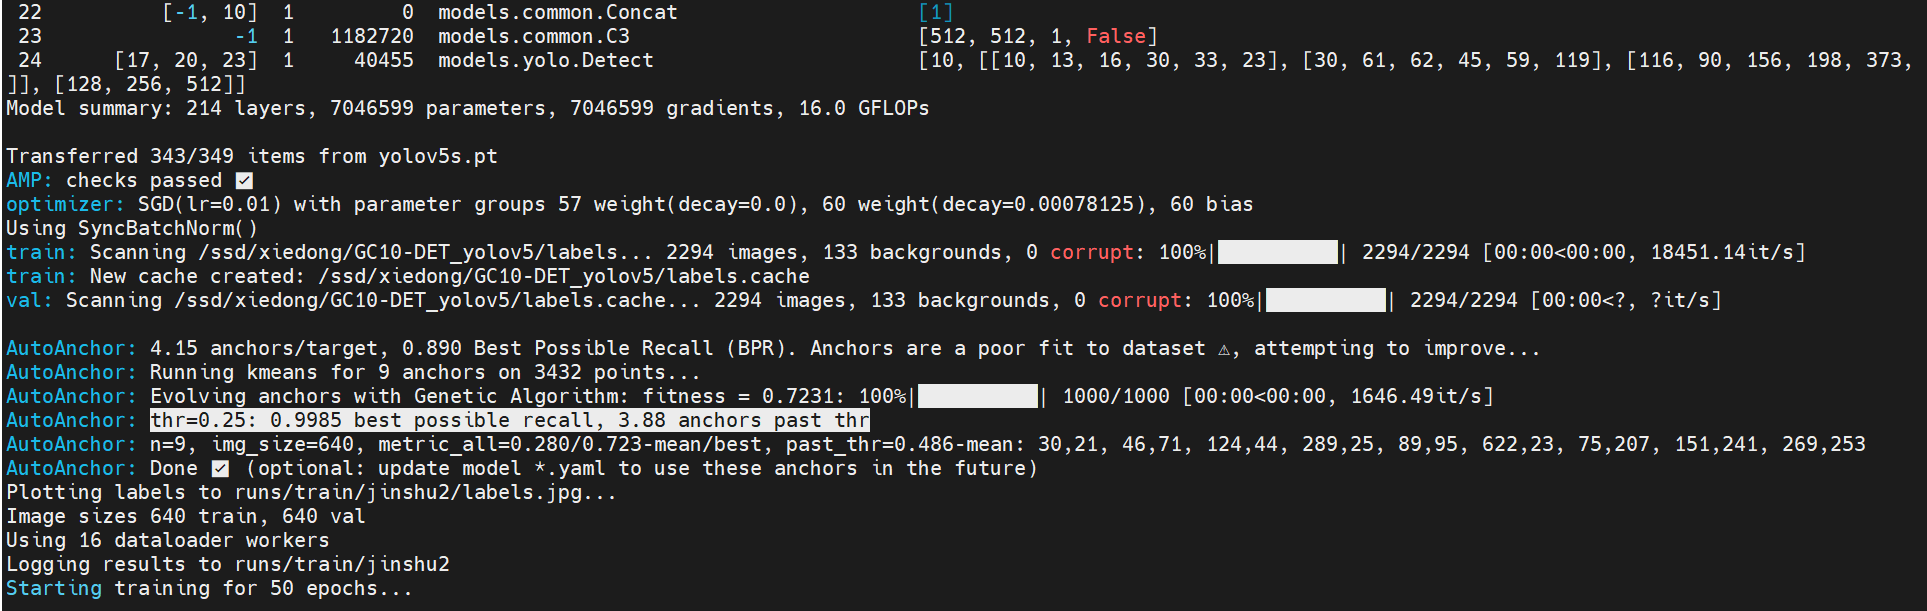
开始训练
多卡训练:
python -m torch.distributed.run --nproc_per_node 2 train.py --weights yolov5s.pt --data jinshu.yaml --batch-size 100 --epochs 50 --img 640 --sync-bn --name jinshu --cos-lr --device 0,1
- 1
- 2

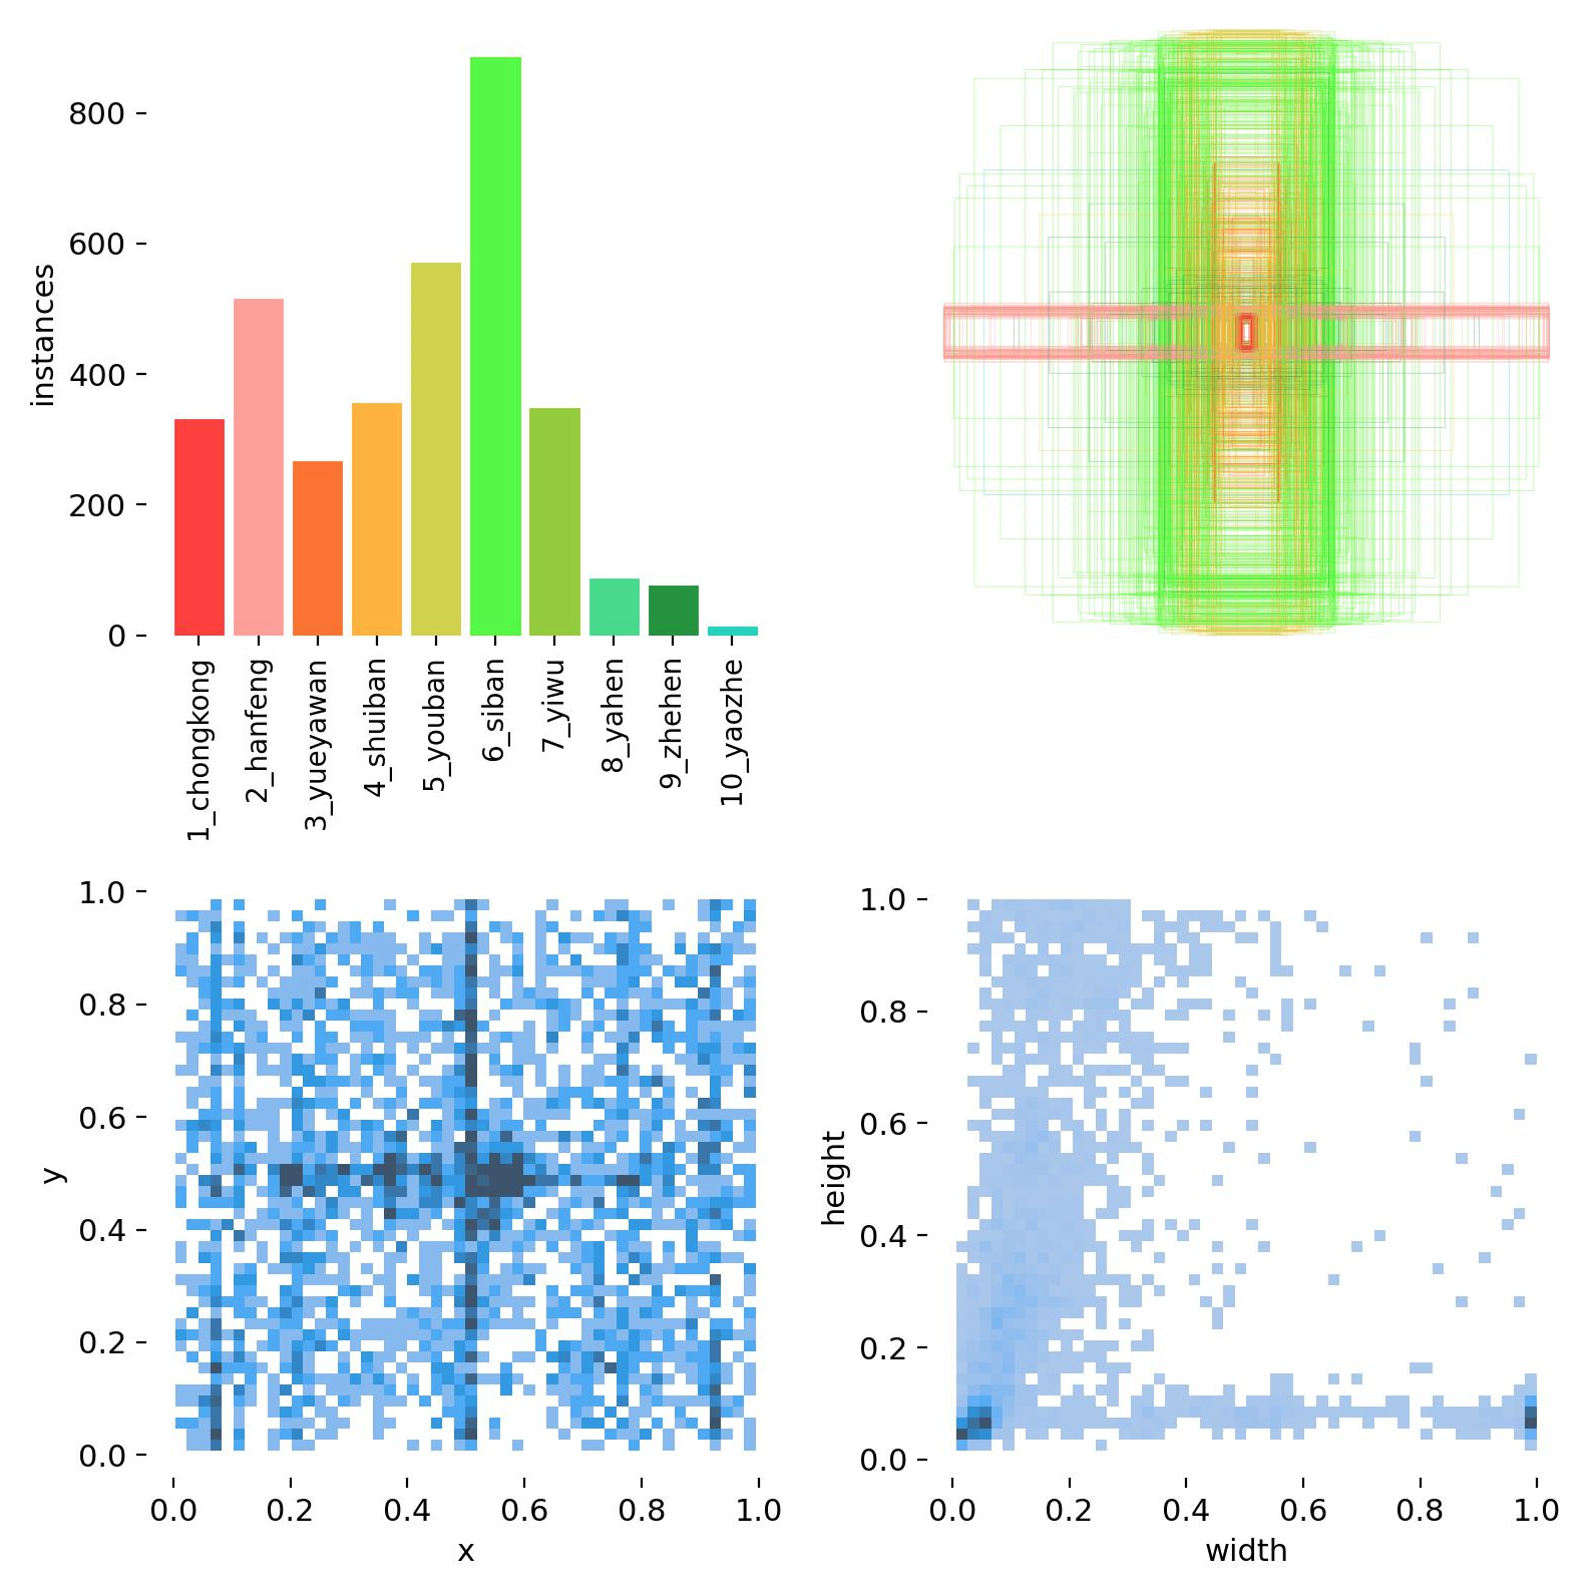
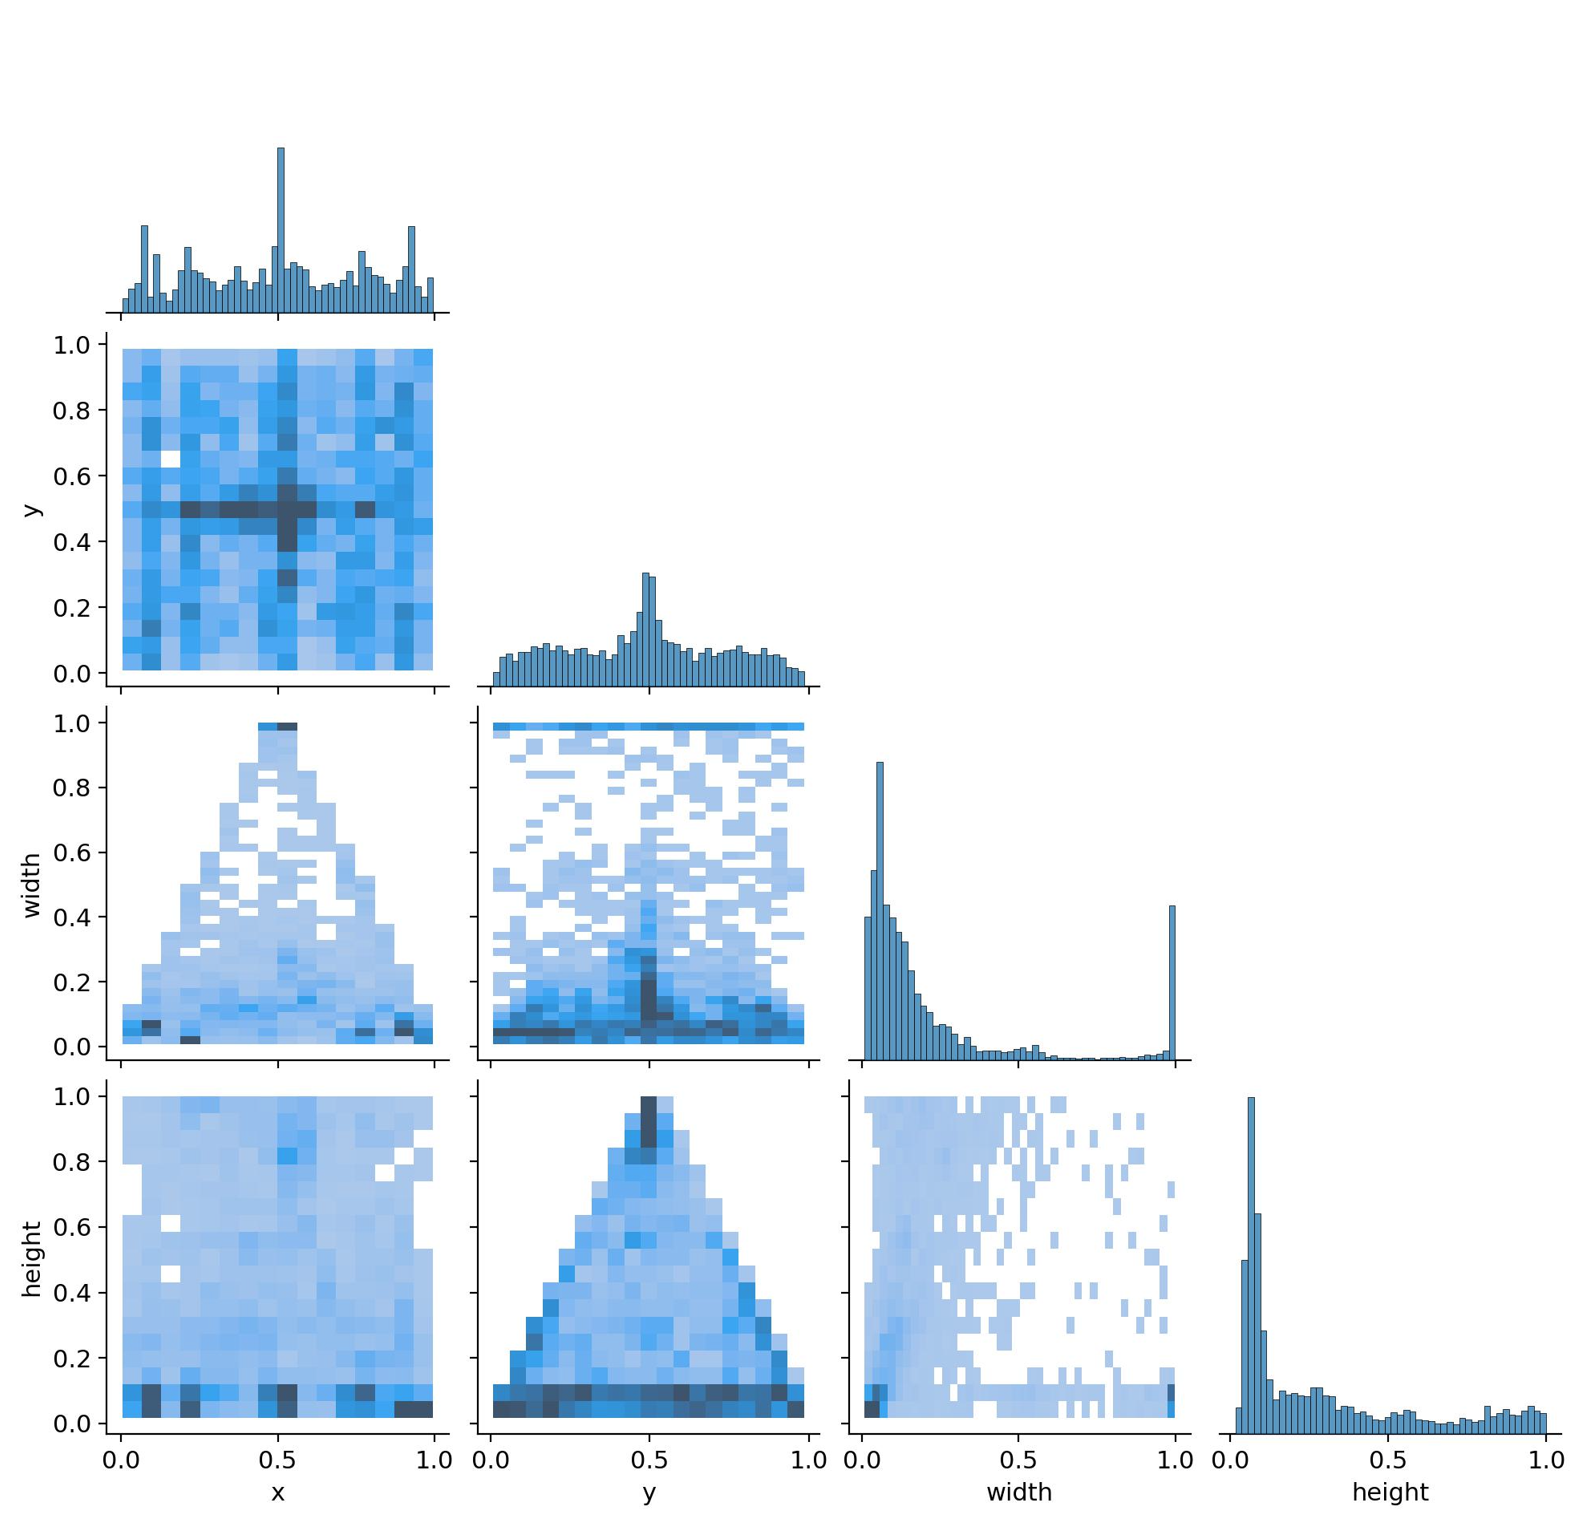
数据分布
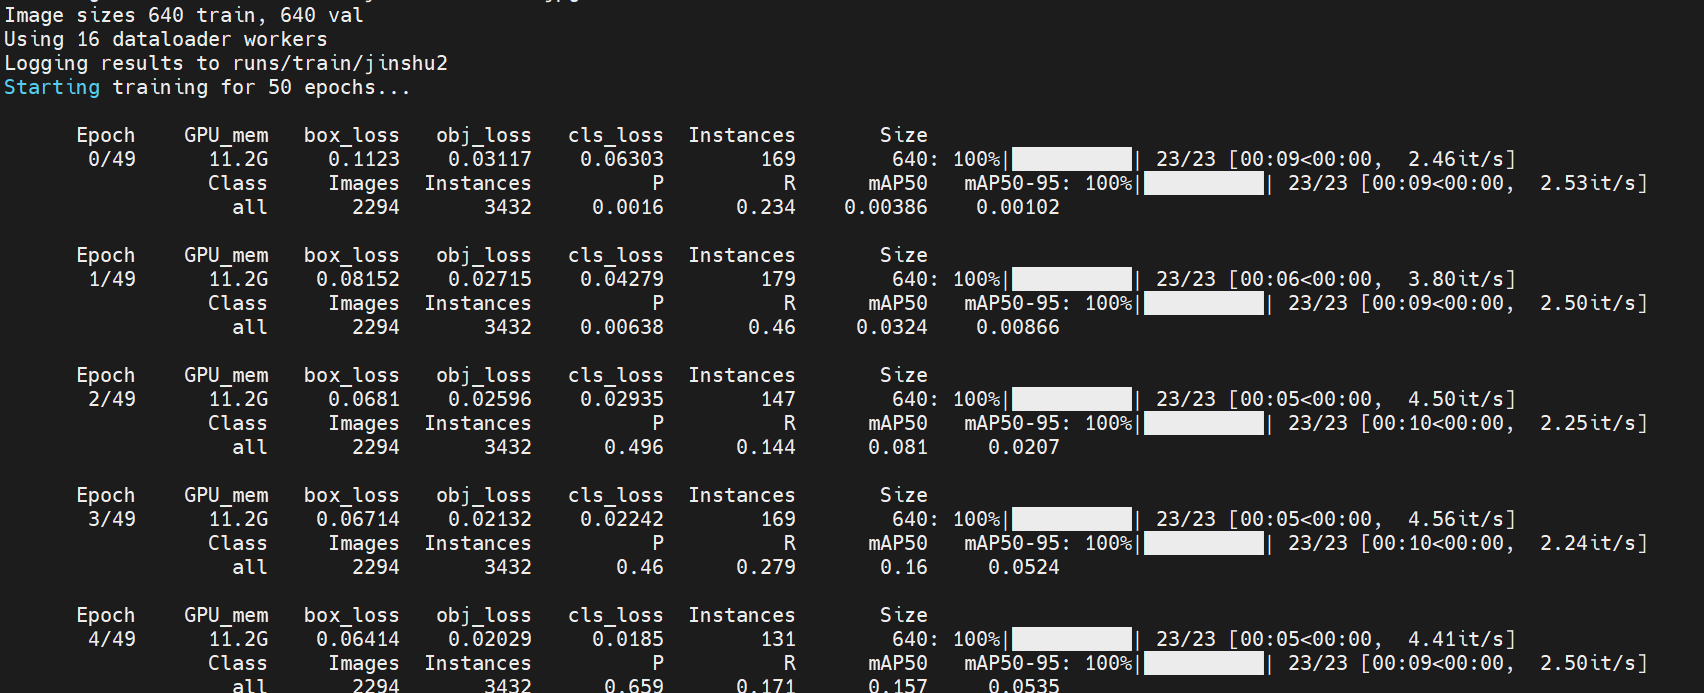
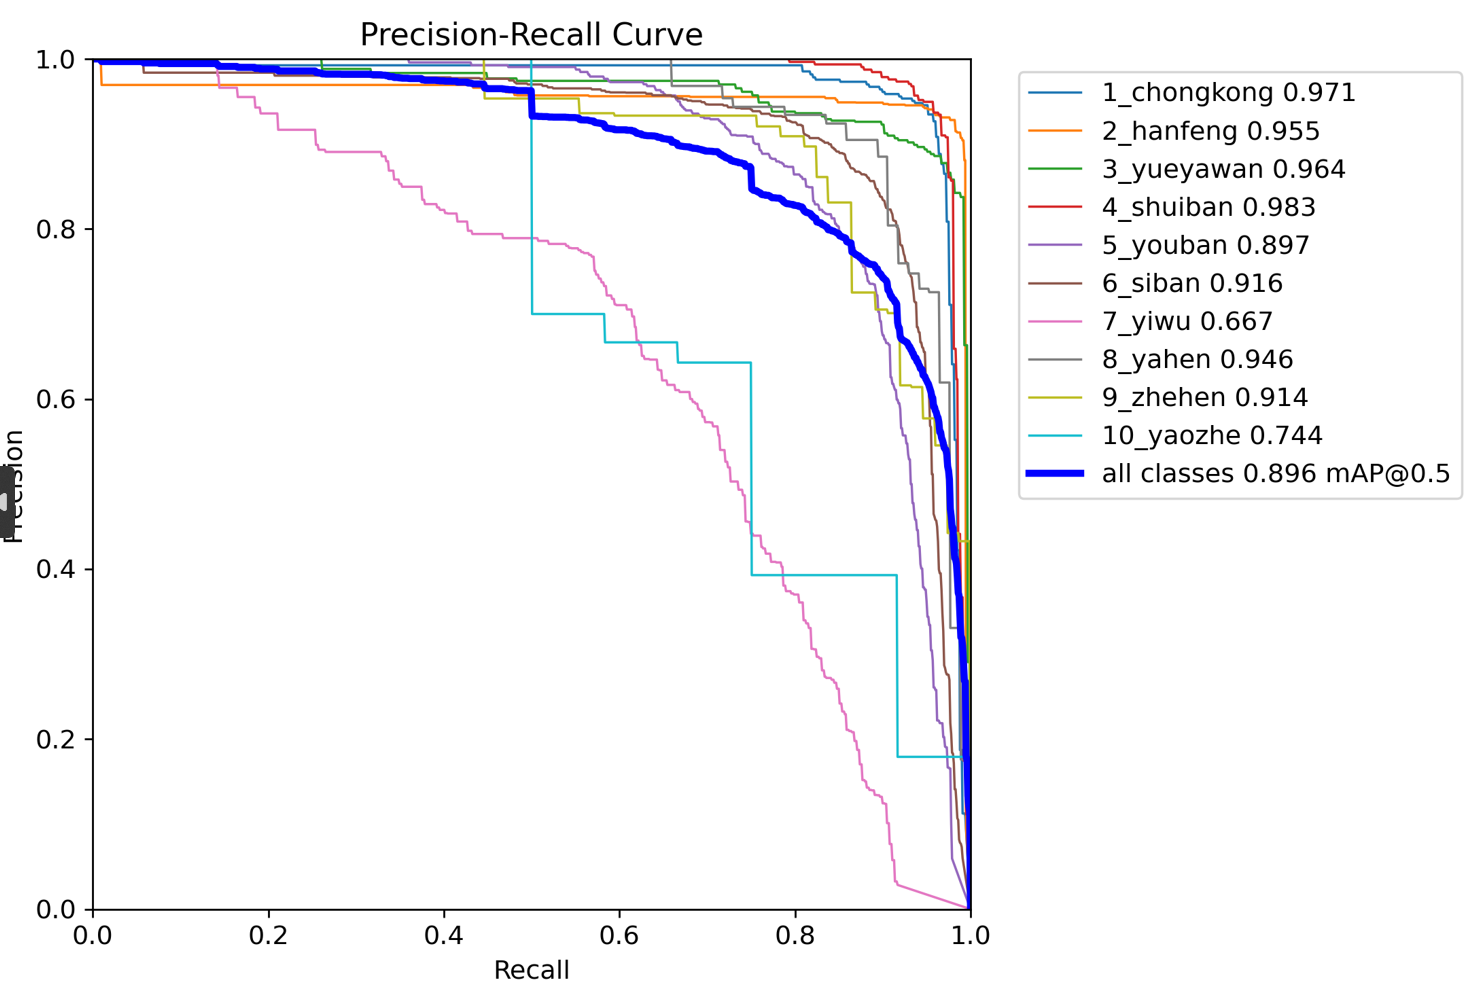
训练结果
问询、帮助
https://docs.qq.com/sheet/DUEdqZ2lmbmR6UVdU?tab=BB08J2
- 1
声明:本文内容由网友自发贡献,不代表【wpsshop博客】立场,版权归原作者所有,本站不承担相应法律责任。如您发现有侵权的内容,请联系我们。转载请注明出处:https://www.wpsshop.cn/w/Monodyee/article/detail/495475
推荐阅读
相关标签

