热门标签
热门文章
- 1Java贪吃蛇360旋转,贪吃蛇大作战360版
- 2WebGPU快速入门教程_threejs webgpu
- 3新人报道啊
- 4Hive索引_with deferred rebuild
- 5django模型的crud操作
- 6微信小程序 --- 自定义组件_微信小程序自定义组件
- 7Md5(base64)加密与解密实战_md5(base64)
- 8zookeeper Client Session 0x0 for server null
- 9Linux系统下运行bash脚本提示/usr/bin/env: ‘bash\r’: No such file or directory_env: bash: no such file or directory
- 10【xilinx SDK教程】第2篇:超实用的xilinx SDK使用技巧合集_xilinx sdk使用教程
当前位置: article > 正文
关于element-plus中el-select自定义标签及样式的问题_element-plus el-select 自定义 label
作者:Monodyee | 2024-06-18 01:39:12
赞
踩
element-plus el-select 自定义 label
关于element-plus中el-select自定义标签及样式的问题
我这天天的都遇到各种坑,关于自定义,我直接复制粘贴代码都实现不了,研究了一下午,骂骂咧咧了一下午,服气了。官网代码实现不了,就只能 “ 曲线救国 ” 了,哈哈哈
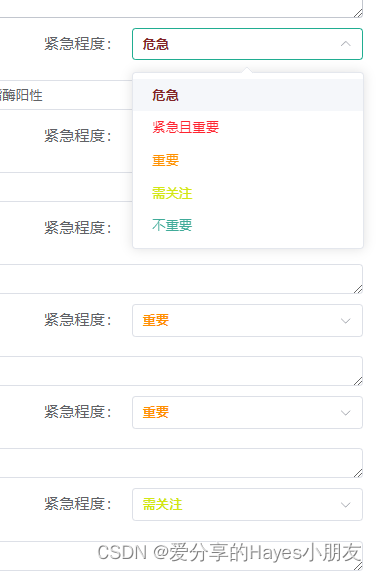
1. 先看最终实现的效果
五种程度,每种颜色都不同,回显也需要分不同颜色

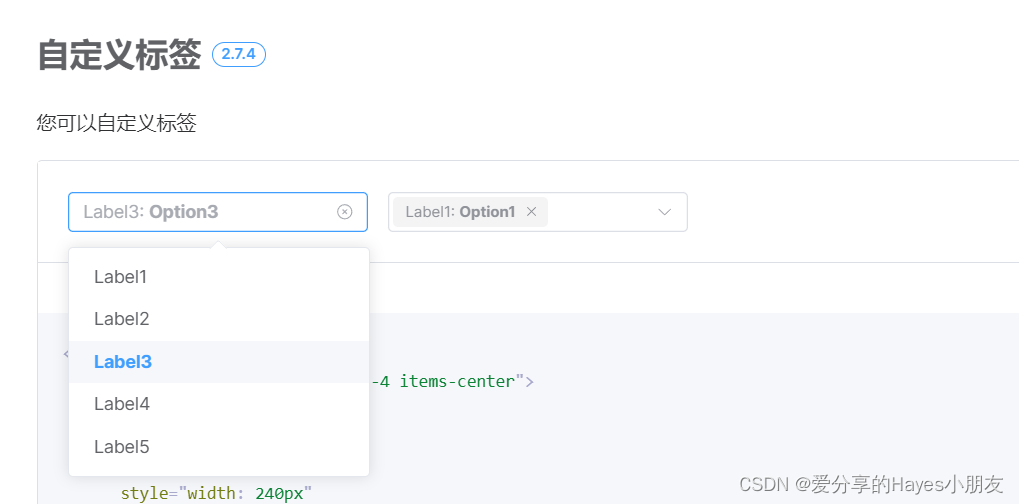
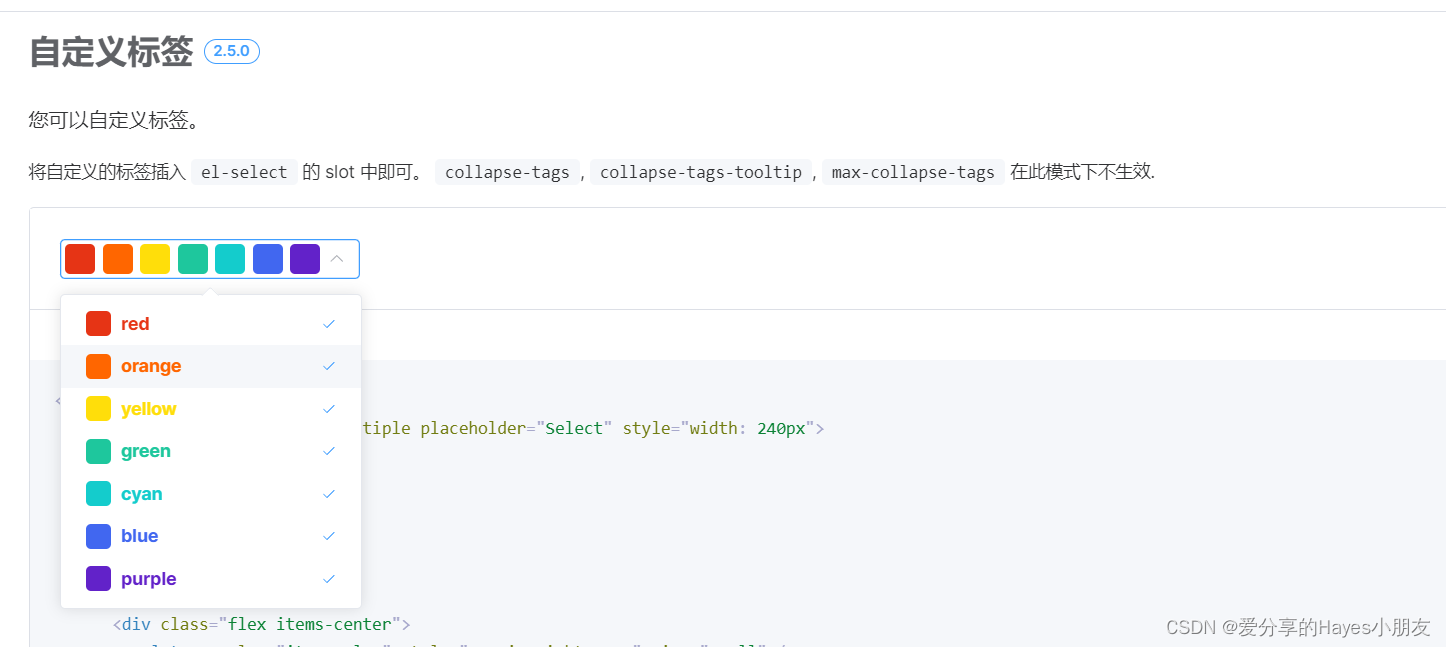
2. 再看看官网是怎么写的
- label + value 形式

	<el-select
      v-model="value1"
      placeholder="Select"
      style="width: 240px"
      clearable
    >
    // 核心代码: #label="{ label, value }" 插槽
      <template #label="{ label, value }">
        <span>{{ label }}: </span>
        <span style="font-weight: bold">{{ value }}</span>
      </template>
      <el-option
        v-for="item in options"
        :key="item.value"
        :label="item.label"
        :value="item.value"
      />
    </el-select>
- 1
- 2
- 3
- 4
- 5
- 6
- 7
- 8
- 9
- 10
- 11
- 12
- 13
- 14
- 15
- 16
- 17
- 18
- 多选 + options自定义 + 回显自定义

// 这串代码options自定义是没问题的,但是回显根本不理我啊,我很难受!
<el-select v-model="value" multiple placeholder="Select" style="width: 240px">
    <el-option
      v-for="item in colors"
      :key="item.value"
      :label="item.label"
      :value="item.value"
    >
      <div class="flex items-center">
        <el-tag :color="item.value" style="margin-right: 8px" size="small" />
        <span :style="{ color: item.value }">{{ item.label }}</span>
      </div>
    </el-option>
    // 不好使啊,至少在我的项目中是的
    <template #tag>
      <el-tag v-for="color in value" :key="color" :color="color" />
    </template>
  </el-select>
- 1
- 2
- 3
- 4
- 5
- 6
- 7
- 8
- 9
- 10
- 11
- 12
- 13
- 14
- 15
- 16
- 17
- 18
这两种一结合,我觉得我瞬间行了(男人不能说不行)
现实给了我一耳光,并赋予我骂骂咧咧一下午的资格,草(一种植物)
3. 解决问题
- 解决options下拉框数据颜色问题
- 通过prefix前置插槽,将label数据作为前置,添加到输入框中回显
- 将输入框原本回显的lebal数据隐藏,嘿嘿
<!-- html -->
<el-form-item label="紧急程度:" class="select-one">
   <el-select v-model="item.urgencyLevel" placeholder="单选">
       <template #prefix>
       <!-- 将前置插槽数据设置为label的值 -->
          <span :style="{ color: itemStyleColor(item.urgencyLevel['color']}" style="font-weight:600;">{{itemStyleColor(item.urgencyLevel)['label'] }}</span>
      </template>
      <!-- options下拉框数据 -->
      <el-option v-for="el in urgencyLevels" :label="el.label" :value="el.value">
         <span :style="{ color: el.color }">{{ el.label }}</span>
      </el-option>
   </el-select>
</el-form-item>
- 1
- 2
- 3
- 4
- 5
- 6
- 7
- 8
- 9
- 10
- 11
- 12
- 13
// js
// options数据
let urgencyLevels = [
    { color: '#852527', label: '危急', value: 'critical' },
    { color: '#ff2430', label: '紧急且重要', value: 'urgentAndImportant' },
    { color: '#ff9100', label: '重要', value: 'important' },
    { color: '#D3E713', label: '需关注', value: 'attentionRequired' },
    { color: '#40ab99', label: '不重要', value: 'notImportant' }
]
// 获取颜色的方法,通过v-model的值来选择当前的回显和颜色
// 我就直接手写了,当然也可以选择用find方法,直接返回的就是一个对象
const itemStyleColor = (val) => {
    switch (val) {
        case 'critical':
            return { color: '#852527', label: '危急' }
        case 'urgentAndImportant':
            return { color: '#ff2430', label: '紧急且重要' }
        case 'important':
            return { color: '#ff9100', label: '重要' }
        case 'attentionRequired':
            return { color: '#D3E713', label: '需关注' }
        case 'notImportant':
            return { color: '#40ab99', label: '不重要' }
    }
}
- 1
- 2
- 3
- 4
- 5
- 6
- 7
- 8
- 9
- 10
- 11
- 12
- 13
- 14
- 15
- 16
- 17
- 18
- 19
- 20
- 21
- 22
- 23
- 24
- 25
代码到目前为止,效果是这样的,所以嘞,我们就隐藏一个没有动态变色的value

// css
// 将回显的input框内的数据变成和背景色一样的颜色
// 我使用了深度选择器,是用/deep/还是:deep,根据项目来定
:deep(.select-one) {
        .el-input__inner {
            color: #fff;
        }
    }
- 1
- 2
- 3
- 4
- 5
- 6
- 7
- 8
4. 最后
具体为啥我的项目中就实现不了官网的效果,原因我还在查找,找到了之后会写在评论区,如果有小伙伴知道,也欢迎评论;如有不足之处,请指正!
声明:本文内容由网友自发贡献,不代表【wpsshop博客】立场,版权归原作者所有,本站不承担相应法律责任。如您发现有侵权的内容,请联系我们。转载请注明出处:https://www.wpsshop.cn/w/Monodyee/article/detail/733046
推荐阅读
相关标签


