- 1Unity解析和读取文本—— txt 文件_unity resources可以获取txt文件嘛?
- 2kafka分区(partition)和和分组(group)_kafka分区和分组
- 3【转】纯干货:PS高手完全自学宝典(原创文章)
- 4el-table使用fixed=“right“时最后一列边框消失_el-table表头最后一列没有左分界线
- 5nodejs做即时聊天_nodejs langchain 案例聊天实例
- 6Android AIDL异步回调实现
- 7Unity3d中UGUI组件精简复盘(二十)EventSystem组件与Standalone Input Moudle组件_unity eventsystem input
- 8C# SQLite 数据库
- 9Rabbitmq集群高可用部署详细_./rabbitmqctl join_cluster --ram rabbit@gf25
- 10python实现视频ai换脸_基于Python实现视频的人脸融合功能
使用vue+elementUI+springboot创建基础后台增删改查的管理页面_vue2+element+spring管理界面
赞
踩
目前这家公司前端用的是vue框架,由于在之前的公司很少涉及到前端内容,对其的了解也只是会使用js和jquery,所以..慢慢来吧。
在此之前需要先了解vue的大致语法和规则,可先前往官方文档进行学习https://cn.vuejs.org/v2/guide/
1.搭建vue工程
使用vue一般有直接引入vue.js方式,或者使用node.js进行构建,因为大部分的教程都是围绕node.js来展开的,所以这儿也使用node。
步骤1.下载node.js并安装,一般安装完成后会环境变量已经配置好,网上此类教程很多,不作赘述

步骤2.使用node.js创建vue工程
2.1安装vue脚手架
npm install –global vue-cli
2.2创建vue工程
vue init webpack my-project
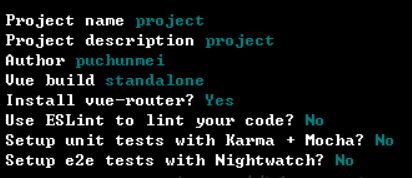
这儿的选项

2.3创建好之后进入工程目录执行npm install安装所需要的依赖
2.4执行npm run dev启动工程,默认地址为localhost:8080,打开看到vue主页表明工程创建成功
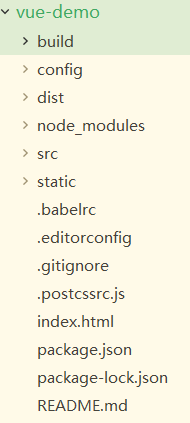
同时创建好的工程目录大致如下

2.主要文件说明
引入需要的包
npm install --save axios //主要用来发送请求,可理解为ajax
npm install element-ui -S //一个ui框架
npm install qs -S //包装传回后台的数据防止接收不到
npm install vue-router //vue路由
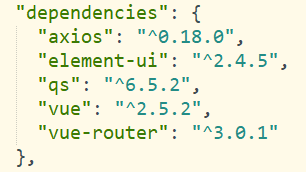
完成后可以在package.json中可以查看到项目依赖

3.代码详细
3.1 src/main.js

 1 // The Vue build version to load with the `import` command
 2 // (runtime-only or standalone) has been set in webpack.base.conf with an alias.
 3 import Vue from 'vue'
 4 import App from './App'
 5 import router from './router'
 6
 7 //引入elemen-u控件
 8 import ElementUI from 'element-ui'
 9 import 'element-ui/lib/theme-chalk/index.css'
10 Vue.config.productionTip = false
11 //使用use命令后才起作用
12 Vue.use(ElementUI)
13
14 /* eslint-disable no-new */
15 new Vue({
16   el: '#app',
17   router,
18   components: { App },
19   template: '<App/>'
20 })

3.2 src/router/index.js

 1 import Vue from 'vue'
 2 import Router from 'vue-router'
 3 //使用懒加载的方式来引入,只有路由被访问的时候才加载
 4 import home from '@/components/home'
 5 const loginpage = resolve => require(['@/components/Login'],resolve)
 6
 7 Vue.use(Router)
 8     let router =  new Router({
 9   routes: [
10         {
11             path:'/',
12             name :'login',
13             component:loginpage
14         },
15         {
16             path:'/login',
17             name :'login',
18             component:loginpage
19         },
20         {
21             path:'/home',
22             name :'home',
23             component:home
24         }
25   ]
26 })
27     //对每次访问之前都要先看是否已经登录
28     router.beforeEach((to,from,next)=>{
29         if(to.path.startsWith('/login')){
30             window.sessionStorage.removeItem('access-token');
31             next();
32         }else{
33             let token = window.sessionStorage.getItem('access-token');
34             if(!token){
35                 //未登录  跳回主页面
36                 next({path:'/login'});
37             }else{
38                 next();
39             }
40         }
41
42     });
43
44
45 export default router

3.3在src下创建api文件夹,进入文件夹后创建api.js与index.js
api.js

//进行远程调用
import axios from 'axios'
//包装param参数
import qs from 'qs'
// 声明基础访问地址
axios.defaults.baseURL = 'http://localhost:8081'

//声明一个调用方法
export const requestLogin = params => {return axios.post('/user/login',qs.stringify(params)).then(res => res.data)}

index.js
import * as api from './api'

export default api
3.4在src/components下创建登录组件Login.vue

  1 <!--  3     时间:2018-08-07
  4     描述:
  5 -->
  6
  7 <template>
  8     <!--<div id="login">
  9
 10         <h1> {{msg}}</h1>
 11     </div>-->
 12     <el-form ref='AccountFrom' :model='account' :rules='rules' lable-position='left' lable-width='0px' class='demo-ruleForm login-container'>
 13         <h3 class="title">登录系统首页</h3>
 14         <el-form-item prop="username">
 15             <el-input type="text" v-model="account.username" auto-complete="off" placeholder="账号"></el-input>
 16         </el-form-item>
 17         <el-form-item prop="pwd">
 18             <el-input type="password" v-model="account.pwd" auto-complete="off" placeholder="密码"></el-input>
 19         </el-form-item>
 20         <el-checkbox v-model="checked" checked class="remember">记住密码</el-checkbox>
 21         <el-form-item style="width:100%;">
 22             <el-button type="primary" style="width:100%;" @click.native.prevent='handleLogin' :loading= 'logining'>登录</el-button>
 23         </el-form-item>
 24
 25     </el-form>
 26
 27 </template>
 28
 29 <script>
 30     //引入api.js  好调用里面的接口
 31     import {requestLogin} from '../api/api';
 32     export default {
 33         name: 'login',
 34         data() {
 35             return {
 36                 logining: false,
 37                 account: {
 38                     username: '',
 39                     pwd: ''
 40                 },
 41                 rules: {
 42                     username: [{
 43                         required: true,
 44                         message: '请输入账号',
 45                         trigger: 'blur'
 46                     }],
 47                     pwd: [{
 48                         required: true,
 49                         message: '请输入密码',
 50                         trigger: 'blur'
 51                     }]
 52                 },
 53                 checked: true
 54             }
 55         },
 56         methods:{
 57             handleLogin(){
 58                 this.$refs.AccountFrom.validate((valid)=>{
 59
 60                     if(valid){
 61                         //验证通过 可以提交
 62                         this.logining = true;
 63                         //将提交的数据进行封装
 64                         var loginParams = {cUsername : this.account.username,cPwd:this.account.pwd};
 65
 66                         //调用函数  传递参数 获取结果
 67                         requestLogin(loginParams).then(data=>{
 68
 69                             this.logining = false;
 70
 71                             if(data.code == '200'){
 72                                 //登录成功
 73                                 sessionStorage.setItem('access-token',data.token);
 74                                 //用vue路由跳转到后台主界面
 75                                 this.$router.push({path:'/home'});
 76                             }else{
 77                                 this.$message({
 78                                     message:data.msg,
 79                                     type:'error'
 80                                 });
 81                             }
 82                         })
 83
 84                     }else{
 85                         console.log('error submit');
 86                         return false;
 87                     }
 88                 });
 89             }
 90         }
 91     }
 92 </script>
 93
 94 <style>
 95     body {
 96         background: #DFE9FB;
 97     }
 98
 99     .login-container {
100         width: 350px;
101         margin-left: 35%;
102     }
103 </style>

3.5在component下创建home.vue组件作为登录成功后跳转的页面

  1 <template>
  2     <div>
  3         <!--工具条-->
  4         <el-col :span="24" class="toolbar" style="padding-bottom: 0px;">
  5             <el-form :inline="true" :model="filters">
  6                 <el-form-item>
  7                     <el-input v-model="filters.name" placeholder="姓名"></el-input>
  8                 </el-form-item>
  9                 <el-form-item>
 10                     <el-button type="primary" v-on:click="getUsers">查询</el-button>
 11                 </el-form-item>
 12                 <el-form-item>
 13                     <el-button type="info" @click="addUser">新增</el-button>
 14                 </el-form-item>
 15             </el-form>
 16         </el-col>
 17
 18
 19         <el-table :data="userInfoList" style="width: 100%">
 20             <el-table-column prop="cId" label="id" width="180">
 21             </el-table-column>
 22             <el-table-column prop="cUsername" label="名字" width="180">
 23             </el-table-column>
 24             <el-table-column prop="cPwd" label="密码" width="180">
 25             </el-table-column>
 26             <!--第二步  开始进行修改和查询操作-->
 27             <el-table-column label="操作" align="center" min-width="100">
 28
 29                 <template slot-scope="scope">
 30
 31                     <el-button type="text" @click="checkDetail(scope.row)">查看详情</el-button>
 32
 33                     <el-button type="info" @click="modifyUser(scope.row)">修改</el-button>
 34
 35                     <el-button type="info" @click="deleteUser(scope.row)">删除</el-button>
 36                 </template>
 37             </el-table-column>
 38             <!--编辑与增加的页面-->
 39
 40
 41         </el-table>
 42         <!--新增界面-->
 43         <el-dialog title="记录" :visible.sync="dialogVisible" width="50%" :close-on-click-modal="false">
 44             <el-form :model="addFormData" :rules="rules2" ref="addFormData" label-width="0px" class="demo-ruleForm login-container">
 45                 <el-form-item prop="cUsername">
 46                     <el-input type="text" v-model="addFormData.cUsername" auto-complete="off" placeholder="账号"></el-input>
 47                 </el-form-item>
 48                 <el-form-item prop="cPwd">
 49                     <el-input type="password" v-model="addFormData.cPwd" auto-complete="off" placeholder="密码"></el-input>
 50                 </el-form-item>
 51             </el-form>
 52             <span slot="footer" class="dialog-footer">
 53                 <el-button @click.native="dialogVisible = false,addFormData={cId:'',cUsername:'',cPwd:''}">取 消</el-button>
 54                 <el-button v-if="isView" type="primary" @click.native="addSubmit">确 定</el-button>
 55             </span>
 56         </el-dialog>
 57     </div>
 58
 59 </template>
 60
 61 <script>
 62     import {
 63         userList
 64     } from '../api/api';
 65     import axios from 'axios';
 66     import qs from 'qs';
 67     export default {
 68         name: 'home',
 69         data() {
 70             return {
 71                 userInfoList: [],
 72                 addFormReadOnly: true,
 73                 dialogVisible: false,
 74                 isView: true,
 75                 addFormData: {
 76                     cId: '',
 77                     cUsername: '',
 78                     cPwd: ''
 79                 },
 80                 rules2: {
 81                     cUsername: [{
 82                         required: true,
 83                         message: '用户名不能为空',
 84                         trigger: 'blur'
 85                     }],
 86                     cPwd: [{
 87                         required: true,
 88                         message: '密码不能为空',
 89                         trigger: 'blur'
 90                     }]
 91                 },
 92                 filters: {
 93                     name: ''
 94                 }
 95             }
 96         },
 97         mounted: function () {
 98             this.loadData();
 99         },
100
101         methods: {
102             loadData() {
103                 let param = {filter:this.filters.name};
104                 axios.post('/user/userlist',qs.stringify(param)).then((result) => {
105                     var _data = result.data;
106                     this.userInfoList = _data;
107                 });
108
109
110             },
111             getUsers() {
112                 this.loadData();
113             },
114             addUser() {
115                 this.addFormData = {
116                     cId: '',
117                     cUsername: '',
118                     cPwd: ''
119                 };
120                 this.isView = true;
121                 this.dialogVisible = true;
122                 //    this.addFormReadOnly = false;
123             },
124             checkDetail(rowData) {
125                 this.addFormData = Object.assign({}, rowData);
126                 this.isView = false;
127                 this.dialogVisible = true;
128
129                 //    this.addFormReadOnly = true;
130             },
131             modifyUser(rowData) {
132                 this.addFormData = Object.assign({}, rowData);
133                 this.isView = true;
134                 this.dialogVisible = true;
135                 //    this.addFormReadOnly = false;
136             },
137             deleteUser(rowData) {
138
139                 this.$alert('是否删除这条记录', '信息删除', {
140                     confirmButtonText: '确定',
141                     callback: action => {
142                         var params = {
143                             userId: rowData.cId
144                         };
145                         axios.post("/user/delete", qs.stringify(params)).then((result) => {
146                             console.info(result);
147                             if (result.data.success) {
148                                 this.$message({
149                                     type: 'info',
150                                     message: `已删除`
151                                 });
152                             } else {
153                                 this.$message({
154                                     type: 'info',
155                                     message: `删除失败`
156                                 });
157
158                             }
159                             this.loadData();
160                         });
161
162                     }
163                 });
164
165             },
166             //增加一条记录
167             addSubmit() {
168
169                 //先判断表单是否通过了判断
170                 this.$refs.addFormData.validate((valid) => {
171                     //代表通过验证 ,将参数传回后台
172                     if (valid) {
173                         let param = Object.assign({}, this.addFormData);
174                         axios.post("/user/submit", qs.stringify(param)).then((result) => {
175                             if (result.data.success) {
176                                 this.$message({
177                                     type: 'info',
178                                     message: '添加成功',
179                                 });
180                                 this.loadData();
181                             } else {
182                                 this.$message({
183                                     type: 'info',
184                                     message: '添加失败',
185                                 });
186                             }
187                             this.dialogVisible = false;
188                         });
189                     }
190
191                 });
192             }
193
194         }
195
196     }
197 </script>
198
199 <style>
200     body {
201         background: #DFE9FB;
202     }
203 </style>

4运行项目
在项目目录下执行以下命令并访问localhost:8080
npm install
npm run dev
5.java编写后台api
创建mavevn项目,引入springboot与数据库的相关的包,pom文件如下

  1 <project xmlns="http://maven.apache.org/POM/4.0.0" xmlns:xsi="http://www.w3.org/2001/XMLSchema-instance" xsi:schemaLocation="http://maven.apache.org/POM/4.0.0 http://maven.apache.org/xsd/maven-4.0.0.xsd">
  2   <modelVersion>4.0.0</modelVersion>
  3   <groupId>com.megalith</groupId>
  4   <artifactId>vtpj</artifactId>
  5   <version>0.0.1-SNAPSHOT</version>
  6   <name>vtpj</name>
  7   <description>vtpj</description>
  8
  9
 10       <parent>
 11         <groupId>org.springframework.boot</groupId>
 12         <artifactId>spring-boot-starter-parent</artifactId>
 13         <version>2.0.1.RELEASE</version>
 14         <relativePath /> <!-- lookup parent from repository -->
 15     </parent>
 16
 17     <properties>
 18         <project.build.sourceEncoding>UTF-8</project.build.sourceEncoding>
 19         <project.reporting.outputEncoding>UTF-8</project.reporting.outputEncoding>
 20         <java.version>1.8</java.version>
 21     </properties>
 22
 23     <dependencies>
 24         <dependency>
 25             <groupId>org.springframework.boot</groupId>
 26             <artifactId>spring-boot-starter-actuator</artifactId>
 27         </dependency>
 28         <dependency>
 29             <groupId>org.springframework.boot</groupId>
 30             <artifactId>spring-boot-starter-cache</artifactId>
 31         </dependency>
 32         <dependency>
 33             <groupId>org.springframework.boot</groupId>
 34             <artifactId>spring-boot-starter-jdbc</artifactId>
 35         </dependency>
 36         <dependency>
 37             <groupId>org.springframework.boot</groupId>
 38             <artifactId>spring-boot-starter-web</artifactId>
 39         </dependency>
 40         <dependency>
 41             <groupId>org.springframework.boot</groupId>
 42             <artifactId>spring-boot-starter-test</artifactId>
 43             <scope>test</scope>
 44         </dependency>
 45         <dependency>
 46             <groupId>org.springframework.boot</groupId>
 47             <artifactId>spring-boot-devtools</artifactId>
 48             <optional>true</optional>
 49         </dependency>
 50         <dependency>
 51             <groupId>org.apache.commons</groupId>
 52             <artifactId>commons-lang3</artifactId>
 53         </dependency>
 54         <dependency>
 55             <groupId>org.apache.commons</groupId>
 56             <artifactId>commons-collections4</artifactId>
 57             <version>4.1</version>
 58         </dependency>
 59
 60             <!-- jdbc -->
 61          <dependency>
 62         <groupId>org.mybatis.spring.boot</groupId>
 63         <artifactId>mybatis-spring-boot-starter</artifactId>
 64         <version>1.1.1</version>
 65     </dependency>
 66     <dependency>
 67     <groupId>mysql</groupId>
 68     <artifactId>mysql-connector-java</artifactId>
 69     <version>6.0.6</version>
 70 </dependency>
 71     </dependencies>
 72
 73     <repositories>
 74         <repository>
 75             <id>aliyun</id>
 76             <name>aliyun</name>
 77             <url>http://maven.aliyun.com/nexus/content/groups/public</url>
 78         </repository>
 79     </repositories>
 80
 81     <build>
 82         <plugins>
 83             <plugin>
 84                 <groupId>org.springframework.boot</groupId>
 85                 <artifactId>spring-boot-maven-plugin</artifactId>
 86             </plugin>
 87         </plugins>
 88
 89         <resources>
 90             <resource>
 91                 <directory>src/main/java</directory>
 92                 <includes>
 93                     <include>**/*.properties</include>
 94                     <include>**/*.xml</include>
 95                 </includes>
 96                 <filtering>false</filtering>
 97             </resource>
 98         </resources>
 99
100     </build>
101 </project>

配置application.properties数据库链接及其他配置

server.port=8081
#取消自动加载数据源
#spring.autoconfigure.exclude=org.springframework.boot.autoconfigure.jdbc.DataSourceAutoConfiguration

#配置数据源
mybatis.type-aliases-package=com.megalith.tjfx.bean

spring.datasource.driverClassName = com.mysql.jdbc.Driver
spring.datasource.url = jdbc:mysql://localhost:3306/tjfx?useUnicode=true&characterEncoding=utf-8&useJDBCCompliantTimezoneShift=true&useLegacyDatetimeCode=false&serverTimezone=UTC
spring.datasource.username = root
spring.datasource.password = root

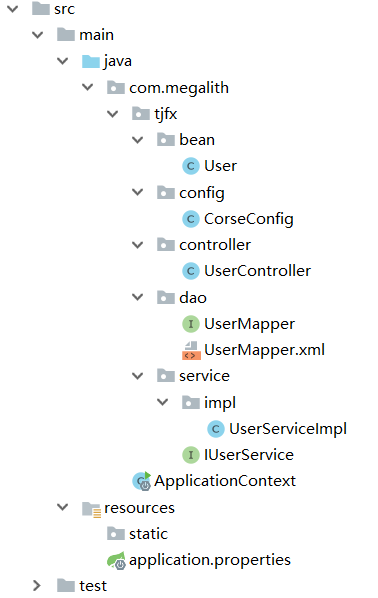
项目目录大致如下

corseconfig.java内容如下,主要解决跨域访问不到地址的问题

 1 package com.megalith.tjfx.config;
 2
 3 import org.springframework.context.annotation.Bean;
 4 import org.springframework.context.annotation.Configuration;
 5 import org.springframework.web.cors.CorsConfiguration;
 6 import org.springframework.web.cors.UrlBasedCorsConfigurationSource;
 7 import org.springframework.web.filter.CorsFilter;
 8
 9 /**
10  *
11  * @ClassName: CorseConfig
12  * @Desc:
13  * @author: zhouming
14  * @date: 2018年8月7日 下午4:16:39
15  * @version 1.0
16  */
17 @Configuration
18 public class CorseConfig {
19
20
21     private CorsConfiguration buildConfig() {
22         CorsConfiguration corsConfiguration = new CorsConfiguration();
23         corsConfiguration.addAllowedOrigin("*");
24         corsConfiguration.addAllowedHeader("*");
25         corsConfiguration.addAllowedMethod("*");
26         corsConfiguration.setAllowCredentials(true);
27         return corsConfiguration;
28     }
29
30     @Bean
31     public CorsFilter corsFilter() {
32         UrlBasedCorsConfigurationSource source = new UrlBasedCorsConfigurationSource();
33         source.registerCorsConfiguration("/**", buildConfig());
34         return new CorsFilter(source);
35
36     }
37 }

启动类记得添加mybatis扫描

1 @EnableCaching
2 @SpringBootApplication
3 @MapperScan("com.megalith.tjfx.dao")
4 public class ApplicationContext {
5
6     public static void main(String[] args) {
7         SpringApplication.run(ApplicationContext.class, args);
8     }
9 }

编写相应api,然后启动项目后vue项目即可以与java进行开发

package com.megalith.tjfx.controller;

import java.util.HashMap;
import java.util.List;
import java.util.Map;
import java.util.UUID;

import org.apache.commons.lang3.StringUtils;
import org.springframework.beans.factory.annotation.Autowired;
import org.springframework.web.bind.annotation.*;

import com.megalith.tjfx.bean.User;
import com.megalith.tjfx.service.IUserService;

/**
 *
 * @ClassName: UserController
 * @Desc: 用户注册的controller
 * @author: zhouming
 * @date: 2018年8月7日 下午1:43:16
 * @version 1.0
 */

@RestController
@RequestMapping("/user")
public class UserController {

    @Autowired
    private IUserService userService;

    @PostMapping("/login")
    public Object loginUser(User user) {
        Map<String,Object> result = new HashMap<String, Object>();
        System.err.println(user);
        if("admin".equals(user.getcUsername()) && "123456".equals(user.getcPwd())) {
            result.put("code", 200);
            result.put("msg", "登录成功");
            result.put("token", "adminxxxx");
            return result;
        }


        result.put("code", 500);
        result.put("msg", "登录失败");
        return result;
    }

    @PostMapping("/submit")
    public Object submitUser(User user) {

        Map<String,Object> result = new HashMap<String, Object>();
        if(StringUtils.isBlank(user.getcId())) {
            user.setcId(UUID.randomUUID().toString().replaceAll("-", ""));
            userService.save(user);
        }else{
            userService.update(user);
        }


        result.put("success", true);
        result.put("msg", "登录成功");
        result.put("token", "adminxxxx");
        return result;
    }
    @PostMapping("/userlist")
    public List<User> userList(String filter){
        return userService.listUser(filter);
    }

    @PostMapping("/delete")
    public Map<String, Object> delete(String userId){
        Map<String,Object> result = new HashMap<String, Object>();
        if(StringUtils.isNotBlank(userId)) {
            userService.deleteByPrimarykey(userId);
            result.put("success", true);
        }else {
            result.put("success", false);
        }
        return result;
    }

}

项目简单demo地址github:https://github.com/hetutu5238/vue-demo
5.项目部署
Nginx部署我也还在琢磨当中,下一篇再看能不能写出来吧吧
6.总结
本来之前是主要负责后端的,现在开始接触前端后不得不说前端的发展都超过自己的想象了。node.js还有vue之类的主流前端技术都完全没有
接触过,刚开始学起来完全是一脸懵逼,自己还停留在jquery,bootstrap之类的东西上。看了两三天天的教程才都是模糊的。这儿借鉴了很多
的博客,所以要是有博主发现和自己的很像还请见谅,因为我实在不能记住全部。


