
热门标签
当前位置: article > 正文
Windows搭建RTMP服务器+OBS推流+VLC拉流_浏览器查看 推流服务器信息 vlc
作者:一键难忘520 | 2024-07-02 18:27:06
赞
踩
浏览器查看 推流服务器信息 vlc
一、Nginx-RTMP服务器搭建
1、下载Nginx

该版本是带rtmp模块且编译过的nginx版本,可以直接使用
下载完成后解压,解压后的目录命名为 nginx
2、下载Nginx的RTMP扩展包
下载完成后解压,将解压后的文件夹放入 nginx 目录下

3、修改配置文件
在conf目录下,新建一个文件“nginx.conf”,内容如下
- worker_processes 1;
-
- events {
- worker_connections 1024;
- }
-
- #RTMP服务
- rtmp {
- server {
- listen 1935; #监听端口
- chunk_size 4096; #数据传输块大小
- application live{ #创建名为"live"的应用
- live on;
- }
- }
- }
-
- #HTTP服务,可以通过浏览器访问http://localhost/stat 或者 http://localhost:80/stat 查看服务器状态
- http {
- include mime.types;
- default_type application/octet-stream;
- sendfile on;
- keepalive_timeout 65;
-
- server {
- listen 80;
- server_name localhost;
-
- location /stat {
- rtmp_stat all;
- rtmp_stat_stylesheet stat.xsl;
- }
-
- location /stat.xsl {
- root ./nginx-rtmp-module-master/; #rtmp拓展包目录
- }
-
- location / {
- root html;
- index index.html index.htm;
- }
-
- error_page 500 502 503 504 /50x.html;
- location = /50x.html {
- root html;
- }
- }
-
- }

该文件主要是直播配置,录播配置、直播回放配置各有不同
4、启动服务器
在nginx目录下打开命令行界面,输入 nginx.exe -c conf\nginx.conf
启动后,可以在任务管理器中看到nginx进程
![]()
5、查看服务器状态
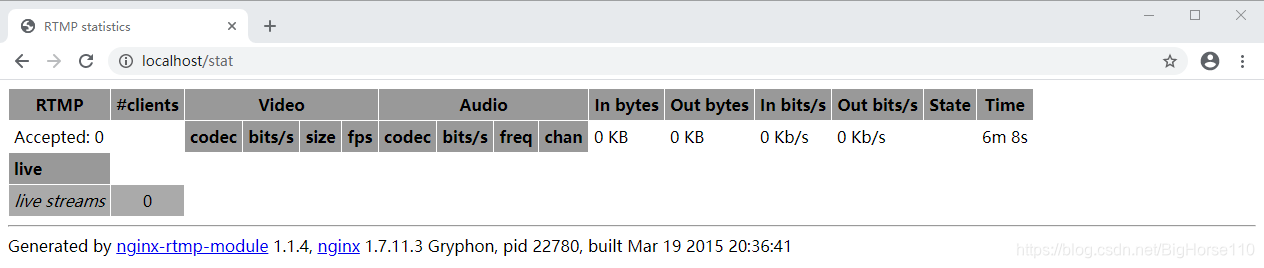
在浏览器地址栏输入 localhost/stat ,可以看到服务器状态信息
6、其它ngnix命令
- nginx.exe -s stop //快速终止服务器,可能不保存相关信息
- nginx.exe -s quit //完整有序停止服务器,保存相关信息
- nginx.exe -s reload //重新载入Nginx,当配置信息修改,需要重新载入这些配置时使用此命令
二、OBS推流
官网下载地址:https://obsproject.com/zh-cn/download
其它下载地址:http://www.pc6.com/down.asp?id=410276

大致步骤如图所示,分为四步
1、添加场景
软件默认有一个场景,我们可以不用再去添加,直接去步骤2添加来源即可
2、添加来源
可以添加显示器捕获、视频捕获、音频捕获、媒体源等,此处根据需要进行选择。
本文将本地视频video.mp4作为媒体源进行推流

3、推流设置

服务:自定义
服务器: rtmp://127.0.0.1:1935/live
串流秘钥: stream
4、开始推流
点击开始推流按钮
5、查看服务器状态
打开浏览器输入 localhost/stat 可以看到推流信息

三、VLC拉流
VLC下载地址:https://www.videolan.org/
1、打开网络串流配置

2、输入媒体流地址rtmp://127.0.0.1:1935/live/stream,点击播放即可

声明:本文内容由网友自发贡献,不代表【wpsshop博客】立场,版权归原作者所有,本站不承担相应法律责任。如您发现有侵权的内容,请联系我们。转载请注明出处:https://www.wpsshop.cn/w/一键难忘520/article/detail/780519
推荐阅读
相关标签

