
热门标签
热门文章
- 1Unity开发——UGUI优化之图集的生成与运用_unity 创建图集
- 2基于javaweb jsp ssm电子竞技管理平台的设计与实现(源码+lw+部署文档+讲解等)
- 3按照CIS-Tomcat7最新基线标准进行中间件层面基线检测_cis安全标准 tomcat
- 4探索生成式AI的未来:Chat与Agent的较量与融合_aigc和agent的区别
- 5Linux中环境变量_linux环境变量是什么
- 64.UE数字人工程运行逻辑及程序逻辑_ue5 humen数字人及接口通信示例
- 7Hadoop入门学习笔记——五、在虚拟机中部署Hive_hive可以单独安装到一台虚拟机吗
- 8安装win11后电脑发热,升级win11电脑发热怎么办_win11升级后电脑发热
- 9对话系统中自然语言理解NLU——意图识别与槽位填充_意图识别,槽位抽取,nl2sql,语言大模型基本能力,rag
- 10在小公司做开发太难了!面试面到我心态爆炸..._进了家小公司,伦不到我开发
当前位置: article > 正文
安卓利用tensorflow-lite使用yolov5训练的模型_android yolov5 tensorflow
作者:一键难忘520 | 2024-07-13 07:21:04
赞
踩
android yolov5 tensorflow
前言
作为使用yolov5后一次简单的尝试
准备工作
- 通过yolov5训练出自己所需要的模型查看模型训练教程
- 将模型通过tensorflow的python版转换,使用yolov5 6.1以上版本
- 安卓端引入tensorflow远端依赖,并置入模型文件在项目工程里
这里我并没有去看tensorflow的api,而是直接参考了yolov5-android
注意事项
- 模型我全部用的是demo默认模型
- 运行demo时请打开悬浮窗权限
配置gradle
需要执行cmake来生成通过jni调用的资源
在app目录下的CmakeList.txt文本可以查看具体配置
这里不过多描述,只描述构建过程
远程引入tensorflow依赖
    externalNativeBuild {
        cmake {
            path "CMakeLists.txt"
        }
    }
      defaultConfig {......
        ndk {
            abiFilters 'armeabi-v7a', 'arm64-v8a'
        }
    }
    dependencies {......
	 implementation 'org.tensorflow:tensorflow-lite:2.4.0'
 }
- 1
- 2
- 3
- 4
- 5
- 6
- 7
- 8
- 9
- 10
- 11
- 12
- 13
迁移文件
将在modle_tflite下的文件夹复制到如下图所示
将在main/cpp的文件夹也复制到如下图所示
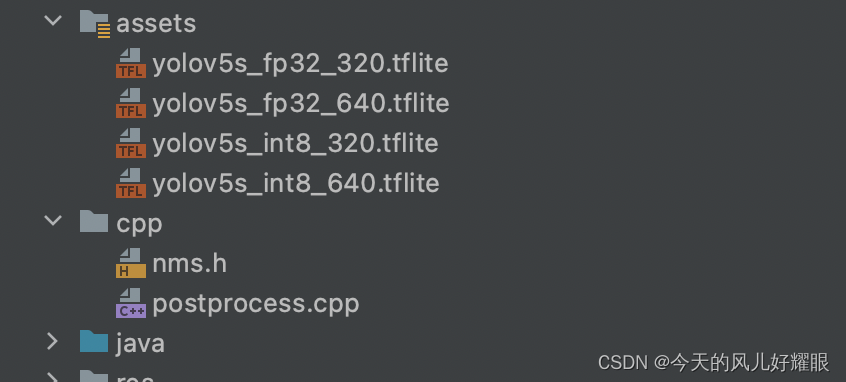
postprocess.cpp文件提供了供java调用的检测函数,这里可以去参考Tensorflow官方网站,是将结果通过jni给回调至客户端
编写悬浮窗
使用了XToast,我是以library形式引入工程的
执行录制屏幕代码
使用的是官方api,MediaProjection,感兴趣可以去查找相关资料
注意在安卓10级以上需要启动一个前台服务才可以使用
开启录屏部分代码
	// 顶部初始化
    private var mediaProjection: MediaProjection?=null
    private lateinit var projectionManager:MediaProjectionManager
    ......
    // 点击事件请求开始录屏
      binding.btnRecord.setOnClickListener {
             projectionManager =getSystemService(MEDIA_PROJECTION_SERVICE) as MediaProjectionManager
            val captureIntent= projectionManager.createScreenCaptureIntent();
            startActivityForResult(captureIntent,20);
        }
    ......
    // 和运行时权限申请一样,在onActivityResult回调里处理开始录屏事件
     override fun onActivityResult(requestCode: Int, resultCode: Int, data: Intent?) {
        super.onActivityResult(requestCode, resultCode, data)
        if (requestCode == 20 && resultCode == RESULT_OK) {
           FloatUtil.showFloatWindow(application).apply {
               contentImageView = this
           }
            mediaProjection = projectionManager.getMediaProjection(resultCode, data!!);
            //执行查看视图函数
            seeContent()
        }
    }

- 1
- 2
- 3
- 4
- 5
- 6
- 7
- 8
- 9
- 10
- 11
- 12
- 13
- 14
- 15
- 16
- 17
- 18
- 19
- 20
- 21
- 22
- 23
开启录屏后,需要用到另外一个东西,就是mediaProjection的createVirtualDisplay函数,其实就是VirtualDisplay,创建一个虚拟显示器。mediaProjection的使用(转载)和关于VirtualDisplay的使用
    private fun seeContent() {
        mediaProjection?.apply {
            createDetector()//创建检测器
            createImageReader() //创建imageReader
            registerCallback(object :MediaProjection.Callback(){
                override fun onStop() {
                    super.onStop()
                }
            },handler)
			//使用createVirtuaDisplay函数,需要制定名称,宽和高,dpi,显示模式,surface,剩余两个参数可以为null
            dispalyD = createVirtualDisplay("ScreenImageReader",640,640,1000
            , DisplayManager.VIRTUAL_DISPLAY_FLAG_AUTO_MIRROR,imageReader.surface,object :VirtualDisplay.Callback(){
                    override fun onResumed() {
                        super.onResumed()
                    }

                    override fun onPaused() {
                        super.onPaused()
                    }

                    override fun onStopped() {
                        super.onStopped()
                    }
                },handler)
        }
    }
- 1
- 2
- 3
- 4
- 5
- 6
- 7
- 8
- 9
- 10
- 11
- 12
- 13
- 14
- 15
- 16
- 17
- 18
- 19
- 20
- 21
- 22
- 23
- 24
- 25
- 26
这里这里使用imageReader,imageReader它是包含一个surface的,并且它有一个setOnImageAvailableListener可以进行监听视图刷新,在刷新的时候去获取image对象,关于图片的边框添加和识别操作,可以看下面代码片段
  /**
     * 图片更新
     * 此处为回调函数
     * 交由handler处理
     */
    override fun onImageAvailable(p0: ImageReader?) {
        //利用handler
            p0?.apply {
                val message = Message()
                message.what = 0xdd
                message.obj = this
                handlerDelayImage.sendMessage(message)
                handlerDelayImage.obtainMessage()
            }
    }
   /**
     * 开始截屏并识别
     * 这个才是具体的处理函数
     */
    private fun startCacheAndSetInput(p0: ImageReader) {
        var nowImage:Image?=null
        try {
            nowImage = p0.acquireLatestImage()

        }catch (e:Exception){
            nowImage = p0.acquireLatestImage()
        }
        nowImage?.apply {
            val width = 640 //可选
            val height = 640
            val planes = planes
            val buffer: ByteBuffer = planes[0].buffer
            val pixelStride = planes[0].pixelStride
            val rowStride = planes[0].rowStride
            val rowPadding = rowStride - pixelStride * width
            var bitmap: Bitmap =
                Bitmap.createBitmap(width + rowPadding / pixelStride, height, Bitmap.Config.ARGB_8888)
            bitmap.copyPixelsFromBuffer(buffer)
            //这就是初始截图
            bitmap = Bitmap.createBitmap(bitmap, 0, 0, width, height)
            //开始检测
            detector.setInput(bitmap)
            //获取到检测结果
            val bboxes: List<TfliteRunner.Recognition> = detector.runInference()
            //绘制识别框到bitmap里
            val resBitmap: Bitmap =ImageProcess.drawBboxes(bboxes, bitmap, 640)
            if (bboxes.size>0){
                //对人点击
                if (bboxes[bboxes.lastIndex].title=="person"){
                    if (!personClick){
                        //检测到人之后对人进行点击
                        //ScreenUtil.click(bboxes[bboxes.lastIndex].location.centerX(), bboxes[bboxes.lastIndex].location.centerY())
                        personClick = true //防止重复点击
                    }
                }else{
                    personClick = false
                }
            }else{
                personClick = false
            }

            runOnUiThread {
                contentImageView?.apply {
                    setImageBitmap(resBitmap)
                }

            }
            close()
        }


    }
- 1
- 2
- 3
- 4
- 5
- 6
- 7
- 8
- 9
- 10
- 11
- 12
- 13
- 14
- 15
- 16
- 17
- 18
- 19
- 20
- 21
- 22
- 23
- 24
- 25
- 26
- 27
- 28
- 29
- 30
- 31
- 32
- 33
- 34
- 35
- 36
- 37
- 38
- 39
- 40
- 41
- 42
- 43
- 44
- 45
- 46
- 47
- 48
- 49
- 50
- 51
- 52
- 53
- 54
- 55
- 56
- 57
- 58
- 59
- 60
- 61
- 62
- 63
- 64
- 65
- 66
- 67
- 68
- 69
- 70
- 71
- 72
- 73
关键使用类
悬浮窗 -FloatUtil
模型检测-TfliteRunner
首页-MainActitvity
边框绘制-ImageProcess
使用效果
最后github地址
yolov5结合tensflow在移动端的方案
本文内容由网友自发贡献,转载请注明出处:【wpsshop博客】
推荐阅读
相关标签

