- 1包里替换class文件_为了让Tomcat支持热替换,我直接修改了他的源码
- 2最好用的编辑器之一:Vim-Go环境搭建_vim golang
- 3解决:word打开后mathtype公式乱码、visio图乱码_office365查看visio出现乱码
- 4发布aar包到maven仓库_afterevaluate { artifact(tasks.getbyname("bundlere
- 5Python利用经纬度创建shpfile点图层并生成tif-问题_python gdal创建点shapefile
- 6华为手机如何升级鸿蒙系统_华为手机如何开启鸿蒙系统?
- 7通过View.post()获取View的宽高引发的两个问题:1post的Runnable何时被执行,2为何View需要layout两次;以及发现Android的一个小bug_view.post获取不到宽高
- 8ld: framework not found FileProvider
- 9今天聊聊基于神经符号的认知推理方法_符号神经推理
- 10P5963 [BalticOI ?] Card 卡牌游戏 贪心
鸿蒙开发-ArkTS 语言(二)— ArkUI组件_arkts语言 image圆图
赞
踩
一.Image:图片显示组件
1.声明Image组件并设置图片源:
Image(src: string| PixelMap| Resource)
加载图片资源
- 本地资源
- Image('images/view.jpg')
- .width(200)
- 网络资源 引入网络图片需申请权限ohos.permission.INTERNET。
如何申请权限ohos.permission.INTERNET:需要在module.json5配置文件中声明权限。
- "requestPermissions": [
- {
- "name": 'ohos.permission.INTERNET'
- }
- ]
Image('https://www.example.com/example.JPG') - Resource资源
使用资源格式可以跨包/跨模块引入图片,resources文件夹下的图片都可以通过$r资源接口读取到并转换到Resource格式。
图1 resources
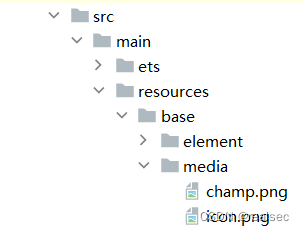
调用方式:
Image($r('app.media.icon'))还可以将图片放在rawfile文件夹下。
图2 rawfile
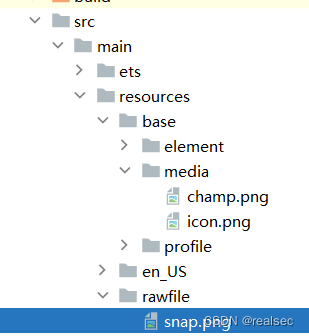
调用方式:
Image($rawfile('snap'))2.添加图片属性
- Image($r('app.media.icon'))
- .width(100)//宽度
- .height(120)//高度
- .borderRadius(10)//边框圆角
- .interpolation(ImageInterpolation.High)//图片插值
更多查看官方文档:显示图片(Image)-显示图形-基于ArkTS的声明式开发范式-UI开发-开发-HarmonyOS应用开发
二.Text:文本显示组件
1.声明Text组件并设置文本内容
Text(content?:string| Resource)
创建文本
- string格式,直接填写文本内容
Text('图片宽度')- Resource格式,读取本地资源文件
资源引用类型可以通过$r创建Resource类型对象,文件位置为/resources/base/element/string.json。
Text($r('app.string.width_label'))2. 添加文本属性
- Text('注册账号!')
- .lineHeight(32)//行高fontsize(20)//字体大小
- .fontColor('#ff1876f8')//字体颜色
- .fontWeight(FontWeight.Medium)//字体粗细
更多查看官方文档:文本显示(Text/Span)-添加常用组件-添加组件-基于ArkTS的声明式开发范式-UI开发-开发-HarmonyOS应用开发
三.TextInput:文本输入框
1.声明TextInput组件:
TextInput( {placeholder?: Resourcestr,text?: ResourceStr})
- 单行输入框
TextInput()
- 多行输入框
TextArea({text:"我是TextArea我是TextArea我是TextArea我是TextArea"}).width(300)
2.添加属性和事件
- TextInput({text:'当前输入文本'})
- .width(150)//宽
- .height(30)//高
- .backgroundcolor('#FFF')//背最色
- .type(InputType.Password)//输入框类型
- .onChange(value =>{
- //value是用户输入的文本内容
- })
TextInput有5种可选类型,分别为Normal基本输入模式、Password密码输入模式、Email邮箱地址输入模式、Number纯数字输入模式、PhoneNumber电话号码输入模式。通过type属性进行设置:
- 密码输入模式
- TextInput()
- .type(InputType.Password)
更多查看官方文档:文本输入(TextInput/TextArea)-添加常用组件-添加组件-基于ArkTS的声明式开发范式-UI开发-开发-HarmonyOS应用开发
四.Button:按钮组件
1.创建按钮
创建不包含子组件的按钮。
Button(label?: string, options?: { type?: ButtonType, stateEffect?: boolean })该接口用于创建不包含子组件的按钮,其中label用来设置按钮文字,type用于设置Button类型,stateEffect属性设置Button是否开启点击效果。
- Button('Ok', { type: ButtonType.Normal, stateEffect: true })
- .borderRadius(8)
- .backgroundColor(0x317aff)
- .width(90)
- .height(40)

创建包含子组件的按钮。
- Button({ type: ButtonType.Normal, stateEffect: true }) {
- Row() {
- Image($r('app.media.loading')).width(20).height(40).margin({ left: 12 })
- Text('loading').fontSize(12).fontColor(0xffffff).margin({ left: 5, right: 12 })
- }.alignItems(VerticalAlign.Center)
- }.borderRadius(8).backgroundColor(0x317aff).width(90).height(40)

设置按钮类型
Button有三种可选类型,分别为Capsule(胶囊类型)、Circle(圆形按钮)和Normal(普通按钮),通过type进行设置。
- //胶囊按钮(默认类型)此类型按钮的圆角自动设置为高度的一半,不支持通过borderRadius属性重新设置圆角。
- Button('Disable', { type: ButtonType.Capsule, stateEffect: false })
- .backgroundColor(0x317aff)
- .width(90)
- .height(40)
-
- //圆形按钮 此类型按钮为圆形,不支持通过borderRadius属性重新设置圆角。
- Button('Circle', { type: ButtonType.Circle, stateEffect: false })
- .backgroundColor(0x317aff)
- .width(90)
- .height(90)
-
- //普通按钮 此类型的按钮默认圆角为0,支持通过borderRadius属性重新设置圆角。
- Button('Ok', { type: ButtonType.Normal, stateEffect: true })
- .borderRadius(8)
- .backgroundColor(0x317aff)
- .width(90)
- .height(40)


2.添加属性和事件
- Button('点我')
- .width(100)
- .height(30)type(ButtonType.Normal)// 按钮类型
- .onclick(()=>{
- //处理点击事件
- })
更多查看官方文档:按钮(Button)-添加常用组件-添加组件-基于ArkTS的声明式开发范式-UI开发-开发-HarmonyOS应用开发
五.Slider:滑动条组件
- Slider({
- min:0,//最小值
- max:100,//最大值
- value:40,//当前值
- step:10,//滑动步长
- style: sliderstyle.0utset,// InSet
- direction: Axis.Horizontal,//Vertical
- reverse:false//是否反向滑动
- })
- .width('90%')
- .showTips(true)//是否展示value百分比提示
- .blockColor('#36d')
- .onChange(value =>{
- //value就是当前滑块值
- })
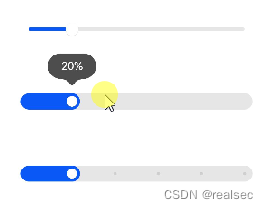
更多查看官方文档:slider-基础组件-组件参考(兼容JS的类Web开发范式-ArkUI.Full)-ArkTS API参考-HarmonyOS应用开发
六.Column与Row
1.纵向布局使用Column容器,横向布局采用Row容器

2.justifyContent和alignItems分别用来设置主轴和交叉轴的对齐方式


示例:
- @Entry
- @Component
- struct ColumnExample {
- build() {
- Column({ space: 5 }) {
- // 设置子元素垂直方向间距为5
- Text('space').width('90%')
- Column({ space: 5 }) {
- Column().width('100%').height(30).backgroundColor(0xAFEEEE)
- Column().width('100%').height(30).backgroundColor(0x00FFFF)
- }.width('90%').height(100).border({ width: 1 })
-
- // 设置子元素水平方向对齐方式
- Text('alignItems(Start)').width('90%')
- Column() {
- Column().width('50%').height(30).backgroundColor(0xAFEEEE)
- Column().width('50%').height(30).backgroundColor(0x00FFFF)
- }.alignItems(HorizontalAlign.Start).width('90%').border({ width: 1 })
-
- Text('alignItems(End)').width('90%')
- Column() {
- Column().width('50%').height(30).backgroundColor(0xAFEEEE)
- Column().width('50%').height(30).backgroundColor(0x00FFFF)
- }.alignItems(HorizontalAlign.End).width('90%').border({ width: 1 })
-
- Text('alignItems(Center)').width('90%')
- Column() {
- Column().width('50%').height(30).backgroundColor(0xAFEEEE)
- Column().width('50%').height(30).backgroundColor(0x00FFFF)
- }.alignItems(HorizontalAlign.Center).width('90%').border({ width: 1 })
-
- // 设置子元素垂直方向的对齐方式
- Text('justifyContent(Center)').width('90%')
- Column() {
- Column().width('90%').height(30).backgroundColor(0xAFEEEE)
- Column().width('90%').height(30).backgroundColor(0x00FFFF)
- }.height(100).border({ width: 1 }).justifyContent(FlexAlign.Center)
-
- Text('justifyContent(End)').width('90%')
- Column() {
- Column().width('90%').height(30).backgroundColor(0xAFEEEE)
- Column().width('90%').height(30).backgroundColor(0x00FFFF)
- }.height(100).border({ width: 1 }).justifyContent(FlexAlign.End)
- }.width('100%').padding({ top: 5 })
- RowExample()
- }
- }
-
-
- @Component
- struct RowExample {
- build() {
- Column({ space: 5 }) {
- // 设置子组件水平方向的间距为5
- Text('space').width('90%')
- Row({ space: 5 }) {
- Row().width('30%').height(50).backgroundColor(0xAFEEEE)
- Row().width('30%').height(50).backgroundColor(0x00FFFF)
- }.width('90%').height(107).border({ width: 1 })
-
- // 设置子元素垂直方向对齐方式
- Text('alignItems(Bottom)').width('90%')
- Row() {
- Row().width('30%').height(50).backgroundColor(0xAFEEEE)
- Row().width('30%').height(50).backgroundColor(0x00FFFF)
- }.width('90%').alignItems(VerticalAlign.Bottom).height('15%').border({ width: 1 })
-
- Text('alignItems(Center)').width('90%')
- Row() {
- Row().width('30%').height(50).backgroundColor(0xAFEEEE)
- Row().width('30%').height(50).backgroundColor(0x00FFFF)
- }.width('90%').alignItems(VerticalAlign.Center).height('15%').border({ width: 1 })
-
- // 设置子元素水平方向对齐方式
- Text('justifyContent(End)').width('90%')
- Row() {
- Row().width('30%').height(50).backgroundColor(0xAFEEEE)
- Row().width('30%').height(50).backgroundColor(0x00FFFF)
- }.width('90%').border({ width: 1 }).justifyContent(FlexAlign.End)
-
- Text('justifyContent(Center)').width('90%')
- Row() {
- Row().width('30%').height(50).backgroundColor(0xAFEEEE)
- Row().width('30%').height(50).backgroundColor(0x00FFFF)
- }.width('90%').border({ width: 1 }).justifyContent(FlexAlign.Center)
- }.width('100%')
- }
- }

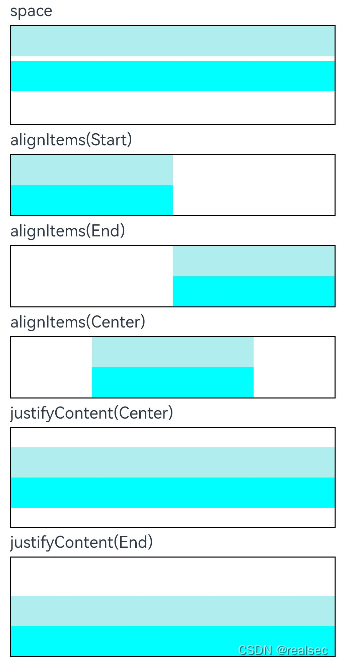
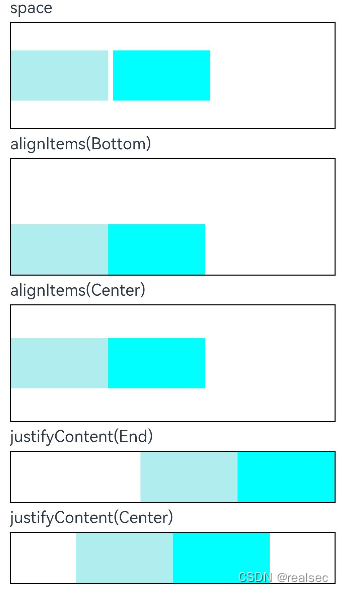
更多查看官方文档:Column-容器组件-组件参考(基于ArkTS的声明式开发范式)-ArkTS API参考-HarmonyOS应用开发
Row-容器组件-组件参考(基于ArkTS的声明式开发范式)-ArkTS API参考-HarmonyOS应用开发
七.循环控制
1.ForEach:循环遍历数组,根据数组内容渲染页面组件
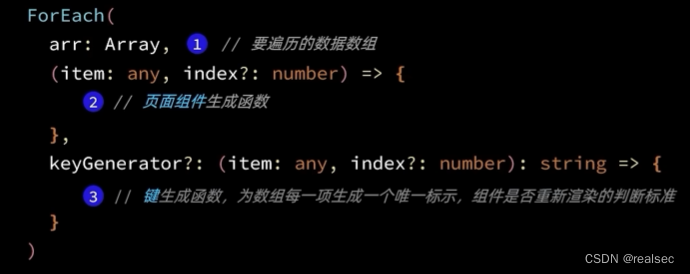
2.if/else:条件控制,根据数据状态的不同,染不同的页面组件
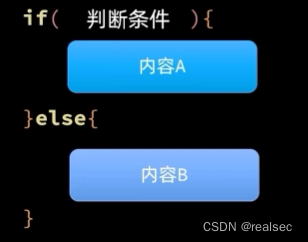
更多查看官方文档:if/else:条件渲染-渲染控制-学习ArkTS语言-入门-HarmonyOS应用开发
八.List
列表包含一系列相同宽度的列表项。适合连续、多行呈现同类数据,例如图片和文本。
- List({space:7}){
- ForEach(
- this.items,//循环数组
- (item:Item) => {
- ListItem(){ //List子组件
- ...
- }
- }
- )
- }
- .width('100%')
- .layoutWeight(1) // 设置权重
- .alignListItem(ListItemAlign.Center) //使List居中
更多查看官方文档:List-容器组件-组件参考(基于ArkTS的声明式开发范式)-ArkTS API参考-HarmonyOS应用开发
九.页面路由
页面路由指在应用程序中实现不同页面之间的跳转和数据传递。HarmonyOS提供了Router模块,通过不同的url地址,可以方便地进行页面路由,轻松地访问不同的页面。
- 页面栈的最大容量为32个页面。如果超过这个限制,可以调用router.clear()方法清空历史页面栈,释放内存空间。
Router模块提供了两种跳转模式,分别是router.pushUrl()和router.replaceUrl()。这两种模式决定了目标页是否会替换当前页。
- router.pushUrl():目标页不会替换当前页,而是压入页面栈。这样可以保留当前页的状态,并且可以通过返回键或者调用router.back()方法返回到当前页。
- router.replaceUrl():目标页会替换当前页,并销毁当前页。这样可以释放当前页的资源,并且无法返回到当前页。
同时,Router模块提供了两种实例模式,分别是Standard和Single。
-
Standard:标准实例模式,也是默认情况下的实例模式。每次调用该方法都会新建一个目标页,并压入栈顶。
-
Single:单实例模式。即如果目标页的url在页面栈中已经存在同url页面,则离栈顶最近的同url页面会被移动到栈顶,并重新加载;如果目标页的url在页面栈中不存在同url页面,则按照标准模式跳转。
1.首先要导入HarmonyOS提供的Router模块
import router from '@ohos.router';2.然后利用router实现跳转、返回等操作:
- router.pushUrl({
- url: 'pages/Detail' // 目标url
- },
- router.RouterMode.Standard,//页面模式:RouterMode枚举
- (err) => {
- if (err) {
- console.error(err);//异常响应回调函数
- return;
- }
- console.info('succeeded.');
- });
3.可以使用以下几种方式进行页面返回:
返回提示
- //返回确认提示
- router.showAlertBeforeBackPage({
- message:"确定返回吗?"
- })
方式一:返回到上一个页面。
- router.showAlertBeforeBackPage({
- message:"确定返回吗?"
- })
- //确定之后才会回退
- router.back();
这种方式会返回到上一个页面,即上一个页面在页面栈中的位置。但是,上一个页面必须存在于页面栈中才能够返回,否则该方法将无效。
方式二:返回到指定页面。
- router.back({
- url: 'pages/Home'
- });
这种方式可以返回到指定页面,需要指定目标页的路径。目标页必须存在于页面栈中才能够返回。
方式三:返回到指定页面,并传递自定义参数信息。
- router.back({
- url: 'pages/Home',
- params: {
- info: '来自Home页'
- }
- });
这种方式不仅可以返回到指定页面,还可以在返回的同时传递自定义参数信息。这些参数信息可以在目标页中通过调用router.getParams()方法进行获取和解析。
解析参数
- //获取传递过来的参数
- onPageShow() {
- const params = router.getParams(); // 获取传递过来的参数对象
- const info = params['info']; // 获取info属性的值
- }
更多查看官方文档:页面路由(router)-设置页面路由和组件导航-基于ArkTS的声明式开发范式-UI开发-开发-HarmonyOS应用开发
十.页面动画
1.属性动画 一加全部加
属性动画是通过设置组件的animation属性来给组件添加动画,当组件的width、height、opacity、backgroundcolor、scale、rotate、translate等属性变更时,可以实现渐变过渡效果。
- Text('^_^')
- .position({
- x:10,// x轴坐标
- y:0// y轴坐标
- })
- .rotate({
- angle:0,//旋转角度
- centerX:'50%',// 旋转中心横坐标
- centerY:'50%'// 旋转中心纵坐标
- })
- .animation({
- duration: 1000,
- curve: Curve,EaseInOut
- )
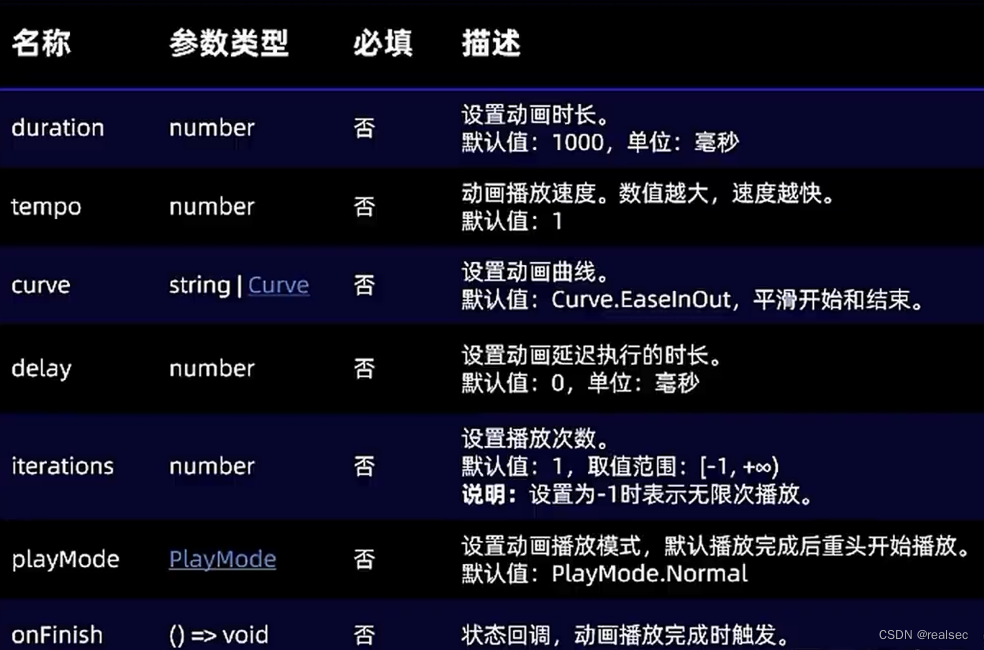
2. 显式动画 更加灵活
显式动画是通过全局animateTo函数来修改组件属性,实现属性变化时的渐变过渡效果。
- Text('^_^')
- .position({
- x:10,// x轴坐标
- y:0// y轴坐标
- })
- .rotate({
- angle:0,//旋转角度
- centerX:'50%',// 旋转中心横坐标
- centerY:'50%'// 旋转中心纵坐标
- })
- .onClick(()=>{
- animateTo(
- {duration:1000},
- ()=>{
- // 开始游戏,显示小鱼
- this.isBegin = true
- }
- )
- })

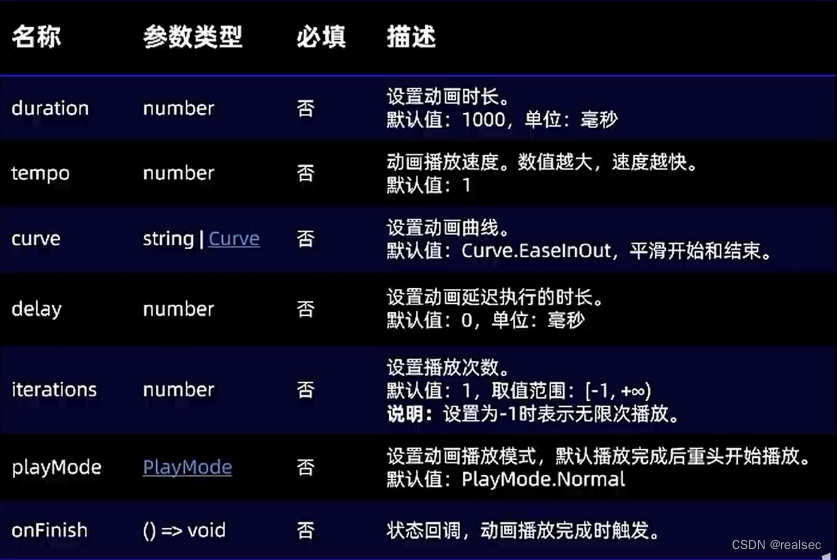
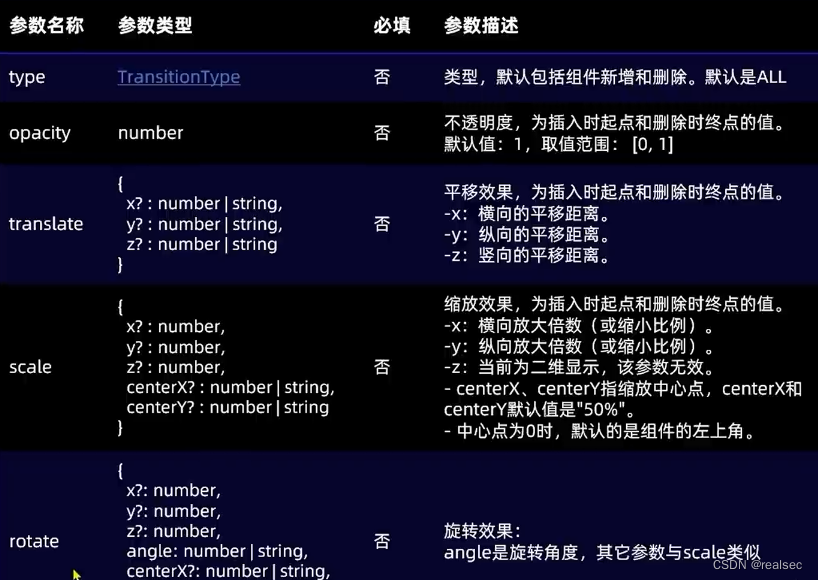
3.组件转场动画
- // 过度动画 显示动画
- .transition({
- type:TransitionType.Insert,
- opacity:0,
- translate:{x:-270}
- })
更多查看官方文档:布局更新动画-页面内的动画-使用动画-基于ArkTS的声明式开发范式-UI开发-开发-HarmonyOS应用开发


