- 1MySQL基础总结_mysql根据性别对员工进行分组
- 2Context Capture10.20 安装教程(附安装包)
- 3在线设计数据库表用Itbuilder,极简易用真香!!!_数据库表设计工具
- 4uniapp:完成商品分类页面(scroll-view),左侧导航,右侧商品_uniapp左侧导航右侧内容
- 5一篇文章教会你搭建Hive分布式集群_hive集群搭建
- 6数据库系统概述之数据库的安全性_]链路加密所需密码设备数量相对较少,容易被非法监听者发现并从中获取敏感信息
- 7【Android】保留elevation层级效果,舍弃阴影效果
- 8从零开始学习大模型-第一章-大模型是什么_大模型如何入门教程
- 9卷王之王---MySQL最强篇 面试必备_卷王 数据库
- 10计算机程序员的职业能力_程序员需要掌握的技能
【全网最简单】基于Amazon EC2 linux快速部署 Stable Diffusion WebUI_linux搭建stable-diffusion-webui
赞
踩
前言
Stable Diffusion已成为2023年最流行的文生图模型之一,它使用超级简单、完全开源免费,生成的图片以假乱真、震惊四座。
Stable Diffusion WebUI是由 Automatic1111 开发的简单但功能强大的 Web 界面,可以帮助我们轻松运行Stable Diffusion模型。
Stable Diffusion运行需要高性能的显卡支持,个人电脑一般很难达到其需要的性能要求,比较好的解决方案是在云服务上部署运行Stable Diffusion
我发现当前网上大部分Stable Diffusion WebUI安装教程需要安装大量的环境插件,费事费力,还容易有兼容性问题。所以,我测试在Amazon EC2 linux 快速部署 Stable Diffusion WebUI,适合初创公司或者个人开发者
准备
亚马逊云账号
本地部署Stable Diffusion WebUI
系统配置需求
Stable Diffusion还是比较吃资源的,因此对基础硬件有一定要求。
NVIDIA RTX GPU 至少 8GB 显存
至少50GB 可用硬盘空间
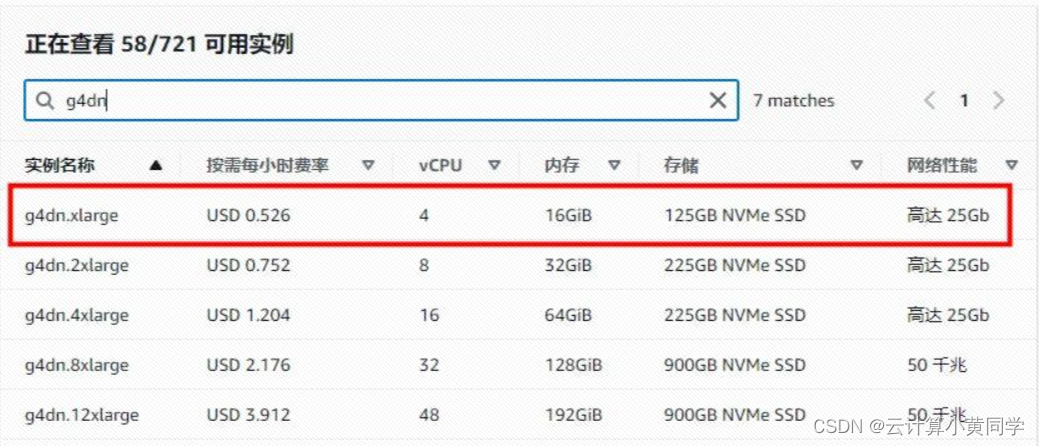
我对比了一下,目前最经济的是AWS的g4dn.xlarge,¥3.682元/小时

启动EC2实例
地区最好选择美国地区,下载安装模型速度快
镜像我们选择Ubuntu的镜像,并且附带GPU 驱动,例如:Deep Learning OSS Nvidia Driver AMI GPU PyTorch 2.0.1
实例类型选择:g4dn.xlarge
磁盘我们选择挂盘100G
实例启动成功
安装Stable Diffusion WebUI
执行下面的命令
sudo apt install wget git python3 python3-venv libgl1 libglib2.0-0
git clone https://github.com/AUTOMATIC1111/stable-diffusion-webui.git
cd stable-diffusion-webui
./webui.sh  --theme dark --precision full --no-half --port 7860 --listen --gradio-auth root:root
- 1
- 2
- 3
- 4
如果如图报错,原因是使用root运行webui.sh,需要注释掉webui.sh中关于root权限的判断

vim webui.sh
- 1

再次执行启动命令:./webui.sh --theme dark --precision full --no-half --port 7860 --listen --gradio-auth root:root
Stable Diffusion WebUI会自动安装各种依赖,最后启动成功,端口7860,账号密码:root/root

如果出现以下报错,请自行根据报错内容调试
1、ERROR: This script must not be launched as root, aborting…
方法一: 运行 bash webui.sh如果是root用户,需要注释掉webui.sh中关于root权限的判断。
方法二:root用户还可以直接运行 bash webui.sh -f
2、RuntimeError: Torch is not able to use GPU;
启动命令增加–skip-torch-cuda-test
3、ImportError: libGL.so.1: cannot open shared object file: No such file or directory
apt-get update && apt-get install libgl1
4、The NVIDIA driver on your system is too old(found version 9010)
如何在Ubuntu18.04安装Tesla T4板的驱动程序【改进中-】
5、RuntimeError: “LayerNormKernelImpl” not implemented for ‘Half’
启动命令增加–precision full --no-half
6、http://127.0.0.1:7860公网地址无法访问
启动命令增加 --listen --gradio-auth root:root
使用Stable Diffusion WebUI
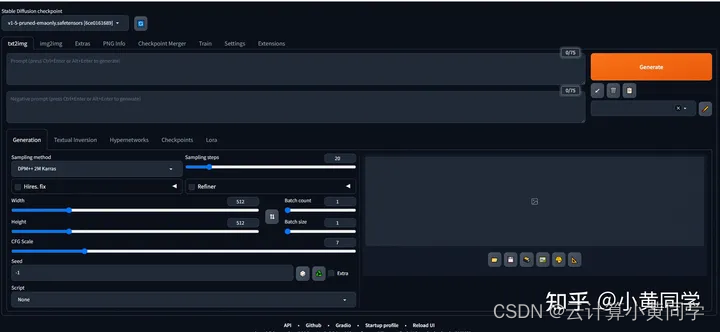
能访问ip:7860,说明Stable Diffusion WebUI安装成功

这边我借用其他博主的sd使用例子,为大家简单展示一下Stable Diffusion WebUI的使用方法
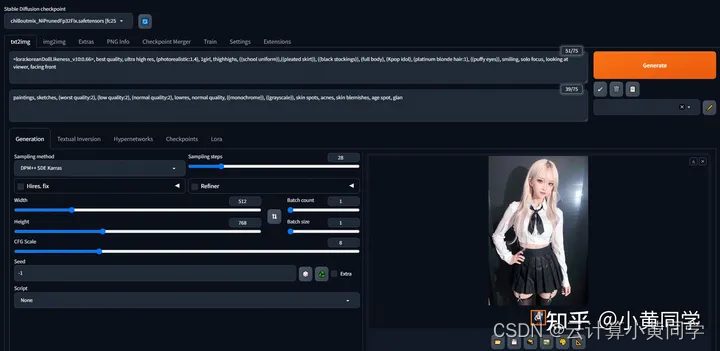
这里我将使用chilloutmix + KoreanDollLikeness生成写实风韩系偶像小姐姐。
模型
首先需要下载chilloutmix模型(我用的是chilloutmix_NiPrunedFp32Fix.safetensors),将其拷贝到models/Stable-diffusion目录,还需要下载KoreanDollLikeness这个LoRA模型,将其拷贝到Lora目录
Prompt
完整的promt是:
<lora:koreanDollLikeness_v10:0.66>, best quality, ultra high res, (photorealistic:1.4), 1girl, thighhighs, ((school uniform)),((pleated skirt)), ((black stockings)), (full body), (Kpop idol), (platinum blonde hair:1), ((puffy eyes)), smiling, solo focus, looking at viewer, facing front
- 1
Negative prompt
paintings, sketches, (worst quality:2), (low quality:2), (normal quality:2), lowres, normal quality, ((monochrome)), ((grayscale)), skin spots, acnes, skin blemishes, age spot, glan
- 1
这里主要剔除了绘画风、简笔画、低质量、灰度图,同时去除雀斑、痤疮等皮肤瑕疵。
参数设置
为了让图片生成得更加真实自然,我们需要对参数做一些调整,需要调整的参数如下:
- Sampler: DPM++ SDE Karras
- Sample Steps: 28
- CFG scale: 8
- Size: 512x768
这里鼓励大家多尝试其他取值,上面只是我认为效果最好的一组参数。
生成
完成上面所有设置后,就可以点击Generate按钮生成图片了。生成速度由你的实例性能决定。


后续
如果还有安装Stable Diffusion WebUI的问题,可以联系我+v:popai4520,看能否帮助到你


