- 1无人机应用场景和发展趋势,无人机技术的未来发展趋势分析
- 2uniapp 学习笔记三十五 首页底部菜单独立封装_uniapp 做一个圆弧形菜单
- 3vue深度监听对象newVal和oldVal一样怎么回事_vue监测表单变化 oldval, newval 一样
- 4Android 11.0 SystemUI 状态栏下拉快捷面板,添加“反色“快捷开关_androidsystemui下拉快捷键
- 5mysql 5.7 undo_MySQL5.7中Undo回收收缩相关参数
- 6Python中的pywin32入门
- 71、一个简单的 ROS web 人机建图页面开发_ros web界面
- 8JS 生成随机数_js生成100个随机浮点数组
- 9Android实现控件随手指而移动,解决onTouch事件和onClick事件的冲突,以及一键还原位置_android action_move onclick 同时
- 10java相机开发_控制相机 | Android 开发者 | Android Developers
【鸿蒙应用ArkTS开发系列】- 云开发入门实战二 实现省市地区三级联动地址选择器组件(下)_鸿蒙多级联动
赞
踩
概述
我们在前面的课程,对云开发的入门做了介绍,以及使用一个省市地区联动的地址选择器示例,为大家演示了如何创建云开发工程,以及云数据库、云函数的开发实战。如果有读者还没看过前面的这两篇文章,那在读这篇文章之前,建议先看下以下这两篇文章,之后再来阅读本篇文章,会更好理解云开发这块的内容。
《【鸿蒙应用ArkTS开发系列】- 云开发入门简介》
《【鸿蒙应用ArkTS开发系列】- 云开发入门实战二 实现省市地区三级联动地址选择器组件(上)》
那我们现在正式开始今天的课程,本次课程是 《【鸿蒙应用ArkTS开发系列】- 云开发入门实战二 实现省市地区三级联动地址选择器组件(上)》 的下篇,上篇我们完成了省市地区联动的地址选择器云工程的云数据、云函数的开发跟部署,这次的课程,我们将开发一个鸿蒙客户端,来调用云服务的API,获取地址信息数据进行展示。
通过本次课程,我们将学习到以下内容:
- 鸿蒙客户端如何集成AGC SDK;
- 鸿蒙客户端如何调用云函数获取数据;
- 实现省市地区联动的地址选择器组件;
- ArkUI @Provide、@Consume、@Watch等状态管理装饰器的使用
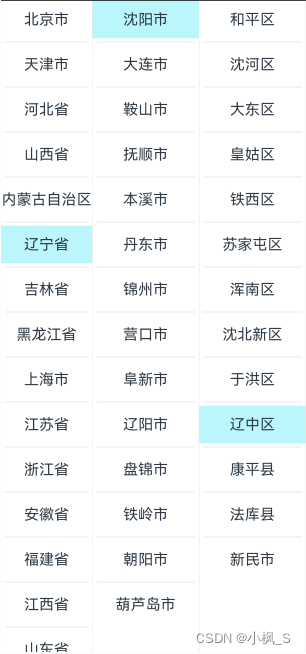
那下面我们直接进入本次课程的学习。按照惯例,这里先上成品效果图:
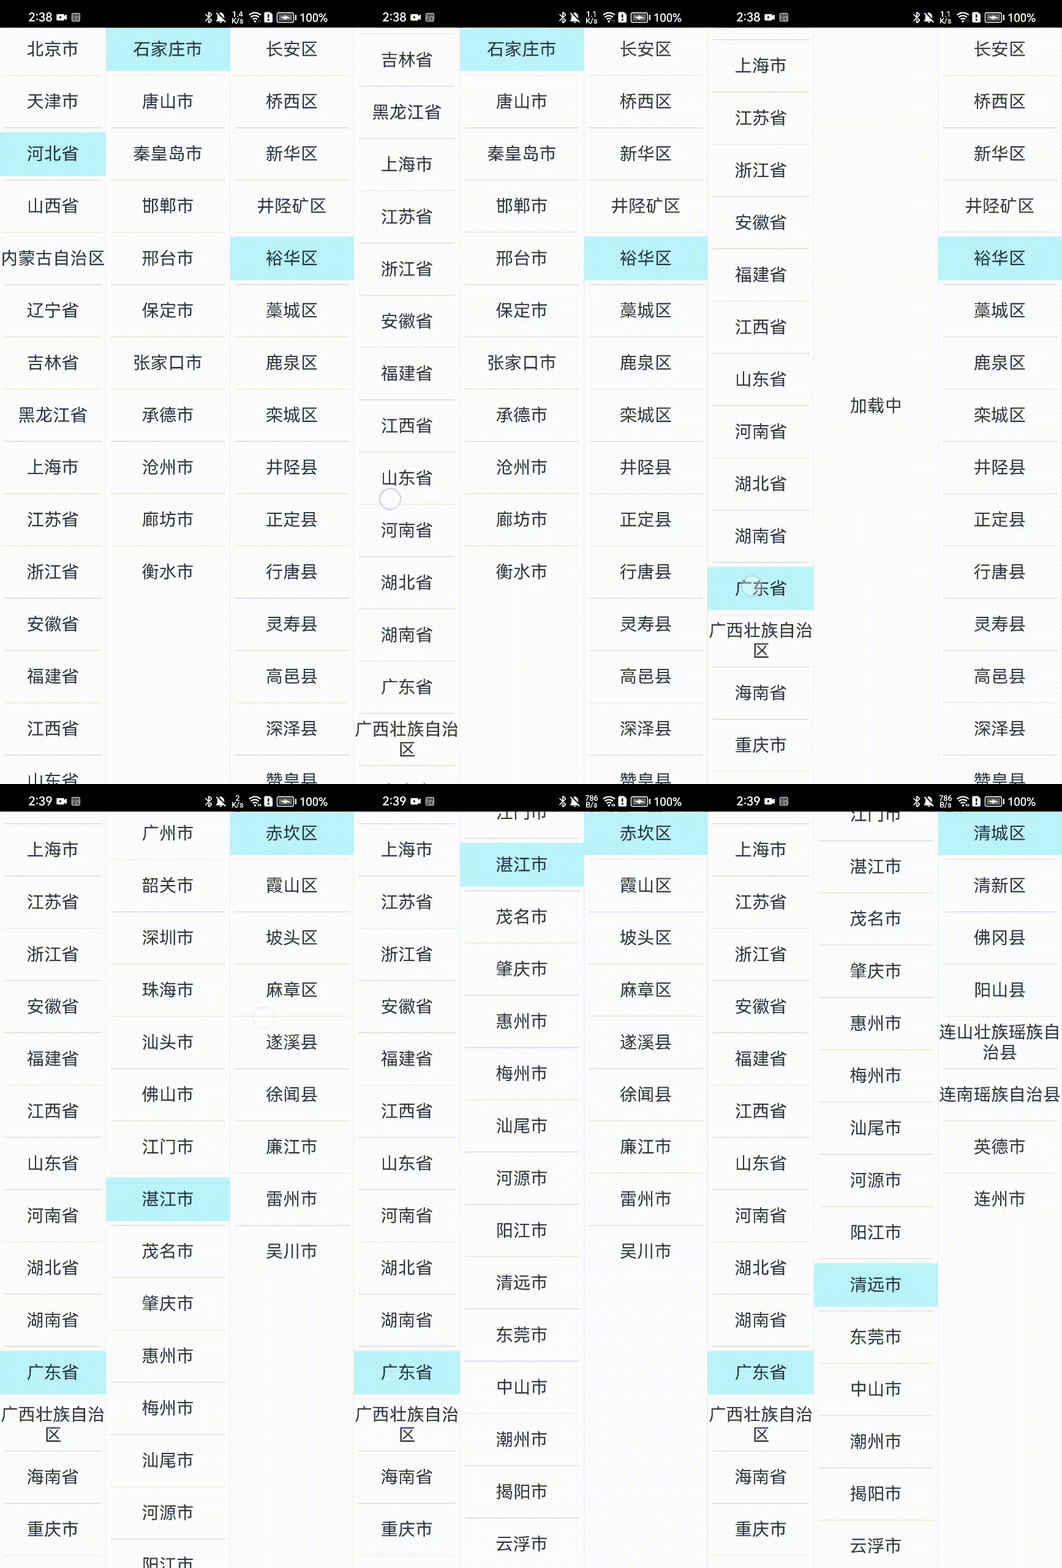
上面由于是用的云端地址位置数据,因此会有一个加载的过程,实际开发时,我们也可以将地址数据内置到客户端中,或者网络数据做一个缓存处理,这样用户体验会更好一些。
端云调用流程
下面我们先看下客户端跟云服务之间的一个交互流程图:
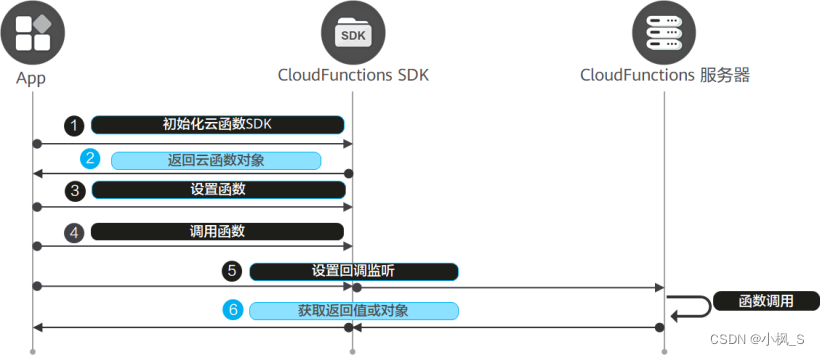
端侧集成AGC SDK
客户端工程应该怎么集成AGC SDK呢,这一步,我建议还是跟《【鸿蒙应用ArkTS开发系列】- 云开发入门简介》 中提到的,使用端云一体化开发目标来创建工程,这样 DevEco Studio会为端侧工程自动集成AGC相关云服务最新版本SDK。
- “entry/src/main/resources/rawfile/agconnect-services.json”:AGC
SDK配置文件,内含client_secret和api_key,请妥善保管。
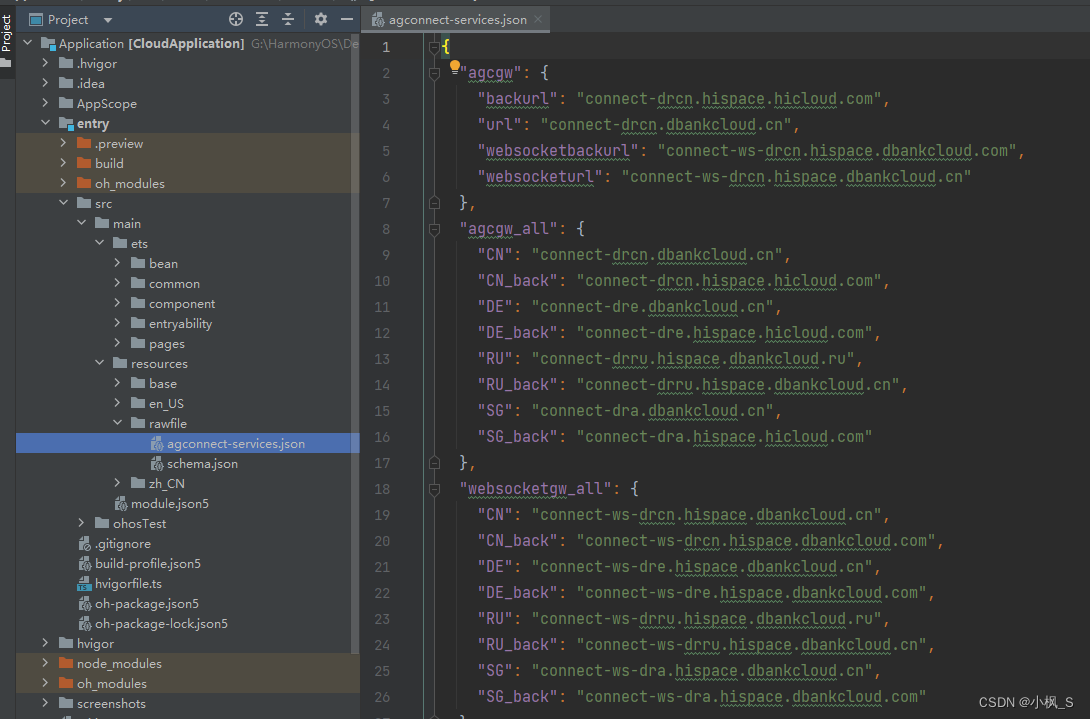
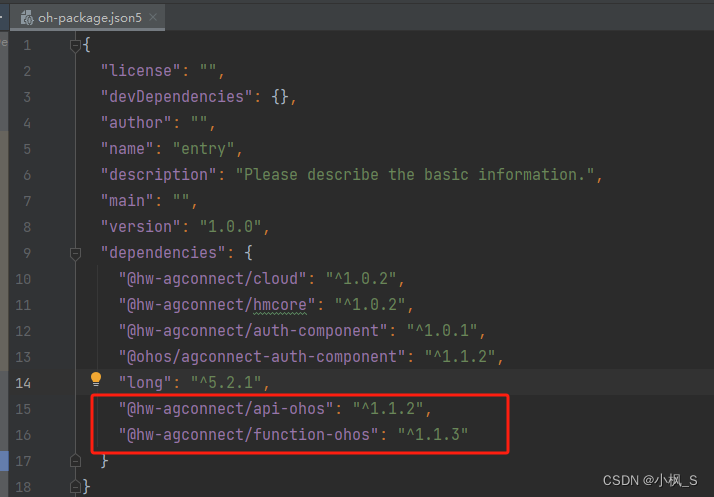
- “entry/oh-package.json5”:自动引入了AGC相关云服务(认证服务、云函数、云存储)最新版本SDK,同时会自动集成端云一体化登录组件的最新SDK。
工程同步成功后可以看到当前从ohpm仓获取的最新版本。
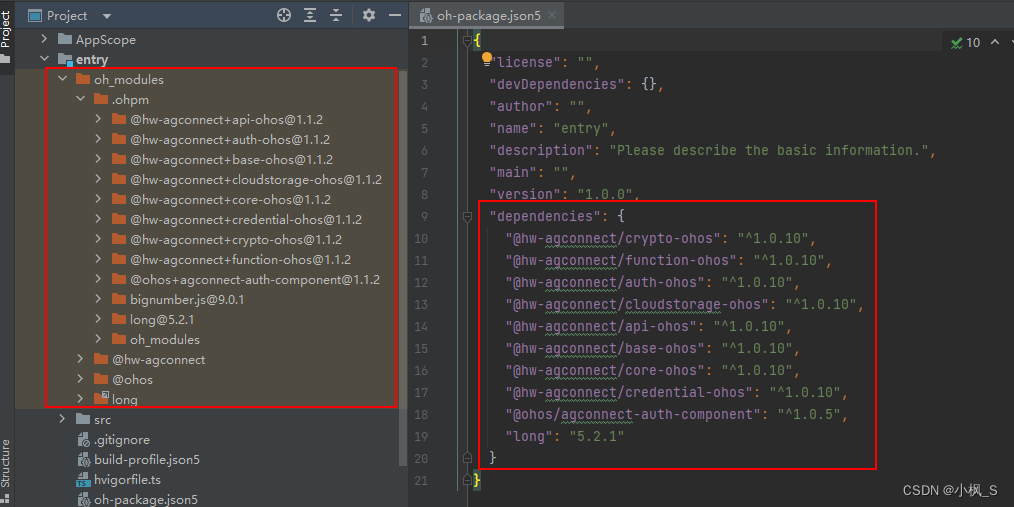
上图是之前创建的,现在的版本的已经有所更新,大家根据IDE实际创建的版本来。我目前工程集成的SDK是下面这样的
如果是已经存在的端侧工程,那需要按照官网的AGC SDK 集成方式集成,包括从AppGallery-Connect 中下载项目agconnect-services.json文件导入到端侧工程,以及对应的AGC SDK库进行 ohpm依赖安装。
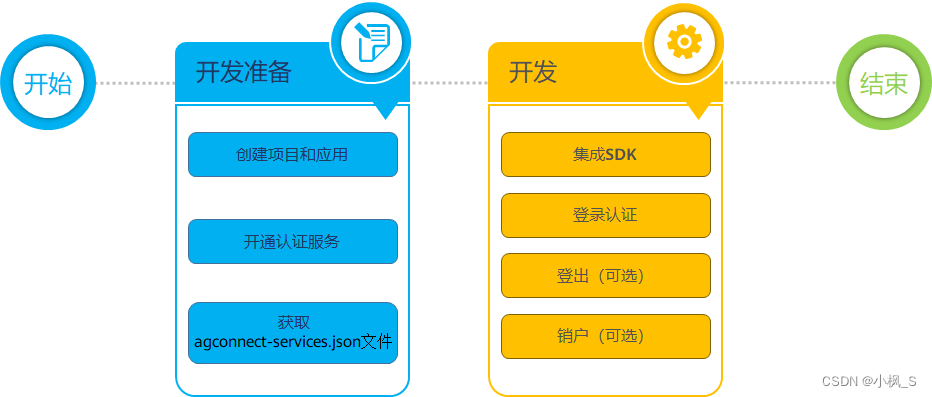 官网 HarmonyOS使用入门(ArkTS API9及以上) 对鸿蒙集成AGC服务 讲解的很详细,这里就不过多赘述,大家直接看官方文档即可。
做完前期工作,那我们开始进入本篇课程的重点内容,开发一个省市地区联动的地址选择器组件。
端侧省市地区联动的地址选择器组件开发
创建省市数据模型
打开DevEco Studio,在"Application-> entry -> src -> main -> ets 下创建一个bean目录,用于存放省市数据的数据模型类,在目录中创建ProvinceBean(省)、CityBean(市)、DistrictBean(区县),

完成代码如下:
ProvinceBean.ts
/**
 * 省份信息
 */
export class ProvinceBean {
  public id: number;
  public code: string;
  public label: string;
}
- 1
- 2
- 3
- 4
- 5
- 6
- 7
- 8
CityBean.ts
/**
 * 城市信息
 */
export class CityBean {
  public id: number;
  public province_code: string;
  public code: string;
  public label: string;
}
- 1
- 2
- 3
- 4
- 5
- 6
- 7
- 8
- 9
- 10
DistrictBean.ts
/**
 * 区县信息
 */
export class DistrictBean {
  public id: number;
  public city_code: string;
  public code: string;
  public label: string;
}
- 1
- 2
- 3
- 4
- 5
- 6
- 7
- 8
- 9
- 10
创建省市地区视图UI子组件
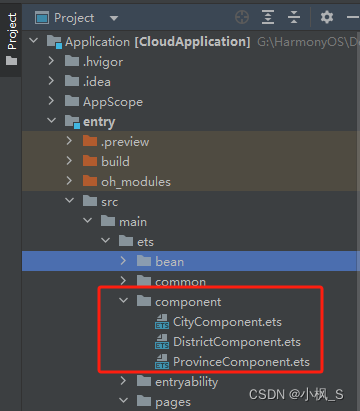
打开DevEco Studio,在"Application-> entry -> src -> main -> ets "目录下新建一个"component"文件夹来存放省份UI子组件、城市UI子组件、区县UI子组件。
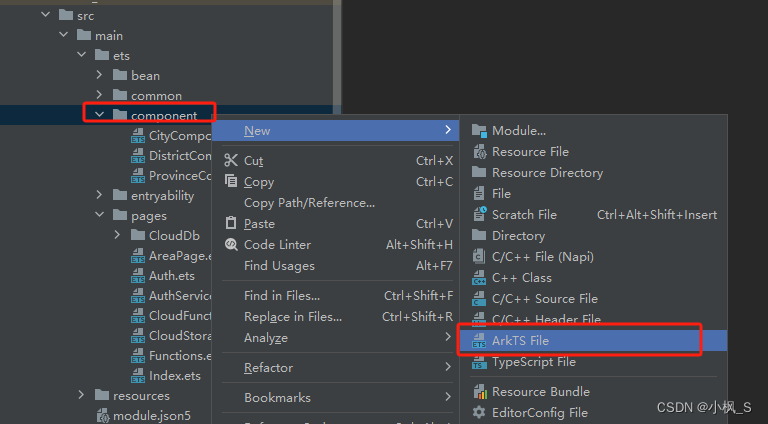
在component目录上右键,点击New ->ArkTS File 菜单, 创建三个UI子组件(ProvinceComponent、CityComponent、DistrictComponent)
完整代码如下:
ProvinceComponent.ets
import agconnect from '@hw-agconnect/api-ohos';
import "@hw-agconnect/function-ohos";

import { ProvinceBean } from '../bean/ProvinceBean'
import { Log } from '../common/Log';

@Component
export struct ProvinceComponent {
  @State mProvinceData: ProvinceBean[] = [];
  @Consume currentProvince: ProvinceBean;

  aboutToAppear() {
    this.callFunction();
  }

  build() {
    Column() {

      Text('省份')
        .width('100%')
        .height(50)
        .fontSize(20)
        .fontWeight(500)
        .textAlign(TextAlign.Center)
        .border({
          color: '#e2e2e2',
          width: { bottom: 1 }
        })

      Column() {

        if (this.mProvinceData.length === 0) {

          Text('加载中').fontSize(20)

        } else {

          List({ space: 10, initialIndex: 0 }) {
            ForEach(this.mProvinceData, (item: ProvinceBean) => {
              ListItem() {
                Text(item.label)
                  .width('100%')
                  .height(50)
                  .fontSize(20)
                  .textAlign(TextAlign.Center)
              }
              .backgroundColor(this.currentProvince?.code === item.code ? '#c8aaf4fc' : Color.Transparent)
              .onClick(() => {
                this.currentProvince = item;
              })
            }, item => JSON.stringify(item))
          }
          .width('100%')
          .height('100%')
          .divider({ strokeWidth: 1, color: "#e2e2e2", startMargin: 5, endMargin: 5 })
        }
      }
      .backgroundColor(Color.White)
      .border({
        color: '#e2e2e2',
        width: { right: 0.5 }
      })
      .width('100%')
      .layoutWeight(1)
      .justifyContent(FlexAlign.Center)
    }
    .height('100%')
  }

  callFunction() {
    agconnect.instance().init(getContext(this));
    let functionCallable = agconnect.function().wrap("province-query-$latest");
    let params = {};
    functionCallable.call(params).then((ret: any) => {
      Log.info("Functions", "Cloud Function Called, Returned Value: " + JSON.stringify(ret.getValue()));
      this.mProvinceData = ret.getValue().result;
      if (this.mProvinceData.length > 0) {
        this.currentProvince = this.mProvinceData[0];
      }
    }).catch((error: any) => {
      Log.error("Functions", "Error - could not obtain cloud function result. Error Detail: " + JSON.stringify(error));
    });
  }
}
- 1
- 2
- 3
- 4
- 5
- 6
- 7
- 8
- 9
- 10
- 11
- 12
- 13
- 14
- 15
- 16
- 17
- 18
- 19
- 20
- 21
- 22
- 23
- 24
- 25
- 26
- 27
- 28
- 29
- 30
- 31
- 32
- 33
- 34
- 35
- 36
- 37
- 38
- 39
- 40
- 41
- 42
- 43
- 44
- 45
- 46
- 47
- 48
- 49
- 50
- 51
- 52
- 53
- 54
- 55
- 56
- 57
- 58
- 59
- 60
- 61
- 62
- 63
- 64
- 65
- 66
- 67
- 68
- 69
- 70
- 71
- 72
- 73
- 74
- 75
- 76
- 77
- 78
- 79
- 80
- 81
- 82
- 83
- 84
- 85
CityComponent.ets
import agconnect from '@hw-agconnect/api-ohos';
import { CityBean } from '../bean/CityBean';
import { ProvinceBean } from '../bean/ProvinceBean';
import { Log } from '../common/Log';

@Component
export struct CityComponent {
  @State mTip: string = ''
  @State mCityData: CityBean[] = [];
  @Consume @Watch('onProvinceChange') currentProvince: ProvinceBean;
  @Consume currentCity: CityBean;

  build() {
    Column() {

      Text('城市')
        .width('100%')
        .height(50)
        .fontSize(20)
        .fontWeight(500)
        .textAlign(TextAlign.Center)
        .border({
          color: '#e2e2e2',
          width: { bottom: 1 }
        })

      Column() {

        if (this.mCityData.length === 0) {

          Text(this.mTip).fontSize(20)

        } else {

          List({ space: 10, initialIndex: 0 }) {
            ForEach(this.mCityData, (item: CityBean) => {
              ListItem() {
                Text(item.label)
                  .width('100%')
                  .height(50)
                  .fontSize(20)
                  .textAlign(TextAlign.Center)
              }
              .backgroundColor(this.currentCity?.code === item.code ? '#c8aaf4fc' : Color.Transparent)
              .onClick(() => {
                this.currentCity = item;
              })
            }, item => JSON.stringify(item))
          }
          .width('100%')
          .height('100%')
          .divider({ strokeWidth: 1, color: "#e2e2e2", startMargin: 5, endMargin: 5 })
        }
      }
      .backgroundColor(Color.White)
      .border({
        color: '#e2e2e2',
        width: { right: 0.5 }
      })
      .width('100%')
      .layoutWeight(1)
      .justifyContent(FlexAlign.Center)
    }
    .height('100%')
  }

  onProvinceChange() {
    Log.info("Functions", "onProvinceChange");
    this.mCityData.splice(0, this.mCityData.length);
    if (this.currentProvince) {
      this.mTip = '加载中';
      this.callFunction(this.currentProvince.code);
    }
  }

  callFunction(provinceCode: string) {
    agconnect.instance().init(getContext(this));
    let functionCallable = agconnect.function().wrap("city-query-$latest");
    let params = { "code": provinceCode };
    Log.info("Functions", "Cloud Function Called, body: " + JSON.stringify(params));
    functionCallable.call(params).then((ret: any) => {
      Log.info("Functions", "Cloud Function Called, Returned Value: " + JSON.stringify(ret.getValue()));
      this.mCityData = ret.getValue().result;
      if (this.mCityData.length > 0) {
        this.currentCity = this.mCityData[0];
      }
    }).catch((error: any) => {
      Log.error("Functions", "Error - could not obtain cloud function result. Error Detail: " + JSON.stringify(error));
    });
  }
}
- 1
- 2
- 3
- 4
- 5
- 6
- 7
- 8
- 9
- 10
- 11
- 12
- 13
- 14
- 15
- 16
- 17
- 18
- 19
- 20
- 21
- 22
- 23
- 24
- 25
- 26
- 27
- 28
- 29
- 30
- 31
- 32
- 33
- 34
- 35
- 36
- 37
- 38
- 39
- 40
- 41
- 42
- 43
- 44
- 45
- 46
- 47
- 48
- 49
- 50
- 51
- 52
- 53
- 54
- 55
- 56
- 57
- 58
- 59
- 60
- 61
- 62
- 63
- 64
- 65
- 66
- 67
- 68
- 69
- 70
- 71
- 72
- 73
- 74
- 75
- 76
- 77
- 78
- 79
- 80
- 81
- 82
- 83
- 84
- 85
- 86
- 87
- 88
- 89
- 90
- 91
- 92
- 93
DistrictComponent.ets
import agconnect from '@hw-agconnect/api-ohos';
import { CityBean } from '../bean/CityBean';
import { DistrictBean } from '../bean/DistrictBean';
import { Log } from '../common/Log';
import { ProvinceBean } from '../bean/ProvinceBean';

@Component
export struct DistrictComponent {
  @State mTip: string = ''
  @State mDistrictData: DistrictBean[] = [];
  @Consume @Watch('onProvinceChange') currentProvince: ProvinceBean;
  @Consume @Watch('onCityChange') currentCity: CityBean;
  @Consume currentDistrict: DistrictBean;

  build() {
    Column() {

      Text('区县')
        .width('100%')
        .height(50)
        .fontSize(20)
        .fontWeight(500)
        .textAlign(TextAlign.Center)
        .border({
          color: '#e2e2e2',
          width: { bottom: 1 }
        })

      Column() {

        if (this.mDistrictData.length === 0) {

          Text(this.mTip).fontSize(20)

        } else {

          List({ space: 10, initialIndex: 0 }) {
            ForEach(this.mDistrictData, (item: DistrictBean) => {
              ListItem() {
                Text(item.label)
                  .width('100%')
                  .height(50)
                  .fontSize(20)
                  .textAlign(TextAlign.Center)
              }
              .backgroundColor(this.currentDistrict?.code === item.code ? '#c8aaf4fc' : Color.Transparent)
              .onClick(() => {
                this.currentDistrict = item;
              })
            }, item => JSON.stringify(item))
          }
          .width('100%')
          .height('100%')
          .divider({ strokeWidth: 1, color: "#e2e2e2", startMargin: 5, endMargin: 5 })
        }
      }
      .backgroundColor(Color.White)
      .border({
        color: '#e2e2e2',
        width: { right: 0.5 }
      })
      .width('100%')
      .layoutWeight(1)
      .justifyContent(FlexAlign.Center)
    }
    .height('100%')
  }

  onProvinceChange() {
    this.mDistrictData.splice(0, this.mDistrictData.length);
  }

  onCityChange() {
    Log.info("Functions", "onCityChange");
    this.mDistrictData.splice(0, this.mDistrictData.length);
    if (this.currentCity) {
      this.mTip = '加载中';
      this.callFunction(this.currentCity.code);
    }
  }

  callFunction(cityCode: string) {
    agconnect.instance().init(getContext(this));
    let functionCallable = agconnect.function().wrap("districts-query-$latest");
    let params = { "code": cityCode };
    Log.info("Functions", "Cloud Function Called, body: " + JSON.stringify(params));
    functionCallable.call(params).then((ret: any) => {
      Log.info("Functions", "Cloud Function Called, Returned Value: " + JSON.stringify(ret.getValue()));
      this.mDistrictData = ret.getValue().result;
      if (this.mDistrictData.length > 0) {
        this.currentDistrict = this.mDistrictData[0];
      }
    }).catch((error: any) => {
      Log.error("Functions", "Error - could not obtain cloud function result. Error Detail: " + JSON.stringify(error));
    });
  }
}
- 1
- 2
- 3
- 4
- 5
- 6
- 7
- 8
- 9
- 10
- 11
- 12
- 13
- 14
- 15
- 16
- 17
- 18
- 19
- 20
- 21
- 22
- 23
- 24
- 25
- 26
- 27
- 28
- 29
- 30
- 31
- 32
- 33
- 34
- 35
- 36
- 37
- 38
- 39
- 40
- 41
- 42
- 43
- 44
- 45
- 46
- 47
- 48
- 49
- 50
- 51
- 52
- 53
- 54
- 55
- 56
- 57
- 58
- 59
- 60
- 61
- 62
- 63
- 64
- 65
- 66
- 67
- 68
- 69
- 70
- 71
- 72
- 73
- 74
- 75
- 76
- 77
- 78
- 79
- 80
- 81
- 82
- 83
- 84
- 85
- 86
- 87
- 88
- 89
- 90
- 91
- 92
- 93
- 94
- 95
- 96
- 97
- 98
三个UI子组件的UI样式基本一致,功能也是基本一致,大家也可以进行代码封装重构,基于通用模型抽取成一个模板组件,这里只演示功能,就不过多赘述。在这里我们就拿城市列表视图 CityComponent.ets来进行代码的讲解。
1、首先我们定义了四个状态变量。
  @State mTip: string = ''
  @State mCityData: CityBean[] = [];
  @Consume @Watch('onProvinceChange') currentProvince: ProvinceBean;
  @Consume currentCity: CityBean;
- 1
- 2
- 3
- 4
- mTip 用于显示加载中提示语
- mCityData 是城市列表的数据源
- currentProvince 是当前选中的省份信息对象(我们基于该对象的省份编码来查询城市列表)。
- currentCity 是记录当前选中的城市。
这里currentProvince 、currentCity 使用**@Consume装饰**,用于跟页面中 @Provide装饰 的状态变量(currentProvince 、currentCity)做双向状态同步,这样Page页面可以拿到当前选中的省份、选中的城市的数据,其他的子组件之间也可以进行数据共享。
currentProvince 同时还用了 @Watch(‘onProvinceChange’)装饰,因为城市列表视图 CityComponent需要实时监听切换省份的事件,来动态调用云函数接口获取对应省份的城市数据,因此这里使用@Watch对currentProvince数据进行观察,如果省份视图子组件中选中的省份有所改变,onProvinceChange方法将会接收到回调。
2、build 方法
UI视图绘制这里,我们根据城市数据源的数据情况,如果是没数据,就显示mTip ,如果mCityData 有数据,就使用一个列表进行数据展示
2、onProvinceChange方法
onProvinceChange() {
    Log.info("Functions", "onProvinceChange");
    this.mCityData.splice(0, this.mCityData.length);
    if (this.currentProvince) {
      this.mTip = '加载中';
      this.callFunction(this.currentProvince.code);
    }
  }
- 1
- 2
- 3
- 4
- 5
- 6
- 7
- 8
当选中的省份数据有变动时,onProvinceChange会被触发,我们在该方法中将mCityData 数据源清空,给mTip 设置一个等待提示语,然后调用callFunction 方法请求云函数根据省份编码查询城市列表数据。因为currentProvince 是跟Page页面和省份子组件是进行数据双向同步的,因此onProvinceChange触发的时候this.currentProvince.code 也是能拿到最新的切换后的省份编码。
3、callFunction方法
这里我们重点讲下这个方法,这关系到云函数的调用。
 callFunction(provinceCode: string) {
    agconnect.instance().init(getContext(this));
    let functionCallable = agconnect.function().wrap("city-query-$latest");
    let params = { "code": provinceCode };
    Log.info("Functions", "Cloud Function Called, body: " + JSON.stringify(params));
    functionCallable.call(params).then((ret: any) => {
      Log.info("Functions", "Cloud Function Called, Returned Value: " + JSON.stringify(ret.getValue()));
      this.mCityData = ret.getValue().result;
      if (this.mCityData.length > 0) {
        this.currentCity = this.mCityData[0];
      }
    }).catch((error: any) => {
      Log.error("Functions", "Error - could not obtain cloud function result. Error Detail: " + JSON.stringify(error));
    });
  }
- 1
- 2
- 3
- 4
- 5
- 6
- 7
- 8
- 9
- 10
- 11
- 12
- 13
- 14
- 15
- 拿到agconnect实例并进行初始化
- 通过 agconnect.function().wrap(“city-query-$latest”) 拿到云函数对象控制器,这里具体要调用哪一个云函数,在wrap方法中采用“云函数名称-版本号” 定义,latest 是最新版本。
- 使用functionCallable.call(params)触发请求,params是body,数据类型是JSON对象
- 使用then异步获取返回的数据,通过ret.getValue()获取数据
- 使用catch处理异常错误情况
三个UI视图子组件开发完毕,下面我们创建个Page页面将三个子组件整合起来显示。
创建页面UI视图Page文件
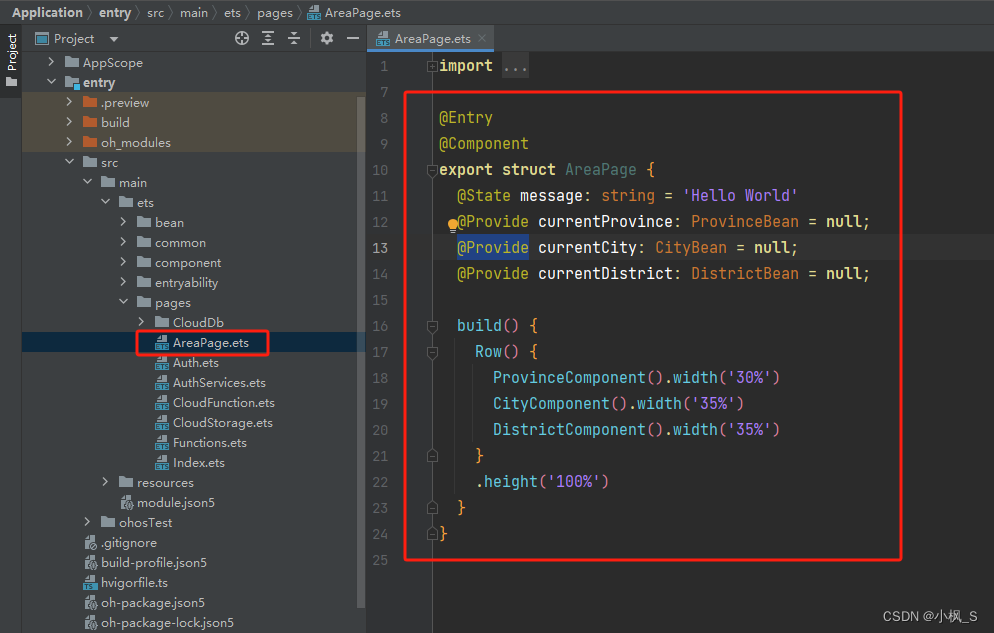
1、打开DevEco Studio,在"Application-> entry -> src -> main -> ets -> pages"目录下新建一个"AreaPage.ets"文件来实现省市地区联动地址选择器功能的页面。
2、配置页面路由
由于模板已经创建了一个main_pages.json文件进行统一的页面管理,所以我们需要将新建的页面注册在"Application-> entry -> src -> main -> resources -> base ->profile -> main_pages.json"文件中。
3、 在EntryAbility.ts 类中onWindowStageCreate 方法中, 将
windowStage.loadContent('pages/Index', (err, data) => {})
- 1
中的第一个参数,修改为’pages/AreaPage’
windowStage.loadContent('pages/AreaPage', (err, data) => {})
- 1
4、在AreaPage界面放三个控件:一个省份视图子组件显示省份列表,一个城市视图子组件显示城市列表,并与选择的省份进行数据联动,一个区县视图子组件显示区县列表,并与选择的城市进行数据联动,完整示例代码如下。
import { CityBean } from '../bean/CityBean'
import { DistrictBean } from '../bean/DistrictBean'
import { ProvinceBean } from '../bean/ProvinceBean'
import { CityComponent } from '../component/CityComponent'
import { DistrictComponent } from '../component/DistrictComponent'
import { ProvinceComponent } from '../component/ProvinceComponent'

@Entry
@Component
export struct AreaPage {
  @Provide currentProvince: ProvinceBean = null;
  @Provide currentCity: CityBean = null;
  @Provide currentDistrict: DistrictBean = null;

  build() {
    Row() {
      ProvinceComponent().width('30%')
      CityComponent().width('35%')
      DistrictComponent().width('35%')
    }
    .height('100%')
  }
}
- 1
- 2
- 3
- 4
- 5
- 6
- 7
- 8
- 9
- 10
- 11
- 12
- 13
- 14
- 15
- 16
- 17
- 18
- 19
- 20
- 21
- 22
- 23
- 24
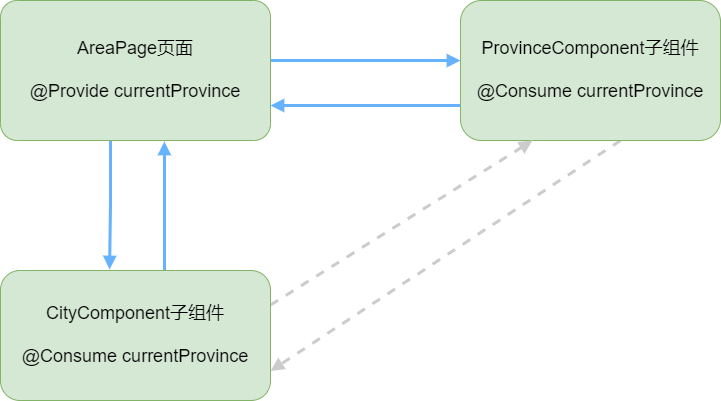
这里我们定义了三个状态变量,存储当前选择的省份、选择的城市、选择的区县这三个对象,并使用@Provide装饰器,这样@Provide装饰的状态变量与子组件的@Consume装饰器装饰的同名状态变量,会实现一个数据状态双向绑定。具体如下图:
AreaPage-currentProvince分别与ProvinceComponent-currentProvince 、 CityComponent-currentProvince 直接建立数据状态双向绑定,ProvinceComponent-currentProvince 与CityComponent-currentProvince 间接建立数据状态双向绑定。
这样,我们这个省市区县联动的地址选择器功能就完成了。
打包测试
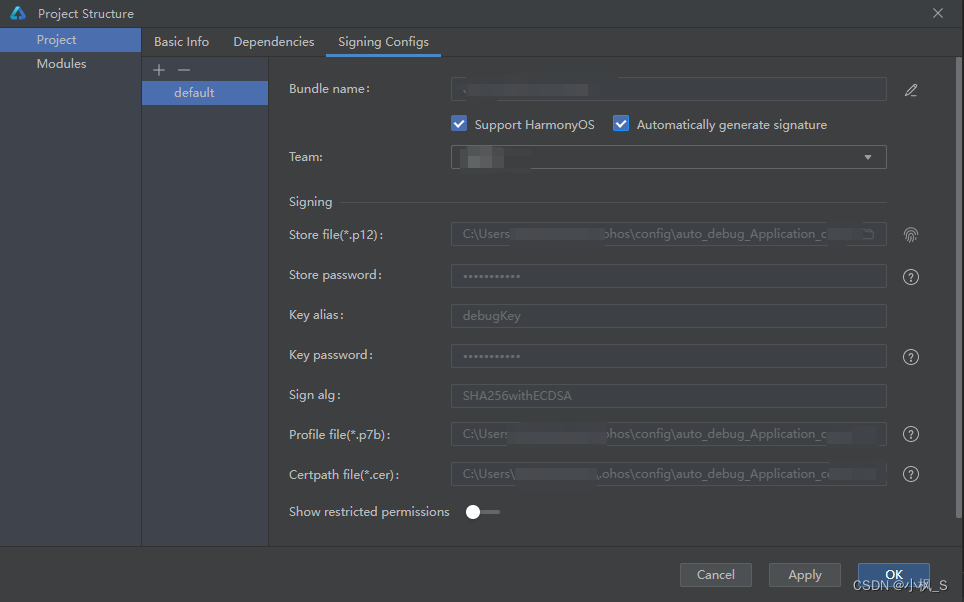
1.DevEco Studio菜单选择“File -> Project Structure”,在“Project Structure”界面导航选择“Project”,选择“Signing Configs”页签。
2.勾选“Automatically generate signature” ,自动签名完成后点击“OK”。
3.将应用服务推送到支持API 9及以上版本的手机。
4.显示效果如下:
5.控制台日志如下:

总结
通过《【鸿蒙应用ArkTS开发系列】- 云开发入门实战三 实现省市地区三级联动地址选择器组件》上下篇这两篇文章, 你应该已经成功地掌握使用HarmonyOS云开发能力开发了一个应用,学会如何使用云数据库、云函数,实现端、云的交互。
感谢阅读,后续有疑问或者其他问题,可以在评论区留言交流。


