
热门标签
热门文章
- 1linux配置yum源_linux yum源
- 2国密算法介绍
- 3yolo可视化——loss、Avg IOU、P-R、mAP、Recall (没有xml文件的情况)_yolo评估指标box loss200
- 4RNN和LSTM详解_lstm 分类 损失函数
- 5SQL 入门及常用实例_sql实例
- 6SQL Server 2012 安装配置图文详解_sql2012安装教程图解
- 7无root权限安装git-lfs(linux版)_linux git lfs
- 8gepc 增强数据的加载 patch enhance_.stack(patches)
- 9基于java的企业员工信息管理系统,ssm+jsp,mysql数据库,员工+管理员,完美运行,有ppt,有一万五千字论文_员工管理系统计算机毕业论文一万五千字
- 10Adb windows脚本_adb 脚本宏
当前位置: article > 正文
uniapp创建vue3项目_uniapp vue3
作者:从前慢现在也慢 | 2024-04-24 20:18:15
赞
踩
uniapp vue3
一.项目全局配置
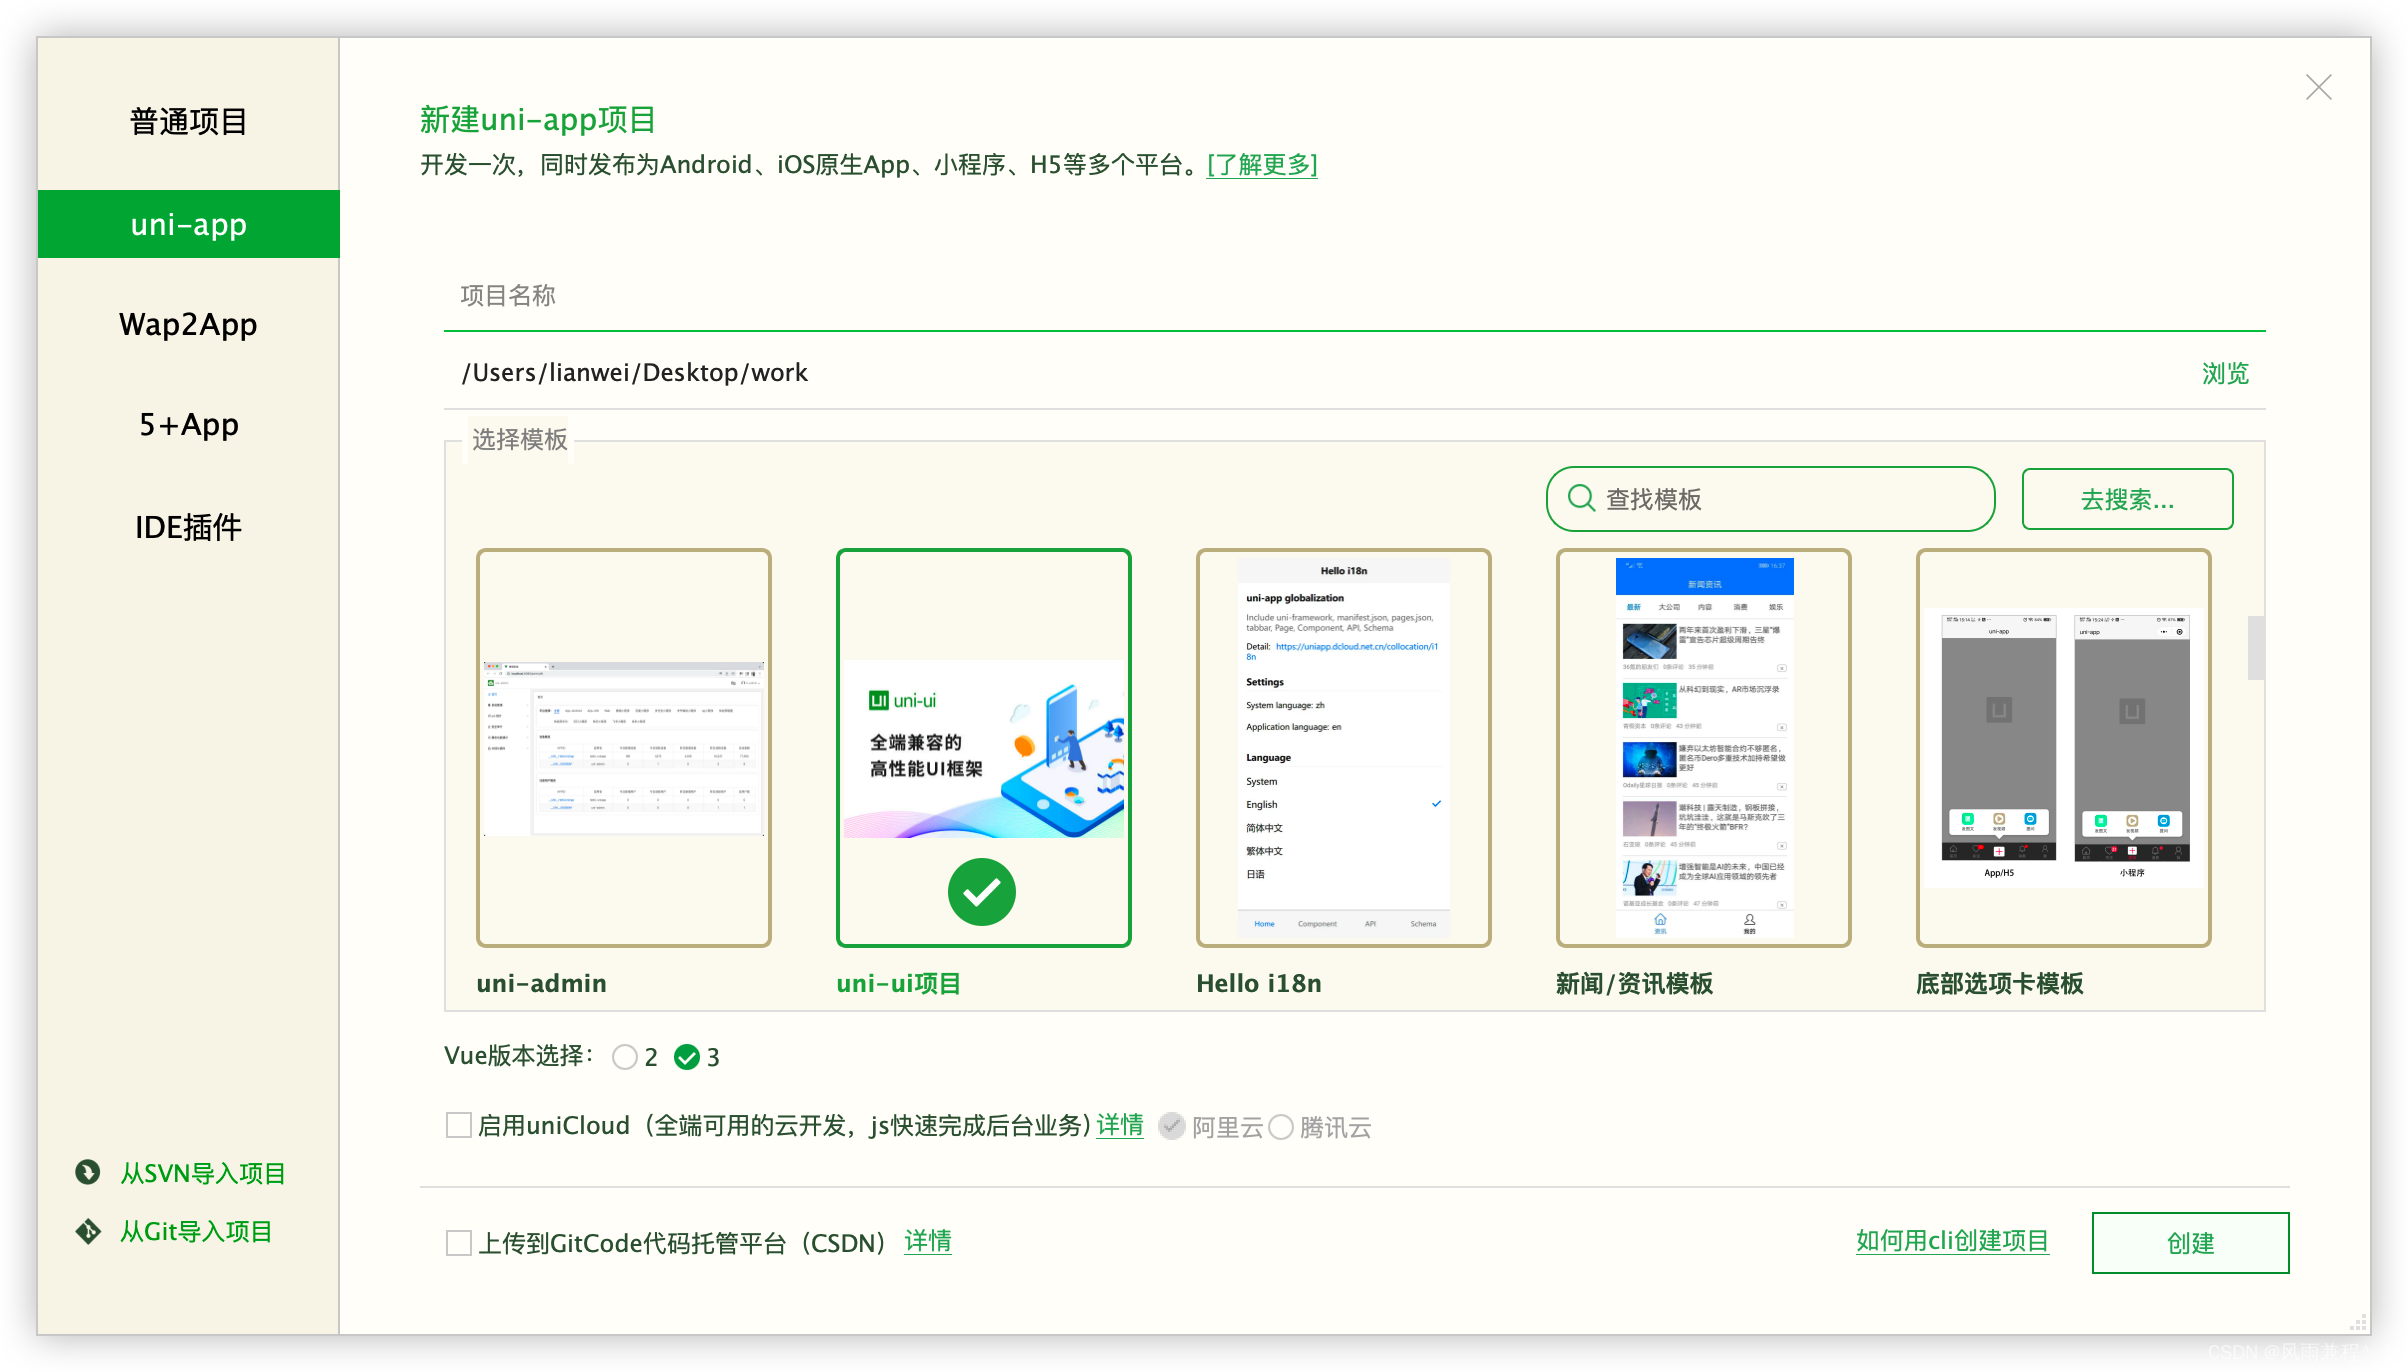
1. 创建项目
使用Hbuilderx工具创建项目,
使用Hbuilderx工具创建项目,选择uni-ui项目模版,VUE3
2.底部菜单栏配置tabBar
uniapp官网: 全局文件--pages.json页面路由 -- tabBar
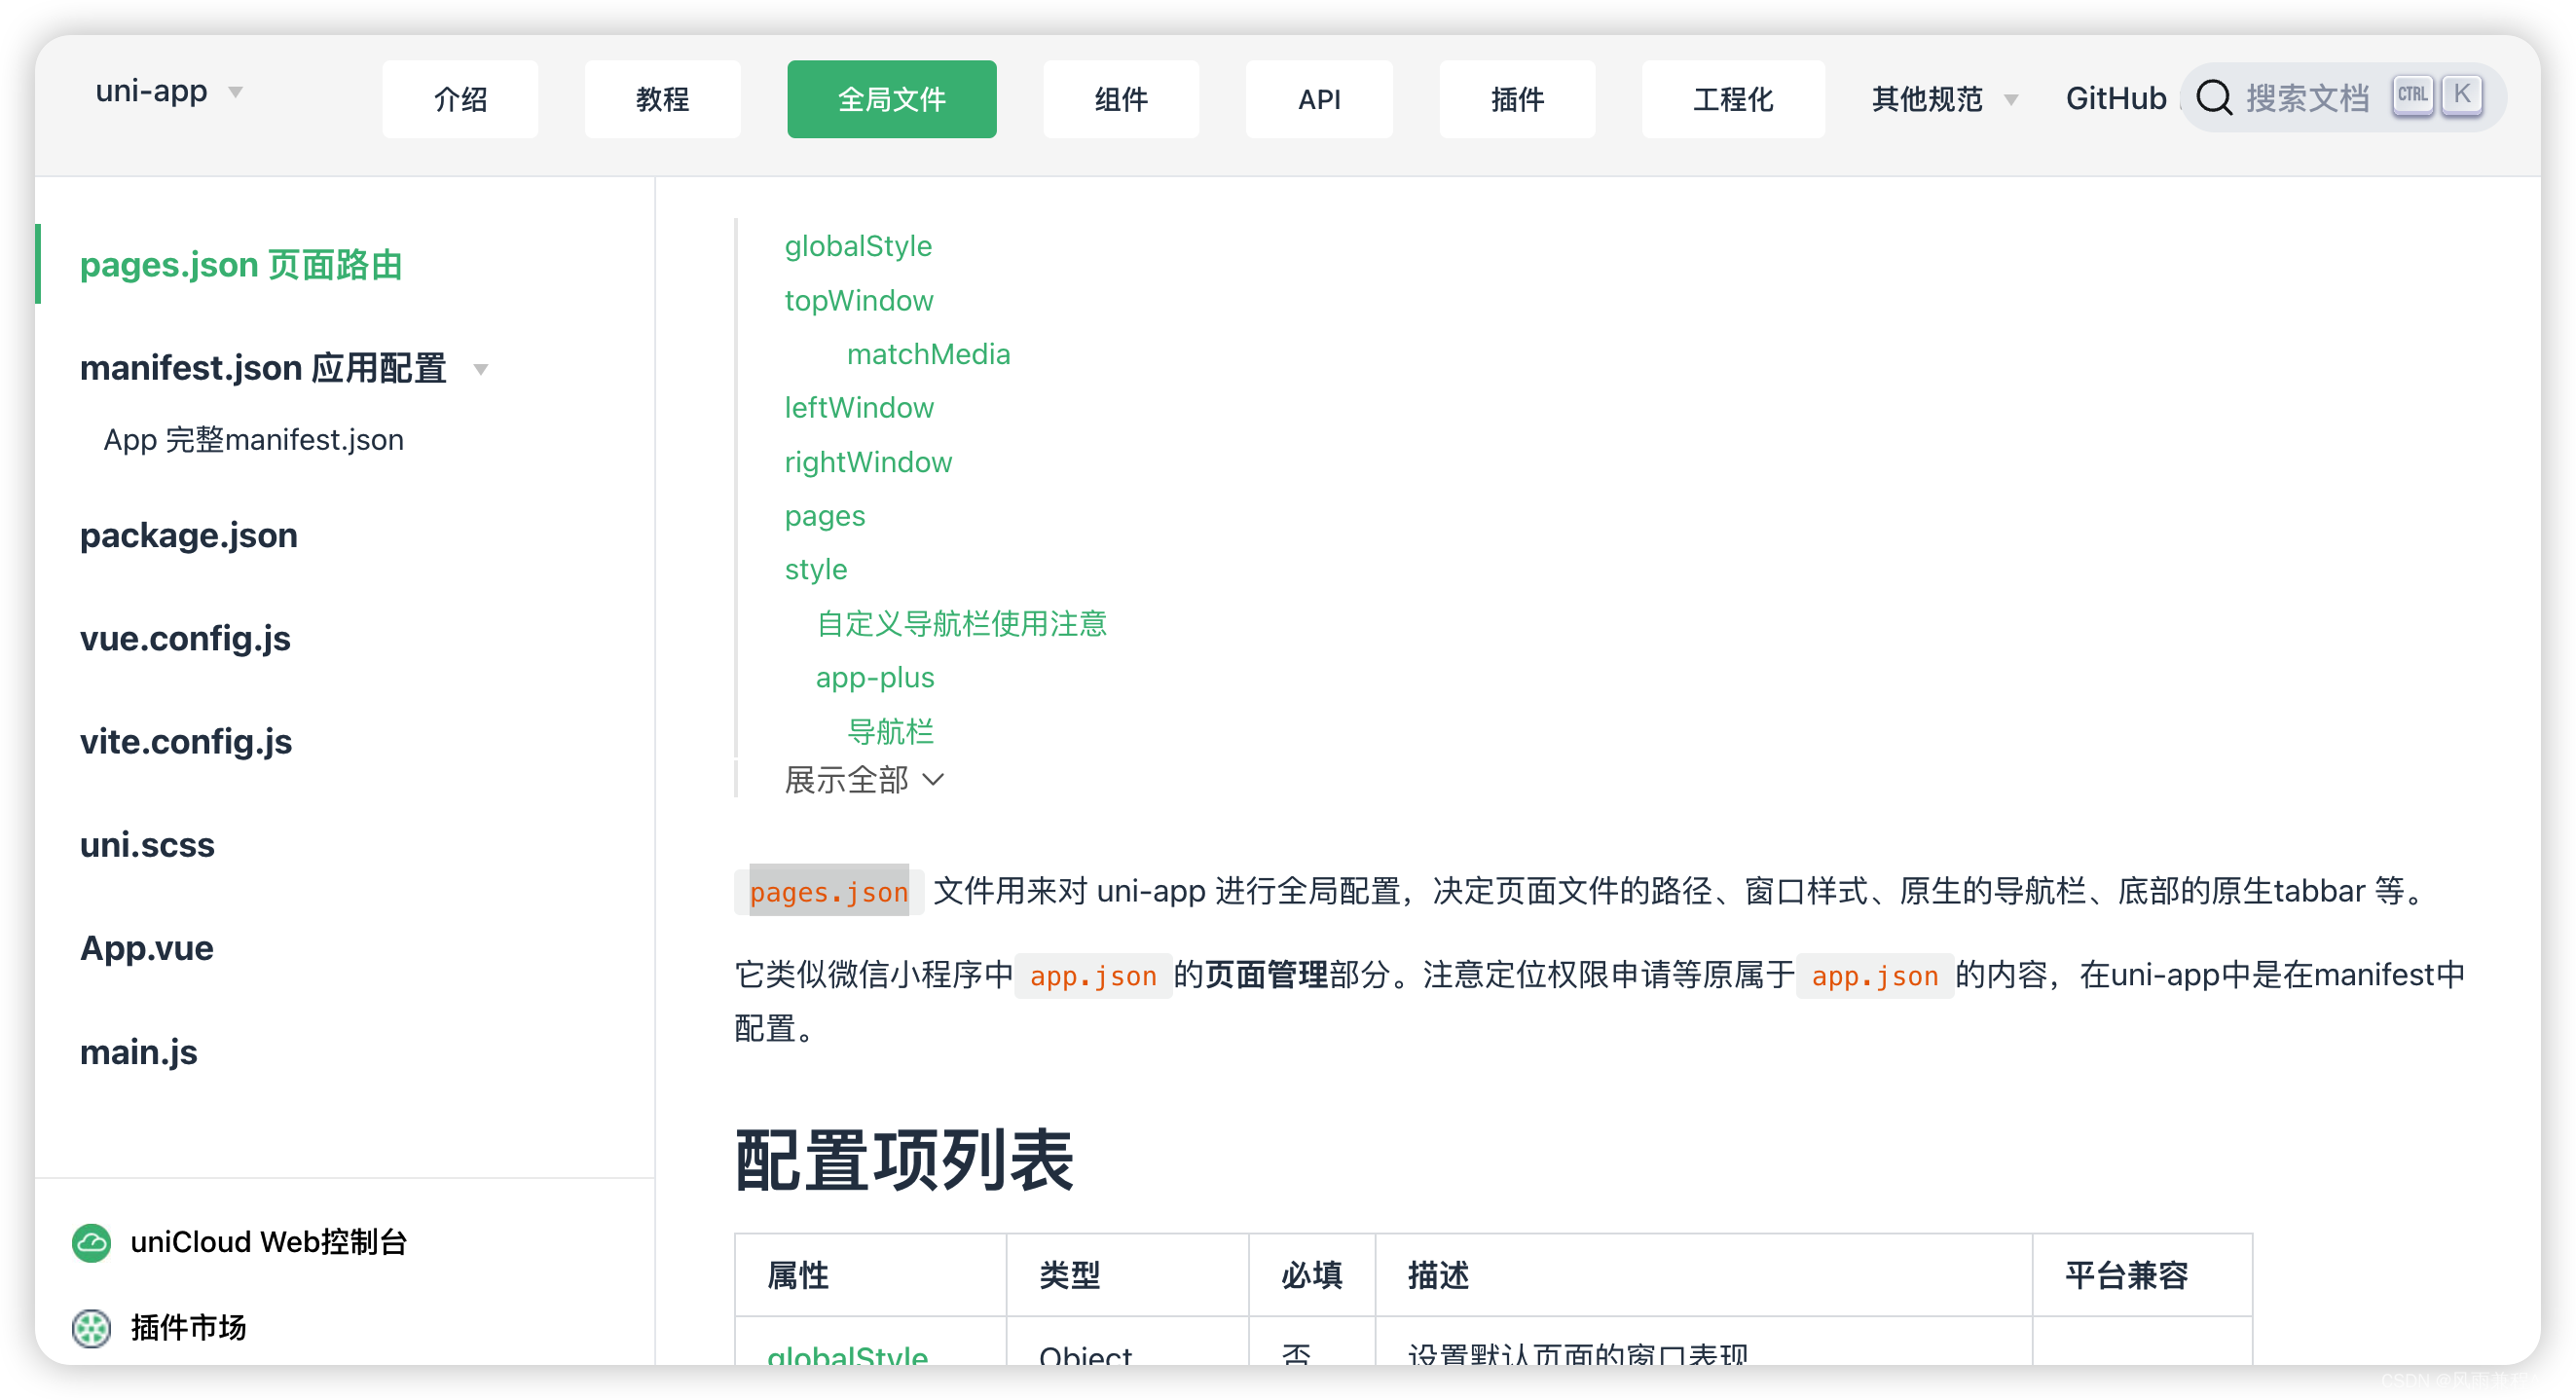
项目文件:pages.json--文件底部添加,list配置2-5
- "tabBar": {
- "color": "#7A7E83",
- "selectedColor": "#3cc51f",
- "borderStyle": "black",
- "backgroundColor": "#ffffff",
- "list": [{
- "pagePath": "pages/index/index",
- "iconPath": "static/c1.png",
- "selectedIconPath": "static/c2.png",
- "text": "首页"
- }, {
- "pagePath": "pages/index2/index",
- "iconPath": "static/c3.png",
- "selectedIconPath": "static/c4.png",
- "text": "页面"
- }]
- }

注:配置tabBar时所加页面一定要在pages中注册,否则会报错
报错:app.json: "tabBar"["pagePath"]: "pages/index2/index" need in ["pages"]
3.路由配置
app.json文件 -- pages页面配置项
4.全局样式配置
uniapp官网: 全局文件--pages.json页面路由 -- globalStyle
app.json文件 -- globalStyle
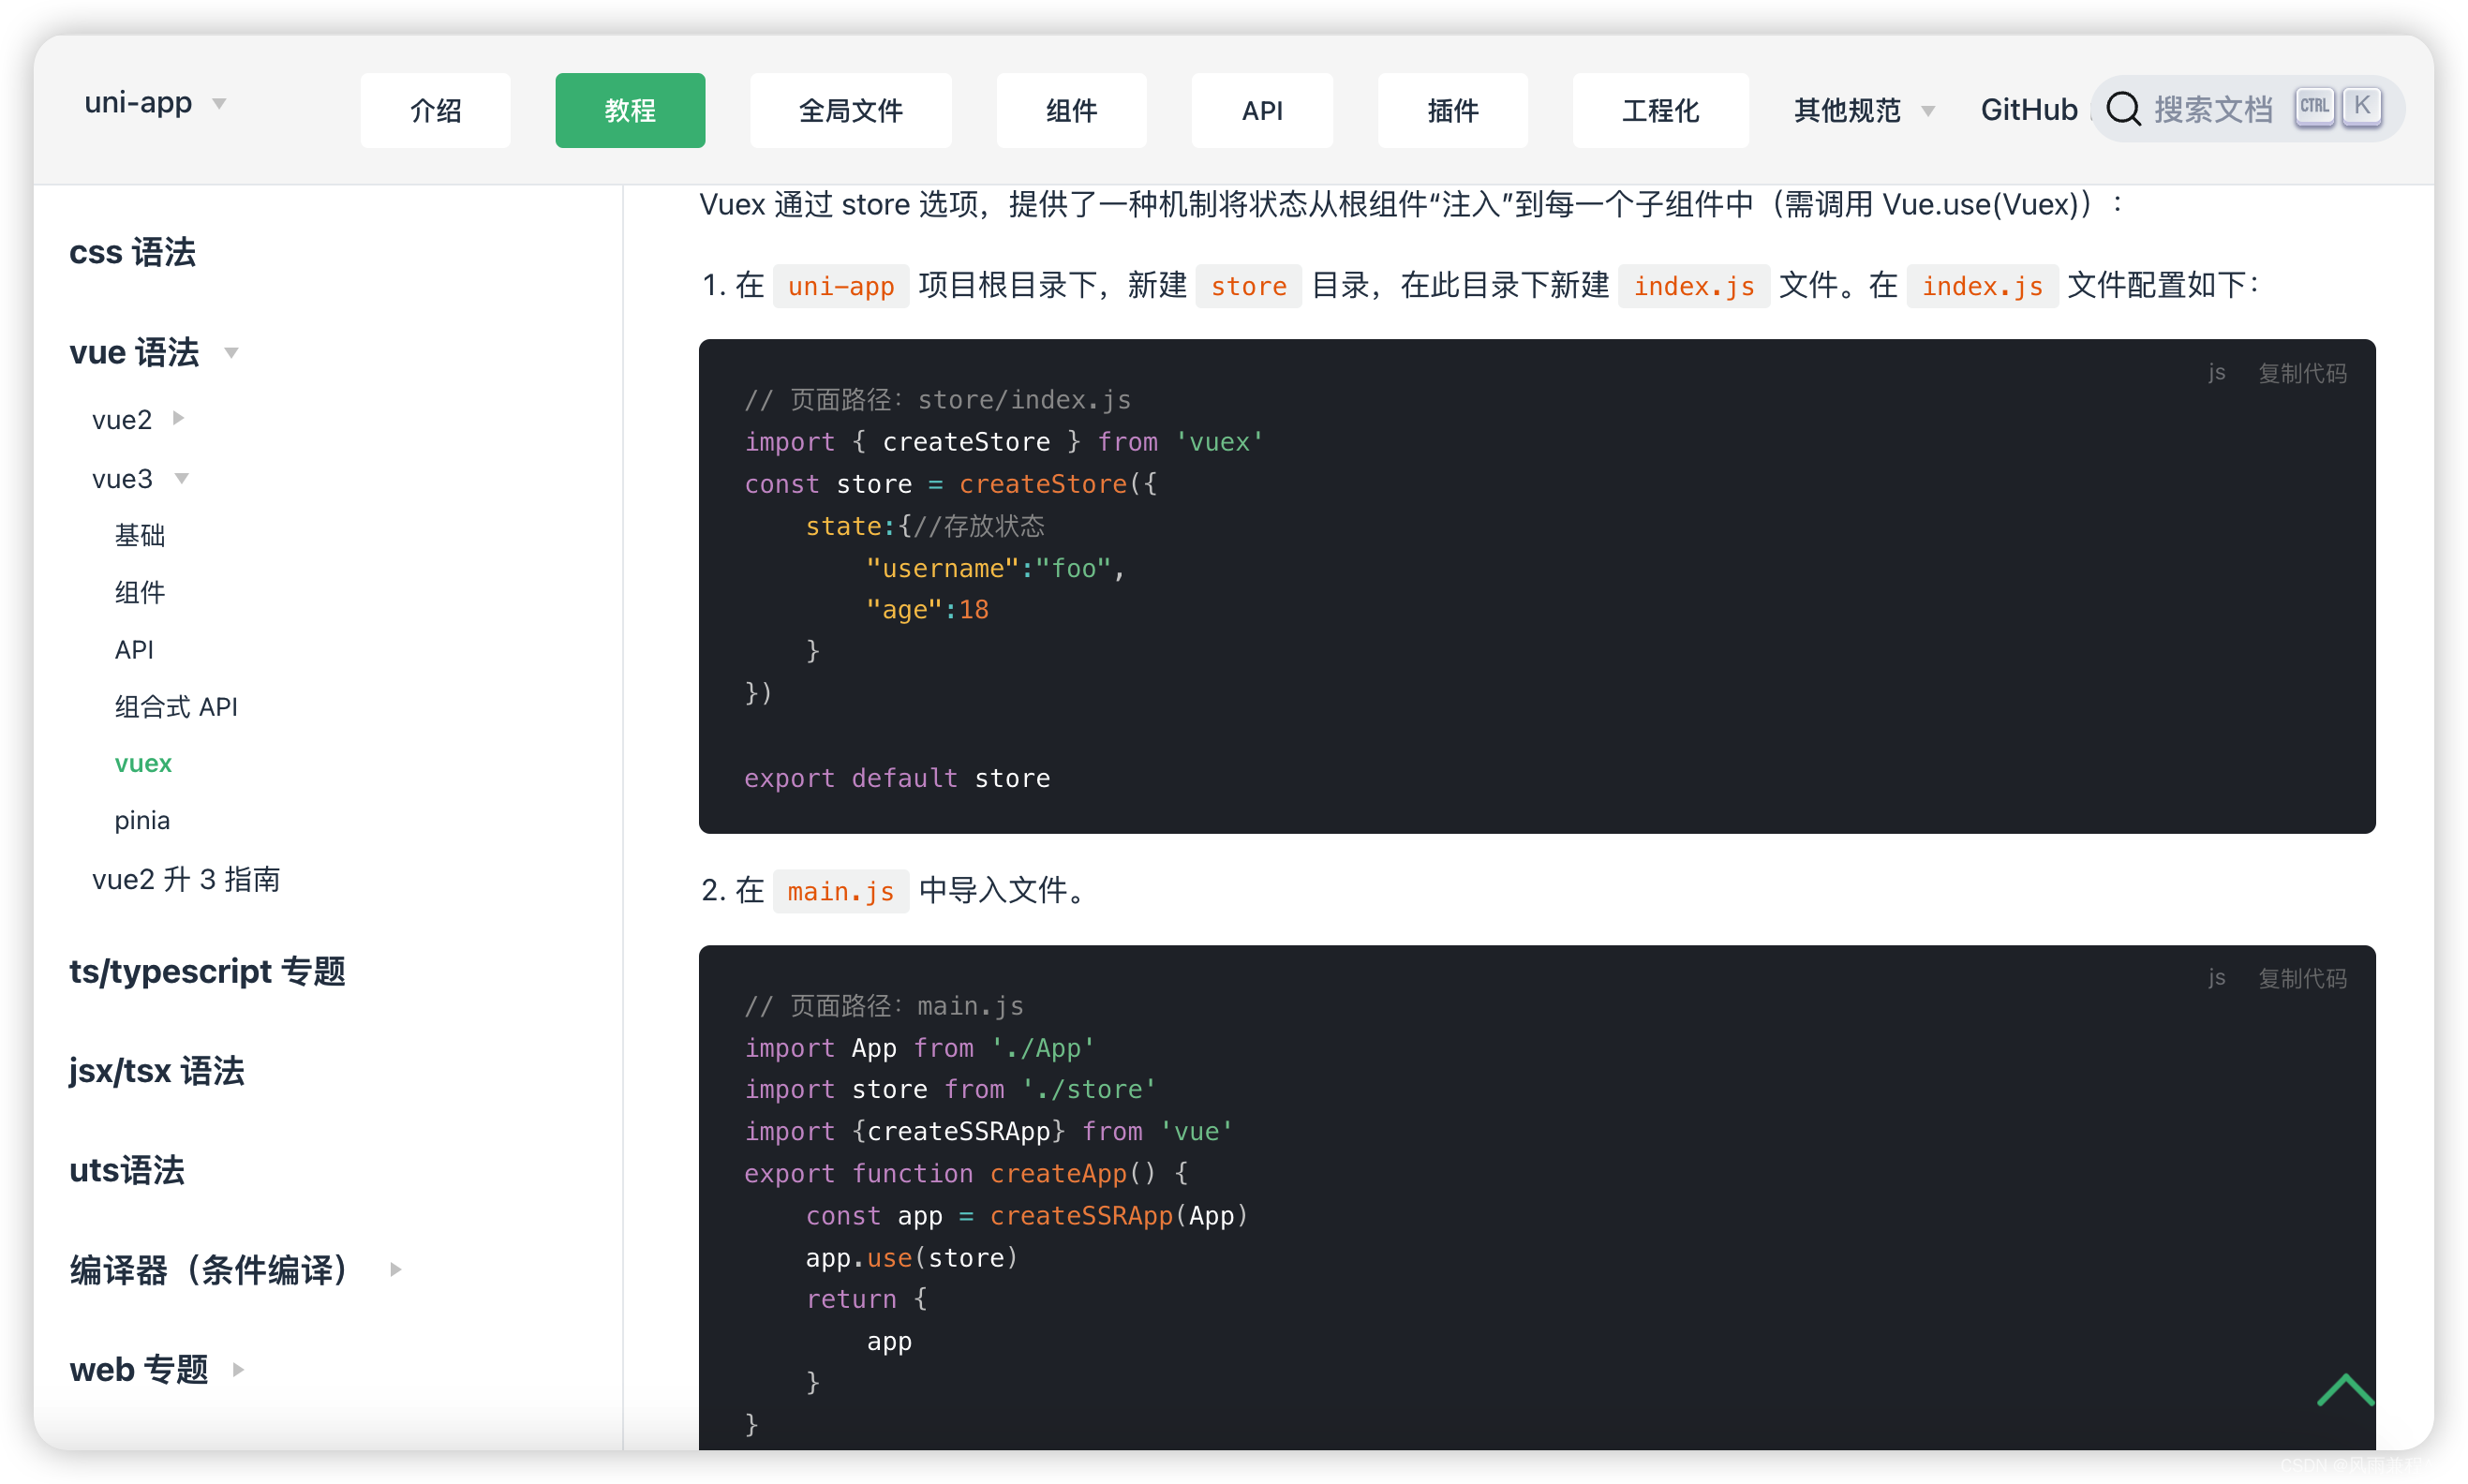
5.VUEX配置
store-->index.js
- // 页面路径:store/index.js
- import { createStore } from 'vuex'
-
- // import moduleA from '@/store/modules/moduleA'
-
- const store = createStore({
- state:{},
- getters: {},
- mutations: {},
- actions: {},
- modules: {
- // moduleA
- }
- })
-
- export default store
main.js 文件挂载全局
Vue2/Vue3配置根据文档来修改
6.全局样式配置
uni-scss文件

7.请求接口封装

api -- reuest.js
- const http = {
- // baseUrl 地址
- baseUrl: 'http://192.168.0.1:28002',
-
- // 请求方法
- request(config) {
- // config:请求配置对象,具体参照uniapp文档
-
- config = beforeRequest(config)
-
- // 请求地址拼接
- config.url = this.baseUrl + config.url
-
- // 异步请求
- return new Promise((resolve, reject) => {
- uni.request(config).then(res => { // 成功
- let [error, resp] = res
- // 响应拦截
- const response = beforeResponse(resp)
- resolve(response)
- }).catch(err => { // 失败
- errorHandle(err)
- reject(err)
- })
- })
-
- },
- get(url, data, auth) {
- /*
- url:接口地址
- data:查询参数
- auth:请求是否携带token进行认证(true/false)
- method:请求方式
- */
- return this.request({
- url: url,
- data: data,
- auth: auth,
- timeout:10000,
- method: 'GET'
- })
- },
- post(url, data, auth) {
- /*
- url:接口地址
- data:请求体参数
- auth:请求是否携带token进行认证(true/false)
- method:请求方式
- */
- return this.request({
- url: url,
- data: data,
- auth: auth,
- timeout:10000,
- method: 'POST'
- })
- },
- put(url, data, auth) {
- /*
- url:接口地址
- data:请求体参数
- auth:请求是否携带token进行认证(true/false)
- method:请求方式
- */
- return this.request({
- url: url,
- data: data,
- auth: auth,
- timeout:10000,
- method: 'PUT'
- })
- },
- delete(url, data, auth) {
- /*
- url:接口地址
- auth:请求是否携带token进行认证(true/false)
- method:请求方式
- */
- return this.request({
- url: url,
- auth: auth,
- timeout:10000,
- method: 'DELETE'
- })
- }
- }
-
- // 请求拦截器
- const beforeRequest = (config) => {
- // 请求之前拦截操作
- console.log('请求拦截器', config)
- return config
- }
-
- // 响应拦截器
- const beforeResponse = (response) => {
- // 请求之后操作
- console.log('响应拦截器', response)
- return response
- }
-
- // 请求异常处理器
- const errorHandle = ((err) => {
- console.log('请求异常', err)
- })
-
- export default http
api -- index.js
- // 封装具体接口调用
- import http from 'request.js'
-
- export default{
- // 登陆接口
- login(params){
- return http.post('/api/users/login',params)
- }
- // 注册接口
-
- // 刷新token
-
- // 获取用户信息
-
- // 获取信息
- }
挂载全局$api方法
- // 导入封装的请求对象
- import api from '@/api/index.js'
- // 将请求对象设置为全局属性
- Vue.prototype.$api = api
使用
- async fn(){
- const response = await this.$api.login()
- }
使用模块,写法用法变化
- api -- index.js
-
- // 封装具体接口调用
- import http from 'request.js'
-
- import user from './modules/user.js'
- import goods from './modules/goods.js'
-
- export default{
- user,
- goods
- }
使用
- async fn(){
- const response = await this.$api.user.login()
- }
二.主要功能实现
1.tabBar导航页面实现,主要页面实现
2.登陆功能实现,token及登陆状态
uni.login 微信登录
1.校验判断
2.调用登录接口,存储登陆的用户信息
saveLoginInfo(){} 存储登陆信息 存储token和refresh,userInfo isAuth 是否登录
3.数据缓存,持久化
- // 数据持久化,存储到缓存中
- uni.setStorage({
- key: 'token',
- data: userInfo.token
- });
- uni.setStorage({
- key: 'isAuth',
- data: isAuth
- });
- uni.setStorage({
- key: 'refresh',
- data: userInfo.refresh
- });
-
- // 异步
- uni.setStorageSync('token', userInfo.token);
4.请求拦截器携带token
- // 请求拦截器
- const beforeRequest = (config) => {
- // 请求之前拦截操作
- console.log('请求拦截器', config)
- config.header = {}
- if (config.auth) {
- // 请求头中添加token
- if (uni.getStorageSync('token')) {
- // Authorization Bearer 根据情况修改
- config.header['Authorization'] = 'Bearer' + uni.getStorageSync('token')
- } else {
- // 为登陆则跳转登陆 重定向
- uni.navigateTo({
- url: '/pages/index/index'
- })
- }
-
- }
- return config
- }
5.响应拦截器,错误信息提示
- // 响应拦截器
- const beforeResponse = (response) => {
- // 请求之后操作
- console.log('响应拦截器', response)
- // 判断请求返回的状态码
- if(response.status !== 200 && response.status !== 201 && response.status !== 204){
- // 给出对应的提示
- if(response.data.error){
- uni.showToast({
- title:response.data.error.toString(),
- icon:'none',
- duration:2000
- })
- }
- }
- return response
- }
6.VUEX刷新后数据丢失处理
App.vue ,根据需求更改
- <script>
- import {mapMutations} from 'vuex'
- export default {
- onLaunch: function() {
- console.warn('当前组件仅支持 uni_modules 目录结构 ,请升级 HBuilderX 到 3.1.0 版本以上!')
- console.log('App Launch')
- },
- onShow: function() {
- console.log('App Show')
-
- // 读取本地缓存,存储到VUEX中
- uni.getStorageSync('userInfo')
-
- // 调用保存登陆信息 操作
- // 存储相应的token,isAuth,userInfo等数据
- },
- onHide: function() {
- console.log('App Hide')
- },
- methods:{
- ...mapMutations(['保存登陆信息'])
- }
- }
- </script>
7.退出登陆效果
将登录时存储的数据清空,跳转相应的登陆页面或者首页
8.用户信息修改
调用相应的修改接口,拿到成功状态后更新VUEX用户信息及本地Storage存储的用户信息
3.登陆功能实现
- // 这里是vue2的写法,需要vue3请自行更换
- // 获取用户信息
- getWXCode() {
- return new Promise((ress, rej) => {
- // wx.login()
- uni.login({
- success: (res) => {
- res.code && ress(res.code)
- },
- fail: (error) => {}
- })
- })
- },
-
- //等三方微信登录 信息补充
- // 兑换code
- // 初始化 获取code 凭证
- wxLogin() {
- if (!this.checked) {
- // 是否勾选
- this.$utils.toast(0, '请先阅读并同意服务协议和隐私政策!')
- return
- }
-
- this.$utils.toast(1, "加载中")
- let that = this
- //#ifdef H5
- // #endif
- //#ifdef MP-WEIXIN
- this.getWXCode().then(res => {
- console.log("getWXCode", res)
- //成功后可根据实际情况自行处理
- // 判断用户是否注册,存储用户数据...
- })
- // #endif
- },
三.支付功能实现
1.微信
- // 此块代码放在vuex中(store.js)
- // 支付接口
- pay({
- commit
- }, param) {
- // console.log("param", param)
- return new Promise((resolve, reject) => {
- $utils.toast(1, "支付中")
-
- //#ifdef MP-WEIXIN
- const payParam = {
- appId: param.appId,
- nonceStr: param.nonceStr,
- package: param.packageVal,
- timeStamp: param.timeStamp,
- signType: param.signType,
- paySign: param.paySign,
- }
- //#endif
- //#ifdef MP-WEIXIN
- // console.log('MP-WEIXIN')
- uni.requestPayment({
- provider: 'wxpay',
- ...payParam,
- success: function(res) {
- console.log("支付成功---", res)
- // $utils.toast(1, "支付成功")
- setTimeout(() => {
- // $utils.toast(2)
- resolve(res)
- }, 1000)
- },
- fail: function(res) {
- console.log("支付失败---", res)
- // $utils.toast(0, "支付失败")
- resolve(res)
- },
- complete: function(res) {
- console.log("支付过程结束", res)
- // resolve(res)
- }
- });
- //#endif
- //#ifndef MP-WEIXIN
- WeixinJSBridge.invoke('getBrandWCPayRequest', {
- "appId": param.appId, //公众号名称,由商户传入
- "timeStamp": param.timeStamp, //时间戳
- "nonceStr": param.nonceStr, //随机串
- "package": param.package, //扩展包
- "signType": param.signType, //微信签名方式:MD5
- "paySign": param.paySign //微信签名
- }, function(respay) {
- // console.log('res', respay)
- if (respay.err_msg === "get_brand_wcpay_request:ok") {
- // 支付完成
- uni.showToast({
- title: "支付成功",
- icon: "none",
- duration: 2000
- })
- callback()
- } else if (respay.err_msg === "get_brand_wcpay_request:cancel") {
- $utils.toast(0, "取消支付")
- } else if (respay.err_msg === "get_brand_wcpay_request:fail") {
- $utils.toast(0, "支付失败")
- }
- }, function(err) {
- $utils.toast(0, err)
- })
- //#endif
- })
- }
2.支付宝
3.混合支付
四.工具函数封装
注:不全!需要其他的请自行搜索!
1.错误信息提示
注:根据后台需要提示接口错误还是前端自行提示!
- // 接口返回提示
- requestCodeTips(code, msg) {
- let errorrMessage = ''
- switch (Number(code)) {
- case 400:
- errorrMessage = '错误请求'
- break;
- case 401:
- errorrMessage = '未授权,请重新登录'
- break;
- case 403:
- errorrMessage = '拒绝访问'
- break;
- case 404:
- errorrMessage = '请求错误,未找到该资源'
- break;
- case 405:
- errorrMessage = '请求方法未允许'
- break;
- case 408:
- errorrMessage = '请求超时'
- break;
- case 500:
- errorrMessage = '服务器端出错啦'
- break;
- case 501:
- errorrMessage = '网络未实现'
- break;
- case 502:
- errorrMessage = '网络错误'
- break;
- case 503:
- errorrMessage = '服务不可用'
- break;
- case 504:
- errorrMessage = '网络超时'
- break;
- case 505:
- errorrMessage = 'http版本不支持该请求'
- break;
- default:
- errorrMessage = '连接错误'
- }
-
- this.toast(0, `${code}-${errorrMessage}-${msg?msg:''}`)
- },
2.全局提示信息(文本提示,加载状态)
- data: {
- msg: null, // 消息提示
- time: 300, // 时间
- hideLoadTimes: null, // 清除加载中的定时器
- showToastTimes: null, // 提示框的定时器
- },
-
- /**
- * * 提示信息
- * state: 类型 (0 提示框 1 showLoading 2 hideLoading )
- * title: 标题
- * duration: 时间
- * icon: 图标
- */
- async toast(state = 0, title = '', duration = 3000, icon = "none") {
- let errMsg = this.data.msg ? this.data.msg.errMsg : null
-
- if (state == 0) { //
- // 隐藏加载中的定时器还在
- if (this.data.hideLoadTimes || errMsg == 'showLoading:ok') {
- // 延后显示
- clearTimeout(this.data.showToastTimes)
- this.data.showToastTimes = setTimeout(async () => {
- this.data.msg = await uni.showToast({
- icon,
- title,
- duration,
- });
- this.data.showToastTimes = null
- }, this.data.time + 200)
- } else { // 隐藏加载中的定时器不能存在
- this.data.msg = await uni.showToast({
- icon,
- title,
- duration,
- });
- }
- } else if (state == 1) {
- this.data.time = this.data.time >= 900 ? 900 : this.data.time + 300
- this.data.msg = await uni.showLoading({
- title,
- mask: true
- });
- } else if (state == 2) {
- clearTimeout(this.data.hideLoadTimes)
- this.data.hideLoadTimes = setTimeout(async () => {
- this.data.msg = await uni.hideLoading();
- this.data.time = 300
- this.data.msg = null //
- this.data.hideLoadTimes = null
- }, this.data.time)
- }
- },
注:内容不全,缺少的话需要客官自行查询!谨慎食用哦!!!
相关文章:
声明:本文内容由网友自发贡献,不代表【wpsshop博客】立场,版权归原作者所有,本站不承担相应法律责任。如您发现有侵权的内容,请联系我们。转载请注明出处:https://www.wpsshop.cn/w/从前慢现在也慢/article/detail/481385
推荐阅读

相关标签

