- 1未来已来:探索5G技术如何改变我们的生活和工作
- 2亚马逊爬虫与NEO4J存储操作_爬虫存储neo4j
- 3python 自动生成淘宝客链接
- 4python计算机视觉学习第8章——图像内容分类_python图像分类
- 5Python全栈开发学习--Reactjs--基础语法(上)--Day12_react js python
- 6SpringBoot启动报错:HikariPool-1 - Exception during pool initialization._hikaripool-1 - failed to create/setup connection:
- 7paip.java 以及JavaScript (js) 的关系以及区别
- 8【赠书第10期】从概念到现实:ChatGPT和Midjourney的设计之旅_从概念到现实,chatgpt和midjourney的设计之旅
- 9微服务---Redis实用篇-黑马头条项目-优惠卷秒杀功能(使用redis的消息队列对秒杀进行异步优化)_如何使用队列为用户发放优惠券
- 10前端基于VUE(PC/移动端)框架推荐,建议收藏_vue移动端框架
Python机器学习09——随机森林_python 随机森林
赞
踩
本系列所有的代码和数据都可以从陈强老师的个人主页上下载:Python数据程序
参考书目:陈强.机器学习及Python应用. 北京:高等教育出版社, 2021.
本系列基本不讲数学原理,只从代码角度去让读者们利用最简洁的Python代码实现机器学习方法。
本章开始集成学习模型。集成学习的方法在实际问题上表现效果都很好,因为它聚集了很多分类器效果,集成学习的模型一般都被称为‘树模型’,因为都是很多很多很多决策树一起估计出来的。随机森林也是这名字的由来。首先要介绍随机森林起源的bagging(袋装法)算法,bagging和后面的boosting区别在于,bagging是装袋了,每个小的估计器之间不相关。而boosting则是每个小估计器之间都相关。bagging在计量里面称为自助法,就是把样本进行很多次重采样,然后分别用不同的估计器去估计,然后再取平均。而随机森林改进的位置在于,每个小分类器之间采用的特征不一样,这样可以降低估计器之间的相关性,虽然可能增大偏差,但也可以更大幅度减少方差。
Bagging的Python案例
首先导入包和数据,采用非线性的数据mcycle
- import numpy as np
- import pandas as pd
- import matplotlib.pyplot as plt
- import seaborn as sns
- from sklearn.model_selection import train_test_split
- from sklearn.model_selection import KFold, StratifiedKFold
- from sklearn.model_selection import GridSearchCV
- from sklearn.metrics import mean_squared_error
-
- from sklearn.linear_model import LinearRegression
- from sklearn.linear_model import LogisticRegression
- from sklearn.tree import DecisionTreeClassifier
- from sklearn.tree import DecisionTreeRegressor
-
- from sklearn.ensemble import BaggingClassifier
- from sklearn.ensemble import BaggingRegressor
- from sklearn.ensemble import RandomForestClassifier
- from sklearn.ensemble import RandomForestRegressor
- from sklearn.datasets import load_iris, load_boston
- from sklearn.metrics import cohen_kappa_score
- from sklearn.metrics import plot_roc_curve
- from sklearn.inspection import plot_partial_dependence
- from mlxtend.plotting import plot_decision_regions
-
- #读取数据
- # Motorcycle Example: Tree vs. Bagging
- mcycle = pd.read_csv('mcycle.csv')
- mcycle.head()
- #取X和y
- X = np.array(mcycle.times).reshape(-1, 1)
- y = mcycle.accel

本次采用决策树对比一下他们的回归线形状,首先估计决策树:
- # Single tree estimation best_estimator_.
- model = DecisionTreeRegressor(random_state=123)
- path = model.cost_complexity_pruning_path(X, y)
- param_grid = {'ccp_alpha': path.ccp_alphas}
- kfold = KFold(n_splits=10, shuffle=True, random_state=1)
- model = GridSearchCV(DecisionTreeRegressor(random_state=123), param_grid, cv=kfold)
- pred_tree = model.fit(X, y).predict(X)
- print(model.score(X,y))
- sns.scatterplot(x='times', y='accel', data=mcycle, alpha=0.6)
- plt.plot(X, pred_tree, 'b')
- plt.title('Single Tree Estimation')
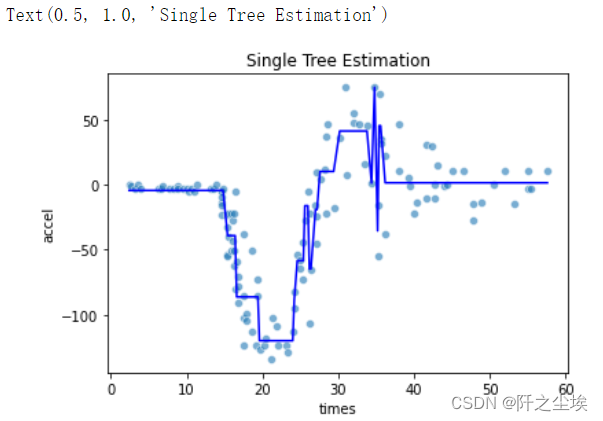
可以看出,单颗决策树的回归线都是矩形,类似楼梯,不平滑,下面进行bagging的方法
- # Bagging estimation
- model = BaggingRegressor(base_estimator=DecisionTreeRegressor(random_state=123), n_estimators=500, random_state=0)
- pred_bag = model.fit(X, y).predict(X)
- print(model.score(X,y))
- sns.scatterplot(x='times', y='accel', data=mcycle, alpha=0.6)
- plt.plot(X, pred_bag, 'b')
- plt.title('Bagging Estimation')
-
- # Alternatively,one could use 'RandomForestRegressor', which by default
- # sets max_features = n_features that is de facto bagging. The results are slightly different.
- # The advantage of 'BaggingRegressor' is the option to use different base learners.
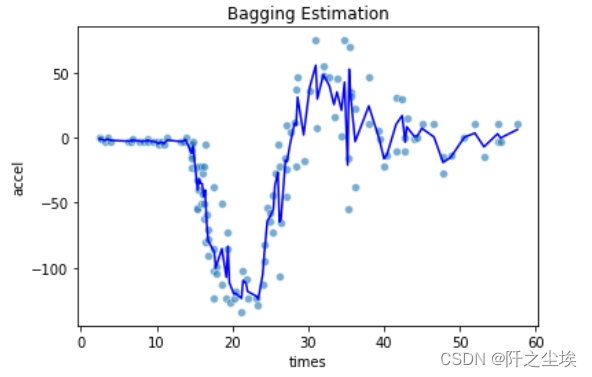
拟合的曲线要平滑很多。
对于回归问题依旧采用最多的波士顿房价数据集,上面依旧导入了包,下面读取数据,划分训练测试集,然后使用bagging拟合:
-
- Boston = load_boston()
- X = pd.DataFrame(Boston.data, columns=Boston.feature_names)
- y = Boston.target
- X_train, X_test, y_train, y_test = train_test_split(X, y, test_size=0.3, random_state=1)
-
- #bagging估计器
- model = BaggingRegressor(base_estimator=DecisionTreeRegressor(random_state=123), n_estimators=500, oob_score=True, random_state=0)
- #拟合
- model.fit(X_train, y_train)
- #袋外预测值
- pred_oob = model.oob_prediction_
- #袋外均方误差
- mean_squared_error(y_train, pred_oob)
- #袋外测试集拟合优度
- model.oob_score_
- #测试集拟合优度
- model.score(X_test, y_test)
- #对比线性回归拟合优度
- # Comparison with OLS
- model = LinearRegression().fit(X_train, y_train)
- model.score(X_test, y_test)
-
-

观察袋外误差随着估计器的个数变化的图:
- # OOB Errors
-
- oob_errors = []
- for n_estimators in range(100,301,10):
- model = BaggingRegressor(base_estimator=DecisionTreeRegressor(random_state=123),
- n_estimators=n_estimators, n_jobs=-1, oob_score=True, random_state=0)
- model.fit(X_train, y_train)
- pred_oob = model.oob_prediction_
- oob_errors.append(mean_squared_error(y_train, pred_oob))
-
- plt.plot(range(100, 301,10), oob_errors)
- plt.xlabel('Number of Trees')
- plt.ylabel('OOB MSE')
- plt.title('Bagging OOB Errors')
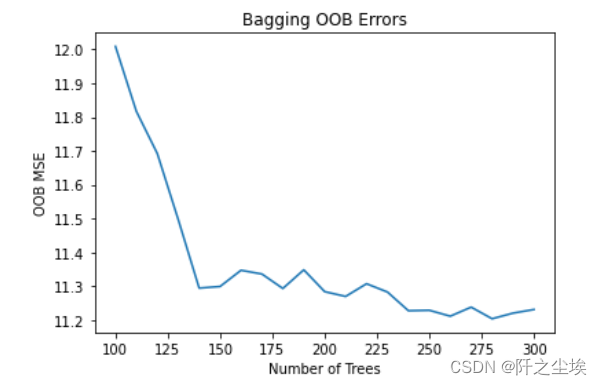
可以看出估计器个数越多,袋外误差越小。
回归森林的Python案例
依旧采用波士顿房价数据集:
- # Random Forest for Regression on Boston Housing Data
- #确定超参数max_features,即每次分裂使用的特征个数
- max_features=int(X_train.shape[1] / 3)
- max_features
-
- 拟合评价
- model = RandomForestRegressor(n_estimators=5000, max_features=max_features, random_state=0)
- model.fit(X_train, y_train)
- model.score(X_test, y_test)
-
-
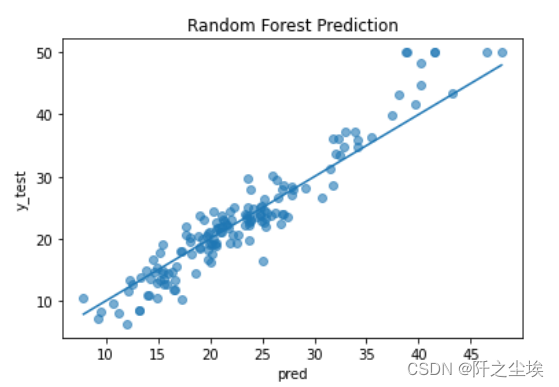
- #预测值和真实值比较
- # Visualize prediction fit
- pred = model.predict(X_test)
-
- plt.scatter(pred, y_test, alpha=0.6)
- w = np.linspace(min(pred), max(pred), 100)
- plt.plot(w, w)
- plt.xlabel('pred')
- plt.ylabel('y_test')
- plt.title('Random Forest Prediction')

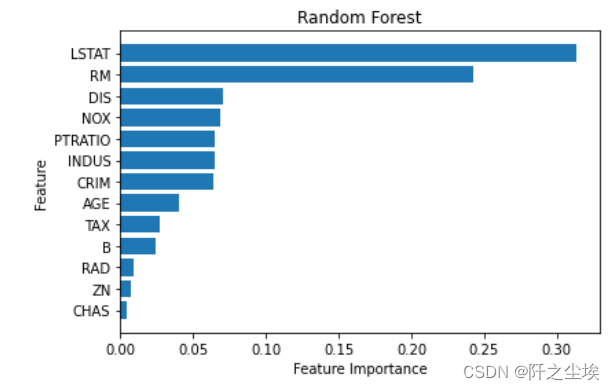
变量重要性的可视化
- # Feature Importance Plot
- model.feature_importances_
- sorted_index = model.feature_importances_.argsort()
-
- plt.barh(range(X.shape[1]), model.feature_importances_[sorted_index])
- plt.yticks(np.arange(X.shape[1]), X.columns[sorted_index])
- plt.xlabel('Feature Importance')
- plt.ylabel('Feature')
- plt.title('Random Forest')
- plt.tight_layout()
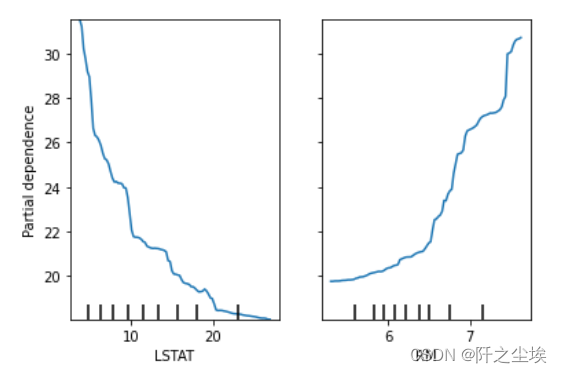
- # 画偏依赖图
- from sklearn.inspection import PartialDependenceDisplay
- PartialDependenceDisplay.from_estimator(model, X, ['LSTAT', 'RM'])
手工循环,找最优超参数
- scores = []
- for max_features in range(1, X.shape[1] + 1):
- model = RandomForestRegressor(max_features=max_features,
- n_estimators=500, random_state=123)
- model.fit(X_train, y_train)
- score = model.score(X_test, y_test)
- scores.append(score)
-
- index = np.argmax(scores)
- range(1, X.shape[1] + 1)[index]
-
-
- plt.plot(range(1, X.shape[1] + 1), scores, 'o-')
- plt.axvline(range(1, X.shape[1] + 1)[index], linestyle='--', color='k', linewidth=1)
- plt.xlabel('max_features')
- plt.ylabel('R2')
- plt.title('Choose max_features via Test Set')

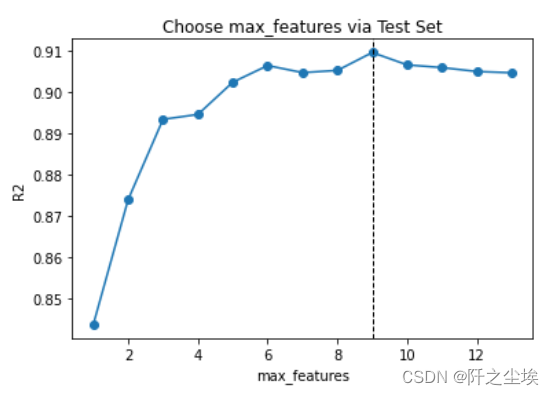
可以看出当max_feature=9时,测试集的拟合优度最高。
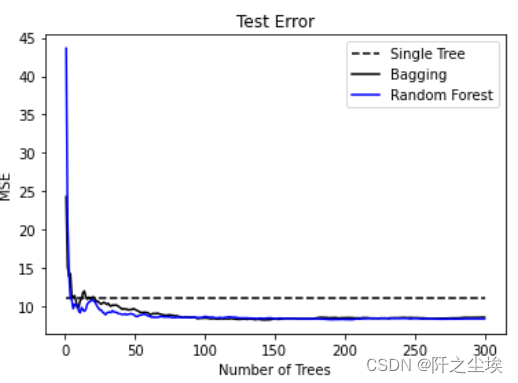
下面比较随机森林,bagging,决策树他们的误差和估计器个数的变化
- #RF
- scores_rf = []
- for n_estimators in range(1, 301):
- model = RandomForestRegressor(max_features=9,
- n_estimators=n_estimators, random_state=123)
- model.fit(X_train, y_train)
- pred = model.predict(X_test)
- mse = mean_squared_error(y_test, pred)
- scores_rf.append(mse)
-
- # Bagging
- scores_bag = []
- for n_estimators in range(1, 301):
- model = BaggingRegressor(base_estimator=DecisionTreeRegressor(random_state=123), n_estimators=n_estimators, random_state=0)
- model.fit(X_train, y_train)
- pred = model.predict(X_test)
- mse = mean_squared_error(y_test, pred)
- scores_bag.append(mse)
-
- #DecisionTree
- model = DecisionTreeRegressor()
- path = model.cost_complexity_pruning_path(X_train, y_train)
- param_grid = {'ccp_alpha': path.ccp_alphas}
- kfold = KFold(n_splits=10, shuffle=True, random_state=1)
- model = GridSearchCV(DecisionTreeRegressor(random_state=123), param_grid, cv=kfold, scoring='neg_mean_squared_error')
- model.fit(X_train, y_train)
- score_tree = -model.score(X_test, y_test)
- scores_tree = [score_tree for i in range(1, 301)]
-
- #画图
- plt.plot(range(1, 301), scores_tree, 'k--', label='Single Tree')
- plt.plot(range(1, 301), scores_bag, 'k-', label='Bagging')
- plt.plot(range(1, 301), scores_rf, 'b-', label='Random Forest')
- plt.xlabel('Number of Trees')
- plt.ylabel('MSE')
- plt.title('Test Error')
- plt.legend()

网格化搜索最优超参数
- max_features = range(1, X.shape[1] + 1)
- param_grid = {'max_features': max_features }
- kfold = KFold(n_splits=10, shuffle=True, random_state=1)
- model = GridSearchCV(RandomForestRegressor(n_estimators=300, random_state=123),
- param_grid, cv=kfold, scoring='neg_mean_squared_error', return_train_score=True)
-
- model.fit(X_train, y_train)
-
- model.best_params_
-
- cv_mse = -model.cv_results_['mean_test_score']
-
- plt.plot(max_features, cv_mse, 'o-')
- plt.axvline(max_features[np.argmin(cv_mse)], linestyle='--', color='k', linewidth=1)
- plt.xlabel('max_features')
- plt.ylabel('MSE')
- plt.title('CV Error for Random Forest')

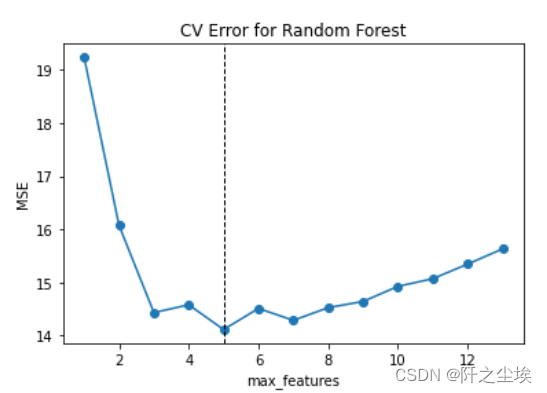 max_features为5时,误差最小
分类森林的Python案例
- #读取数据
- Sonar = pd.read_csv('Sonar.csv')
- Sonar.shape
- Sonar.head(2)
- #取出X和y
- X = Sonar.iloc[:, :-1]
- y = Sonar.iloc[:, -1]
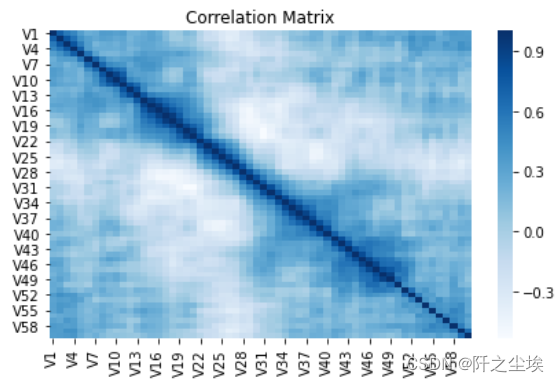
- #画变量之间的相关性热力图
- sns.heatmap(X.corr(), cmap='Blues')
- plt.title('Correlation Matrix')
- plt.tight_layout()
划分测试训练集,用决策树和随机森林去拟合比较
- X_train, X_test, y_train, y_test = train_test_split(X, y, stratify=y, test_size=50, random_state=1)
-
- # Single Tree as benchmark
- model = DecisionTreeClassifier()
- path = model.cost_complexity_pruning_path(X_train, y_train)
- param_grid = {'ccp_alpha': path.ccp_alphas}
- kfold = KFold(n_splits=10, shuffle=True, random_state=1)
- model = GridSearchCV(DecisionTreeClassifier(random_state=123), param_grid, cv=kfold)
- model.fit(X_train, y_train)
- model.score(X_test, y_test)
-
- # Random Forest
- model = RandomForestClassifier(n_estimators=500, max_features='sqrt', random_state=123)
- model.fit(X_train, y_train)
- model.score(X_test, y_test)
网格化搜参
- # Choose optimal mtry parameter via CV
- #GridSearchCV需要响应变量y是数值,所以生成虚拟变量
- y_train_dummy = pd.get_dummies(y_train)
- y_train_dummy = y_train_dummy.iloc[:, 1]
-
- param_grid = {'max_features': range(1, 11) }
- kfold = StratifiedKFold(n_splits=10,shuffle=True,random_state=1)
- model = GridSearchCV(RandomForestClassifier(n_estimators=300, random_state=123), param_grid, cv=kfold)
- model.fit(X_train, y_train_dummy)
-
- model.best_params_
- #max_features=8
- #因此采用8进行估计
- model = RandomForestClassifier(n_estimators=500, max_features=8, random_state=123)
- model.fit(X_train, y_train)
- model.score(X_test, y_test)
-
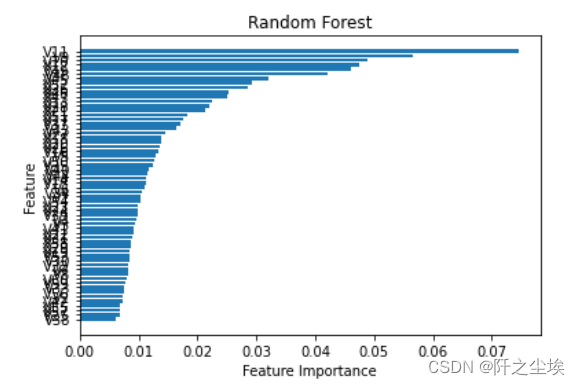
- #变量重要性的图
- sorted_index = model.feature_importances_.argsort()
- plt.barh(range(X.shape[1]), model.feature_importances_[sorted_index])
- plt.yticks(np.arange(X.shape[1]), X.columns[sorted_index])
- plt.xlabel('Feature Importance')
- plt.ylabel('Feature')
- plt.title('Random Forest')

计算混淆矩阵
- # Prediction Performance
- pred = model.predict(X_test)
- table = pd.crosstab(y_test, pred, rownames=['Actual'], colnames=['Predicted'])
- table

计算混淆矩阵指标
- table = np.array(table)
- Accuracy = (table[0, 0] + table[1, 1]) / np.sum(table)
- Accuracy
- Sensitivity = table[1 , 1] / (table[1, 0] + table[1, 1])
- Sensitivity
-
- Specificity = table[0, 0] / (table[0, 0] + table[0, 1])
- Specificity
-
- Recall = table[1, 1] / (table[0, 1] + table[1, 1])
- Recall
-
- cohen_kappa_score(y_test, pred)
-
- #画ROC曲线
- plot_roc_curve(model, X_test, y_test)
- x = np.linspace(0, 1, 100)
- plt.plot(x, x, 'k--', linewidth=1)
- plt.title('ROC Curve for Random Forest')


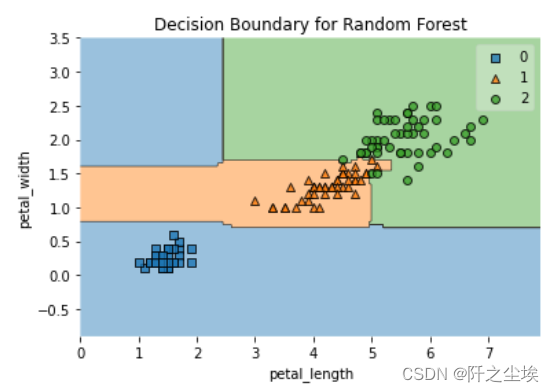
用鸢尾花两个特征变量画其决策边界
- X,y = load_iris(return_X_y=True)
- X2 = X[:, 2:4]
-
- model = RandomForestClassifier(n_estimators=500, max_features=1, random_state=1)
- model.fit(X2,y)
- model.score(X2,y)
-
- plot_decision_regions(X2, y, model)
- plt.xlabel('petal_length')
- plt.ylabel('petal_width')
- plt.title('Decision Boundary for Random Forest')
-
