- 1Unity中Sqlite的配置与使用_unity 中使用sqlift设置
- 2ArticulationBody的锚点位置和锚点旋转_articulation body
- 3qt扩展属性框qtpropertybrowser 中添加按钮_qtpropertybrowser 按钮
- 4【Unity 3D】学习笔记十八:游戏贴图与帧动画_unity贴图动画
- 5pytorch不定长文本识别resnet18+LSTM_resnet+lstm识别验证码
- 6qml 常用_qml anchors按钮锚定父正中
- 7Dlib机器学习库系列2----人脸检测_render_face_detections
- 8【Stable Diffusion】什么是VAE_sd vae
- 9Unity插件TouchScript初识
- 10lisp图库不显示缩略图_威纶通 Easybuilder Pro强大的自带图库/有动图
【Python教程】第一部分 --黑马笔记_黑马程序员 python 资料
赞
踩
第一章 常用函数
1.1 常用知识
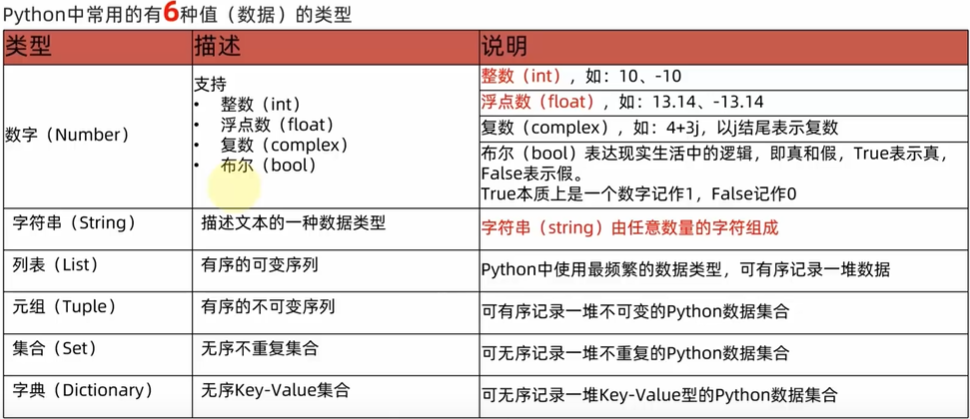
1.1.1 数据类型

#定义变量存储布尔类型的数据
bool_1 = True
bool_2 = False
print(f"bool_1变量的内容是:{bool_1},类型是:{type(bool_1)}")
print(f"bool_2变量的内容是: {bool_2},类型是: {type(bool_2)}")
- 1
- 2
- 3
- 4
- 5
- 6
bool_1变量的内容是:True,类型是:<class ‘bool’>
bool_2变量的内容是: False,类型是: <class ‘bool’>
type是查看数据类型的函数
1.1.2 注释
注释(选中内容,按下快捷键即可全部注释)CTRL+ /
"""
不去打印它,这个也是注释
"""
# 这个也是注释,两种
- 1
- 2
- 3
- 4
1.1.3 数据类型转换

# 整形转浮点数
float_num = float(11)
print(type(float_num),float_num)
# 浮点数转整形
int_num = int(11.345)
print(type(int_num),int_num)
- 1
- 2
- 3
- 4
- 5
- 6
<class ‘float’> 11.0
<class ‘int’> 11
1.1.4 标识符命名规则
1、标识符(或者变量名)只能由数字、字母、下划线构成,不能以数字开头,字母和下划线都可以,不能包含空格。
2、慎用小写字母I和大写字母O,因为它们可能被人错看成数字1和0
3、python中的关键字(例:print)不能当作标识符
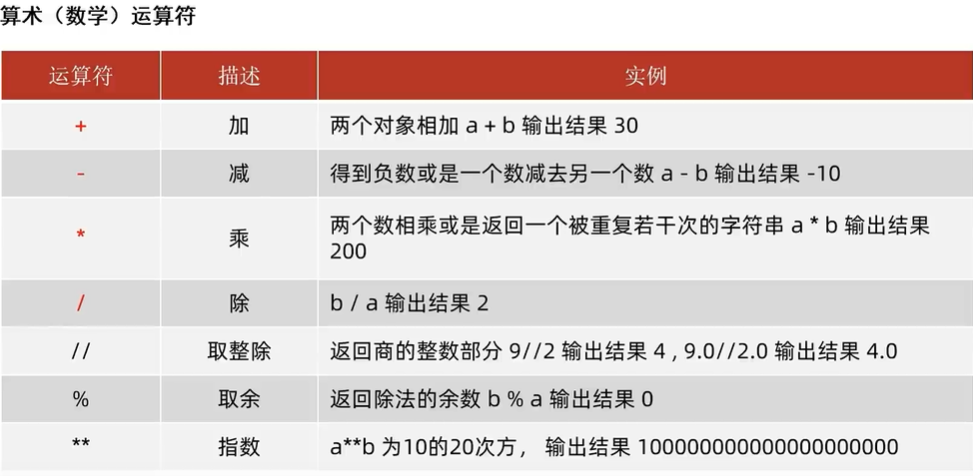
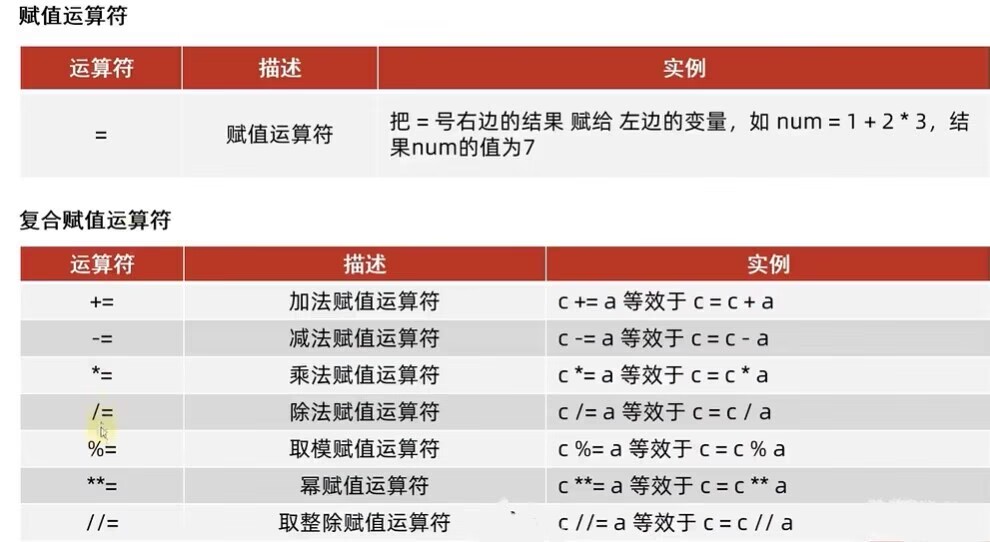
1.1.5 运算符
1.1.6 字符串
(1)三种定义方式:
# 1.单引号定义法
name = '我'
print(type(name), name)
# 2.双引号定义法
name = "我"
print(type(name), name)
# 3.三引号定义法
name = """我"""
print(type(name), name)
- 1
- 2
- 3
- 4
- 5
- 6
- 7
- 8
- 9
- 10
<class ‘str’> 我
<class ‘str’> 我
<class ‘str’> 我
1.单引号定义法,可以包含双引号
2.双引号定义法。可以包含单引号
3.可以使用转义字符(\)
name = "'我'"
print(type(name), name)
name = '"我"'
print(type(name), name)
name = "\"我\""
print(type(name), name)
- 1
- 2
- 3
- 4
- 5
- 6
<class ‘str’> ‘我’
<class ‘str’> “我”
<class ‘str’> “我”
(2)字符串拼接:
如果我们有两个字符串(文本)字面量,可以将其拼接成一个字符串,通过+号即可完成
print("HUAWEI"+"IPHONE")
name = "小明"
address = "北京市朝阳区"
print("I am " + name + ",我的地址是:" + address)
- 1
- 2
- 3
- 4
- 5
HUAWEIIPHONE
I am 小明,我的地址是:北京市朝阳区
注意:字符串无法与数字直接通过+号连接,会报错。
只能通过str(tel)转换成字符串。
tel = 238383323
print("I am " + name + ",我的地址是:" + address + str(tel))
- 1
- 2
- 3
(3)字符串格式化:
常用的

% 表示: 我要占位
s 表示: 将变量变成字符串放入占位的地方
# 通过占位的形式,完成拼接
name = "小明"
message = "学习强人:%s"  % name
print(message)

name = "Alice"
age = 25
print("Name: %s, Age: %d" % (name, age))  # 使用占位符%s和%d,将变量插入到字符串中
- 1
- 2
- 3
- 4
- 5
- 6
- 7
- 8
学习强人:小明
Name: Alice, Age: 25
(4)字符串格式的精准控制*:
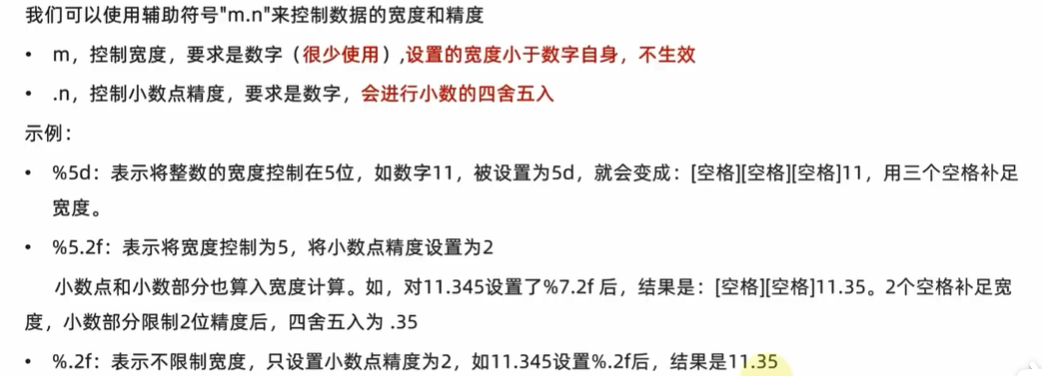
num = 32
num1 = 31.123
print("数字32的宽度限制为5,结果为:%5d" % num)
print("数字32的宽度限制为1,结果为:%1d" % num)
print("数字31.123的宽度限制为7,小数精度2,结果为:%7.2f" % num1)
print("数字32的宽度无限制,小数精度2,结果为:%.2f" % num1)
- 1
- 2
- 3
- 4
- 5
- 6
- 7
数字32的宽度限制为5,结果为: 32
数字32的宽度限制为1,结果为:32
数字31.123的宽度限制为7,小数精度2,结果为: 31.12
数字32的宽度无限制,小数精度2,结果为:31.12
注意:.如果m比数字本身宽度还小,m不生效。.n会对小数部分做精度限制,会对小数部分做四舍五入。
(5)字符串快速格式化:
注意:对精度没有要求可以使用这种。

name = "Alice"
age = 25
print("我的名字:%s, 今年: %d" % (name, age))#普通的格式化
print(f"我的名字:{name}, 今年: {age}")#快速格式化
- 1
- 2
- 3
- 4
使用 f 字符,你可以在字符串中使用大括号 { } 来包含变量、表达式或函数调用,并在运行时将其替换为相应的值。
"""
{first_name} {last_name} 将会被替换为相应的值。
"""
first_name = "you"
last_name = "love"
full_name = f"{first_name} {last_name}"
print(full_name)
print(f"Hello, {full_name.title()}!")
- 1
- 2
- 3
- 4
- 5
- 6
- 7
- 8
you love
Hello, You Love!
(6)字符串表达式格式化:
print("1 * 1的结果是:%d" % (1 * 1))
print(f"1 * 1的结果是:{1 *1}")
print("字符串在Python中的类型是:%s" % type ('字符串'))
- 1
- 2
- 3
1 * 1的结果是:1
1 * 1的结果是:1
字符串在Python中的类型是:<class ‘str’>
1.2 print函数和input函数
1.2.1 print函数

1、 每个print都默认另取一行
2、\n换行符的意思
3、打印单引号、双引号于C语言相同,在前面加\ 即可。(部分用法可看字符串部分)
print("Hello!HI")
print("Hello!"+"HI"+"iphone")
message = "Hello python world!"
# 利用的变量代替
print(message)
name = "Alice"
age = 25
print("我的名字:%s, 今年: %d" % (name, age))#普通的格式化
print(f"我的名字:{name}, 今年: {age}")#快速格式化  # 使用占位符%s和%d,将变量插入到字符串中
#print(name,age),没有这个空格结果也一样。
name, age = "Jack", 24
print(name, age)
print("姓名:", name,",年龄:", age)
- 1
- 2
- 3
- 4
- 5
- 6
- 7
- 8
- 9
- 10
- 11
- 12
- 13
- 14
Hello!HI
Hello!HIiphone
Hello python world!
我的名字:Alice, 今年: 25
我的名字:Alice, 今年: 25
Jack 24
姓名: Jack ,年龄: 24
4、另一种常用的方法是使用字符串的format方法来进行格式化。它使用一对花括号({ })作为占位符,并使用format方法的参数来提供实际的值。
{ }被用作占位符。format方法中的参数将按顺序替换这些占位符。
name = "Alice"
age = 25
print("Name: {}, Age: {}".format(name, age))  # 使用花括号作为占位符
- 1
- 2
- 3
- 4
Name: Alice, Age: 25
1.2.2 input函数
input( )类似C语言的scanf的输入函数
input( )默认返回字符串
print("你用的什么手机?")
phone = input()
print("我的手机是:%s" % phone)
- 1
- 2
- 3
你用的什么手机?
华为
我的手机是:华为
可以把提示直接装入input中,效果是一样的。
phone = input("你用的什么手机?")
print("我的手机是:华为我的手机是:%s" % phone)
- 1
- 2
因为默认是字符串,所有不能用赋值的数进行运算。
1.3 常量与多个变量
多个变量赋值
x, y, z = 0, 0, 0
- 1
常量(全局变量)
使用全大写来指出应将每个变量视为常量,其值应为始终不变。
MAX_CONNECTIONS = 5000
- 1
第二章 for循环
2.1 for循环

# 定义字符串name
name = "itheima"
# for循环处理字符串
for x in name:
       print(x)
- 1
- 2
- 3
- 4
- 5
- 6
i
t
h
e
i
m
a
例子:
for i in range(1, 10):
    for j in range(1, i +1):
        print(f"{j} * {i} = {j * i}\t", end='')#end=''不打印回车符

    print()
- 1
- 2
- 3
- 4
- 5
- 6
1 * 1 = 1
1 * 2 = 2 2 * 2 = 4
1 * 3 = 3 2 * 3 = 6 3 * 3 = 9
1 * 4 = 4 2 * 4 = 8 3 * 4 = 12 4 * 4 = 16
1 * 5 = 5 2 * 5 = 10 3 * 5 = 15 4 * 5 = 20 5 * 5 = 25
1 * 6 = 6 2 * 6 = 12 3 * 6 = 18 4 * 6 = 24 5 * 6 = 30 6 * 6 = 36
1 * 7 = 7 2 * 7 = 14 3 * 7 = 21 4 * 7 = 28 5 * 7 = 35 6 * 7 = 42 7 * 7 = 49
1 * 8 = 8 2 * 8 = 16 3 * 8 = 24 4 * 8 = 32 5 * 8 = 40 6 * 8 = 48 7 * 8 = 56 8 * 8 = 64
1 * 9 = 9 2 * 9 = 18 3 * 9 = 27 4 * 9 = 36 5 * 9 = 45 6 * 9 = 54 7 * 9 = 63 8 * 9 = 72 9 * 9 = 81
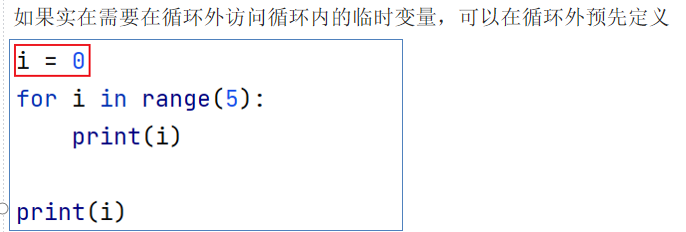
2.2 range( )
range(5)       #取得的数据是:[0, 1, 2, 3, 4]
range(5 ,10)   #取得的数据是:[5, 6, 7, 8, 9]
range(5, 10, 2)#从5开始,到10结束的数字序列,步长为2
- 1
- 2
- 3
for x in range(10):
    print("桂花")
- 1
- 2
- 3
桂花
桂花
桂花
桂花
桂花
桂花
桂花
桂花
桂花
桂花
第三章 if 语句
这个示例中的循环首先检查当前的汽车名是否是’ bmw’。如果是,就以全大写方式打印,否则以首字母大写的方式打印:
cars = ['audi', 'bmw', 'subaru', 'toyota']
for car in cars:
    if car == 'bmw':
        print(car.upper())
    else:
        print(car.title())
- 1
- 2
- 3
- 4
- 5
- 6
Audi
BMW
Subaru
Toyota
3.1 简单的if语句
(1)、if —else
age = 19
if age >= 18:
    print("You are old enough to vote!")
- 1
- 2
- 3
You are old enough to vote!
age = 17
if age >= 18:
    print("You are old enough to vote!")
    print("Have you registered to vote yet?")
else:
    print("Sorry, you are too young to vote.")
    print("Please register to vote as soon as you turn 18!")
- 1
- 2
- 3
- 4
- 5
- 6
- 7
Sorry, you are too young to vote.
Please register to vote as soon as you turn 18!
3.2 if —elif—else
age = 12
if age < 4:
    print("Your admission cost is $0.")
elif age < 18:
    print("Your admission cost is $25.")
else:
    print("Your admission cost is $40.")
- 1
- 2
- 3
- 4
- 5
- 6
- 7
Your admission cost is $25.
3.3 使用多个elif代码块
age = 12
if age < 4:
    price = 0
elif age < 18:
    price = 25
elif age < 65:
    price = 40
else:
    price = 20
print(f"Your admission cost is ${price}.")
- 1
- 2
- 3
- 4
- 5
- 6
- 7
- 8
- 9
- 10
Your admission cost is $25.
3.4 省略else代码块
Python并不要求if-elif 结构后面必须有else代码块。在有些情况下,else代码块很有用;而在其他一些情况下,使用一条elif语句来处理特定的情形更清晰:
age = 12
if age < 4:
    price = 0
elif age < 18:
    price = 25
elif age < 65:
    price = 40
elif age >= 65:
    price = 20
print(f"Your admission cost is ${price}.")
- 1
- 2
- 3
- 4
- 5
- 6
- 7
- 8
- 9
- 10
Your admission cost is $25.
3.5 多个条件
下面再来看看前面的比萨店示例。如果顾客点了两种配料,就需要确保在其比萨中包含这些配料:
3个独立的测试:
requested_toppings = ['mushrooms', 'extra cheese']
if 'mushrooms' in requested_toppings:
    print("Adding mushrooms.")
if 'pepperoni' in requested_toppings:
    print("Adding pepperoni.")
if 'extra cheese' in requested_toppings:
    print("Adding extra cheese.")
print("\nFinished making your pizza!")
- 1
- 2
- 3
- 4
- 5
- 6
- 7
- 8
Adding mushrooms.
Adding extra cheese.
Finished making your pizza!
3.6 判断语句的嵌套

age = 20
year = 3
level = 1
if age >= 18:
    print("你是成年人")
    if age < 30:
           print("你的年龄达标了")
           if year > 2:
                print("恭喜你,年龄和入职时间都达标,可以领取礼物")
           elif level > 3:
                print("恭喜你,年龄和级别大表,可以领取礼物")
           else:
                print("不好意思,尽管年龄达标,但是入职时间和级别都不达标。")


    else:
        print("不好意思,年龄太大了")
else:
    print("年龄太大了")
- 1
- 2
- 3
- 4
- 5
- 6
- 7
- 8
- 9
- 10
- 11
- 12
- 13
- 14
- 15
- 16
- 17
- 18
- 19
- 20
你是成年人
你的年龄达标了
恭喜你,年龄和入职时间都达标,可以领取礼物
第四章 while()
4.1 while()常用方法
在Python中,while循环用于重复执行一段代码,直到指定的条件不再满足。while循环的基本语法如下:

count = 0
while count < 5:
    print("Count:", count)
    count += 1
- 1
- 2
- 3
- 4
- 5
Count: 0
Count: 1
Count: 2
Count: 3
Count: 4
1、break和continue语句: break语句可以用于提前终止循环,即使条件仍然满足(就是跳出循环,即使条件满足)。**而continue语句用于跳过当前循环中的剩余代码,直接开始下一次循环迭代。**下面是一个示例:
count = 0
while count < 5:
    if count == 3:
        break
    print("Count:", count)
    count += 1
- 1
- 2
- 3
- 4
- 5
- 6
- 7
Count: 0
Count: 1
Count: 2
在上述代码中,当count的值为3时,break语句会立即终止循环,不再执行后续代码。
4.2 while()循环嵌套
# 定义外层循环的控制变量
i = 1
while i <= 9:
    # 定义内层循环的控制变量
    j = 1
    while j <= i:
        #内层循环的print语句,不要换行,通过\t制表符进行对齐 ,end=''即可输出不换行。
        print(f"{j} * {i} = {j * i}\t", end='')
        j +=1

    i += 1
    print()    #print空内容,就是输出一个换行
- 1
- 2
- 3
- 4
- 5
- 6
- 7
- 8
- 9
- 10
- 11
- 12
1 * 1 = 1
1 * 2 = 2 2 * 2 = 4
1 * 3 = 3 2 * 3 = 6 3 * 3 = 9
1 * 4 = 4 2 * 4 = 8 3 * 4 = 12 4 * 4 = 16
1 * 5 = 5 2 * 5 = 10 3 * 5 = 15 4 * 5 = 20 5 * 5 = 25
1 * 6 = 6 2 * 6 = 12 3 * 6 = 18 4 * 6 = 24 5 * 6 = 30 6 * 6 = 36
1 * 7 = 7 2 * 7 = 14 3 * 7 = 21 4 * 7 = 28 5 * 7 = 35 6 * 7 = 42 7 * 7 = 49
1 * 8 = 8 2 * 8 = 16 3 * 8 = 24 4 * 8 = 32 5 * 8 = 40 6 * 8 = 48 7 * 8 = 56 8 * 8 = 64
1 * 9 = 9 2 * 9 = 18 3 * 9 = 27 4 * 9 = 36 5 * 9 = 45 6 * 9 = 54 7 * 9 = 63 8 * 9 = 72 9 * 9 = 81
第五章 定义函数
5.1 定义函数
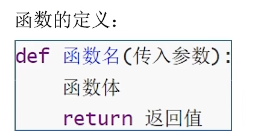
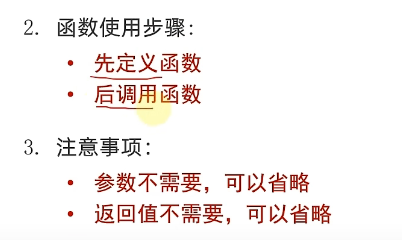
使用def关键字来定义函数
(1) 无传入参数
"""
没有renturn,默认返回None
"""
def greet(name):
    print("Hello,", name)
    print("Welcome to our website!")
#调用函数
greet("Alice")
- 1
- 2
- 3
- 4
- 5
- 6
- 7
- 8
Hello, Alice
Welcome to our website!
(2) 有传入参数
"""
定义函数,接受2个参数
"""
def add(x, y):
    result = x + y
    print(f"{x} + {y}的计算结果是:{result}")
# 调用函数
add(1, 2)
- 1
- 2
- 3
- 4
- 5
- 6
- 7
- 8
1 + 2的计算结果是:3
5.2 返回值
用return的目的是为了将局部变量变成全局变量,在定义函数中赋值的数中无法在外部使用,必须要有return将需要使用的值返回出来,进而在定义函数外使用。(return后的代码不会被执行)
1、返回单个值:可以使用return关键字返回一个单独的值,上面的程序其实没有返回函数值,只是使用了print打印出来而已。
def add_numbers(a, b):
    return a + b
# 上面是函数定义,返回了a+b的函数
result = add_numbers(3, 5)
print(result)  # 输出:8
- 1
- 2
- 3
- 4
- 5
8
2、返回多个值: *:实际上,Python中的return语句也可以返回多个值。它使用逗号分隔多个表达式或值,将它们作为元组一起返回。
没有return程序会报错,使用定义函数无法打印局部变量
def calculate(a, b):
    add = a + b
    subtract = a - b
    return add, subtract

result = calculate(10, 5)
print(result)  # 输出:(15, 5)
- 1
- 2
- 3
- 4
- 5
- 6
- 7
- 8
(15, 5)
5.3 定义函数进行文档说明
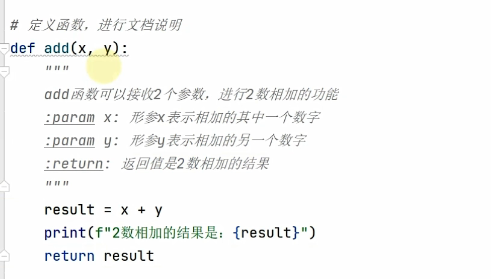
5.4 函数的嵌套使用

def add(x, y, z):
    result = x + y + z
    print(f"{x} + {y} +{z}的计算结果是:{result}")
    # 调用函数,传入被计算的2个数字


def sum_1():
    add(2, 3, 4)
    print("函数的嵌套使用")


# 调用函数
sum_1()
- 1
- 2
- 3
- 4
- 5
- 6
- 7
- 8
- 9
- 10
- 11
- 12
- 13
2 + 3 +4的计算结果是:9
函数的嵌套使用
5.5 函数的局部变量与全局变量
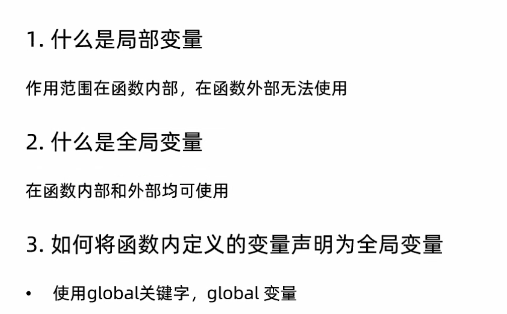
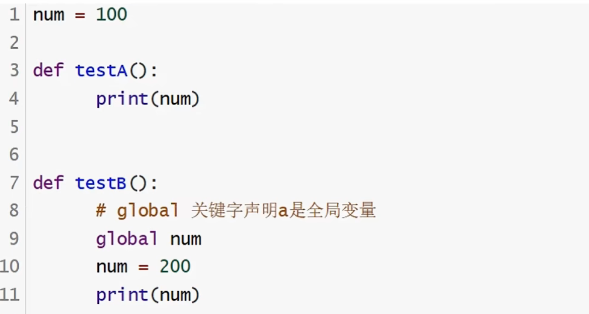
写入了一个global ,就让两个num是同一个了。
