- 1教你如何在vue项目中封装通用的axios_vue 封装axios code
- 2EXCEL 2016 冻结窗口(首行首列,多行多列)_冻结窗口怎么冻结多行多列
- 3句子迷,语录,苏引华
- 4使用wget批量下载geo数据集的全部文件 linux下载geo数据 geo处理的数据不是下载原始数据 Linux如何下载ftp文件 geo ftp geo ftp下载 geo下载_linux系统下载geo的数据
- 5thingsboard从搭建环境到安装部署,给安装出错,或者安装失败的小伙伴现场写一遍(修正版)_找不到lwm2m-registry
- 6快应用开发初体验_快应用 webview
- 7详解边缘计算系统逻辑架构:云、边、端协同
- 8Dynamic Web Module facet version问题_dynamic web module facet version (5.0), was not fo
- 9Linux小项目-倒车影像功能设计_linux车机 项目
- 10Gradle的下载与安装教程
k8s-应用编排和持久化存储_hostpath subpath
赞
踩
第六章、应用编排与管理(Deployment)
6.1、引入
- 背景:我们可以直接管理集群中所有的Pod吗?
- 如果这样做,以下的问题有什么方式来解决?
- 1)如何保证集群内可用Pod的数量
- 2)如何为所有的Pod更新镜像版本
- 3)更新的过程中,如何保证服务的可用性
- 4)更新的过程中,发现问题如何快速回滚
- Deploymet:管理部署发布的控制器,能够帮我们做什么?
- 1)定义一组pod的期望数量,controller会维持Pod数量与期望数量一致
- 2)配置Pod发布方式,controller会按照给定策略更新Pod,保证更新过程中不可用的pod数量在限定范围内
- 3)如果发布有问题,支持“一键”回滚
6.2、实操
- 1、Deployment语法
- [root@master1 yaml]# cat deployment.yaml
- apiVersion: apps/v1
- kind: Deployment
- metadata:
- labels:
- app: nginx
- name: nginx-deployment
- spec:
- replicas: 3 #期望副本数量
- selector:
- matchLabels:
- app: nginx
- template: #pod模板
- metadata:
- labels:
- app: nginx
- spec:
- containers:
- - image: reg.mt.com:5000/nginx:v1
- name: nginx
- ports:
- - containerPort: 80
-
- 2、创建pod
- [root@master1 yaml]# kubectl apply -f deployment.yaml
- deployment.apps/nginx-deployment created
- [root@master1 yaml]# kubectl get deployment
- NAME READY UP-TO-DATE AVAILABLE AGE
- nginx-deployment 3/3 3 3 57s
-
- DESIRED: 期望pod数量(replicas)
- CURRENT:当前实际的pod数量
- UP-TO-DATE: 当达到期望版本的pod数量
- AVAILABLE:运行中并可用的pod数量
- AGE: deployment创建的时长
-
- [root@master1 yaml]# kubectl get replicaset
- NAME DESIRED CURRENT READY AGE
- nginx-deployment-675d5d8757 3 3 3 64s
-
- [root@master1 yaml]# kubectl get pods
- NAME READY STATUS RESTARTS AGE
- nginx-deployment-675d5d8757-9jlkg 1/1 Running 0 68s
- nginx-deployment-675d5d8757-jxfwt 1/1 Running 0 68s
- nginx-deployment-675d5d8757-w982m 1/1 Running 0 68s
- pod名字格式: ${deployment-name}-${template-hash}-${random-suffix}
-
- 3、更新镜像
- [root@master1 yaml]# kubectl set image deployment/nginx-deployment nginx=reg.mt.com:5000/nginx:v2
- deployment.extensions/nginx-deployment image updated
- [root@master1 yaml]# kubectl get replicaset
- NAME DESIRED CURRENT READY AGE
- nginx-deployment-54ccbb99b8 3 3 2 5s
- nginx-deployment-675d5d8757 1 1 1 10m
- [root@master1 yaml]# kubectl get replicaset
- NAME DESIRED CURRENT READY AGE
- nginx-deployment-54ccbb99b8 3 3 3 18s #nginx:v2的 replicaset
- nginx-deployment-675d5d8757 0 0 0 10m #nginx:v1的 pod逐渐为0
- [root@master1 yaml]# kubectl set image deployment/nginx-deployment nginx=reg.mt.com:5000/nginx:latest #最后一个参数nginx为容器名称,一个pod内有多个容器,需要指定容器名
- [root@master1 yaml]# kubectl get replicaset
- NAME DESIRED CURRENT READY AGE
- nginx-deployment-54ccbb99b8 3 3 3 69s
- nginx-deployment-675d5d8757 0 0 0 11m
- nginx-deployment-697b6ffb7f 1 1 0 2s #nginx:latest的pod 为逐渐为3
-
- [root@master1 yaml]# kubectl get deployment -o yaml
- --
- spec:
- progressDeadlineSeconds: 600
- replicas: 3
- revisionHistoryLimit: 10 #保留历史版本个数
- --
- [root@master1 yaml]#
-
- 4、回滚到上一个版本,当前为nginx:latest回滚到nginx:v2,如果执行两次就回滚到nginx:latest
- [root@master1 yaml]# kubectl get replicaset -o wide
- NAME DESIRED CURRENT READY AGE CONTAINERS IMAGES SELECTOR
- nginx-deployment-54ccbb99b8 0 0 0 14m nginx reg.mt.com:5000/nginx:v2 app=nginx,pod-template-hash=54ccbb99b8
- nginx-deployment-675d5d8757 0 0 0 24m nginx reg.mt.com:5000/nginx:v1 app=nginx,pod-template-hash=675d5d8757
- nginx-deployment-697b6ffb7f 3 3 3 12m nginx reg.mt.com:5000/nginx:latest app=nginx,pod-template-hash=697b6ffb7f
- [root@master1 yaml]# kubectl rollout undo deployment/nginx-deployment
- deployment.extensions/nginx-deployment rolled back
- [root@master1 yaml]# kubectl get replicaset -o wide
- NAME DESIRED CURRENT READY AGE CONTAINERS IMAGES SELECTOR
- nginx-deployment-54ccbb99b8 3 3 3 14m nginx reg.mt.com:5000/nginx:v2 app=nginx,pod-template-hash=54ccbb99b8
- nginx-deployment-675d5d8757 0 0 0 24m nginx reg.mt.com:5000/nginx:v1 app=nginx,pod-template-hash=675d5d8757
- nginx-deployment-697b6ffb7f 0 0 0 13m nginx reg.mt.com:5000/nginx:latest app=nginx,pod-template-hash=697b6ffb7f
- [root@master1 yaml]#
-
- 5、回滚到特定版本
- [root@master1 yaml]# kubectl rollout history deployment/nginx-deployment
- deployment.extensions/nginx-deployment
- REVISION CHANGE-CAUSE
- 1 <none>
- 4 <none>
- 5 <none>
- [root@master1 yaml]# kubectl rollout undo deployment/nginx-deployment --to-revision=1
- deployment.extensions/nginx-deployment rolled back
- [root@master1 yaml]# kubectl get replicaset -o wide
- NAME DESIRED CURRENT READY AGE CONTAINERS IMAGES SELECTOR
- nginx-deployment-54ccbb99b8 0 0 0 24m nginx reg.mt.com:5000/nginx:v2 app=nginx,pod-template-hash=54ccbb99b8
- nginx-deployment-675d5d8757 3 3 3 34m nginx reg.mt.com:5000/nginx:v1 app=nginx,pod-template-hash=675d5d8757
- nginx-deployment-697b6ffb7f 0 0 0 23m nginx reg.mt.com:5000/nginx:latest app=nginx,pod-template-hash=697b6ffb7f
- [root@master1 yaml]#

6、版本
在需要更复杂的或者更精确的历史版本管理方案的时候,建议使用helm进行版本管理
6.3、架构设计
** DeploymentStatus **
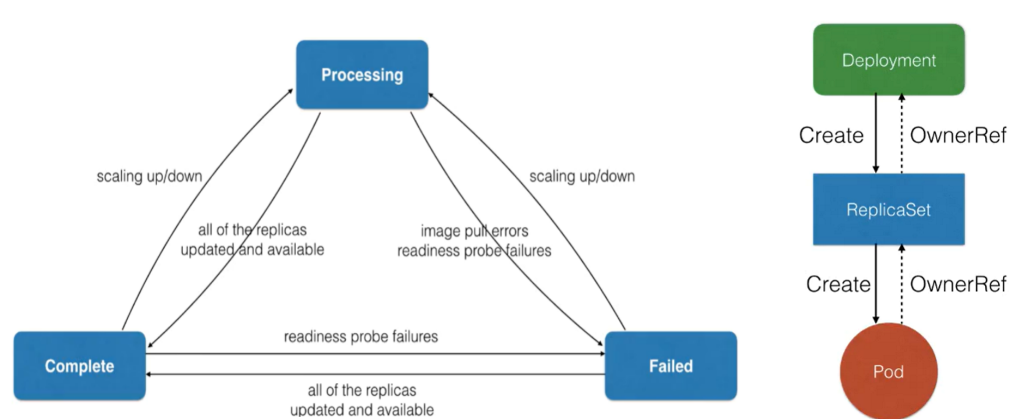
管理模式:
- Deployment只负责管理不同版本的ReplicaSet,由Replicaset管理Pod副本数
- 每个Replicaset对应了Deployment template的一个版本
- 一个Replicaset下的Pod都是相同的版本
6.3.1、Deployment控制器实现:

- Deployment关注deployment以及replicaset相关的event
- Deployment controller从queue中获取到信息后,check Paused(用于判断是否需要新的发布)
- 如果为true值,表示只进行数量更新,只会进行sync到对应的replicas中,然后update deployment状态
- 如果是no则会进行更新recreate或者rolling操作
6.3.2、Replicaset控制器

- Replicaset controller从queue中watch replicaset和pod相关event
- 管理副本数量,进行创建/删除pod
Deployment controller做了一些更复杂的操作,比如版本管理;把pod数量的维持工作交给replicaset controller操作。
6.3.3、扩容模拟
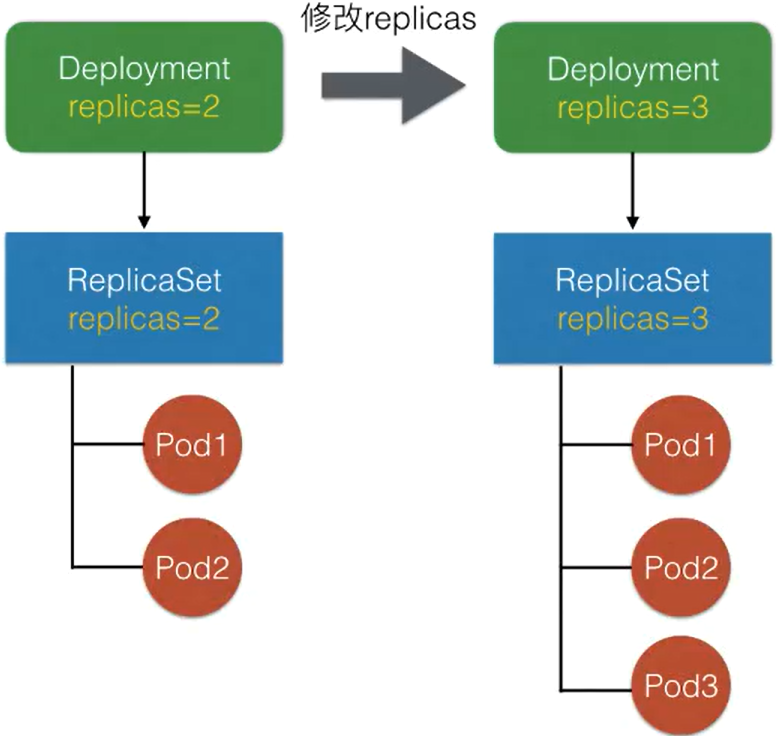
Deployment的副本数由ReplicaSet管理,修改Deployment replicas之后,controller会把replicas同步到当前版本的Replicaset中,由Replicaset执行扩容/缩容。
6.3.4、发布模拟

6.3.5、回滚模拟
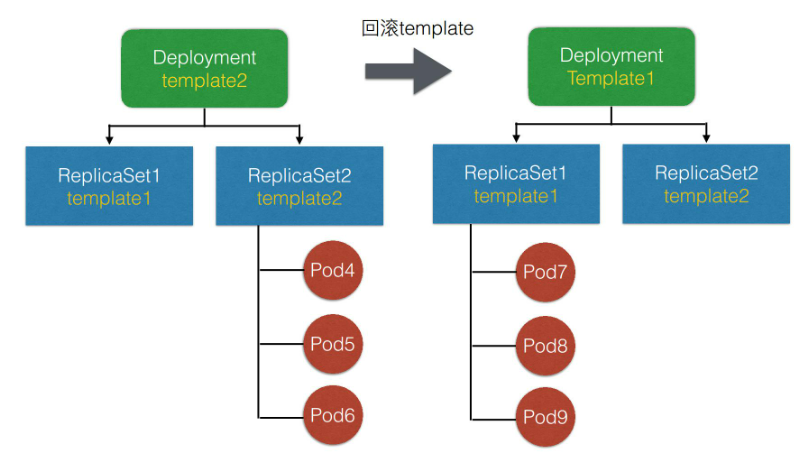
回滚的过程,其实是Deployment controller重新调整下属的Replicaset的replicas数量,最终使旧版本的ReplicaSet重新扩出所有的Pod。重新创建出符合旧版本template的pod
6.4、spec字段解析
- MinReadySeconds:判断Pod available的最小ready时间。ready的pod不一定是available
- revisionHistoryLimit:保留历史revision(ReplicaSet)的数量,默认值10
- paused:标识deployment只做数量维持、不做新的发布;在debug上可能会用到
- progressDeadlineSeconds:判断Deployment status condition为failed的最大时间
-
- 升级策略字段解析:
- MaxUnavailable:滚动过程中最多有多少个Pod不可用
- MaxSurege:滚动过程中最多存在多少个Pod超过期望replicas数量
-
- 当资源比较充足的时候,可以设置MaxUnavailable较小,而MaxSurege较大。在资源紧张的时候,可以设置MaxSurege为0.但是注意MaxSurege和MaxUnavailable不同同时为0
第七章、应用编排与管理(job/cronjob/Daemonset)
- 首先我们来看一下 Job 的需求来源。我们知道 K8s 里面,最小的调度单元是 Pod,我们可以直接通过 Pod 来运行任务进程。这样做将会产生以下几种问题:
-
- 1)我们如何保证 Pod 内进程正确的结束?
- 2)如何保证进程运行失败后重试?
- 3)如何管理多个任务,且任务之间有依赖关系?
- 4)如何并行地运行任务,并管理任务的队列大小?
7.1、job
Kubernetes 的 Job 为我们提供了什么功能:
- 首先 kubernetes 的 Job 是一个管理任务的控制器,它可以创建一个或多个 Pod 来指定 Pod 的数量,并可以监控它是否成功地运行或终止;
- 跟踪Pod 的状态来给 Job 设置重置的方式及重试的次数;
- 确定依赖关系,保证上一个任务运行完成之后再运行下一个任务;
- 控制任务的并行度,根据并行度来确保 Pod 运行过程中的并行次数和总体完成大小。
- [root@master1 yaml]# cat job.yaml
- apiVersion: batch/v1
- kind: Job
- metadata:
- name: my-job
- spec:
- template:
- spec:
- containers:
- - image: reg.mt.com:5000/centos:v1
- name: my-job
- resources: {}
- restartPolicy: Never #重启策略
- backoffLimit: 4 #重试次数限制
- [root@master1 yaml]# kubectl get job
- NAME COMPLETIONS DURATION AGE
- my-job 1/1 3s 3s
- COMPLETIONS: 完成pod数量
- DURATION: Job实际业务运行时长
- AGE: job创建的时长
-
- [root@master1 yaml]# kubectl get pods
- NAME READY STATUS RESTARTS AGE
- my-job-tzccn 0/1 Completed 0 2m21s
-
-
- [root@master1 yaml]# cat job2.yaml
- apiVersion: batch/v1
- kind: Job
- metadata:
- name: my-job
- spec:
- completions: 8
- parallelism: 2
- template:
- spec:
- containers:
- - image: reg.mt.com:5000/centos:latest
- name: my-job
- command: ["/bin/sh"]
- args: ["-c","sleep 30;date"]
- restartPolicy: OnFailure
- backoffLimit: 4
-
- parallelism #代表并行执行个数,这里的2代表并行执行的pod数量,也就是说会有2个pod并行运行
- completions #代表本pod队列执行次数,这里8代表这个任务将被执行8次

7.2、CronJob
- [root@master1 yaml]# cat cron.yaml
- apiVersion: batch/v1beta1
- kind: CronJob
- metadata:
- name: hello
- spec:
- schedule: "*/1 * * * *"
- jobTemplate:
- spec:
- parallelism: 2
- completions: 8
- template:
- spec:
- containers:
- - image: reg.mt.com:5000/centos:latest
- name: hello
- args:
- - /bin/sh
- - -c
- - date;sleep 10;echo Hello from MT
- resources: {}
- restartPolicy: OnFailure
- startingDeadlineSeconds: 10
- concurrencyPolicy: Allow
- successfulJobsHistoryLimit: 3
-
- 参数说明:
- backoffLimit: 4 #重试次数限制
- startingDeadlineSeconds: 10 #job最长启动时间
- concurrencyPolicy: Allow #是否允许并行运行,并行,如果是false就会等待上一个job执行完毕后才会进行下一个pod
- successfulJobHistoryLimit: 3 #允许留存历史job个数
-
-
- [root@master1 yaml]# kubectl get jobs -w #每2个pod并行运行,共8个pod
- hello-1611469980 0/8 0s
- hello-1611469980 0/8 0s 0s
-
- hello-1611469980 1/8 11s 11s
- hello-1611469980 2/8 11s 11s
-
- hello-1611469980 3/8 22s 22s
- hello-1611469980 4/8 22s 22s
-
- hello-1611469980 5/8 33s 33s
- hello-1611469980 6/8 34s 34s
-
- hello-1611469980 7/8 44s 44s
- hello-1611469980 8/8 45s 45s

7.3、Job架构设计
管理模式:
- 1、Job Controller负责根据配置创建pod
- 2、Job Controller跟踪job
- 3、Job Controller会自动添加label来跟踪对应的pod,并根据配置并行或者串行创建Pod
Job Controller 主要去创建相对应的 pod,然后 Job Controller 会去跟踪 Job 的状态,及时地根据我们提交的一些配置重试或者继续创建。同时我们刚刚也提到,每个 pod 会有它对应的 label,来跟踪它所属的 Job Controller,并且还去配置并行的创建, 并行或者串行地去创建 pod。
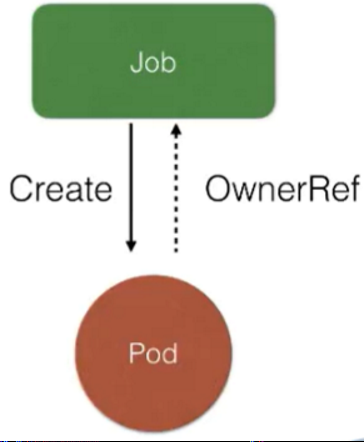
Job控制器:

-
Job controller会去watch apiserver,存放到queue中;我们通过yaml 提交job会经过apiserver到etcd中
-
job controller 检查是否有当前运行的pod,如果没有scale up创建出来。如果有的话或者大于并行度的话进行scale down
-
同时要去检查它是否是并行的 job,或者是串行的 job,根据设置的配置并行度、串行度,及时地把 pod 的数量给创建出来。最后,它会把 job 的整个的状态更新到 API Server 里面去
7.4、DaemonSet
- 背景:同样的问题:如果我们没有 DaemonSet 会怎么样?下面有几个需求:
- 首先如果希望每个节点都运行同样一个 pod 怎么办?
- 如果新节点加入集群的时候,想要立刻感知到它,然后去部署一个 pod,帮助我们初始化一些东西,这个需求如何做?
- 如果有节点退出的时候,希望对应的 pod 会被删除掉,应该怎么操作?
- 如果 pod 状态异常的时候,我们需要及时地监控这个节点异常,然后做一些监控或者汇报的一些动作,那么这些东西运用什么控制器来做?
- DaemonSet 也是 Kubernetes 提供的一个 default controller,它实际是做一个守护进程的控制器,它能帮我们做到以下几件事情:
- 首先能保证集群内的每一个节点都运行一组相同的 pod;
- 同时还能根据节点的状态保证新加入的节点自动创建对应的 pod;
- 在移除节点的时候,能删除对应的 pod;
- 而且它会跟踪每个 pod 的状态,当这个 pod 出现异常、Crash 掉了,会及时地去 recovery 这个状态。
适用场景:
- 1、集群存储过程:glusterd,ceph
- 2、日志收集进程:fluentd,logstash
- 3、需要在每个节点运行的监控收集器
- #1、创建daemonset
- [root@master1 yaml]# cat ds.yaml
- apiVersion: extensions/v1beta1
- kind: DaemonSet
- metadata:
- name: ds
- spec:
- selector:
- matchLabels:
- app: centos-ds
- template:
- metadata:
- labels:
- app: centos-ds
- spec:
- containers:
- - image: reg.mt.com:5000/centos:latest
- imagePullPolicy: Always
- name: my-centos
- command: ["/usr/bin/tail","-f","/etc/hosts"]
- restartPolicy: Always
- updateStrategy:
- type: RollingUpdate
- rollingUpdate:
- maxUnavailable: 1
-
- RollingUpdate: 滚动更新
- OnDelete:只有在删除的时候才有
- [root@master1 yaml]# kubectl get ds
- NAME DESIRED CURRENT READY UP-TO-DATE AVAILABLE NODE SELECTOR AGE
- ds 3 3 3 3 3 <none> 88s
- [root@master1 yaml]#
- DESIRED:需要的pod个数
- CURRENT:当前的pod个数
- READY:就绪的个数
- UP-TO-DATE:最新创建的个数
- AVAILABLE:可用pod个数
- NODE SELECTOR:节点选择器标签
-
- #2、指定node创建daemonset
- [root@master1 yaml]# kubectl label nodes/master3 ds=true #为master3添加标签
- [root@master1 yaml]# cat ds.yaml
- apiVersion: extensions/v1beta1
- kind: DaemonSet
- metadata:
- name: ds
- spec:
- selector:
- matchLabels:
- app: centos-ds
- template:
- metadata:
- labels:
- app: centos-ds
- spec:
- containers:
- - image: reg.mt.com:5000/centos:latest
- imagePullPolicy: Always
- name: my-centos
- command: ["/usr/bin/tail","-f","/etc/hosts"]
- restartPolicy: Always
- nodeSelector:
- ds: "true"
- updateStrategy:
- type: RollingUpdate
- rollingUpdate:
- maxUnavailable: 1
- [root@master1 yaml]#
- [root@master1 yaml]# kubectl get ds
- NAME DESIRED CURRENT READY UP-TO-DATE AVAILABLE NODE SELECTOR AGE
- ds 1 1 1 1 1 ds=true 13m

7.5、DaemonSet架构

DaemonSet 还是一个 controller,真正的业务单元也是 Pod,DaemonSet 其实和 Job controller 特别相似,它也是通过 controller 去 watch API Server 的状态,然后及时地添加 pod。唯一不同的是,它会监控节点的状态,节点新加入或者消失的时候会在节点上创建对应的 pod,然后同时根据你配置的一些 affinity 或者 label 去选择对应的节点。
当有 node 状态节点发生变化时,它会通过一个内存消息队列发进来,然后DaemonSet controller 会去 watch 这个状态,看一下各个节点上是都有对应的 Pod,如果没有的话就去创建。当然它会去做一个对比,如果有的话,它会比较一下版本,然后根据更新策略,决定如何更新pod,Ondelete 删除 pod 的时候也会去做 check 它做一遍检查,是否去更新,或者去创建对应的 pod。
第八章、应用配置管理
- 背景:用一个容器镜像来启动一个 container。要启动这个容器,其实有很多需要配套的问题待解决:
-
-
- 1)比如说一些可变的配置。因为我们不可能把一些可变的配置写到镜像里面,当这个配置需要变化的时候,可能需要我们重新编译一次镜像,这个肯定是不能接受的;
- 2)一些敏感信息的存储和使用。比如说应用需要使用一些密码,或者用一些 token;
- 3)我们容器要访问集群自身。比如我要访问 kube-apiserver,那么本身就有一个身份认证的问题;
- 4)容器在节点上运行之后,它的资源需求;
- 5)容器在节点上,它们是共享内核的,那么它的一个安全管控怎么办?
- 6)容器启动之前的一个前置条件检验。比如说,一个容器启动之前,我可能要确认一下 DNS 服务是不是好用?又或者确认一下网络是不是联通的?那么这些其实就是一些前置的校验。
-
可变配置:ConfigMap
-
敏感信息:Secret
-
身份认证:ServiceAccount
-
资源配置:Spec.Containers[].Resources.limit/requests
-
安全管控:Spec.Containers[].SecurityContext
-
前置校验:Spec.InitContainers
8.1、ConfigMap
主要管理容器运行所需的配置文件,环境变量,命令行参数等可变配置。用于解耦容器镜像和可变配置,从而保障工作负载(pod)的可移植性。
创建命令:
- kubectl create configmap [NAME] [DATA] //DATA可以是指定文件或者目录,或者键值对
- kubectl create configmap kube-flannel-cfg --from-file=${filename} -n kube-system
- kubectl create configmap special-config --from-literal=special.how=very --from-literal=sepcial.type=charm -n kube-system
使用configmap:
Configmap主要被Pod使用,一般用于挂载Pod用的配置文件,环境变量,命令行参数等

Configmap使用注意点:
- ConfigMap 文件的大小。虽然说 ConfigMap 文件没有大小限制,但是在 ETCD 里面,数据的写入是有大小限制的,现在是限制在 1MB 以内(ETCD限制);
- 第二个注意点是 pod 引入 ConfigMap 的时候,必须是相同的 Namespace 中的 ConfigMap,前面其实可以看到,ConfigMap.metadata 里面是有 namespace 字段的;
- 第三个是 pod 引用的 ConfigMap。假如这个 ConfigMap 不存在,那么这个 pod 是无法创建成功的,其实这也表示在创建 pod 前,必须先把要引用的 ConfigMap 创建好;
- 第四点就是使用 envFrom 的方式。把 ConfigMap 里面所有的信息导入成环境变量时,如果 ConfigMap 里有些 key 是无效的,比如 key 的名字里面带有数字,那么这个环境变量其实是不会注入容器的,它会被忽略。但是这个 pod 本身是可以创建的。这个和第三点是不一样的方式,是 ConfigMap 文件存在基础上,整体导入成环境变量的一种形式;
- 最后一点是:什么样的 pod 才能使用 ConfigMap?这里只有通过 K8s api 创建的 pod 才能使用 ConfigMap,比如说通过用命令行 kubectl 来创建的 pod,肯定是可以使用 ConfigMap 的,但其他方式创建的 pod,比如说 kubelet 通过 manifest 创建的 static pod,它是不能使用 ConfigMap 的。
示例:
- 使用configmap为pod指定hosts文件
- [root@master1 yaml]# kubectl create configmap host-cm --from-file=/etc/hosts --dry-run -o yaml
- apiVersion: v1
- data:
- hosts: |
- 127.0.0.1 localhost localhost.localdomain localhost4 localhost4.localdomain4
- ::1 localhost localhost.localdomain localhost6 localhost6.localdomain6
- 192.168.153.132 master1 etcd1
- 192.168.153.133 master2 etcd2
- 192.168.153.134 master3 etcd3
- 192.168.153.132 reg.mt.com
- kind: ConfigMap
- metadata:
- creationTimestamp: null
- name: host-cm
-
-
- # 文件和deployment合并
- [root@master1 yaml]# cat deployment.yaml
- ---
- apiVersion: v1
- data:
- hosts: |
- 127.0.0.1 localhost localhost.localdomain localhost4 localhost4.localdomain4
- ::1 localhost localhost.localdomain localhost6 localhost6.localdomain6
- 192.168.153.132 master1 etcd1
- 192.168.153.133 master2 etcd2
- 192.168.153.134 master3 etcd3
- 192.168.153.132 reg.mt.com
- kind: ConfigMap
- metadata:
- creationTimestamp: null
- name: hostcm
- ---
- apiVersion: apps/v1
- kind: Deployment
- metadata:
- labels:
- app: nginx
- name: nginx-deployment
- spec:
- replicas: 1
- selector:
- matchLabels:
- app: nginx
- template:
- metadata:
- labels:
- app: nginx
- spec:
- containers:
- - image: reg.mt.com:5000/centos:latest
- name: nginx
- ports:
- - containerPort: 80
- volumeMounts:
- - name: hosts
- mountPath: /etc/hosts
- subPath: hosts
- command: ["/usr/bin/tail","-f","/etc/hosts"]
- volumes:
- - name: hosts
- configMap:
- name: hostcm
-
- subPath 说明:在configMap.data中可以定义多个内容,本文中hosts只是其中一个,一个configmap 的data中定义多个key:value,使用subPath引用。这里不加subPath会出现pod起不来的情况
-
- 注意:此时更新configmap,pod不会更新自己的hosts

8.2、Secret
secret用来存储集群中存储密码,token等敏感信息用的资源对象。其中的敏感数据采用base64编码保存。
secret的类型:
- Opaque:普通的secret文件
- kubernetes.io/service-account-token:用于service-account身份认证用的secret
- kubernetes.io/dockerconfigjson: 用于拉取仓库镜像用的一种Secret
- bootstrap.kubernetes.io/token: 用于节点接入集群校验用的Secret
- ...
Secret可以是用户自
己建立,也可以是Secrete系统自动创建:
- 自动:比如:k8s为每个namespace的默认用户(default ServiceAccount)
- 手动:kubectl create secret generic|docker-registry|tls [NAME] [DATA] [TYPE]
- DATA可以指定文件/键值对
- TYpe,默认为Opaque
- #创建docker-registry
- kubectl create secret docker-registry NAME --docker-username=user --docker-password=password --docker-email=email
- [--docker-server=string] [--from-literal=key1=value1] [--dry-run] [options]
-
- #从文件创建
- kubectl create secret generic my-secret --from-file=path/to/bar
- kubectl create secret generic my-secret --from-file=ssh-privatekey=path/to/id_rsa --from-file=ssh-publickey=path/to/id_rsa.pub #ssh-privatekey 为指定key名
- kubectl create secret generic my-secret --from-literal=key1=supersecret --from-literal=key2=topsecret
- kubectl create secret generic my-secret --from-file=ssh-privatekey=path/to/id_rsa --from-literal=passphrase=topsecret
- kubectl create secret generic my-secret --from-env-file=path/to/bar.env
-
- #创建证书secret
- kubectl create secret tls tls-secret --cert=path/to/tls.cert --key=path/to/tls.key
使用:

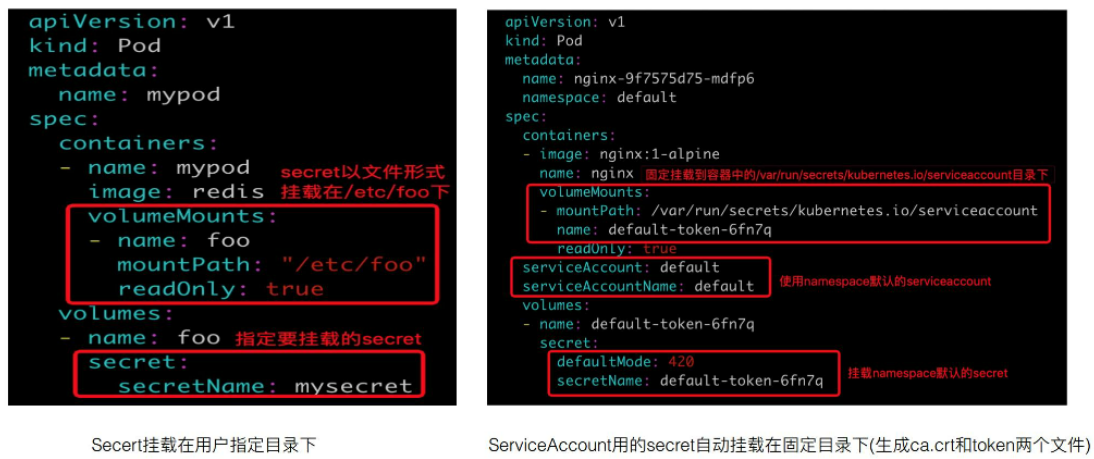
使用私有镜像库:
私有镜像库的信息可以通过Secret(kubernetes.io/dockerconfigjson)存储在集群中,Pod如果需要使用私有镜像仓库,可以通过如下两种方式来配置:
- 1、Pod.spec.imagePullSecret来指定secret
- 2、ServiceAccount中设置imagePullSercets,然后自动使用该SA的Pod注入imagePullSecrets信息。需要先创建SA,在SA中进行配置

注意事项:
- 第一个是 Secret 的文件大小限制。这个跟 ConfigMap 一样,也是 1MB;、
- 第二个是 Secret 采用了 base-64 编码,但是它跟明文也没有太大区别。使用base64 就可以解密。所以说,如果有一些机密信息要用 Secret 来存储的话,还是要很慎重考虑。如果是对 Secret 敏感信息要求很高,对加密这块有很强的需求,推荐可以使用 Kubernetes 和开源的 vault做一个解决方案。
- 第三个就是 Secret 读取的最佳实践,建议不要用 list/watch,如果用 list/watch 操作的话,会把 namespace 下的所有 Secret 全部拉取下来,这样其实暴露了更多的信息。推荐使用 GET 的方法,这样只获取你自己需要的那个 Secret。
- # 1、docker daemon配置调整
- [root@master1 yaml]# cat /etc/docker/daemon.json
- {
- "graph": "/data/docker",
- "storage-driver": "overlay2",
- "insecure-registries": [
- "reg.mt.com:5000",
- "reg2.mt.com:5000"
- ],
- "registry-mirrors": [
- "http://hub-mirror.c.163.com",
- "https://docker.mirrors.ustc.edu.cn"
- ],
- "exec-opts": ["native.cgroupdriver=systemd"],
- "live-restore": true
- }
-
- 修改后注意重启docker daemon,所有pod都要操作
-
- # 2、安装registry
- echo '192.168.153.133 reg2.mt.com' >> /etc/hosts #追加hosts,所有node操作
- [root@master2 ~]# yum install httpd-tools docker-distribution -y #133节点操作
- [root@master2 ~]# htpasswd -Bbn admin 123456 > /usr/local/passwd
- 参考:https://docs.docker.com/registry/configuration/#htpasswd
- [root@master1 yaml]# cat /etc/docker-distribution/registry/config.yml
- version: 0.1
- log:
- fields:
- service: registry
- storage:
- cache:
- layerinfo: inmemory
- filesystem:
- rootdirectory: /var/lib/registry
- http:
- addr: 192.168.153.132:5000
- [root@master2 ~]# systemctl start docker-distribution
- [root@master2 ~]# docker tag reg.mt.com:5000/nginx:latest reg2.mt.com:5000/nginx:latest
- [root@master2 ~]# docker login reg2.mt.com:5000
- Username: admin
- Password:
- WARNING! Your password will be stored unencrypted in /root/.docker/config.json.
- Configure a credential helper to remove this warning. See
- https://docs.docker.com/engine/reference/commandline/login/
-
- Login Succeeded
- [root@master2 ~]# docker push reg2.mt.com:5000/nginx:latest #可以推送成功
-
- # 3、测试pod
- [root@master1 ~]# kubectl create secret docker-registry reg2 --docker-username=admin --docker-password=123456 --docker-server=http://reg2.mt.com:5000 #注意--server一定要指定,域名和ip是不同的
- [root@master1 yaml]# cat a.yaml
- apiVersion: apps/v1
- kind: Deployment
- metadata:
- name: nginx-ds
- annotations:
- environment: "product"
- projectName: "hello world"
- labels:
- dp: nginx
- spec:
- replicas: 3
- selector:
- matchLabels:
- app: nginx-ds
- template:
- metadata:
- labels:
- app: nginx-ds
- spec:
- containers:
- - name: my-nginx
- image: reg2.mt.com:5000/nginx:latest
- ports:
- - containerPort: 80
- imagePullSecrets:
- - name: reg2
-

8.3、ServiceAccount
SA主要用于解决Pod在集群中的身份认证问题,其中认证使用的授权信息,则利用前面讲到Secret(type=kubernetes.io/serviec-account-token)进行管理:

serviceaccount:
- secret.name为后台对应的secret
secret: "secret由serviceaccount controller自动创建"
- data.ca.crt: 为校验服务器的证书信息
- data.token: Pod身份认证用的token,base-64编码
- metadata.annotations: 管理那的serviceaccount信息
- type: 对应的secret类型
Pod中的应用访问它所属的k8s集群:

8.4、Resource
容器资源配置管理:
1、支持资源类型:
- CPU:单位millicore ( 1core=1000millicore)
- MEM:单位Byte
- ephemeral storage(临时存储): 单位Byte
- 自定义资源:配置时必须为整数
2、配置方法:资源配置分为Request/limit 两种
- CPU:
- spec.containers[].resources.limits.cpu
- spec.containers[].resources.requests.cpu #示例:250m,3
- MEM:
- spec.containers[].resources.limits.memory
- spec.containers[].resources.requests.memory #示例:64Mi,7Gi
- ephemeral storage:
- spec.containers[].resources.limits.ephemeral-storage
- spec.containers[].resources.requests.ephemeral-storage
3、Pod 服务质量Qos配置:
依据容器对CPU,Memory资源的request/limit需求,Pod服务质量分类:
- Guaranteed
- Pod中的每个容器都必须有内存限制和请求,而且必须一致
- Pod中的每个容器都必须有CPU限制和请求,而且必须一致
- Burstable
- 非Guaranteed
- Pod中至少有一个容器有内存或者CPU请求
- BestEffort
- 非Guaranteed
- 非Burstable
举例:当节点上Memroy资源不足时,将依据BestEffort、Burstable、Guaranteed的优先顺序驱逐pod
8.5、SecurityContext
主要用于限制容器的行为,从而保障系统和其他容器的安全:
SecurityContext 主要分为三个级别:
- 第一个是容器级别,仅对容器生效;
- 第二个是 pod 级别,对 pod 里所有容器生效;
- 第三个是集群级别,就是 PSP,对集群内所有 pod 生效。
权限和访问控制设置项,现在一共列有七项(这个数量后续可能会变化):
权限和访问控制设置项:
- 第一个就是通过用户 ID 和组 ID 来控制文件访问权限;
- 第二个是 SELinux,它是通过策略配置来控制用户或者进程对文件的访问控制;
- 第三个是特权容器;
- 第四个是 Capabilities,它也是给特定进程来配置一个 privileged 能力;
- 第五个是 AppArmor,它也是通过一些配置文件来控制可执行文件的一个访问控制权限,比如说一些端口的读写;
- 第六个是一个对系统调用的控制;
- 第七个是对子进程能否获取比父亲更多的权限的一个限制。
示例:
- [root@master1 yaml]# cat deployment.yaml
- ---
- apiVersion: v1
- data:
- hosts: |
- 127.0.0.1 localhost localhost.localdomain localhost4 localhost4.localdomain4
- ::1 localhost localhost.localdomain localhost6 localhost6.localdomain6
- 192.168.153.132 master1 etcd1
- 192.168.153.133 master2 etcd2
- 192.168.153.134 master3 etcd3
- 192.168.153.132 reg.mt.com
- kind: ConfigMap
- metadata:
- creationTimestamp: null
- name: hostcm
- ---
- apiVersion: apps/v1
- kind: Deployment
- metadata:
- labels:
- app: nginx
- name: nginx-deployment
- spec:
- replicas: 1
- selector:
- matchLabels:
- app: nginx
- template:
- metadata:
- labels:
- app: nginx
- spec:
- containers:
- - image: reg.mt.com:5000/centos:latest
- name: nginx
- ports:
- - containerPort: 80
- volumeMounts:
- - name: hosts
- mountPath: /etc/hosts
- subPath: hosts
- command: ["/usr/bin/tail","-f","/etc/hosts"]
- securityContext:
- allowPrivilegeEscalation: false
- volumes:
- - name: hosts
- configMap:
- name: hostcm
- securityContext:
- runAsUser: 1001
- runAsGroup: 1001
- [root@master1 yaml]#
-
- securityContext.runAsUser: podpod内进程属主
- securityContext.runAsGroup: pod内进程属组
- containers.securityContext 为container级别
- spec.securityContext为pod级别

8.6、initContainer
接下来看一下 InitContainer,首先介绍 InitContainer 和普通 container 的区别,有以下三点内容:
- InitContainer 首先会比普通 container 先启动,并且直到所有的 InitContainer 执行成功后,普通 container 才会被启动;
- InitContainer 之间是按定义的次序去启动执行的,执行成功一个之后再执行第二个,而普通的 container 是并发启动的;
- InitContainer 执行成功后就结束退出,而普通容器可能会一直在执行。它可能是一个 longtime 的,或者说失败了会重启,这个也是 InitContainer 和普通 container 不同的地方。
举例说明: flannel/kube-flannel.yml at master · flannel-io/flannel · GitHub

InitContainer 其实主要为普通 container 服务,比如说它可以为普通 container 启动之前做一个初始化,或者为它准备一些配置文件, 配置文件可能是一些变化的东西。再比如做一些前置条件的校验,如网络是否联通。
第九章、应用存储与持久化数据卷(核心知识)
引言:
- 1、如果同一个pod中某一个容器异常退出,被kubelet拉起如何保证之前产生的重要数据不丢?
- 2、同一个pod的多个容器如何共享数据?
9.1、volume
Kubernetes volume分类:
- 本地存储,常用的有 emptydir/hostpath;
- 网络存储:网络存储当前的实现方式有两种
- in-tree(awsELasticBlockStore/gcePersistentDisk/nfs),它的实现的代码是放在 K8s 代码仓库中的,随着k8s对存储类型支持的增多,这种方式会给k8s本身的维护和发展带来很大的负担;
- out-of-tree(flexvolume/csi等volume plugin),它的实现其实是给 K8s 本身解耦的,通过抽象接口将不同存储的driver实现从k8s代码仓库中剥离,因此out-of-tree 是后面社区主推的一种实现网络存储插件的方式;
- Projected Volumes(sercret/configmap/downwardAPI/serviceAccountToken):它其实是将一些配置信息,如 secret/configmap 用卷的形式挂载在容器中,让容器中的程序可以通过POSIX接口来访问配置数据;
- PVC与PV体系
9.2、Pervistent Volumes
1、为何要引进PV概念?
- Pod中声明的volume的生命周期与pod相同,以下常见情景:
- 场景一:pod 重建销毁,如用 Deployment 管理的 pod,在做镜像升级的过程中,会产生新的 pod并且删除旧的 pod ,那新旧 pod 之间如何复用数据?
- 场景二:宿主机宕机的时候,要把上面的 pod 迁移,这个时候 StatefulSet 管理的 pod,其实已经实现了带卷迁移的语义。这时通过 Pod Volumes 显然是做不到的;
- 场景三:多个 pod 之间,如果想要共享数据,应该如何去声明呢?我们知道,同一个 pod 中多个容器想共享数据,可以借助 Pod Volumes 来解决;当多个 pod 想共享数据时,Pod Volumes 就很难去表达这种语义;
- 场景四:如果要想对数据卷做一些功能扩展性,如:snapshot、resize 这些功能,又应该如何去做呢?
- 不足之处:
- 使用Pod Volumes无法准确表达数据volume 复用/共享语义,新功能扩展很难实现
- 优化:
- 如果能将存储与计算分类,使用不同的组件(controlllers)管理存储与计算资源,解耦Pod与Volume的生命周期关联,就可以很好的解决这些问题
9.3、Persistent Volumes chain
有了PV,为何又设计了PVC?
- 职责分离:PVC中只用声明自己需要的siz,access mode(单node独占还是node共享?只读还是读写访问?)等业务关心的存储需求(不关心存储实现细节),PV和其对应的后端存储信息交由cluster admin统一运维和管控,安全访问策略更容易控制。
- PVC简化了User对存储的需求,PV才是存储的实际信息的承载体,通过Kube-controller-manager对PersistentVolumeController将PVC与合适的PV bound到一起,从而满足User对存储的实际需求。
- PVC像是面向对象编程中抽象出来的接口,PV是接口对应的实现
9.4、PV产生方式
1、PV产生方式1-静态产生方式-(static Volume Provisioning)
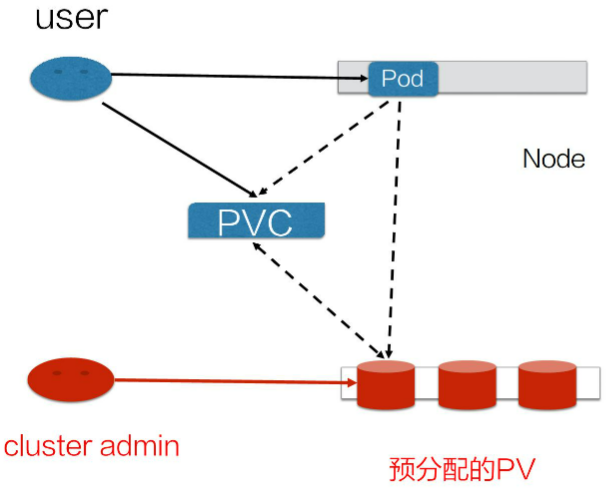
静态 Provisioning:由集群管理员事先去规划这个集群中的用户会怎样使用存储,它会先预分配一些存储,也就是预先创建一些 PV;然后用户在提交自己的存储需求(也就是 PVC)的时候,K8s 内部相关组件会帮助它把 PVC 和 PV 做绑定;之后用户再通过 pod 去使用存储的时候,就可以通过 PVC 找到相应的 PV,它就可以使用了。
不足之处:cluster admin需要提前规划和预测存储需求,而User的需求是多样化的,很容易导致User提交的PVC找不到合适的PV。举一个最简单的例子:如果用户需要的是 20G,然而集群管理员在分配的时候可能有 80G 、100G 的,但没有 20G 的,这样就很难满足用户的真实需求,也会造成资源浪费。有没有更好的方式呢?
更好的方式:Cluster admin只创建不同类型存储的模板,User在PVC中指定使用哪种存储模板以及自己需要的大小、访问方式等参数,然后k8s自动生成相应的PV对象
2、PV产生方式2-动态生产方式-(Dynamic Volume Provisoning)
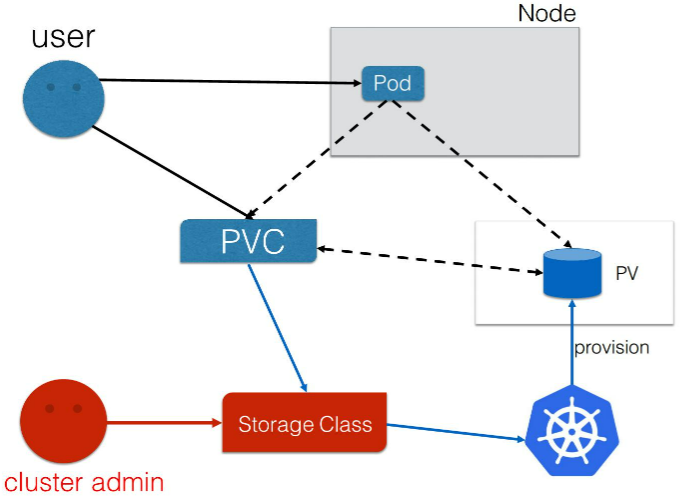
这里的StorageClass就是前文所说的创建PV的模板,它包含了创建某种具体类型PV所需的参数信息,user无需关心这些PV的细节。而k8s则会结合PVC和SC两者的信息动态创建PV对象。
地址:Storage Classes | Kubernetes
9.5、实操
9.5.1、本地volume
- [root@master1 yaml]# cat pv.yaml
- ---
- apiVersion: v1
- data:
- hosts: |
- 127.0.0.1 localhost localhost.localdomain localhost4 localhost4.localdomain4
- ::1 localhost localhost.localdomain localhost6 localhost6.localdomain6
- 192.168.153.132 master1 etcd1
- 192.168.153.133 master2 etcd2
- 192.168.153.134 master3 etcd3
- 192.168.153.132 reg.mt.com
- kind: ConfigMap
- metadata:
- creationTimestamp: null
- name: hostcm
- ---
- apiVersion: apps/v1
- kind: Deployment
- metadata:
- labels:
- app: nginx
- name: nginx-deployment
- spec:
- replicas: 1
- selector:
- matchLabels:
- app: nginx
- template:
- metadata:
- labels:
- app: nginx
- spec:
- containers:
- - image: reg.mt.com:5000/centos:latest
- name: nginx
- ports:
- - containerPort: 80
- volumeMounts:
- - name: hosts
- mountPath: /etc/hosts
- subPath: hosts
- - name: hostpath
- mountPath: /opt
- subPath: hostpath1
- - name: cache-volume
- mountPath: /data
- readOnly: true
- command: ["/usr/bin/tail","-f","/etc/hosts"]
- volumes:
- - name: hosts
- configMap:
- name: hostcm
- - name: cache-volume
- emptyDir: {}
- - name: hostpath
- hostPath:
- path: /tmp/data
- type: DirectoryOrCreate
-
- 说明:
- .spec.volumes.emptyDir{}对应宿主机上 ${kubelet-workdir}/pods/${pod-uid}/volumes/kubernetes.io~empty-dir/cache-volume
- .spec.volumes.hostPath在pod删除后,依然存在
- .spec.volumes 声明pod的volumes信息
- .spec.containers.volumeMounts声明container如何使用pod的volumes
- 多个container共享同一个volume时,可以通过.spec.containers.volumesMounts.subPath隔离不同容器在同一个volume上数据存储的路径

9.5.2、静态pv创建方式
以使用阿里云文件系统NAS为例:
cluster admin:
1.通过阿里云文件存储控制台,创建NAS文件系统和添加挂载点
2.创建PV对象,将NAS文件系统大小,挂载点,以及PV的access mode,reclaim policy等信息添加到PV对象中
User:
1.创建pvc对象,声明存储需求
2.创建应用pod并通过在.spec.volumes中通过pvc声明volume,通过.spec.containers.volumeMounts声明conainer挂载使用该volume
系统管理员预先创建PV:
- storage: 5Gi 该volume的总容量大小
- ReadWriteMany: 该volume可以被多个node上的pod挂载使用,并且具有读写权限
- PersistengVolumeReclaimPolicy:Retain 该volume使用后被release后的回收策略
- driver:指定由什么volume plugin来挂载该volume (需要提前在node上部署)
static volume provisioning实验:使用aliyunnas存储:
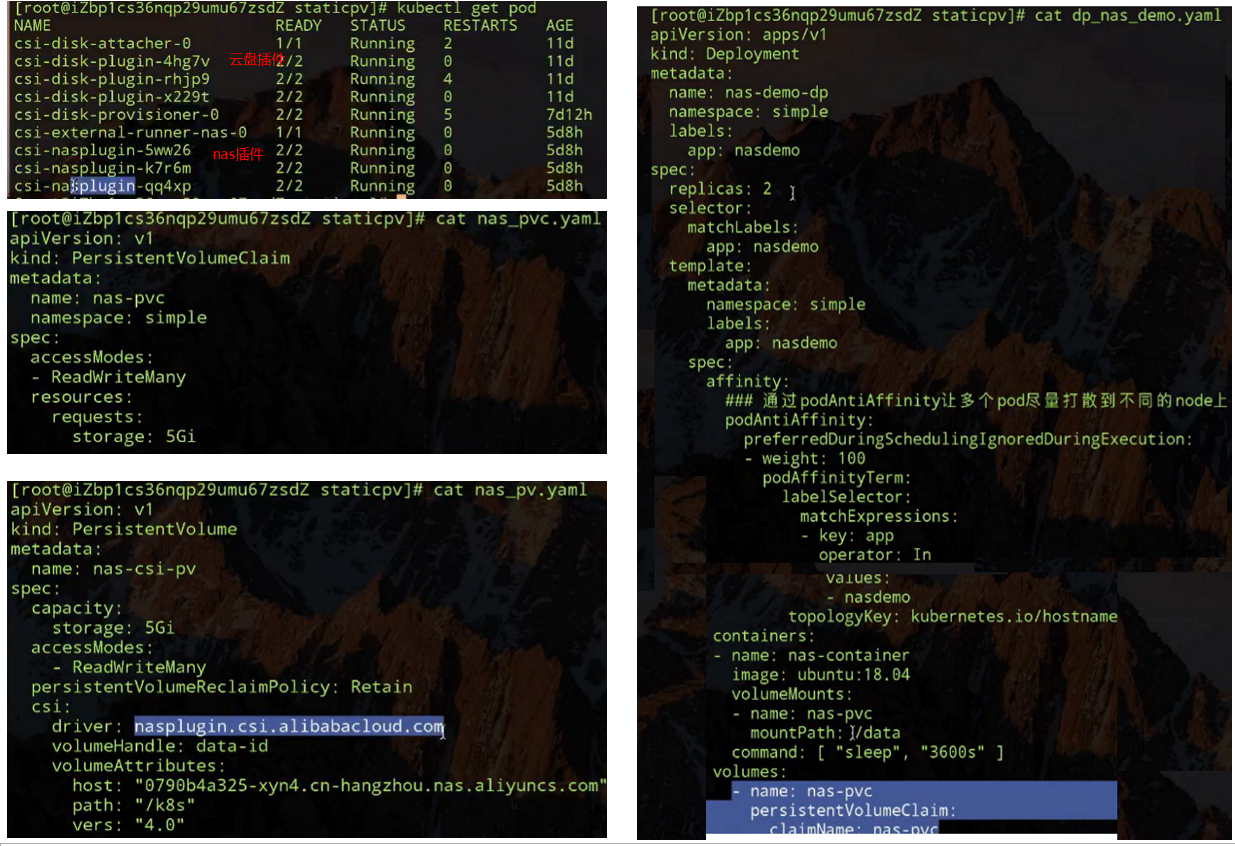
(csi-nasplugin是为了在k8s中使用阿里云NAS所需的插件,csi-disk是为了在k8s中使用阿里云云盘所需要的插件)
在两个pod内执行:findmnt 会发现/data/的挂载源一样,手动删除pvc后,pv是依旧存在的,状态是release状态
9.5.3、动态PV
PV的一些重要字段:
- Capacity:这个很好理解,就是存储对象的大小;
- AccessModes:也是用户需要关心的,就是说我使用这个 PV 的方式。它有三种使用方式。
- 一种是单 node 读写访问;
- 第二种是多个 node 只读访问,是常见的一种数据的共享方式;
- 第三种是多个 node 上读写访问。
用户在提交 PVC 的时候,最重要的两个字段 —— Capacity 和 AccessModes。在提交 PVC 后,k8s 集群中的相关组件是如何去找到合适的 PV 呢?首先它是通过为 PV 建立的 AccessModes 索引找到所有能够满足用户的 PVC 里面的 AccessModes 要求的 PV list,然后根据PVC的 Capacity,StorageClassName, Label Selector 进一步筛选 PV,如果满足条件的 PV 有多个,选择 PV 的 size 最小的,accessmodes 列表最短的 PV,也即最小适合原则。
-
ReclaimPolicy:这个就是刚才提到的,用户在 PV 的 PVC 在删除之后,我的 PV 应该做如何处理?常见的有三种方式。
- 第一种方式我们就不说了,现在 K8s 中已经不推荐使用了;
- 第二种方式 delete,也就是说 PVC 被删除之后,PV 也会被删除;
- 第三种方式 Retain,就是保留,保留之后,后面这个 PV 需要管理员来手动处理。
-
StorageClassName:StorageClassName 动态 Provisioning 时必须指定的一个字段,就是说我们要指定到底用哪一个模板文件来生成 PV ;
-
NodeAffinity:就是说我创建出来的 PV,它能被哪些 node 去挂载使用,其实是有限制的。然后通过 NodeAffinity 来声明对node的限制,这样其实对使用该PV的pod调度也有限制,就是说 pod 必须要调度到这些能访问 PV 的 node 上,才能使用这块 PV,这个字段在我们下一讲讲解存储拓扑调度时在细说。
Dynamic volume provisioning实验:使用aliyun云盘

9.6、PV状态流转

PV创建请求提交后处于pending状态,创建完成后处于available状态,被k8s相关组件bound后(找到相应的pv)这个时候PV和PVC就结合在一起了,此时两者都是bound状态。当用户使用完PVC,将其删除后,这个PV就处于release状态。之后它应该是被删除还是被保留呢?这个就依赖ReclaimPolicy。
说明:到达released状态的pv无法根据recliaim policy回到available状态再次bound新的PVC。此时,如果想复用原来PV对应的存储中的数据,只有两种方式:
- 复用old PV中记录的存储信息新建PV对象
- 直接从PVC对象复用,即不unbound PVC和PV;即不删除pvc对象,这样pvc和pv都是存在的。下次pod使用的时候,直接通过pvc复用。statefulset的带存储的迁移就是这种方式
9.7、架构设计
pv&pvc内部处理流程:
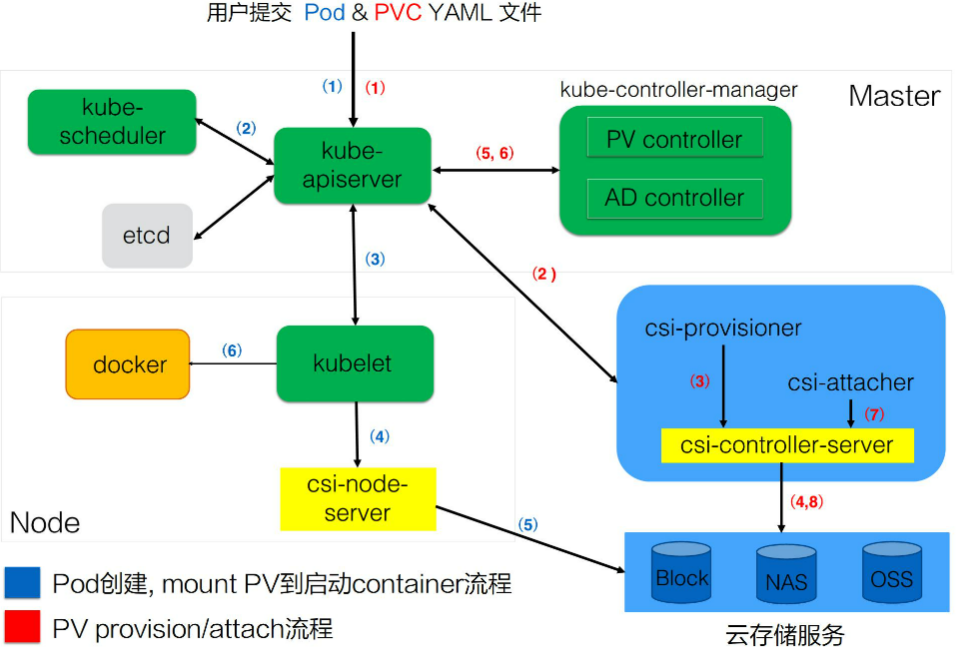
csi 是什么?csi 的全称是 container storage interface,它是K8s社区后面对存储插件实现(out of tree)的官方推荐方式。
csi 的实现大体可以分为两部分:
- 第一部分是由k8s社区驱动实现的通用的部分,像我们这张图中的 csi-provisioner和 csi-attacher controller;
- 另外一种是由云存储厂商实践的,对接云存储厂商的 OpenApi,主要是实现真正的 create/delete/mount/unmount 存储的相关操作,对应到上图中的csi-controller-server和csi-node-server。
用户提交 yaml 之后,k8s内部的处理流程: 用户在提交 PVC yaml 的时候,首先会在集群中生成一个 PVC 对象,然后 PVC 对象会被 csi-provisioner controller watch到,csi-provisioner 会结合 PVC 对象以及 PVC 对象中声明的 storageClass,通过 GRPC 调用 csi-controller-server,然后,到云存储服务这边去创建真正的存储,并最终创建出来 PV 对象。最后,由集群中的 PV controller 将 PVC 和 PV 对象做 bound 之后,这个 PV 就可以被使用了。
用户在提交 pod 之后,首先会被调度器调度选中某一个合适的node,之后该 node 上面的 kubelet 在创建 pod 流程中会通过首先 csi-node-server 将我们之前创建的 PV 挂载到我们 pod 可以使用的路径,然后 kubelet 开始 create && start pod 中的所有 container。

主要分为三个阶段:
- 第一个阶段(Create阶段)是用户提交完 PVC,由 csi-provisioner 创建存储,并生成 PV 对象,之后 PV controller 将 PVC 及生成的 PV 对象做 bound,bound 之后,create 阶段就完成了;
- 之后用户在提交 pod yaml 的时候,首先会被调度选中某一个 合适的node,等 pod 的运行 node 被选出来之后,会被 AD Controller watch 到 pod 选中的 node,它会去查找 pod 中使用了哪些 PV。然后它会生成一个内部的对象叫 VolumeAttachment 对象,从而去触发 csi-attacher去调用csi-controller-server 去做真正的 attache 操作,attach操作调到云存储厂商OpenAPI。这个 attach 操作就是将存储 attach到 pod 将会运行的 node 上面。第二个阶段 —— attach阶段完成;
- 然后我们接下来看第三个阶段。第三个阶段 发生在kubelet 创建 pod的过程中,它在创建 pod 的过程中,首先要去做一个 mount,这里的 mount 操作是为了将已经attach到这个 node 上面那块盘,进一步 mount 到 pod 可以使用的一个具体路径,之后 kubelet 才开始创建并启动容器。这就是 PV 加 PVC 创建存储以及使用存储的第三个阶段 —— mount 阶段。
总的来说,有三个阶段:第一个 create 阶段,主要是创建存储;第二个 attach 阶段,就是将那块存储挂载到 node 上面(通常为将存储load到node的/dev下面);第三个 mount 阶段,将对应的存储进一步挂载到 pod 可以使用的路径。这就是我们的 PVC、PV、已经通过CSI实现的卷从创建到使用的完整流程。
第十章、应用存储与持久化数据卷(存储快照与拓扑调度)
- 存储快照产生背景:
- 1、如何保证重要数据在误操作之后可以快速恢复,以提高数据容错率
- 2、如何能够快速进行复制,迁移重要数据的动作?如进行环境复制与数据开发等
-
- Kubernetes CSI Snapshotter controller正式为了解决这些问题而设计的
10.1、基础知识
10.1.1、存储快照用户接口-snapshot

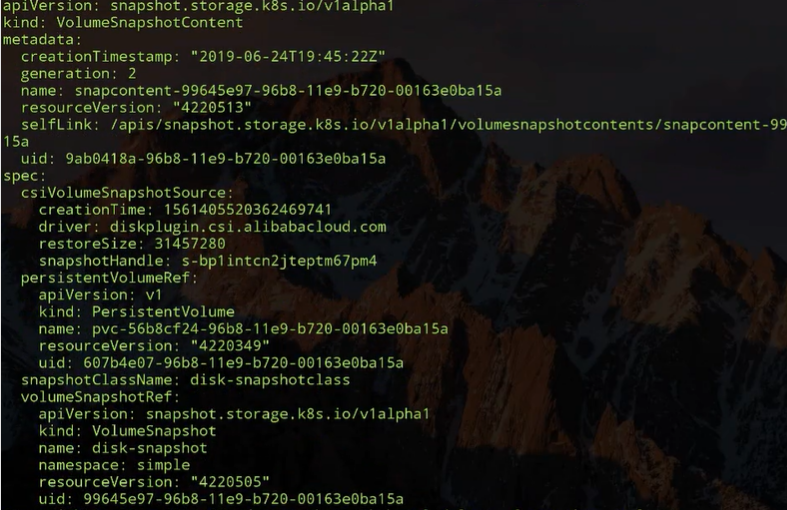
存储快照的设计是仿照PV&PVC的设计思想。当用户需要存储快照的功能时,可以通过 VolumeSnapshot 对象来声明,并指定相应的 VolumeSnapshotClass 对象,之后由集群中的相关组件动态生成存储快照以及存储快照对应的对象 VolumeSnapshotContent。
10.1.2、存储快照用户接口-restore
PVC对象(PersistentVolumeChain)借助于扩展字段 .spec.dataSource指定为VolumeSnapshot对象,这样PVC提交之后,会由集群中的相关组件找到dataSource所指定的存储快照数据,然后新创建对应的存储以及pv对象,将存储快照数据恢复到新的pv中,这样数据就恢复回来了

10.1.3、存储拓扑
1、定义:
Topology:这里所说的拓扑是 K8s 集群中为管理的 nodes 划分的一种“位置”关系,并通过在 node 的 labels 信息里面填写某一个 node 属于某一个拓扑。常见的Node labels 有三种:
- failure-domain.beta.kubernetes.io/region => us-centra1 #拓扑域为Region范围 ,在使用云存储服务的时候,经常会遇到 region,也就是地域的概念,在 K8s 中常通过 label failure-domain.beta.kubernetes.io/region 来标识。这个是为了标识单个 K8s 集群管理的跨 region 的 nodes 到底属于哪个地区;
- failure-domain.beta.kubernetes.io/zone => us-central1 #拓扑域为zone ,也就是 available zone(可用区)
- kubernetes.io/hostname => hostname 单机维度,是拓扑域为 node 范围
也可以定义一个字符串来表示一个拓扑域,这个 key 所对应的值其实就是拓扑域下不同的拓扑位置。
例如:可以用 rack,也就是机房中的机架这个纬度来做一个拓扑域。这样就可以将不同机架 (rack) 上面的机器标记为不同的拓扑位置,也就是说可以将不同机架上机器的位置关系通过 rack 这个纬度来标识。属于 rack1 上的机器,node label 中都添加 rack 的标识,它的 value 就标识成 rack1,即 rack=rack1;另外一组机架上的机器可以标识为 rack=rack2,这样就可以通过机架的纬度就来区分来 K8s 中的 node 所处的位置。
2、产生背景:
kubernetes中通过PV&PVC体系将存储和计算分离,即使用不同的Controllers管理存储资源和计算资源。但如果创建的PV有访问“位置”(.spec.nodeAffinity)的限制,也就是只有在特定的一些Nodes才能访问PV。原有的创建Pod的流程与创建PV的流程分离,就无法保证新创建的Pod被调度到可以访问PV的Nodes上,最终导致Pod无法正常运行起来,如:

场景1:pod要访问本机的磁盘,用来提高io性能(SSD),但是如果pod创建在了Node1,但是PV创建在了Node2上就不会达到性能提高的目的
场景2:不同可用区,PV创建在了其他的zone
3、存储拓扑调度
1)本质问题:PV在Binding或者Dynamic Provisoning时,并不知道使用它的Pod会被调用到哪些Node上,但PV本身的访问对Node的“位置”(拓扑)有限制。
2)流程改进:
Binding/Dynamic Provisoning PV的操作Delay到Pod调度结果确定之后做,好处:
- 对于pre-provisioned的含有NodeAffinity的PV对象,可以在Pod运行的Node确认之后,根据Node找到合适的PV对象,然后与Pod中使用的PVC Binding,保证Pod运行的Node满足PV对访问“位置”(拓扑)的要求
- 对于dynamic provisoning PV场景,在Pod运行的Node确认之后,可以结合Node的"位置"(拓扑)信息创建可被该node访问的PV对象
3)Kubernetes组件改进:
- PV Controller:支持延迟Binding操作
- Dynamic PV Provisioner: 动态创建PV时结合Pod待运行的Node的“位置”(拓扑)信息
- Scheduler:选择Node的时候要考虑Pod的PVC Binding需求,也就是结合pre-provisioned的PV的Node Affinity以及dynamic provisioning时PVC指定StorageClass.AllowedTopologies的限制
10.2、用例解读
10.2.1、Volume Snapshot/Restore 示例
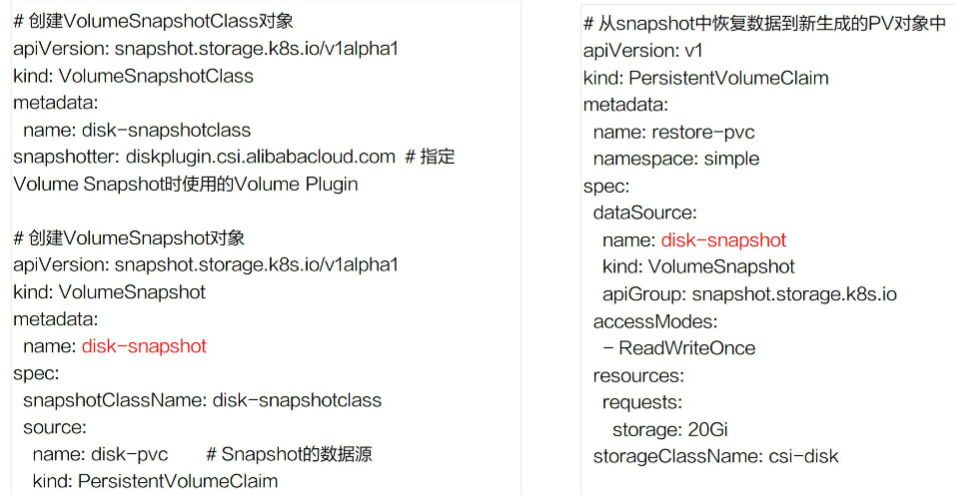
- 首先集群管理员,在集群中创建 VolumeSnapshotClass 对象 ,VolumeSnapshotClass 中一个重要字段就是 Snapshot,它是指定真正创建存储快照所使用的卷插件,这个卷插件是需要提前部署的,稍后再说这个卷插件。
- 声明一个 VolumeSnapshotClass,VolumeSnapshotClass 首先它要指定的是 VolumeSnapshotClassName,接着它要指定的一个非常重要的字段就是 source,这个 source 其实就是指定快照的数据源是啥。这个地方指定 name 为 disk-pvc,也就是说通过这个 pvc 对象来创建存储快照。提交这个 VolumeSnapshot 对象之后,集群中的相关组件它会找到这个 PVC 对应的 PV 存储,对这个 PV 存储做一次快照。
- 有了存储快照之后,那接下来怎么去用存储快照恢复数据呢?这个其实也很简单,声明一个新的 PVC 对象并在它的 spec 下面的 DataSource 中来声明我的数据源来自于哪个 VolumeSnapshot,这里指定的是 disk-snapshot 对象,当我这个 PVC 提交之后,集群中的相关组件,它会动态生成新的 PV 存储,这个新的 PV 存储中的数据就来源于这个 Snapshot 之前做的存储快照。
10.2.2、Local PV示例:
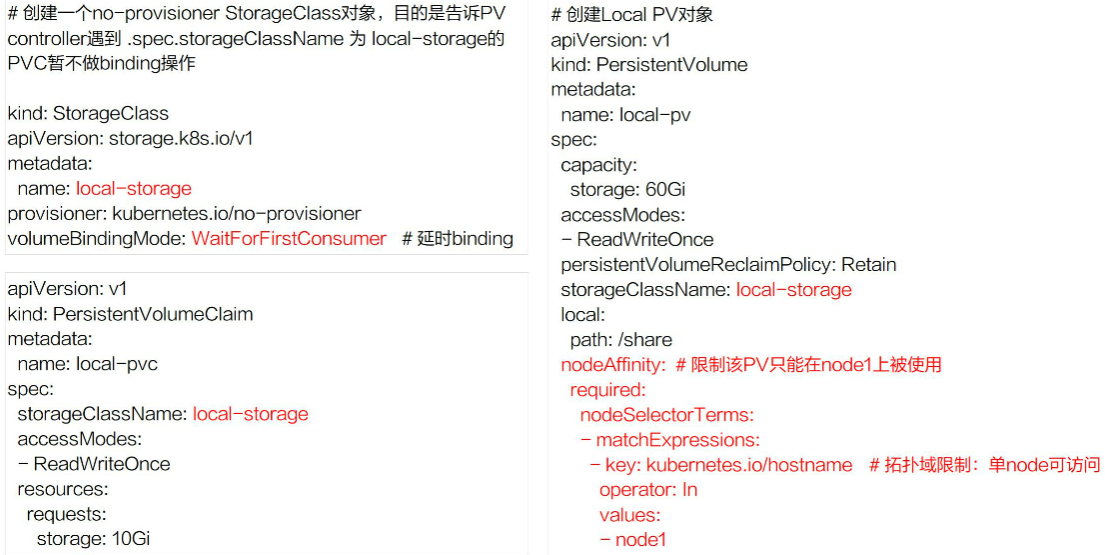
- Local PV 大部分使用的时候都是通过静态创建的方式,也就是要先去声明 PV 对象,既然 Local PV 只能是本地访问,就需要在 PV 对象中通过 nodeAffinity 来限制我这个 PV 只能在单 node 上访问,也就是给这个 PV 加上拓扑限制。如上图拓扑的 key 用 kubernetes.io/hostname 来做标记,也就是只能在 node1 访问。如果想用这个 PV,你的 pod 必须要调度到 node1 上。
-
- 既然是静态创建 PV 的方式,这里为什么还需要 storageClassname 呢?因为在 Local PV 中,如果要想让它正常工作,需要用到延迟绑定特性才行,当用户在写完 PVC 提交之后,即使集群中有相关的 PV 能跟它匹配,它也暂时不能做匹配,也就是说 PV controller 不能马上去做 binding,这个时候你就要通过一种手段来告诉 PV controller,什么情况下是不能立即做 binding。这里的 storageClass 就是为了起到这个作用,我们可以看到 storageClass 对象里的 provisioner 指定的是 **no-provisioner**,其实就是相当于告诉 K8s 它不会去动态创建 PV,它主要用到 storageclass 的 VolumeBindingMode 字段,叫 WaitForFirstConsumer,可以先简单地认为它是延迟绑定。
-
- 当用户开始提交 PVC 的时候,pv controller 在看到这个 pvc 的时候,它会找到相应的 storageClass,发现这个 BindingMode 是延迟绑定,它就不会做任何事情。
-
- 在调度的时候,当pod恰好调度在符合 pv nodeaffinity 的 node 的上面后,这个 pod 里面所使用的 PVC 才会真正地与 PV 做绑定,这样就保证我 pod 调度到这台 node 上之后,这个 PVC 才与这个 PV 绑定,最终保证的是创建出来的 pod 能访问这块 Local PV
10.2.3、动态pv(Dynamic Provisioning PV)

- 动态就是指动态创建PV 有拓扑位置的限制,那怎么去指定?
-
- 首先在 storageclass 还是需要指定 BindingMode,就是 WaitForFirstConsumer,就是延迟绑定。
- 其次就是 allowedTopologies,限制就在这个地方。上图中可以看到拓扑限制是可用区的级别,这里其实有两层意思:
- 1、第一层意思就是说我在动态创建 PV 的时候,创建出来的 PV 必须是在这个可用区可以访问的;
- 2、第二层含义是因为声明的是延迟绑定,那调度器在发现使用它的 PVC 正好对应的是该 storageclass 的时候,调度 pod 就要选择位于该可用区的 nodes。
-
- 用户在写 PVC 文件的时候,写法是跟以前的写法是一样的,主要是在 storageclass 中要做一些拓扑限制。
10.3、演示
10.3.1、snapshot演示

10.3.2、动态创建pv拓扑限制
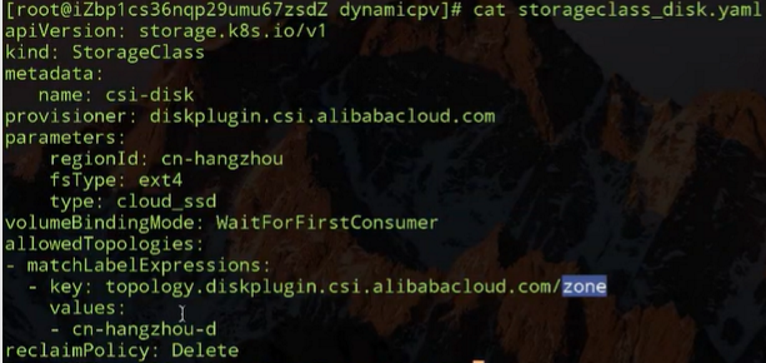
步骤:1、创建storageclass ;2、创建pvc ;3、创建pod 绑定;
pvc创建后处于 pending 状态,在pod绑定时候的时候才会。限定node所在的可用区
10.4 、处理流程
10.4.1、kubernetes对volume Snapshot/Restore处理流程
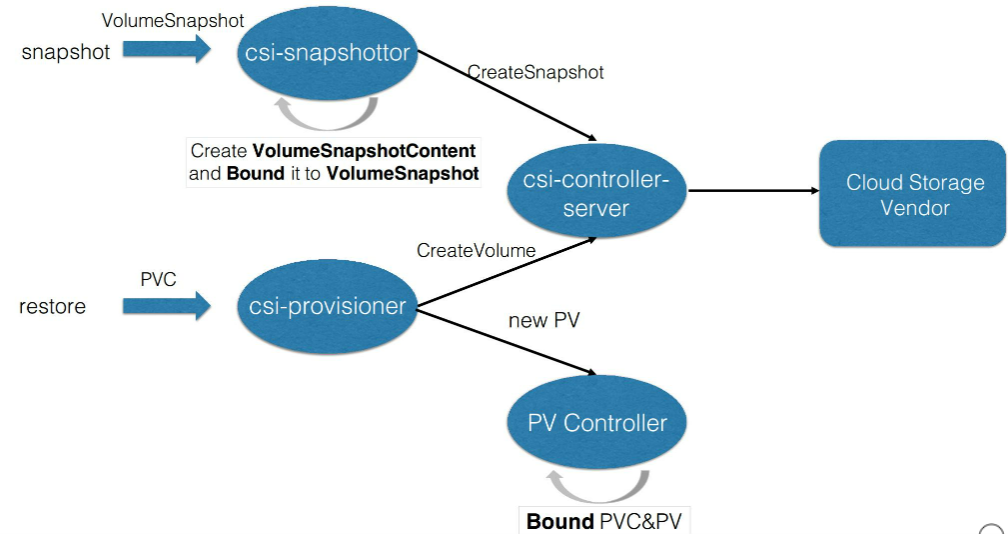
首先先解释一下 csi 部分。K8s 中对存储的扩展功能都是推荐通过csi out-of-tree 的方式来实现的。
csi 实现存储扩展主要包含两部分:
- 第一部分是由 K8s 社区推动实现的 csi controller 部分,也就是上图中 csi-snapshottor controller 以及 csi-provisioner controller,这些主要是通用的 controller 部分;
- 另外一部分是由特定的云存储厂商用自身 OpenAPI 实现的不同的 csi-plugin 部分,也叫存储的 driver 部分。
两部分部件通过 unix domain socket 通信连接到一起。有这两部分,才能形成一个真正的存储扩展功能。
当用户提交 VolumeSnapshot 对象之后,会被 csi-snapshottor controller watch 到。之后它会通过 GPPC 调用到 csi-plugin,csi-plugin 通过 OpenAPI 来真正实现存储快照的动作,等存储快照已经生成之后,会返回到 csi-snapshottor controller 中,csi-snapshottor controller 会将存储快照生成的相关信息放到 VolumeSnapshotContent 对象中并将用户提交的 VolumeSnapshot 做 bound。这个 bound 其实就有点类似 PV 和 PVC 的 bound 一样。
有了存储快照,如何去使用存储快照恢复之前的数据呢?通过声明一个新的 PVC 对象,并且指定他的 dataSource 为 Snapshot 对象,当提交 PVC 的时候会被 csi-provisioner watch 到,之后会通过 GRPC 去创建存储(create volume)。这里创建存储跟之前讲解的 csi-provisioner 有一个不太一样的地方,就是它里面还指定了 Snapshot 的 ID,当去云厂商创建存储时,需要多做一步操作,即将之前的快照数据恢复到新创建的存储中。之后流程返回到csi-provisioner,它会将新创建的存储的相关信息写到一个新的 PV 对象中,新的 PV 对象被 PV controller watch 到它会将用户提交的 PVC 与 PV 做一个 bound,之后 pod 就可以通过 PVC 来使用Restore 出来的数据了。
10.4.2、Kubernetes对Volume Topology-aware Scheduling处理流程
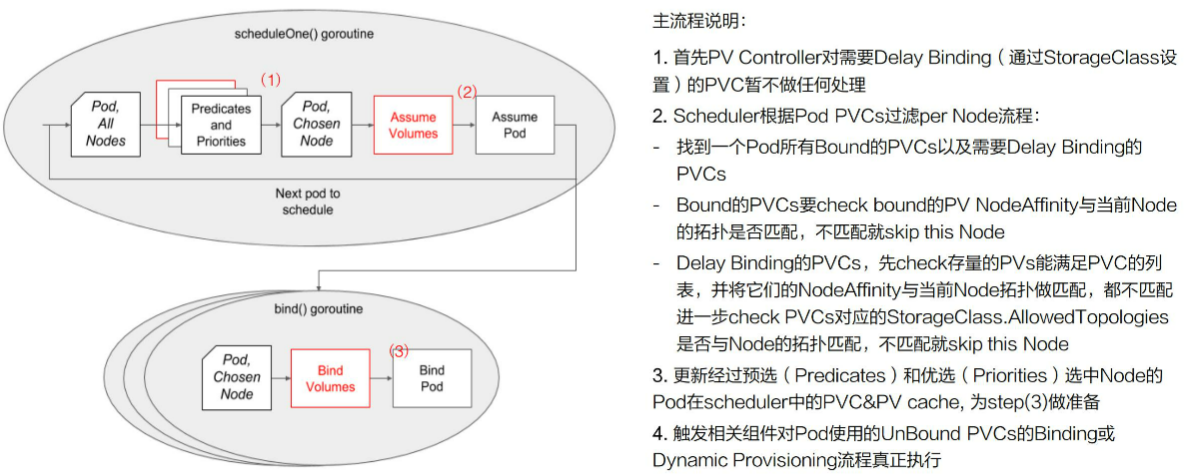
- 第一个步骤其实就是要去声明延迟绑定,这个通过 StorageClass 来做的
- 上图中红色部分就是调度器新加的存储拓扑调度逻辑,我们先来看一下不加红色部分时调度器的为一个 pod 选择 node 时,它的大概流程:
- 首先用户提交完 pod 之后,会被调度器 watch 到,它就会去首先做预选,预选就是说它会将集群中的所有 node 都来与这个 pod 它需要的资源做匹配;
- 如果匹配上,就相当于这个 node 可以使用,当然可能不止一个 node 可以使用,最终会选出来一批 node;
- 然后再经过第二个阶段优选,优选就相当于我要对这些 node 做一个打分的过程,通过打分找到最匹配的一个 node;
- 之后调度器将调度结果写到 pod 里面的 spec.nodeName 字段里面,然后会被相应的 node 上面的 kubelet watch 到,最后就开始创建 pod 的整个流程。
- 上图中红色部分就是调度器新加的存储拓扑调度逻辑,我们先来看一下不加红色部分时调度器的为一个 pod 选择 node 时,它的大概流程:
- 第二个步骤 下加上卷相关的调度的时候,筛选 node()又是怎么做的?
- 先就要找到 pod 中使用的所有 PVC,找到已经 bound 的 PVC,以及需要延迟绑定的这些 PVC;
- 对于已经 bound 的 PVC,要 check 一下它对应的 PV 里面的 nodeAffinity 与当前 node 的拓扑是否匹配 。如果不匹配, 就说明这个 node 不能被调度。如果匹配,继续往下走,就要去看一下需要延迟绑定的 PVC;
- 对于需要延迟绑定的 PVC。先去获取集群中存量的 PV
- 满足 PVC 需求的,先把它全部捞出来,然后再将它们一一与当前的 node labels 上的拓扑做匹配
- 如果它们(存量的 PV)都不匹配,那就说明当前的存量的 PV 不能满足需求,就要进一步去看一下;如果要动态创建 PV 当前 node 是否满足拓扑限制,也就是还要进一步去 check StorageClass 中的拓扑限制,如果 StorageClass 中声明的拓扑限制与当前的 node 上面已经有的 labels 里面的拓扑是相匹配的,那其实这个 node 就可以使用,如果不匹配,说明该 node 就不能被调度。
经过这上面步骤之后,就找到了所有即满足 pod 计算资源需求又满足 pod 存储资源需求的所有 nodes。
-
第三个步骤就是调度器内部做的一个优化(node筛选出来之后)
- 就是更新经过预选和优选之后,pod 的 node 信息,以及 PV 和 PVC 在 scheduler 中做的一些 cache 信息。
-
**第四个步骤 ** binding/dynamic create PV
- 已经选择出来 node 的 Pod,不管其使用的 PVC 是要 binding 已经存在的 PV,还是要做动态创建 PV,这时就可以开始做。由调度器来触发,调度器它就会去更新 PVC 对象和 PV 对象里面的相关信息,然后去触发 PV controller 去做 binding 操作,或者是由 csi-provisioner 去做动态创建流程
第十一章、可观测性(你的应用健康吗)
需求来源:当我们迁移应用到kubernetes后,要如何保障应用健康稳定?
- 1、提高应用的可观测行
- 应用健康状态
- 应用资源使用
- 应用实时日志
- 2、提高应用的可恢复能力
- 应用出现问题需要降低影响范围,进行问题调试、诊断
- 应用出现问题可以通过自愈机制恢复
11.1、Liveness&Readiness
当应用的Pod已经运行起来,如何让kubernetes检查应用的状态,判断是否准备好对外提供服务?

Readiness Probe:判断pod是否处于就绪状态,pod处于就绪状态的时候才会对外提供服务。当pod状态不在Readness的时候则进行流量摘除
Liveiess Probe:判断pod是否需要被重新拉起,如果配置的策略为restartAlways的时候,那么此时这个pod将被重新拉起
应用健康状态-使用方式:
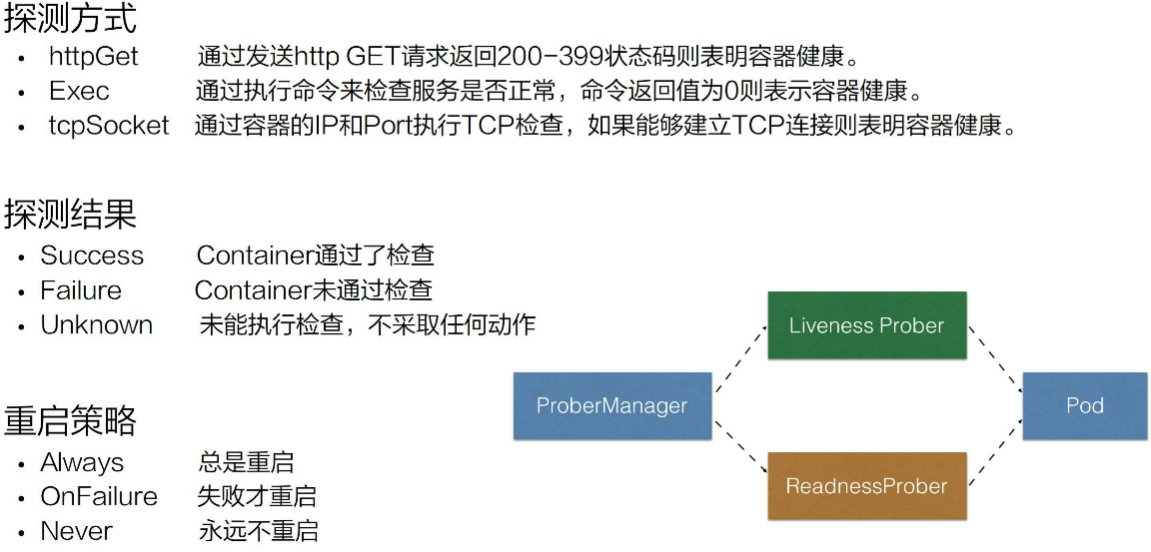
- Success:表示通过了Liveness Prober和ReadnessProber的健康检查
- Failure: ReadnessProber从service侧摘除流量,Liveness将pod重新拉起或者删除
- Unknown: 可能为超时,等待下一次校验

其他参数:
-
initialDelaySeconds:pod 启动延迟多久进行一次检查,比如说现在有一个 Java 的应用,它启动的时间可能会比较长,因为涉及到 jvm 的启动,包括 Java 自身 jar 的加载;
-
periodSeconds:检测的时间间隔,正常默认的这个值是 10 秒;
-
timeoutSeconds:它表示的是检测的超时时间,当超时时间之内没有检测成功,那它会认为是失败的一个状态;
-
successThreshold:当 pod 从探测失败到再一次判断探测成功,所需要的阈值次数,默认情况下是 1 次,表示原本是失败的,那接下来探测这一次成功了,就会认为这个 pod 是处在一个探针状态正常的一个状态;
-
failureThreshold:探测失败的重试次数,默认值是 3,表示的是当从一个健康的状态连续探测 3 次失败,那此时会判断当前这个pod的状态处在一个失败的状态。
小结:

- [root@master1 yaml]# cat pod2.yaml
- apiVersion: apps/v1
- kind: Deployment
- metadata:
- creationTimestamp: null
- name: nginx
- labels:
- app: nginx
- namespace: default
- spec:
- replicas: 1
- selector:
- matchLabels:
- app: nginx
- template:
- metadata:
- labels:
- app: nginx
- spec:
- containers:
- - image: reg.mt.com:5000/nginx:latest
- name: nginx2
- resources: {}
- ports:
- - containerPort: 80
- livenessProbe:
- tcpSocket:
- port: 80
- initialDelaySeconds: 10
- periodSeconds: 3
- readinessProbe:
- successThreshold: 1
- periodSeconds: 5
- httpGet:
- path: /
- port: 80
- timeoutSeconds: 5
- initialDelaySeconds: 10

11.2、问题诊断
执行Kubectl describe pods/${pod名称}输出:
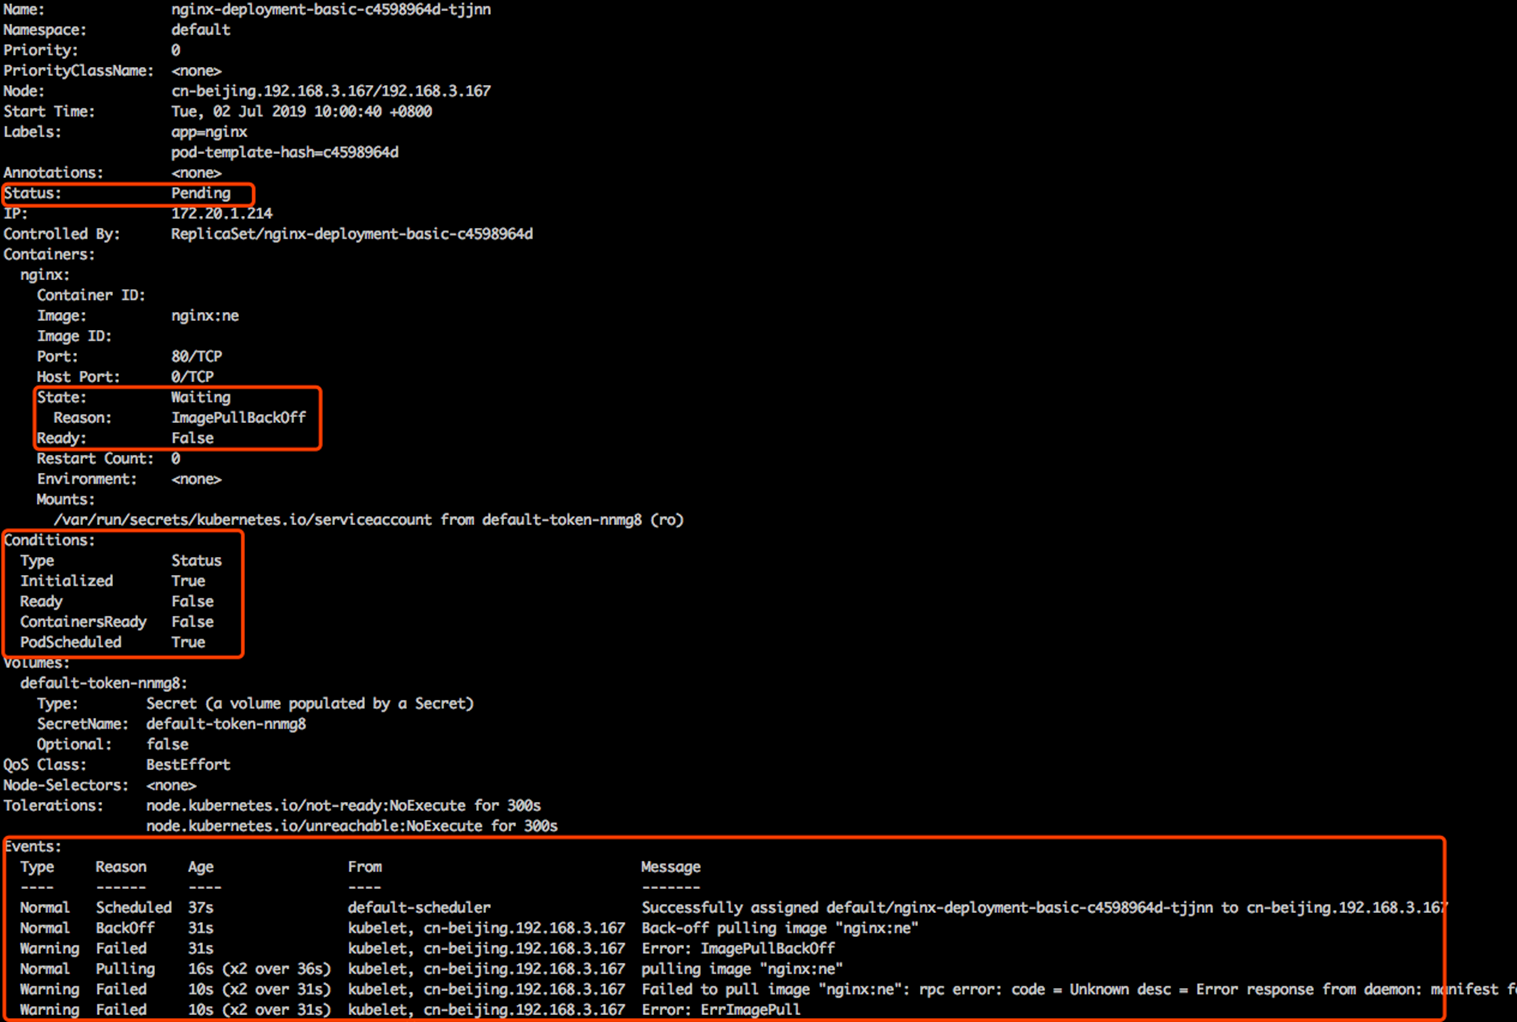
Pod状态为Pending,可能会转换到running/Unknown/FAILED/SUCCEED。container(nginx)状态为Waiting,conditions为k8s中很多小的状态,而这个状态的聚合会变成上层的status; K8s 里面这个状态机制之间这个状态转换会产生相应的事件,而这个事件又通过类似像 normal 或者是 warning 的方式进行暴露。开发者可以通过类似像通过这个事件的机制,可以通过上层 condition Status 相应的一系列的这个字段来判断当前这个应用的具体的状态以及进行一系列的诊断。
k8s pod状态机:

| Value | Description |
|---|---|
Pending | The Pod has been accepted by the Kubernetes cluster, but one or more of the containers has not been set up and made ready to run. This includes time a Pod spends waiting to be scheduled as well as the time spent downloading container images over the network. |
Running | The Pod has been bound to a node, and all of the containers have been created. At least one container is still running, or is in the process of starting or restarting. |
Succeeded | All containers in the Pod have terminated in success, and will not be restarted. |
Failed | All containers in the Pod have terminated, and at least one container has terminated in failure. That is, the container either exited with non-zero status or was terminated by the system. |
Unknown | For some reason the state of the Pod could not be obtained. This phase typically occurs due to an error in communicating with the node where the Pod should be running. |
- Pod 停留在Pending:pending 表示调度器没有进行介入。此时可以通过 kubectl describe pod 来查看相应的事件,如果由于资源或者说端口占用,或者是由于 node selector 造成 pod 无法调度的时候,可以在相应的事件里面看到相应的结果,这个结果里面会表示说有多少个不满足的 node,有多少是因为 CPU 不满足,有多少是由于 node 不满足,有多少是由于 tag 打标造成的不满足。
- Pod停留在waiting: pod 的 states 处在 waiting 的时候,通常表示说这个 pod 的镜像没有正常拉取,原因可能是镜像地址问题
- Pod 不断被拉取并且可以看到 crashing:这个通常表示说 pod 已经被调度完成了,但是启动失败,那这个时候通常要关注的应该是这个应用自身的一个状态,通常可以检查配置是否正确、权限是否正确,此时需要查看的应该是 pod 的具体日志。
- Pod 处在 Runing 但是没有正常工作:可能是由于一些非常细碎的配置,类似像有一些字段可能拼写错误,造成了 yaml 下发下去了,但是有一段没有正常地生效,从而使得这个 pod 处在 running 的状态没有对外服务,那此时可以通过 的方式来进行判断
kubectl apply -f --validate -f pod2.yaml --dry-run当前 yaml 是否是正常的,如果 yaml 没有问题,那么接下来可能要诊断配置的端口是否是正常的,以及 Liveness 或 Readiness 是否已经配置正确。 - **Service 无法正常的工作: ** 比较常见的 service 出现问题的时候,是自己的使用上面出现了问题。因为 service 和底层的 pod 之间的关联关系是通过 selector 的方式来匹配的,也就是说 pod 上面配置了一些 label,然后 service 通过 match label 的方式和这个 pod 进行相互关联。如果这个 label 配置的有问题,可能会造成这个 service 无法找到后面的 endpoint,从而造成相应的 service 没有办法对外提供服务,那如果 service 出现异常的时候,第一个要看的是这个 service 后面是不是有一个真正的 endpoint,其次来看这个 endpoint 是否可以对外提供正常的服务。
11.3、应用远程调试
分为Pod远程调试和Service远程调试:
11.3.1、Pod的远程调试
进入Pod: kubectl exec -it ${pod-name} /bin/bash
进入Pod内的container: kubectl exec -it ${pod-name} -c ${container-name} /bin/bash
11.3.2、Service的远程调试:
- 集群中应用调用本地服务:
- 使用 Telepresence 将本地的应用代理到集群中的一个Service上
- Telepresence --swap-deployment ${DEPLOYMENT_NAME}
- 本地开发的应用调用集群中的服务时:
- 使用port-forward将远程的应用代理到本地的端口上
- kubectl port-forward svc/app -n app-namespace
- # 1、port-forward调试
- [root@master1 yaml]# cat pod2.yaml
- apiVersion: "v1"
- kind: "Service"
- metadata:
- name: "nginx-svc"
- namespace: "default"
- labels:
- app: nginx-svc
- spec:
- ports:
- - name: "port-80"
- port: 8080
- targetPort: 80
- selector:
- app: nginx
- ---
- apiVersion: apps/v1
- kind: Deployment
- metadata:
- creationTimestamp: null
- name: nginx
- labels:
- app: nginx
- namespace: default
- spec:
- replicas: 1
- selector:
- matchLabels:
- app: nginx
- template:
- metadata:
- labels:
- app: nginx
- spec:
- containers:
- - image: reg.mt.com:5000/nginx:latest
- name: nginx2
- resources: {}
- ports:
- - containerPort: 80
- livenessProbe:
- tcpSocket:
- port: 80
- initialDelaySeconds: 10
- periodSeconds: 3
- readinessProbe:
- successThreshold: 1
- periodSeconds: 5
- httpGet:
- path: /
- port: 80
- timeoutSeconds: 5
- initialDelaySeconds: 10
- [root@master1 yaml]# kubectl get pods -o wide
- NAME READY STATUS RESTARTS AGE IP NODE NOMINATED NODE READINESS GATES
- nginx-74895b888f-246f6 1/1 Running 0 48s 172.7.25.2 master3 <none> <none>
- [root@master1 yaml]# kubectl get svc/nginx-svc -o wide
- NAME TYPE CLUSTER-IP EXTERNAL-IP PORT(S) AGE SELECTOR
- nginx-svc ClusterIP 192.168.0.16 <none> 8080/TCP 53s app=nginx
-
- 用法示例:
- 1) kubectl port-forward deployment/mydeployment 5000 6000
- # Listen on ports 5000 and 6000 locally, forwarding data to/from ports 5000 and 6000 in a pod selected by the deployment
-
- 2)kubectl port-forward pod/mypod 8888:5000
- # Listen on port 8888 locally, forwarding to 5000 in the pod
-
- 3)kubectl port-forward --address localhost,10.19.21.23 pod/mypod 8888:5000
- # Listen on port 8888 on localhost and selected IP, forwarding to 5000 in the pod
- 不添加 --address 参数,则监听本机
- [root@master1 yaml]# kubectl port-forward --address 192.168.153.132 svc/nginx-svc 2222:8080
- Forwarding from 192.168.153.132:2222 -> 80
- Handling connection for 2222 # 每执行一个请求,输出一行
- . . .

11.3.3、开源调试工具
kubectl-debug #docker和containerd不会在镜像中携带很多的调试工具,底层的容器 runtime 比较常见的就是类似像 docker 或者是 containerd,不论是 docker 还是 containerd,它们使用的一个机制都是基于 Linux namespace 的一个方式进行虚拟化和隔离的。通常情况下 ,并不会在镜像里面带特别多的调试工具,类似像 netstat telnet 等等这些 ,因为这个会造成应用整体非常冗余。那么如果想要调试的时候该怎么做呢?其实这个时候就可以依赖类似于像 kubectl-debug 这样一个工具。kubectl-debug 这个工具是依赖于 Linux namespace 的方式来去做的,它可以 datash 一个 Linux namespace 到一个额外的 container,然后在这个 container 里面执行任何的 debug 动作,其实和直接去 debug 这个 Linux namespace 是一致的。
- 包含:kubectl-debug命令行,debug-agent部署在k8s的node上,用于启动关联排错工具集
- # 1、安装kube-debug
- export PLUGIN_VERSION=0.1.1
- wget https://github.com/aylei/kubectl-debug/releases/download/v${PLUGIN_VERSION}/kubectl-debug_${PLUGIN_VERSION}_linux_amd64.tar.gz
- tar -zxvf kubectl-debug.tar.gz
- mv kubectl-debug /usr/local/bin/
-
- # 2、 安装debu-agent
- # https://raw.githubusercontent.com/aylei/kubectl-debug/master/scripts/agent_daemonset.yml
- [root@master1 yaml]# cat agent_daemonset.yaml
- apiVersion: extensions/v1beta1
- kind: DaemonSet
- metadata:
- labels:
- app: debug-agent
- name: debug-agent
- spec:
- selector:
- matchLabels:
- app: debug-agent
- template:
- metadata:
- labels:
- app: debug-agent
- spec:
- hostPID: true
- tolerations:
- - key: node-role.kubernetes.io/master
- effect: NoSchedule
- containers:
- - name: debug-agent
- image: reg.mt.com:5000/debug-agent:latest
- imagePullPolicy: Always
- securityContext:
- privileged: true
- livenessProbe:
- failureThreshold: 3
- httpGet:
- path: /healthz
- port: 10027
- scheme: HTTP
- initialDelaySeconds: 10
- periodSeconds: 10
- successThreshold: 1
- timeoutSeconds: 1
- ports:
- - containerPort: 10027
- hostPort: 10027
- name: http
- protocol: TCP
- volumeMounts:
- - name: cgroup
- mountPath: /sys/fs/cgroup
- - name: lxcfs
- mountPath: /var/lib/lxc
- mountPropagation: Bidirectional
- - name: docker
- mountPath: "/var/run/docker.sock"
- - name: runcontainerd
- mountPath: "/run/containerd"
- - name: runrunc
- mountPath: "/run/runc"
- - name: vardata
- mountPath: "/var/data"
- # hostNetwork: true
- volumes:
- - name: cgroup
- hostPath:
- path: /sys/fs/cgroup
- - name: lxcfs
- hostPath:
- path: /var/lib/lxc
- type: DirectoryOrCreate
- - name: docker
- hostPath:
- path: /var/run/docker.sock
- # containerd client will need to access /var/data, /run/containerd and /run/runc
- - name: vardata
- hostPath:
- path: /var/data
- - name: runcontainerd
- hostPath:
- path: /run/containerd
- - name: runrunc
- hostPath:
- path: /run/runc
- updateStrategy:
- rollingUpdate:
- maxUnavailable: 5
- type: RollingUpdate
-
- # 3、agentless模式,没有安装debug-agent(daemonset)
- [root@master1 src]# kubectl debug --image=reg.mt.com:5000/debug-agent:latest nginx-74895b888f-rj6qb --agentless=true /bin/sh
-
- # 4、agent模式
- 使用步骤2的daemonset安装,kubectl debug $pod 即可。在 ~/.kube/debug-config 可以配置一些默认的参数。官方示例如下:
- # debug agent listening port(outside container)
- # default to 10027
- agentPort: 10027
-
- # whether using agentless mode
- # default to true
- agentless: true
- # namespace of debug-agent pod, used in agentless mode
- # default to 'default'
- agentPodNamespace: default
- # prefix of debug-agent pod, used in agentless mode
- # default to 'debug-agent-pod'
- agentPodNamePrefix: debug-agent-pod
- # image of debug-agent pod, used in agentless mode
- # default to 'aylei/debug-agent:latest'
- agentImage: aylei/debug-agent:latest
-
- # daemonset name of the debug-agent, used in port-forward
- # default to 'debug-agent'
- debugAgentDaemonset: debug-agent
- # daemonset namespace of the debug-agent, used in port-forwad
- # default to 'default'
- debugAgentNamespace: kube-system
- # whether using port-forward when connecting debug-agent
- # default true
- portForward: true
- # image of the debug container
- # default as showed
- image: nicolaka/netshoot:latest
- # start command of the debug container
- # default ['bash']
- command:
- - '/bin/bash'
- - '-l'
- # private docker registry auth kuberntes secret
- # default registrySecretName is kubectl-debug-registry-secret
- # default registrySecretNamespace is default
- registrySecretName: my-debug-secret
- registrySecretNamespace: debug
- # in agentless mode, you can set the agent pod's resource limits/requests:
- # default is not set
- agentCpuRequests: ""
- agentCpuLimits: ""
- agentMemoryRequests: ""
- agentMemoryLimits: ""
- # in fork mode, if you want the copied pod retains the labels of the original pod, you can change this params
- # format is []string
- # If not set, this parameter is empty by default (Means that any labels of the original pod are not retained, and the labels of the copied pods are empty.)
- forkPodRetainLabels: []
- # You can disable SSL certificate check when communicating with image registry by
- # setting registrySkipTLSVerify to true.
- registrySkipTLSVerify: false
- # You can set the log level with the verbosity setting
- verbosity : 0


