- 1【每日一练】3_每个输入包含 1 个测试用例。每个测试用例先给出一个不超过 1000 的正整数 n,随后
- 2POI处理导入excel发生RecordInputStream$LeftoverDataException处理记录_org.apache.poi.hssf.record.recordinputstream$lefto
- 33D轻量化引擎HOOPS Communicator中的反向代理_hoops communicator架构
- 4ZYNQ7045从flash启动linux vivado配置
- 5建造者模式——KFC点餐系统_kfc 点餐app餐厅点餐菜单设计案例
- 6计算机网络第三章(数据链路层)_叙述时分解复用信号处理流程帧头作用?
- 7Spring6框架-容器:IoC-基于XML管理Bean-依赖注入-Map类型属性_spring学习ioc容器属性类型为map
- 8Linux一一第六章、文件与目录管理_使用绝对路径表示根目录的tmp子目录
- 95 zookeeper内部原理_zk 节点一直没有ack
- 10Unity Dotween插件的运动曲线(Ease)介绍Ease选项Ease效果示例以及C#修改动画曲线功能_dotween ease
SpringCloud+Spring Security+OAuth2 + JWT + Gateway讲解_springcloudalibaba整合jwt+spring security
赞
踩
项目简介
- 本登录系统是一个适应前后端分离并支持传统PC登录的全方位微服务登录架构
- 基于Spring Boot 2.2.8.、 Spring Cloud Hoxton.SR5 和 Spring Cloud Alibaba 2.2.1
- 深度定制Spring Security,基于RBAC、jwt和oauth2的无状态统一权限认证的
- 单点登录、单点登出、续签等功能
- 提供C端多租户功能
- 提供第三方被授权登录方式(openId方式)
- 提供供内部服务调用的OAuth2客户端模式
- 提供基于OAuth2的第三方授权码模式
- 提供自定义添加OAuth2的四种模式的扩展
- 统一角色权限校验
实现思路
1.基于Spring Security源码
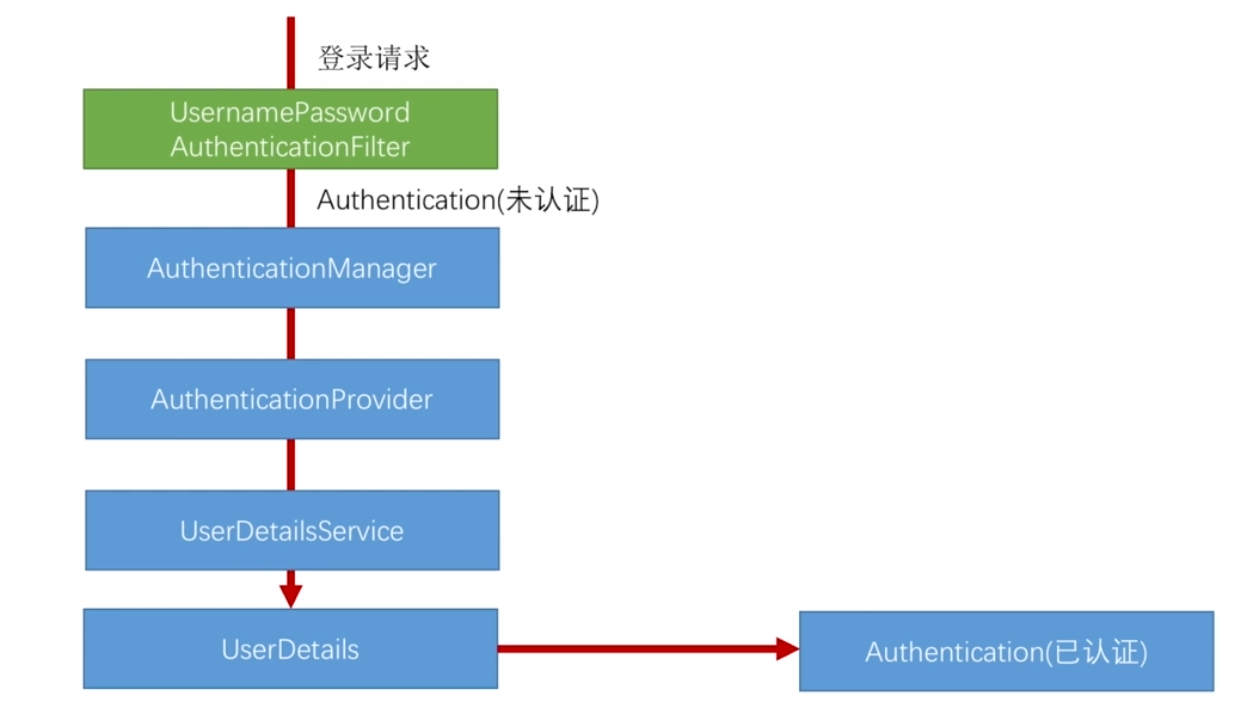
所有的请求首先会到 AbstractAuthenticationProcessingFilter 中,并调用doFilter方法,该过滤器会判断用户是否需要登录,如果不登录直接返回。如果需要登录,则调用attemptAuthentication判断自定义拦截器,如果存在自定义拦截器,则会调用子类的该方法,用于用户名、密码登录。否则会进UsernamePasswordAuthenticationFilter。
UsernamePasswordAuthenticationFilter 主要负责登录请求(包含表单等),请求首先回到 attemptAuthentication 方法中,判断用户名和密码是否是空,如果不是,就去构建 UsernamePasswordAuthenticationToken 对象。
UsernamePasswordAuthenticationToken 是 Authentication 接口的其中一个实现,如果第一次进入(这时还没有执行权限认证),该构造方法首先会把用户名、密码设置到本地,然后会赋予权限一个空权限,然后会 setAuthenticated,因为这时还没有执行权限,所以会设置为false。
然后回到 UsernamePasswordAuthenticationFilter ,执行了 setDetails 方法,把request信息和 UsernamePasswordAuthenticationToken 对象塞入进去。
UsernamePasswordAuthenticationFilter 最后一步会进去 AuthenticationManager(也就是如上图第二步所示),它本身没什么作用,主要用来管理多个AuthenticationProvider,因为本身登录方式有多种,比如用户名密码登录,第三方登录等区别,并判断当前请求是否支持当前AuthenticationProvider,如果支持,则执行真正的校验逻辑,会调用 authenticate 方法,该方法默认从AbstractUserDetailsAuthenticationProvider 实现,该类的 authenticate 方法会调用 retrieveUser 方式,该方式是一个抽象方法,由 DaoAuthenticationProvider 实现。
划重点:真正的校验逻辑就在这个方法内,而最终会拿到 getUserDetailsService的loadUserByUsername方法,这个方法就是我们自己程序要实现的用户校验逻辑。
在上步拿到UserDetails后,AbstractUserDetailsAuthenticationProvider 把拿到的UserDetails校验,调用preAuthenticationChecks.check(UserDetails)方法,会进行一些预检查,会判断用户是否锁定,是否过期等操作。在做完预检查后,会调用additionalAuthenticationChecks 进行一些附加检查,该方法是一个抽象类,由DaoAuthenticationProvider 实现,主要是对密码的校验(PasswordEncoder)。上面检查都做完后,return this.createSuccessAuthentication(),至此,整个AbstractUserDetailsAuthenticationProvider 认证流程走完。
上面说到 createSuccessAuthentication(),该方法会重新(重点:记住是重新构造UsernamePasswordAuthenticationToken,上面调过一次)构造UsernamePasswordAuthenticationToken方法,把username、password和权限重新塞回去。
至此,整个调用链结束,然后Authentication会沿着刚才的调用链返回回去,然后又回到 UsernamePasswordAuthenticationFilter,拿到用户名、密码那。最终回到最开始的 AbstractAuthenticationProcessingFilter 过滤器 ,AbstractAuthenticationProcessingFilter.doFilter 成功结束return
PS:this.successfulAuthentication(request, response, chain, authResult),该方法会调用我们自定义的successfulHandler处理器(重点:在OAuth2中,会接手successfulHandler,然后返回token,因此在OAuth2不需要写该handler),successfulAuthentication 方法会把登录成功用户信息存到ThreadLocal中,全局共享。
PS:上面所有流程中任何一处出现错误或者异常则会掉unsuccessfulAuthentication方法,该方法会调用自定义的failureHandler把存入的用户信息从ThreadLocal中清除。
2.Security多请求共享
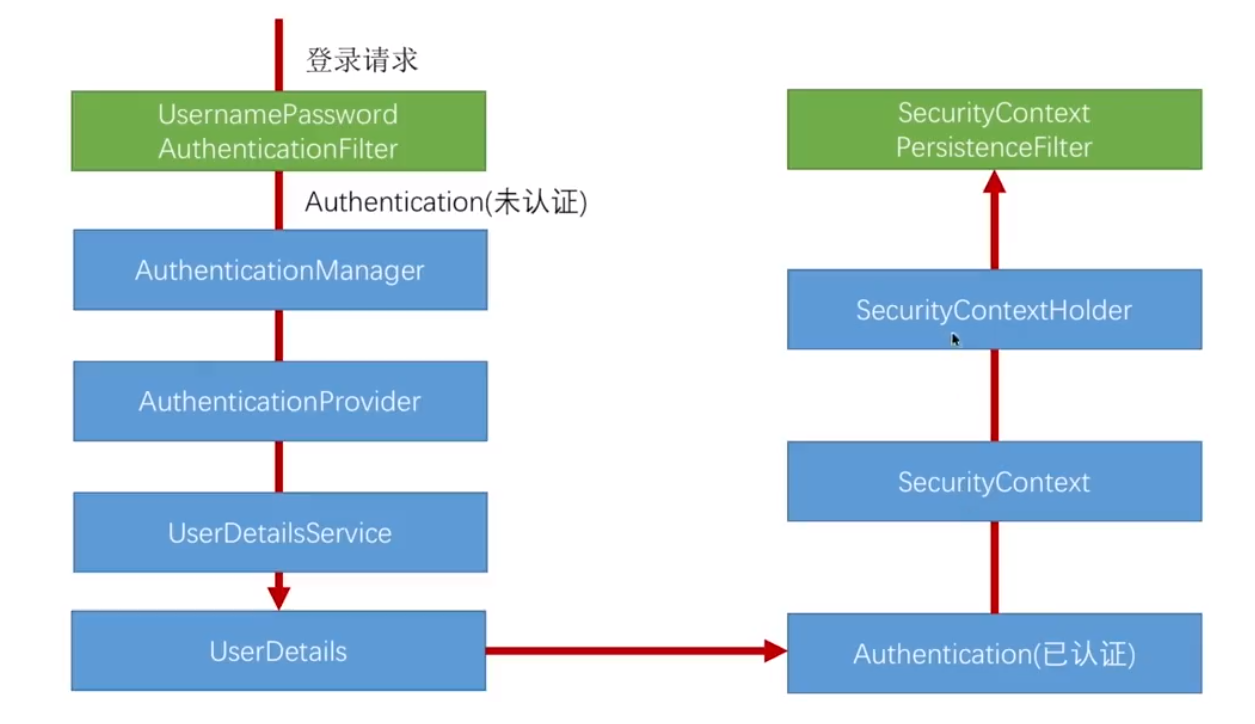
如上图所示,其实上面最后一步在 successfulAuthentication 或 unsuccessfulAuthentication 就能看到 SecurityContext,它的作用是把 Authentication 包装起来,而 SecurityContextHolder 则是一个ThreadLocal封装,封装 SecurityContext。

SecurityContextPersistenceFilter 是过滤链上第一个过滤器,所有请求都先过它,响应最后过它,它的作用是:
请求过来后,检查session,判断session是否有
SecurityContext,如果有就把SecurityContext拿出来放到线程里;当整个响应回来最后一个过它的时候,它检查线程,如果线程里有SecurityContext,就拿出来放到Session里,因为整个响应过程是在一个线程里的,在线程其他位置随时可以拿到用户信息。
Oauth2.0
客户端必须得到用户的授权(authorization grant),才能获得令牌(access token)
OAuth 2.0定义了四种授权方式:
- 授权码模式(authorization code)
- 简化模式(implicit)
- 密码模式(resource owner password credentials)
- 客户端模式(client credentials)
而它默认的授权服务接口是:
/oauth/authorize:验证接口, AuthorizationEndpoint
/oauth/token:获取token
/oauth/confirm_access:用户授权
/oauth/error:认证失败
/oauth/check_token:资源服务器用来校验token
/oauth/token_key:jwt模式下获取公钥;位于:TokenKeyEndpoint ,通过 JwtAccessTokenConverter 访问key
- 1
- 2
- 3
- 4
- 5
- 6
JWT
简述
客户端身份经过服务器验证通过后,会生成带有签名的 JSON 对象并将它返回给客户端。客户端在收到这个 JSON 对象后存储起来。
在以后的请求中客户端将 JSON 对象连同请求内容一起发送给服务器,服务器收到请求后通过 JSON 对象标识用户,如果验证不通过则不返回请求的数据。
验证不通过的情况有很多,比如签名不正确、无权限等。在 JWT 中服务器不保存任何会话数据,使得服务器更加容易扩展。
Base64URL 算法
在讲解 JWT 的组成结构前我们先来讲解一下 Base64URL 算法。这个算法和 Base64 算法类似,但是有一点区别。
我们通过名字可以得知这个算法使用于 URL 的,因此它将 Base64 中的 + 、 / 、 = 三个字符替换成了 - 、 _ ,删除掉了 = 。因为这个三个字符在 URL 中有特殊含义。
JWT 组成结构
JWT 是由三段字符串和两个 . 组成,每个字符串和字符串之间没有换行(类似于这样:xxxxxx.yyyyyy.zzzzzz),每个字符串代表了不同的功能,我们将这三个字符串的功能按顺序列出来并讲解:
1. JWT 头
JWT 头描述了 JWT 元数据,是一个 JSON 对象,它的格式如下:
json{“alg”:“HS256”,“typ”:“JWT”}
这里的 alg 属性表示签名所使用的算法,JWT 签名默认的算法为 HMAC SHA256 , alg 属性值 HS256 就是 HMAC SHA256 算法。typ 属性表示令牌类型,这里就是 JWT。
2. 有效载荷
有效载荷是 JWT 的主体,同样也是个 JSON 对象。有效载荷包含三个部分:
标准注册声明
标准注册声明不是强制使用是的,但是我建议使用。它一般包括以下内容:
iss:jwt的签发者/发行人;
sub:主题;
aud:接收方;
exp:jwt过期时间;
nbf:jwt生效时间;
iat:签发时间
jti:jwt唯一身份标识,可以避免重放攻击
公共声明:
可以在公共声明添加任何信息,我们一般会在里面添加用户信息和业务信息,但是不建议添加敏感信息,因为公共声明部分可以在客户端解密。
私有声明:
私有声明是服务器和客户端共同定义的声明,同样这里不建议添加敏感信息。
下面这个代码段就是定义了一个有效载荷:
json{“exp”:“201909181230”,“role”:“admin”,“isShow”:false}
3. 哈希签名
哈希签名的算法主要是确保数据不会被篡改。它主要是对前面所讲的两个部分进行签名,通过 JWT 头定义的算法生成哈希。哈希签名的过程如下:
-
指定密码,密码保存在服务器中,不能向客户端公开;
-
使用 JWT 头指定的算法进行签名,进行签名前需要对 JWT 头和有效载荷进行 Base64URL 编码,JWT 头和邮箱载荷编码后的结果之间需要用 . 来连接。
简单示例如下:
HMACSHA256(base64UrlEncode(JWT 头) + “.” + base64UrlEncode(有效载荷),密码)
最终结果如下:
base64UrlEncode(JWT 头)+"."+base64UrlEncode(有效载荷)+"."+HMACSHA256(base64UrlEncode(JWT 头) + “.” + base64UrlEncode(有效载荷),密码)
JWT 注意事项
在使用 JWT 时需要注意以下事项:
-
JWT 默认不加密,如果要写入敏感信息必须加密,可以用生成的原始令牌再次对内容进行加密;
-
JWT 无法使服务器保存会话状态,当令牌生成后在有效期内无法取消也不能更改;
-
JWT 包含认证信息,如果泄露了,任何人都可以获得令牌所有的权限;因此 JWT 有效期不能太长,对于重要操作每次请求都必须进行身份验证。
认证中心(uaa-server)
本项目深度定制了OAuth2.0,扩展了部分OAuth2部分接口,原因是现有业务不支持,原生接口只有传用户名、密码,而本公司业务除了用户名、密码还有买家多租户方式,因此不太适合,比如重写了如密码模式获取token、刷新token(暂未完成)、客户端模式获取token、openId获取token等方式,这些都是原生没有的。
其次如果用JWT这种获取token方式是要加密的,默认可以使用对称加密,也可以是用非对称加密,本项目使用非对称加密方式,因为非对称加密几乎不可能被破解,私钥存在认证中心,公钥存在各资源服务器上。
JWT的RSA非对称密钥生成
1.生成密钥文件
使用jdk自带的keytool工具,执行后会在当前目录生成fzp-jwt.jks(存在uaa资源目录下)密钥文件
keytool -genkey -alias dhgate -keyalg RSA -storetype PKCS12 -keysize 1024 -keystore fzp-jwt.jks
参数解析
-genkey:创建证书
-alias:证书的别名。在一个证书库文件中,别名是唯一用来区分多个证书的标识符
-keyalg:密钥的算法,非对称加密的话就是RSA
-keystore:证书库文件保存的位置和文件名。如果路径写错的话,会出现报错信息。如果在路径下,证书库文件不存在,那么就会创建一个
-keysize:密钥长度,一般都是1024
-validity:证书的有效期,单位是天。比如36500的话,就是100年
2.提取公钥
keytool -list -rfc -keystore fzp-jwt.jks -storepass libaojun@dhgate.com | openssl x509 -inform pem -pubkey
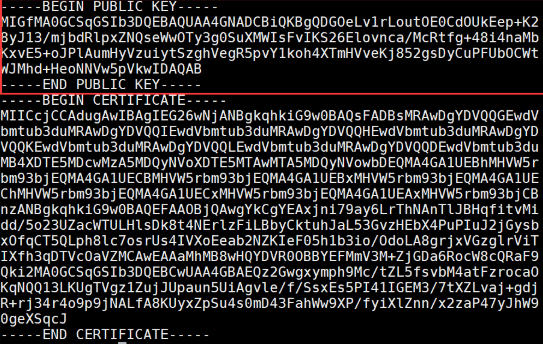
参数解析
-keystore:密钥文件
-storepass:密钥密码
用户名密码获取token(/oauth/user/token)
该接口后期需要优化,原因是前期业务路线变化,前期实现给自己挖坑,也是最开始讨论所有认证中心+网关拆分,导致后面多了C端用户,并在C端用户上扩展多租户让原本的用户名、密码登录方式变成了各种填坑,因此也是后面要做的拆分。预期是不做认证中心拆分,而达到多租户效果。
代码逻辑:
    /**
     * Oauth2 密码模式
     * @param passwordLoginParamDto
     * @param request
     * @param response
     * @throws IOException
     */
    @ApiOperation(value = "用户名密码获取token")
    @RequestMapping(value = "/oauth/user/token", method = RequestMethod.POST, consumes = MediaType.APPLICATION_JSON_VALUE)
    public void userTokenInfo(@RequestBody PasswordLoginParamDto passwordLoginParamDto,
                              HttpServletRequest request, HttpServletResponse response) throws IOException {
        String userName = "";
        if(passwordLoginParamDto.getUserType() == 1){
            userName = String.format("%s,%s", passwordLoginParamDto.getUsername(), passwordLoginParamDto.getUserType());
        }else{
            userName = String.format("%s;%s,%s", passwordLoginParamDto.getUsername(), passwordLoginParamDto.getShopId(), passwordLoginParamDto.getUserType());
        }

        UsernamePasswordAuthenticationToken token = new UsernamePasswordAuthenticationToken(userName, passwordLoginParamDto.getPassword());
        TokenTransferDto dto = getTokenTransferDto("username or password error!");
        dto.request = request;
        dto.response = response;
        dto.token = token;
        writerDefaultToken(dto);
    }
- 1
- 2
- 3
- 4
- 5
- 6
- 7
- 8
- 9
- 10
- 11
- 12
- 13
- 14
- 15
- 16
- 17
- 18
- 19
- 20
- 21
- 22
- 23
- 24
- 25

1.将用户名、密码和用户类型(如果是C端用户还得传shopId)传入UsernamePasswordAuthenticationToken(这个类作用和实现原理在前面Security有提到),然后会校验用户名、密码等信息,校验逻辑可以是数据库,也可以是内存。
2.构造TokenTransferDto默认dto,把错误信息、request、response、UsernamePasswordAuthenticationToken等构造进去。
3.指定模式为密码模式,获取clientId和clientSecret(默认内存获取,已实现从数据库获取,并加入缓存),根据clientId拿到ClientDetails(ClientDetails在AuthorizationServerConfig.configure去刷到缓存中),拿到ClientDetails的目的是,OAuth2默认需要Basic验证,不加会报如下错误:

4.根据附加参数(可选,刷新必须传)、ClientId、Scope和当前使用的OAuth2模式来构造TokenRequest,而TokenRequest的作用是:在隐式流中,令牌通过AuthorizationEndpoint直接请求,在这种情况下,AuthorizationRequest被转换为TokenRequest,以便通过令牌授予链进行处理。
5.TokenRequest根据clientSecret、grant_type、password和GrantedAuthority去构造OAuth2Request。
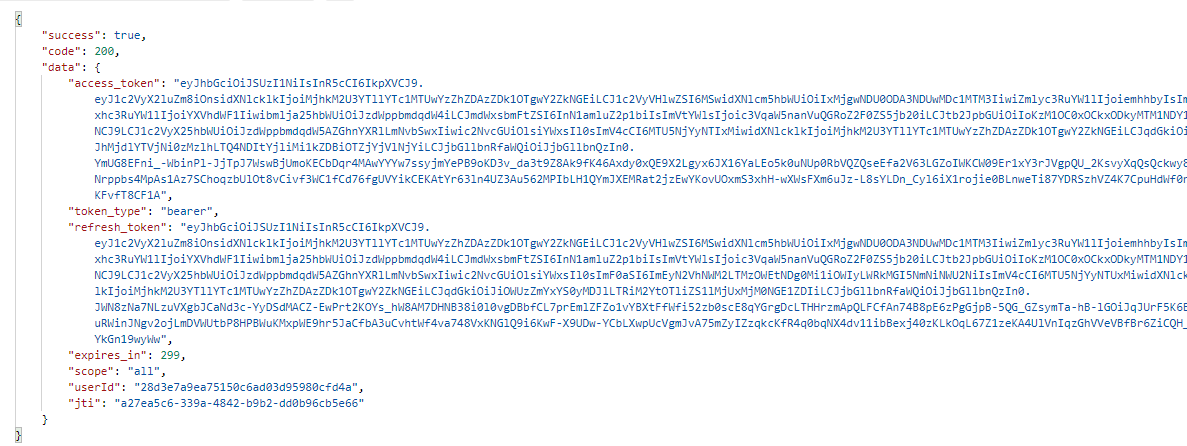
6.根据OAuth2Request和Authentication去构造OAuth2Authentication,然后通过OAuth2Authentication最终去创造AccessToken。至此,密码登录方式完成。效果如下:
clientId获取token(/oauth/client/token)
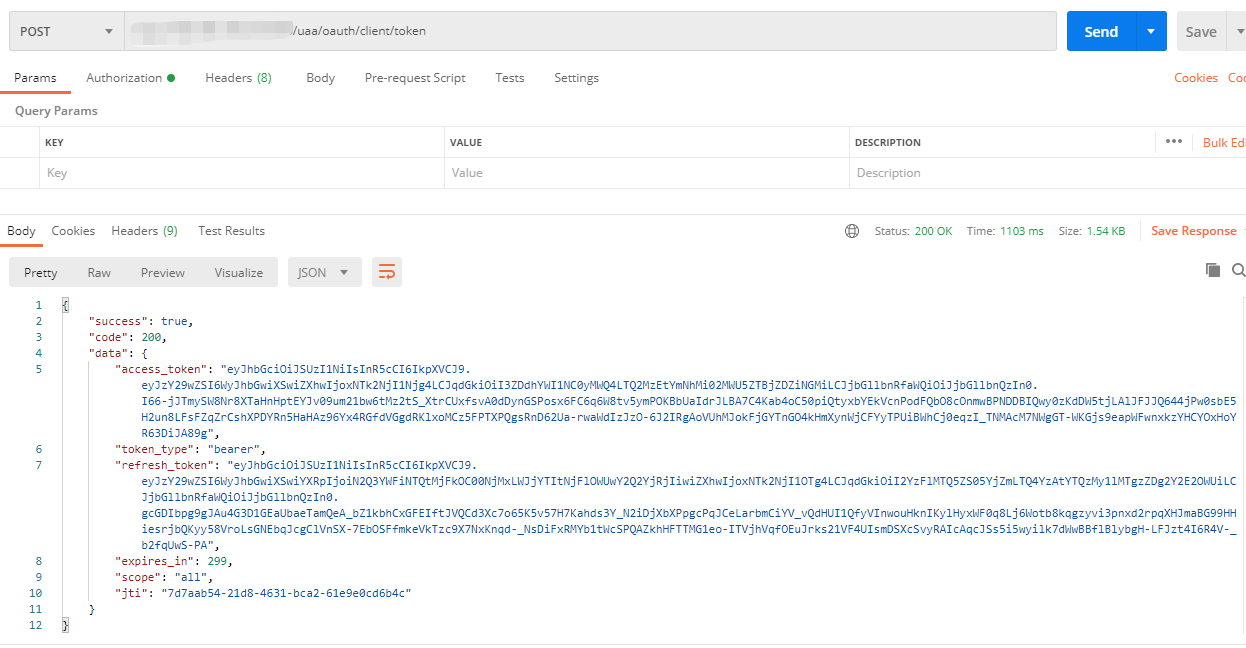
此登录方式适合服务间内部调用登录用,安全性比较低(但比简单模式高),因为不用传入用户名、密码等信息,就可以拿到登录信息
    /**
     * Oauth2 客户端模式
     * @param request
     * @param response
     * @throws IOException
     */
    @ApiOperation(value = "clientId获取token")
    @PostMapping("/oauth/client/token")
    public void clientTokenInfo(HttpServletRequest request, HttpServletResponse response)throws IOException {
        TokenTransferDto dto = getTokenTransferDto("clientId or secret error.");
        dto.request = request;
        dto.response = response;
        writerClientToken(dto);
    }
- 1
- 2
- 3
- 4
- 5
- 6
- 7
- 8
- 9
- 10
- 11
- 12
- 13
- 14
实现方式跟密码模式基本一致,请查看密码模式方式。该结果只能拿到userId,并不能拿到其他信息,返回结果如下:
openId获取token(/oauth/openId/token)
openId这种登录方式比较特别,因为它不在OAuth2的四种模式之内,但查看源码能看到可以依靠OAuth2提供的扩展实现该方式,详情源码可以参照UsernamePasswordAuthenticationToken,这在前面的Security已经有介绍。
@ApiOperation(value = "openId获取token")
    @PostMapping("/oauth/openId/token")
    public void getTokenByOpenId(
            @RequestBody OpenIdLoginParamDto openIdLoginParamDto,
            HttpServletRequest request, HttpServletResponse response) throws IOException {
        OpenIdAuthenticationToken token = new OpenIdAuthenticationToken(openIdLoginParamDto.getOpenId());
        TokenTransferDto dto = getTokenTransferDto("openId error!");
        dto.request = request;
        dto.response = response;
        dto.token = token;
        writerDefaultToken(dto);
    }
- 1
- 2
- 3
- 4
- 5
- 6
- 7
- 8
- 9
- 10
- 11
- 12
1.首先要实现一个类似于UsernamePasswordAuthenticationToken的token类(请看源码),去生成要传入的参数。
然后再实现AuthenticationProvider接口,该接口作用主要是生成UserDetails,然后把参数传入UsernamePasswordAuthenticationToken并构造:
/**
 * @author lbj
 */
public class OpenIdAuthenticationProvider implements AuthenticationProvider {

    private MySocialUserDetailsService userDetailsService;

    @Override
    public Authentication authenticate(Authentication authentication) {
        OpenIdAuthenticationToken authenticationToken = (OpenIdAuthenticationToken) authentication;
        String openId = (String) authenticationToken.getPrincipal();
        UserDetails user = userDetailsService.loadUserByOpenId(openId);
        if (user == null) {
            throw new InternalAuthenticationServiceException("openId result user is null.");
        }
        OpenIdAuthenticationToken authenticationResult = new OpenIdAuthenticationToken(user, user.getAuthorities());
        authenticationResult.setDetails(authenticationToken.getDetails());
        return authenticationResult;
    }

    @Override
    public boolean supports(Class<?> authentication) {
        return OpenIdAuthenticationToken.class.isAssignableFrom(authentication);
    }

    public MySocialUserDetailsService getUserDetailsService() {
        return userDetailsService;
    }

    public void setUserDetailsService(MySocialUserDetailsService userDetailsService) {
        this.userDetailsService = userDetailsService;
    }
}
- 1
- 2
- 3
- 4
- 5
- 6
- 7
- 8
- 9
- 10
- 11
- 12
- 13
- 14
- 15
- 16
- 17
- 18
- 19
- 20
- 21
- 22
- 23
- 24
- 25
- 26
- 27
- 28
- 29
- 30
- 31
- 32
- 33
然后再创建OpenIdAuthenticationSecurityConfig来加入Security的默认支持方式
/**
 * openId的相关处理配置
 *
 * @author lbj
 */
@Component
public class OpenIdAuthenticationSecurityConfig extends SecurityConfigurerAdapter<DefaultSecurityFilterChain, HttpSecurity> {
    @Autowired
    private MySocialUserDetailsService userDetailsService;

    @Override
    public void configure(HttpSecurity http) {
        //openId provider
        OpenIdAuthenticationProvider provider = new OpenIdAuthenticationProvider();
        provider.setUserDetailsService(userDetailsService);
        http.authenticationProvider(provider);
    }
}
- 1
- 2
- 3
- 4
- 5
- 6
- 7
- 8
- 9
- 10
- 11
- 12
- 13
- 14
- 15
- 16
- 17
- 18
最后在Security的拦截类加入自定义的登录方式
@Override
    protected void configure(HttpSecurity http) throws Exception {

        http.csrf().disable().httpBasic().disable().authorizeRequests().anyRequest().permitAll()
        .and().apply(openIdAuthenticationSecurityConfig); //就是这里对OpenId生效

        // 基于密码 等模式可以无session,不支持授权码模式
        if (authenticationEntryPoint != null) {
            http.exceptionHandling().authenticationEntryPoint(authenticationEntryPoint)
                    .accessDeniedHandler(customAccessDeniedHandler);
            http.sessionManagement().sessionCreationPolicy(SessionCreationPolicy.STATELESS);

        } else {
            // 授权码模式单独处理,需要session的支持,此模式可以支持所有oauth2的认证
            http.sessionManagement().sessionCreationPolicy(SessionCreationPolicy.IF_REQUIRED);
        }

        // 解决不允许显示在iframe的问题
        http.headers().frameOptions().disable();
        http.headers().cacheControl();

    }
- 1
- 2
- 3
- 4
- 5
- 6
- 7
- 8
- 9
- 10
- 11
- 12
- 13
- 14
- 15
- 16
- 17
- 18
- 19
- 20
- 21
- 22
资源中心
各资源服务器需要实现ResourceServerConfigurerAdapter,代表开启一个资源服务器,再配置下各资源服务引入的token方式,配置为resJwt的都会被标记为资源服务器,配置如下:
dhgate:
  oauth2:
    token:
      store:
        type: resJwt
- 1
- 2
- 3
- 4
- 5
前端传入token后,各资源服务器会去解析当前token(网关会校验当前登录有效性),解析方式在各资源服务器的资源文件中(public.cert),如果公钥验证成功,会进入DefaultUserAuthenticationConverter
如果当前用户已登录,则会去DefaultUserAuthenticationConverter中去获取用户的登录信息,然后塞入ThreadLocal中
public class JWTfaultUserAuthenticationConverter extends DefaultUserAuthenticationConverter {
			private Collection<? extends GrantedAuthority> defaultAuthorities;

			public Authentication extractAuthentication(Map<String, ?> map) {
				if (map.containsKey("user_info")) {
					Object principal = map.get("user_info");
				//	Collection<? extends GrantedAuthority> authorities = getAuthorities(map);
					LoginAppUser loginUser = new LoginAppUser();
					if (principal instanceof Map) {
						loginUser = BeanUtil.mapToBean((Map) principal, LoginAppUser.class, true);
					}
					return new UsernamePasswordAuthenticationToken(loginUser, "N/A", loginUser.getAuthorities());
				}
				return null;
			}
		}
- 1
- 2
- 3
- 4
- 5
- 6
- 7
- 8
- 9
- 10
- 11
- 12
- 13
- 14
- 15
- 16
因为SecurityContext在当前线程全局有效,所以登录信息可以在资源服务器任何一个地方拿到
/**
 * @author 作者 lbj
 * @version 创建时间:2020年07月01日 上午20:57:51 获取用户信息
 */
public class SysUserUtil {

    /**
     * 获取登陆的 LoginAppUser
     *
     * @return
     */
    public static LoginAppUser getLoginAppUser() {

        // 当OAuth2AuthenticationProcessingFilter设置当前登录时,直接返回
        // 强认证时处理
        Authentication authentication = SecurityContextHolder.getContext().getAuthentication();
        if (authentication instanceof OAuth2Authentication) {
            OAuth2Authentication oAuth2Auth = (OAuth2Authentication) authentication;
            authentication = oAuth2Auth.getUserAuthentication();

            if (authentication instanceof UsernamePasswordAuthenticationToken) {
                UsernamePasswordAuthenticationToken authenticationToken = (UsernamePasswordAuthenticationToken) authentication;

                if (authenticationToken.getPrincipal() instanceof LoginAppUser) {
                    return (LoginAppUser) authenticationToken.getPrincipal();
                } else if (authenticationToken.getPrincipal() instanceof Map) {

                    LoginAppUser loginAppUser = BeanUtil.mapToBean((Map) authenticationToken.getPrincipal(), LoginAppUser.class, true);
                    return loginAppUser;
                }
            } else if (authentication instanceof PreAuthenticatedAuthenticationToken) {
                // 刷新token方式
                PreAuthenticatedAuthenticationToken authenticationToken = (PreAuthenticatedAuthenticationToken) authentication;
                return (LoginAppUser) authenticationToken.getPrincipal();
            }
        }

        return null;
    }
}
- 1
- 2
- 3
- 4
- 5
- 6
- 7
- 8
- 9
- 10
- 11
- 12
- 13
- 14
- 15
- 16
- 17
- 18
- 19
- 20
- 21
- 22
- 23
- 24
- 25
- 26
- 27
- 28
- 29
- 30
- 31
- 32
- 33
- 34
- 35
- 36
- 37
- 38
- 39
- 40
登录信息已经存到了本地线程变量中,因此上面代码能在资源服务器任何地方拿到用户登录信息。
Gateway
网关在本项目中的角色是对来自认证中心的服务鉴权、过滤地址、服务转发等功能(后续功能添加中,比如全局过滤,局部过滤)
网关鉴权
要实现网关鉴权,则网关必须得标记为资源服务器,因网关使用webflux异步非阻塞原理实现,底层服务器是基于netty,不向下兼容,不兼容普通web相关,所以网关得单独实现一套资源服务认证。资源认证流程如下:
/**
 * webflux资源服务器配置
 *
 * @author lbj
 * @date 2020/07/02
 */
@EnableConfigurationProperties(SecurityProperties.class)
public class ResourceServerConfiguration {
    @Autowired
    private SecurityProperties securityProperties;

    @Autowired
    private TokenStore tokenStore;

    @Autowired
    private PermitAuthenticationWebFilter permitAuthenticationWebFilter;

    @Bean
    SecurityWebFilterChain springSecurityFilterChain(ServerHttpSecurity http) {
        http.addFilterBefore(permitAuthenticationWebFilter, SecurityWebFiltersOrder.AUTHENTICATION);
        //认证处理器
        ReactiveAuthenticationManager customAuthenticationManager = new CustomAuthenticationManager(tokenStore);
        JsonAuthenticationEntryPoint entryPoint = new JsonAuthenticationEntryPoint();
        //token转换器
        ServerBearerTokenAuthenticationConverter tokenAuthenticationConverter = new ServerBearerTokenAuthenticationConverter();
        tokenAuthenticationConverter.setAllowUriQueryParameter(true);
        //oauth2认证过滤器
        AuthenticationWebFilter oauth2Filter = new AuthenticationWebFilter(customAuthenticationManager);
        oauth2Filter.setServerAuthenticationConverter(tokenAuthenticationConverter);
        oauth2Filter.setAuthenticationFailureHandler(new ServerAuthenticationEntryPointFailureHandler(entryPoint));
        oauth2Filter.setAuthenticationSuccessHandler(new Oauth2AuthSuccessHandler());
        http.addFilterAt(oauth2Filter, SecurityWebFiltersOrder.AUTHENTICATION);

        ServerHttpSecurity.AuthorizeExchangeSpec authorizeExchange = http.authorizeExchange();
//        if (securityProperties.getAuth().getHttpUrls().length > 0) {
//            authorizeExchange.pathMatchers(securityProperties.getAuth().getHttpUrls()).authenticated();
//        }
        if (securityProperties.getIgnore().getUrls().length > 0) {
            authorizeExchange.pathMatchers(securityProperties.getIgnore().getUrls()).permitAll();
        }

        ServerHttpSecurity.AuthorizeExchangeSpec.Access access = authorizeExchange
                .pathMatchers(HttpMethod.OPTIONS).permitAll()
                .anyExchange();
        setAuthenticate(access);

                //.anyExchange().authenticated()  //这个跟下面那行是一样的,只是下面能更细的控制权限
                   // .access(permissionAuthManager)   // 应用api权限控制 后期权限控制会用,暂时先不做
        http
            .exceptionHandling()
                .accessDeniedHandler(new JsonAccessDeniedHandler())
                .authenticationEntryPoint(entryPoint)
        .and()
            .headers()
                .frameOptions()
                .disable()
        .and()
            .httpBasic().disable()
            .csrf().disable();

        return http.build();
    }

    /**
     * url权限控制,默认是认证就通过,可以重写实现个性化 permisson设置
     * @param authorizedAccess
     */
    public ServerHttpSecurity setAuthenticate(ServerHttpSecurity.AuthorizeExchangeSpec.Access authorizedAccess) {
        return authorizedAccess.authenticated().and();
    }
}
- 1
- 2
- 3
- 4
- 5
- 6
- 7
- 8
- 9
- 10
- 11
- 12
- 13
- 14
- 15
- 16
- 17
- 18
- 19
- 20
- 21
- 22
- 23
- 24
- 25
- 26
- 27
- 28
- 29
- 30
- 31
- 32
- 33
- 34
- 35
- 36
- 37
- 38
- 39
- 40
- 41
- 42
- 43
- 44
- 45
- 46
- 47
- 48
- 49
- 50
- 51
- 52
- 53
- 54
- 55
- 56
- 57
- 58
- 59
- 60
- 61
- 62
- 63
- 64
- 65
- 66
- 67
- 68
- 69
- 70
- 71
网关转发、动态路由
网关转发和动态路由需要如下配置,id为要匹配的id、predicates为要匹配的路径,加前缀、filters为截去的路径,动态路由实现是基于Nacos的配置监听,Gateway给了一个端点来实现此功能,当然Gateway提供多种方式实现路由:
[
    {
        "id": "ebay-service",
        "predicates": [{
            "name": "Path",
            "args": {
                "pattern": "/ebay/**"
            }
        }],
        "uri": "lb://ebay-service",
        "filters": [{
            "name": "StripPrefix",
            "args": {
                "parts": "1"
            }
        }]
    }
]
- 1
- 2
- 3
- 4
- 5
- 6
- 7
- 8
- 9
- 10
- 11
- 12
- 13
- 14
- 15
- 16
- 17
- 18
网关统一请求拦截
统一资源过滤是需要把普通资源服务器的鉴权工作移到网关,只需网关也是资源服务器就能做到此功能,前面已经实现了网关作为资源服务器,并且实现了对普通服务转发,因此只需如下配置就可以对各资源服务器统一请求拦截:
  security:
    ignore:
      httpUrls: >
        /uaa/**,
        /dsuser/users-anon/**,
        /dsuser/api/**,
        /buser/users-anon/**,
        /buser/api/**,
        /shopify/dhgate/shopify/unauth/**,
        /myyshop/everybody/**,
        /umc/email/**,
        /myyshop-order/everybody/**,
        /myyshop/everybody/**,
        /umc/email/**,
        /myyshop-order/order/payCallBack,
        /search/myyshop/search,
        /myyshop-order/shipping/api/**
- 1
- 2
- 3
- 4
- 5
- 6
- 7
- 8
- 9
- 10
- 11
- 12
- 13
- 14
- 15
- 16
- 17
网关拦截器 PermitAuthenticationWebFilter
该拦截器作用于全局,并且顺序是在鉴权之前,顺序配置只需要在网关资源中心加个拦截器并指定生效于哪个拦截器之前即可:
http.addFilterBefore(permitAuthenticationWebFilter, SecurityWebFiltersOrder.AUTHENTICATION);
- 1
作用是判断当前地址是否需要放权,放权判断你是通过spring提供的通配符判断,如果放权则删除当前请求header token:
/**
 * webflux资源服务器配置
 *
 * @author lbj
 * @date 2020/07/02
 */
@EnableConfigurationProperties(SecurityProperties.class)
public class ResourceServerConfiguration {
    @Autowired
    private SecurityProperties securityProperties;

    @Autowired
    private TokenStore tokenStore;

    @Autowired
    private PermitAuthenticationWebFilter permitAuthenticationWebFilter;

    @Bean
    SecurityWebFilterChain springSecurityFilterChain(ServerHttpSecurity http) {
        http.addFilterBefore(permitAuthenticationWebFilter, SecurityWebFiltersOrder.AUTHENTICATION);
        //认证处理器
        ReactiveAuthenticationManager customAuthenticationManager = new CustomAuthenticationManager(tokenStore);
        JsonAuthenticationEntryPoint entryPoint = new JsonAuthenticationEntryPoint();
        //token转换器
        ServerBearerTokenAuthenticationConverter tokenAuthenticationConverter = new ServerBearerTokenAuthenticationConverter();
        tokenAuthenticationConverter.setAllowUriQueryParameter(true);
        //oauth2认证过滤器
        AuthenticationWebFilter oauth2Filter = new AuthenticationWebFilter(customAuthenticationManager);
        oauth2Filter.setServerAuthenticationConverter(tokenAuthenticationConverter);
        oauth2Filter.setAuthenticationFailureHandler(new ServerAuthenticationEntryPointFailureHandler(entryPoint));
        oauth2Filter.setAuthenticationSuccessHandler(new Oauth2AuthSuccessHandler());
        http.addFilterAt(oauth2Filter, SecurityWebFiltersOrder.AUTHENTICATION);

        ServerHttpSecurity.AuthorizeExchangeSpec authorizeExchange = http.authorizeExchange();
//        if (securityProperties.getAuth().getHttpUrls().length > 0) {
//            authorizeExchange.pathMatchers(securityProperties.getAuth().getHttpUrls()).authenticated();
//        }
        if (securityProperties.getIgnore().getUrls().length > 0) {
            authorizeExchange.pathMatchers(securityProperties.getIgnore().getUrls()).permitAll();
        }

        ServerHttpSecurity.AuthorizeExchangeSpec.Access access = authorizeExchange
                .pathMatchers(HttpMethod.OPTIONS).permitAll()
                .anyExchange();
        setAuthenticate(access);

                //.anyExchange().authenticated()  //这个跟下面那行是一样的,只是下面能更细的控制权限
                   // .access(permissionAuthManager)   // 应用api权限控制 后期权限控制会用,暂时先不做
        http
            .exceptionHandling()
                .accessDeniedHandler(new JsonAccessDeniedHandler())
                .authenticationEntryPoint(entryPoint)
        .and()
            .headers()
                .frameOptions()
                .disable()
        .and()
            .httpBasic().disable()
            .csrf().disable();

        return http.build();
    }

    /**
     * url权限控制,默认是认证就通过,可以重写实现个性化 permisson设置
     * @param authorizedAccess
     */
    public ServerHttpSecurity setAuthenticate(ServerHttpSecurity.AuthorizeExchangeSpec.Access authorizedAccess) {
        return authorizedAccess.authenticated().and();
    }
}
- 1
- 2
- 3
- 4
- 5
- 6
- 7
- 8
- 9
- 10
- 11
- 12
- 13
- 14
- 15
- 16
- 17
- 18
- 19
- 20
- 21
- 22
- 23
- 24
- 25
- 26
- 27
- 28
- 29
- 30
- 31
- 32
- 33
- 34
- 35
- 36
- 37
- 38
- 39
- 40
- 41
- 42
- 43
- 44
- 45
- 46
- 47
- 48
- 49
- 50
- 51
- 52
- 53
- 54
- 55
- 56
- 57
- 58
- 59
- 60
- 61
- 62
- 63
- 64
- 65
- 66
- 67
- 68
- 69
- 70
- 71
至此,整个SpringCloud+Spring Security+OAuth2 + JWT + Gateway集成通过源码+现有代码结束。
此外。
Security拦截器
Security拦截器顺序在FilterComparator中,可以动态加入比他前或者后的顺序
private static final int INITIAL_ORDER = 100;
    private static final int ORDER_STEP = 100;
    private final Map<String, Integer> filterToOrder = new HashMap();

    FilterComparator() {
        FilterComparator.Step order = new FilterComparator.Step(100, 100);
        this.put(ChannelProcessingFilter.class, order.next());
        this.put(ConcurrentSessionFilter.class, order.next());
        this.put(WebAsyncManagerIntegrationFilter.class, order.next());
        this.put(SecurityContextPersistenceFilter.class, order.next());
        this.put(HeaderWriterFilter.class, order.next());
        this.put(CorsFilter.class, order.next());
        this.put(CsrfFilter.class, order.next());
        this.put(LogoutFilter.class, order.next());
        this.filterToOrder.put("org.springframework.security.oauth2.client.web.OAuth2AuthorizationRequestRedirectFilter", order.next());
        this.filterToOrder.put("org.springframework.security.saml2.provider.service.servlet.filter.Saml2WebSsoAuthenticationRequestFilter", order.next());
        this.put(X509AuthenticationFilter.class, order.next());
        this.put(AbstractPreAuthenticatedProcessingFilter.class, order.next());
        this.filterToOrder.put("org.springframework.security.cas.web.CasAuthenticationFilter", order.next());
        this.filterToOrder.put("org.springframework.security.oauth2.client.web.OAuth2LoginAuthenticationFilter", order.next());
        this.filterToOrder.put("org.springframework.security.saml2.provider.service.servlet.filter.Saml2WebSsoAuthenticationFilter", order.next());
        this.put(UsernamePasswordAuthenticationFilter.class, order.next());
        this.put(ConcurrentSessionFilter.class, order.next());
        this.filterToOrder.put("org.springframework.security.openid.OpenIDAuthenticationFilter", order.next());
        this.put(DefaultLoginPageGeneratingFilter.class, order.next());
        this.put(DefaultLogoutPageGeneratingFilter.class, order.next());
        this.put(ConcurrentSessionFilter.class, order.next());
        this.put(DigestAuthenticationFilter.class, order.next());
        this.filterToOrder.put("org.springframework.security.oauth2.server.resource.web.BearerTokenAuthenticationFilter", order.next());
        this.put(BasicAuthenticationFilter.class, order.next());
        this.put(RequestCacheAwareFilter.class, order.next());
        this.put(SecurityContextHolderAwareRequestFilter.class, order.next());
        this.put(JaasApiIntegrationFilter.class, order.next());
        this.put(RememberMeAuthenticationFilter.class, order.next());
        this.put(AnonymousAuthenticationFilter.class, order.next());
        this.filterToOrder.put("org.springframework.security.oauth2.client.web.OAuth2AuthorizationCodeGrantFilter", order.next());
        this.put(SessionManagementFilter.class, order.next());
        this.put(ExceptionTranslationFilter.class, order.next());
        this.put(FilterSecurityInterceptor.class, order.next());
        this.put(SwitchUserFilter.class, order.next());
    }
- 1
- 2
- 3
- 4
- 5
- 6
- 7
- 8
- 9
- 10
- 11
- 12
- 13
- 14
- 15
- 16
- 17
- 18
- 19
- 20
- 21
- 22
- 23
- 24
- 25
- 26
- 27
- 28
- 29
- 30
- 31
- 32
- 33
- 34
- 35
- 36
- 37
- 38
- 39
- 40
- 41
FilterComparator 比较器中初始化了Spring Security 自带的Filter 的顺序,即在创建时已经确定了默认Filter的顺序。并将所有过滤器保存在一个 filterToOrder Map中。key值是Filter的类名,value是过滤器的顺序号。
完结。


