
热门标签
热门文章
- 1北斗企业50强_公司主要产品为基于北斗及其他所有全球卫星导航系统,实时定位精度为厘米、后处理
- 2【guava】 谷歌guava工具包的常用方法 双key的map 、驼峰转下划线等小结
- 3SpringBoot集成Redisson实现延迟队列_springboot 整合redisson 延时队列
- 4ROI 接口便捷修改
- 5GPT-5不会真正突破,24年AGI不会实现!全网AI大佬24年最全预测!
- 6链表的结构_id负向增加改变电压利用率
- 7Tez优化参数设置_tez.grouping.max-size
- 8【技术分享】BERT系列(二)-- BERT在序列标注上的应用_bert中文序列标注
- 9公司日常巡检管理系统的设计与实现
- 10Incus:新一代容器与虚拟机编排管理引擎
当前位置: article > 正文
深度学习的onnx模型插入新节点构建新模型_onnx 插入节点
作者:喵喵爱编程 | 2024-07-19 07:42:22
赞
踩
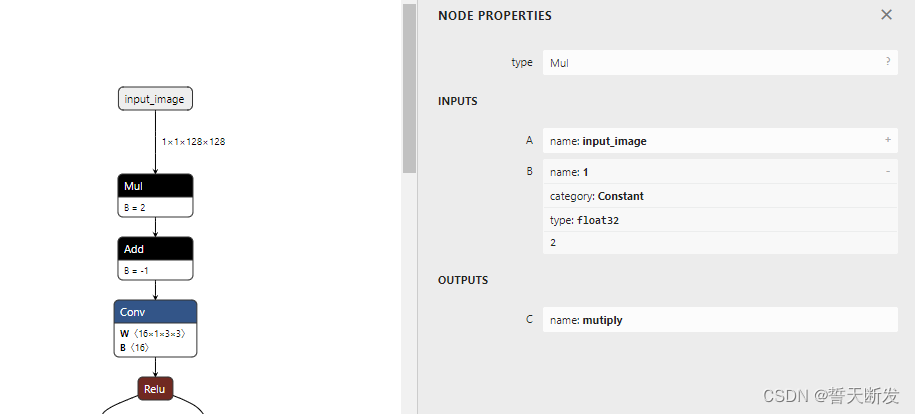
onnx 插入节点

import numpy as np
import onnx
import onnxruntime
import onnxruntime.backend as backend

model = onnx.load('test.onnx')
node = model.graph.node
graph = model.graph

# 1.2搜索目标节点
# for i in range(len(node)):
#     if node[i].op_type == 'Conv':
#         node_rise = node[i]
#         if node_rise.output[0] == '203':
#             print(i)
# print(node[159])

new_node_0 = onnx.helper.make_node(
    "Mul",
    inputs=["input_image","1"],
    outputs=["mutiply"],
)

mutiply_node = onnx.helper.make_node(
    "Constant",
    inputs=[],
    outputs=["1"],
    value=onnx.helper.make_tensor('value', onnx.TensorProto.FLOAT, [], [2.0])
)

new_node_1 = onnx.helper.make_node(
    "Add",
    inputs=["mutiply","2"],
    outputs=["add"],
)

add_node = onnx.helper.make_node(
    "Constant",
    inputs=[],
    outputs=["2"],
    value=onnx.helper.make_tensor('value', onnx.TensorProto.FLOAT, [], [-1.0])
)

#删除老节点
old_squeeze_node = model.graph.node[0]
old_squeeze_node.input[0] = "add"
model.graph.node.remove(old_squeeze_node)

graph.node.insert(0, mutiply_node)
graph.node.insert(1, new_node_0)
graph.node.insert(2, add_node)
graph.node.insert(3, new_node_1)
graph.node.insert(4, old_squeeze_node)
onnx.checker.check_model(model)
onnx.save(model, 'out.onnx')

# session = onnxruntime.InferenceSession("out.onnx", providers=['CUDAExecutionProvider', 'CPUExecutionProvider'])
# out = session.run([session.get_outputs()[0].name], {session.get_inputs()[0].name: np.ones([1, 1, 128, 128], dtype=np.float32)})[0]
# print(out)

print(onnxruntime.get_device())
rt = backend.prepare(model, "CPU")
out = rt.run(np.ones([1, 1, 128, 128], dtype=np.float32))
print(out)
- 1
- 2
- 3
- 4
- 5
- 6
- 7
- 8
- 9
- 10
- 11
- 12
- 13
- 14
- 15
- 16
- 17
- 18
- 19
- 20
- 21
- 22
- 23
- 24
- 25
- 26
- 27
- 28
- 29
- 30
- 31
- 32
- 33
- 34
- 35
- 36
- 37
- 38
- 39
- 40
- 41
- 42
- 43
- 44
- 45
- 46
- 47
- 48
- 49
- 50
- 51
- 52
- 53
- 54
- 55
- 56
- 57
- 58
- 59
- 60
- 61
- 62
- 63
- 64
- 65
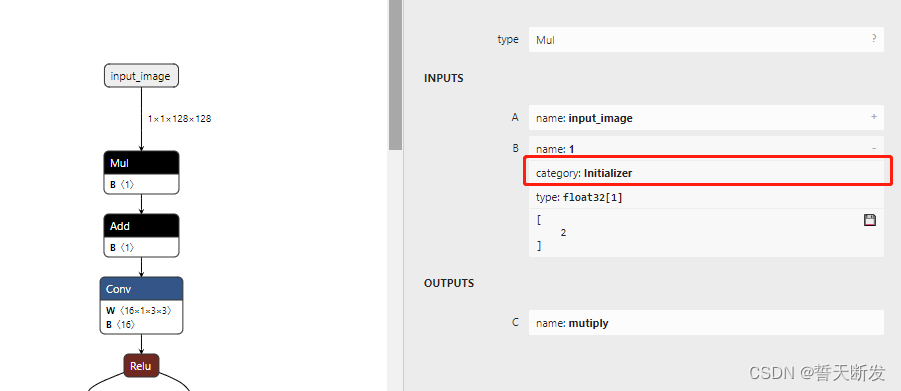
第二种使用可供训练的初始化参数
import numpy as np
import onnx
import onnxruntime
import onnxruntime.backend as backend

model = onnx.load('test.onnx')
node = model.graph.node
graph = model.graph

# 1.2搜索目标节点
# for i in range(len(node)):
#     if node[i].op_type == 'Conv':
#         node_rise = node[i]
#         if node_rise.output[0] == '203':
#             print(i)
# print(node[159])

mutiply_node = onnx.helper.make_tensor(name='1',
                                      data_type=onnx.TensorProto.FLOAT,
                                      dims= [1],
                                      vals = np.array([2.0], dtype=np.float32)
                                        )

graph.initializer.append(mutiply_node)

new_node_0 = onnx.helper.make_node(
    "Mul",
    inputs=["input_image","1"],
    outputs=["mutiply"],
)

add_node = onnx.helper.make_tensor(name='2',
                                      data_type=onnx.TensorProto.FLOAT,
                                      dims= [1],
                                      vals = np.array([-1.], dtype=np.float32)
                                        )

graph.initializer.append(add_node)

new_node_1 = onnx.helper.make_node(
    "Add",
    inputs=["mutiply","2"],
    outputs=["add"],
)

#删除老节点
old_squeeze_node = model.graph.node[0]
old_squeeze_node.input[0] = "add"
model.graph.node.remove(old_squeeze_node)

graph.node.insert(0, new_node_0)
graph.node.insert(1, new_node_1)
graph.node.insert(2, old_squeeze_node)
onnx.checker.check_model(model)
onnx.save(model, 'out.onnx')

# session = onnxruntime.InferenceSession("out.onnx", providers=['CUDAExecutionProvider', 'CPUExecutionProvider'])
# out = session.run([session.get_outputs()[0].name], {session.get_inputs()[0].name: np.ones([1, 1, 128, 128], dtype=np.float32)})[0]
# print(out)

print(onnxruntime.get_device())
rt = backend.prepare(model, "CPU")
out = rt.run(np.ones([1, 1, 128, 128], dtype=np.float32))
print(out)
- 1
- 2
- 3
- 4
- 5
- 6
- 7
- 8
- 9
- 10
- 11
- 12
- 13
- 14
- 15
- 16
- 17
- 18
- 19
- 20
- 21
- 22
- 23
- 24
- 25
- 26
- 27
- 28
- 29
- 30
- 31
- 32
- 33
- 34
- 35
- 36
- 37
- 38
- 39
- 40
- 41
- 42
- 43
- 44
- 45
- 46
- 47
- 48
- 49
- 50
- 51
- 52
- 53
- 54
- 55
- 56
- 57
- 58
- 59
- 60
- 61
- 62
- 63
- 64
推荐阅读
相关标签

