- 1STM32定时器(计数器计数周期)_stm32计数器例程
- 2【学习笔记】kaggle案例之泰坦尼克号(基于R)_r语言泰坦尼克号随机森林案例数据分析报告
- 3Android etc目录文件一览表_真我手机etc目录
- 4高德地图API KEY出现INVALID_USER_SCODE的解决过程_fail:invalid_user_scode#sha1andpackage
- 5结构体vector容器的使用以及结构体容器的初始化_c++结构体中使用容器 问题
- 6Android 性能优化系列 - 03 使用对象池优化内存_android 对象池
- 7opencv实现一个简单的案例(vscode)_#include
vscode - 8【Netty】高阶使用:IdleStateHandler 心跳检测,实现超时断开连接_netty 心跳超时断开
- 9移动魔百盒CM201-1_CW_S905L2_MT7668_线刷固件包_魔百盒cm201-1刷机包
- 10为什么要将程序部署到云服务器上?华为云Web及移动App上云解决方案体验测评_把功能部署到服务器之后就得到一个什么
Spring Cloud实战 | 第九篇:Spring Cloud整合Spring Security OAuth2认证服务器统一认证自定义异常处理_oauth2 自定义异常
赞
踩
本文完整代码下载点击

一. 前言
相信了解过我或者看过我之前的系列文章应该多少知道点我写这些文章包括创建 有来商城youlai-mall 这个项目的目的,想给那些真的想提升自己或者迷茫的人(包括自己–一个工作6年觉得一无是处的菜鸟)提供一块上升的基石。项目是真的从无到有(往期文章佐证),且使用当前主流的开发模式(微服务+前后端分离),最新主流的技术栈(Spring Boot+ Spring Cloud +Spring Cloud Alibaba + Vue),最流行的统一安全认证授权(OAuth2+JWT),好了玩笑开完了大家别当真,总之有兴趣一起的小伙伴欢迎加入~
接下来说下这篇文章的原因,之前我是没想过应用到项目中的OAuth2+JWT这套组合拳这么受大家关注,期间一直有童鞋问怎么自定义Spring Security OAuth2的异常处理、JWT怎么续期、JWT退出等场景下如何失效等问题,所以最近有点时间想把这套统一认证授权完善掉,本篇就以如何自定义Spring Security OAuth2异常处理展开。
往期文章链接:
后端
- Spring Cloud实战 | 第一篇:Windows搭建Nacos服务
- Spring Cloud实战 | 第二篇:Spring Cloud整合Nacos实现注册中心
- Spring Cloud实战 | 第三篇:Spring Cloud整合Nacos实现配置中心
- Spring Cloud实战 | 第四篇:Spring Cloud整合Gateway实现API网关
- Spring Cloud实战 | 第五篇:Spring Cloud整合OpenFeign实现微服务之间的调用
- Spring Cloud实战 | 第六篇:Spring Cloud Gateway+Spring Security OAuth2+JWT实现微服务统一认证授权
- Spring Cloud实战 | 最七篇:Spring Cloud Gateway+Spring Security OAuth2集成统一认证授权平台下实现注销使JWT失效方案
- Spring Cloud实战 | 最八篇:Spring Cloud +Spring Security OAuth2+ Vue前后端分离模式下无感知刷新实现JWT续期
- Spring Cloud实战 | 最九篇:Spring Security OAuth2认证服务器统一认证自定义异常处理
管理前端
- vue-element-admin实战 | 第一篇: 移除mock接入后台,搭建有来商城youlai-mall前后端分离管理平台
- vue-element-admin实战 | 第二篇: 最小改动接入后台实现根据权限动态加载菜单
微信小程序
二. 自定义异常实现代码
直接需要答案的本节走起,添加和修改三个文件即可,异常分析,点击下载完整工程代码
1. 在youlai-auth认证服务器模块添加全局异常处理器AuthExceptionHandler
package com.youlai.auth.exception;

import com.youlai.common.core.result.Result;
import com.youlai.common.core.result.ResultCode;
import lombok.extern.slf4j.Slf4j;
import org.springframework.security.authentication.InternalAuthenticationServiceException;
import org.springframework.security.oauth2.common.exceptions.InvalidGrantException;
import org.springframework.web.bind.annotation.ExceptionHandler;
import org.springframework.web.bind.annotation.RestControllerAdvice;

@RestControllerAdvice
@Slf4j
public class AuthExceptionHandler {

    /**
     * 用户名和密码错误
     *
     * @param e
     * @return
     */
    @ExceptionHandler(InvalidGrantException.class)
    public Result handleInvalidGrantException(InvalidGrantException e) {
        return Result.custom(ResultCode.USERNAME_OR_PASSWORD_ERROR);
    }

    /**
     * 账户异常(禁用、锁定、过期)
     *
     * @param e
     * @return
     */
    @ExceptionHandler({InternalAuthenticationServiceException.class})
    public Result handleInternalAuthenticationServiceException(InternalAuthenticationServiceException e) {
        return Result.error(e.getMessage());
    }
}
- 1
- 2
- 3
- 4
- 5
- 6
- 7
- 8
- 9
- 10
- 11
- 12
- 13
- 14
- 15
- 16
- 17
- 18
- 19
- 20
- 21
- 22
- 23
- 24
- 25
- 26
- 27
- 28
- 29
- 30
- 31
- 32
- 33
- 34
- 35
- 36
- 37
2. 重写ClientCredentialsTokenEndpointFilter实现客户端自定义异常处理
package com.youlai.auth.filter;

import org.springframework.security.authentication.AuthenticationManager;
import org.springframework.security.oauth2.config.annotation.web.configurers.AuthorizationServerSecurityConfigurer;
import org.springframework.security.oauth2.provider.client.ClientCredentialsTokenEndpointFilter;
import org.springframework.security.web.AuthenticationEntryPoint;

/**
 * 重写filter实现客户端自定义异常处理
 */
public class CustomClientCredentialsTokenEndpointFilter extends ClientCredentialsTokenEndpointFilter {

    private AuthorizationServerSecurityConfigurer configurer;
    private AuthenticationEntryPoint authenticationEntryPoint;


    public CustomClientCredentialsTokenEndpointFilter(AuthorizationServerSecurityConfigurer configurer) {
        this.configurer = configurer;
    }

    @Override
    public void setAuthenticationEntryPoint(AuthenticationEntryPoint authenticationEntryPoint) {
        super.setAuthenticationEntryPoint(null);
        this.authenticationEntryPoint = authenticationEntryPoint;
    }

    @Override
    protected AuthenticationManager getAuthenticationManager() {
        return configurer.and().getSharedObject(AuthenticationManager.class);
    }

    @Override
    public void afterPropertiesSet() {
        setAuthenticationFailureHandler((request, response, e) -> authenticationEntryPoint.commence(request, response, e));
        setAuthenticationSuccessHandler((request, response, authentication) -> {
        });
    }
}
- 1
- 2
- 3
- 4
- 5
- 6
- 7
- 8
- 9
- 10
- 11
- 12
- 13
- 14
- 15
- 16
- 17
- 18
- 19
- 20
- 21
- 22
- 23
- 24
- 25
- 26
- 27
- 28
- 29
- 30
- 31
- 32
- 33
- 34
- 35
- 36
- 37
- 38
3. AuthorizationServerConfig认证服务器配置修改
/**
 * 授权服务配置
 */
@Configuration
@EnableAuthorizationServer
@AllArgsConstructor
public class AuthorizationServerConfig extends AuthorizationServerConfigurerAdapter {

    ......

    @Override
    public void configure(AuthorizationServerSecurityConfigurer security) {
        /*security.allowFormAuthenticationForClients();*/
        CustomClientCredentialsTokenEndpointFilter endpointFilter = new CustomClientCredentialsTokenEndpointFilter(security);
        endpointFilter.afterPropertiesSet();
        endpointFilter.setAuthenticationEntryPoint(authenticationEntryPoint());
        security.addTokenEndpointAuthenticationFilter(endpointFilter);

        security.authenticationEntryPoint(authenticationEntryPoint())
                .tokenKeyAccess("isAuthenticated()")
                .checkTokenAccess("permitAll()");
    }

    @Bean
    public AuthenticationEntryPoint authenticationEntryPoint() {
        return (request, response, e) -> {
            response.setStatus(HttpStatus.HTTP_OK);
            response.setHeader(HttpHeaders.CONTENT_TYPE, MediaType.APPLICATION_JSON_UTF8_VALUE);
            response.setHeader("Access-Control-Allow-Origin", "*");
            response.setHeader("Cache-Control", "no-cache");
            Result result = Result.custom(ResultCode.CLIENT_AUTHENTICATION_FAILED);
            response.getWriter().print(JSONUtil.toJsonStr(result));
            response.getWriter().flush();
        };
    }
    ......

}
- 1
- 2
- 3
- 4
- 5
- 6
- 7
- 8
- 9
- 10
- 11
- 12
- 13
- 14
- 15
- 16
- 17
- 18
- 19
- 20
- 21
- 22
- 23
- 24
- 25
- 26
- 27
- 28
- 29
- 30
- 31
- 32
- 33
- 34
- 35
- 36
- 37
- 38
三. 异常处理分析
其实你搜一下有关Spring Security OAuth2如何自定义异常处理,网上会很多差不多解决方案提供参考,但是照搬过来试用,一点效果没有?!咋回事么?其实不能武断的说人家方案不行,最多的可能是Spring Security OAuth2版本不一致,本篇项目使用的是2.3.4版本,目前截止写这篇文章最新一版的是2020.5.28发布的2.5.0版本,后续项目会升级,如果有差异我会修改本篇文章,总之给大家提供一个解决思路,可行不可行我是不希望大家不能在我里浪费时间。
好了正文开始了~ Spring Security OAuth2认证服务器异常目前我知道的有3类:
- 用户名或密码错误
- 账户状态异常
- 客户端认证异常
有知道其他的欢迎留言补充~,以下就这3类异常逐一分析
在异常处理之前先看下UserDetailsServiceImpl#loadUserByUsername方法抛出的异常信息,如下图:

1. 用户名或密码错误
- 异常分析
org.springframework.security.oauth2.common.exceptions.InvalidGrantException: 用户名或密码错误
- 1

通过异常堆栈信息定位到最终抛出异常的方法是ResourceOwnerPasswordTokenGranter#getOAuth2Authentication,异常类型是InvalidGrantException,其实到这个异常类型中间经过几道转换UsernameNotFoundException->BadCredentialsException->InvalidGrantException
- 处理方法
添加全局异常处理器捕获(定位标识:AuthExceptionHandler)
/**
 * 用户名和密码异常
 *
 * @param e
 * @return
 */
@ExceptionHandler(InvalidGrantException.class)
public Result handleInvalidGrantException(InvalidGrantException e) {
    return Result.error(ResultCode.USERNAME_OR_PASSWORD_ERROR);
}
- 1
- 2
- 3
- 4
- 5
- 6
- 7
- 8
- 9
- 10
- 11
- 结果验证
验证成功,已按照自定义异常格式返回

2. 账户状态异常
- 异常分析
首先我们需要把数据库youlai的表sys_user的字段status设置为0,表示不可用状态,然后输入正确的用户名和密码,看看跑出来的原生异常信息,可惜的是这个异常没有打印堆栈信息,不过没关系,我们断点调试下,最终定位到ProviderManager#authenticate方法抛出的异常,异常类型是InternalAuthenticationServiceException。

- 处理方法
添加全局异常处理器捕获(定位标识:AuthExceptionHandler)
/**
 * 账户异常(禁用、锁定、过期)
 *
 * @param e
 * @return
 */
@ExceptionHandler({InternalAuthenticationServiceException.class})
public Result handleInternalAuthenticationServiceException(InternalAuthenticationServiceException e) {
    return Result.error(e.getMessage());
}
- 1
- 2
- 3
- 4
- 5
- 6
- 7
- 8
- 9
- 10
- 结果验证
验证成功,已按照自定义异常格式返回

3. 客户端认证异常
- 异常分析
之前两种异常方式都可以通过全局异常处理器捕获,且@RestControllerAdvice只能捕获Controller的异常。
客户端认证的异常则是发生在过滤器filter上,此时还没进入DispatcherServlet请求处理流程,便无法通过全局异常处理器捕获。
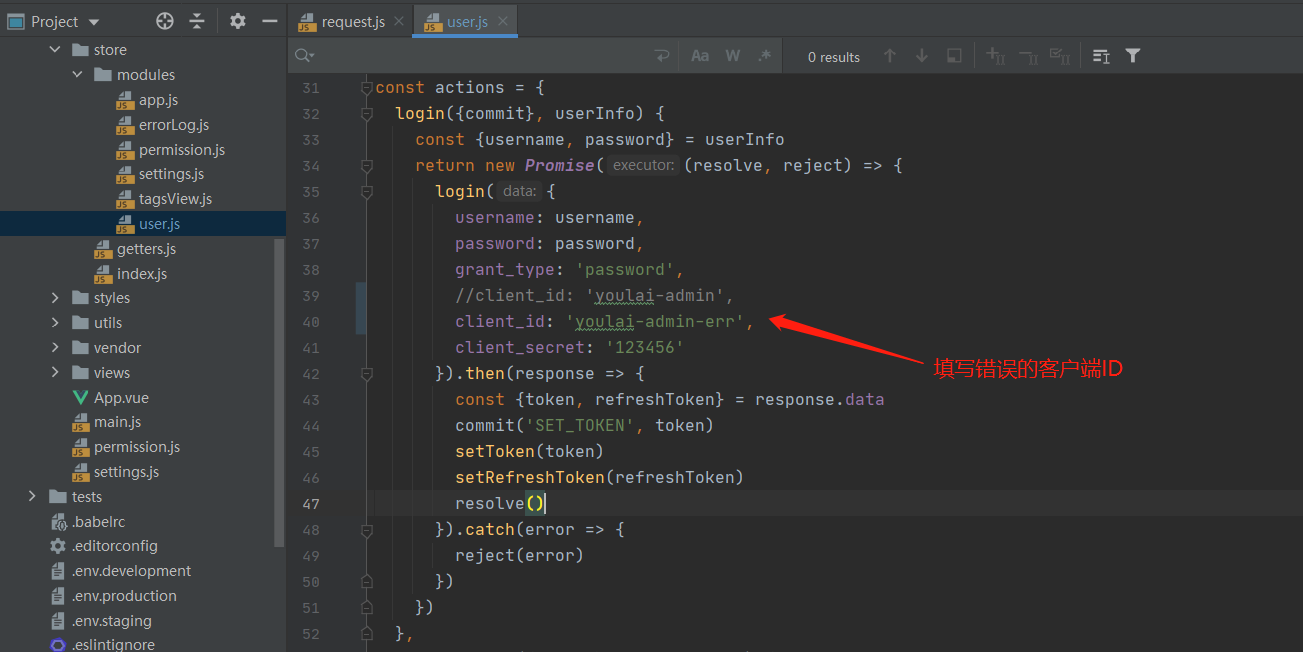
先看下客户端认证异常出现的位置,首先把客户端ID改成错的。

然后执行“登录”操作,返回错误信息如下:
{"error":"invalid_client","error_description":"Bad client credentials"}
- 1
一眼望去,这显然不是我们想要的格式。
那怎么做才能捕获这个异常转换成自定义数据格式返回呢?显然全局异常处理器无法实现,那必须转换下思路了。
首先客户端的认证是交由ClientCredentialsTokenEndpointFilter来完成的,其中有后置添加失败处理方法,最后把异常交给OAuth2AuthenticationEntryPoint这个所谓认证入口处理。

认证入口OAuth2AuthenticationEntryPoint#commence方法中转给父类AbstractOAuth2SecurityExceptionHandler#doHandle方法。

最后异常定格在AbstractOAuth2SecurityExceptionHandler#doHandle方法上,如下图:

其中this.enhanceResponse是调用OAuth2AuthenticationEntryPoint#enhanceResponse方法得到响应结果数据。
- 处理方法
上面我们得知客户端的认证失败异常是过滤器ClientCredentialsTokenEndpointFilter转交给OAuth2AuthenticationEntryPoint得到响应结果的,既然这样我们就可以重写ClientCredentialsTokenEndpointFilter然后使用自定义的AuthenticationEntryPoint替换原生的OAuth2AuthenticationEntryPoint,在自定义AuthenticationEntryPoint处理得到我们想要的异常数据。
自定义AuthenticationEntryPoint设置异常响应数据格式

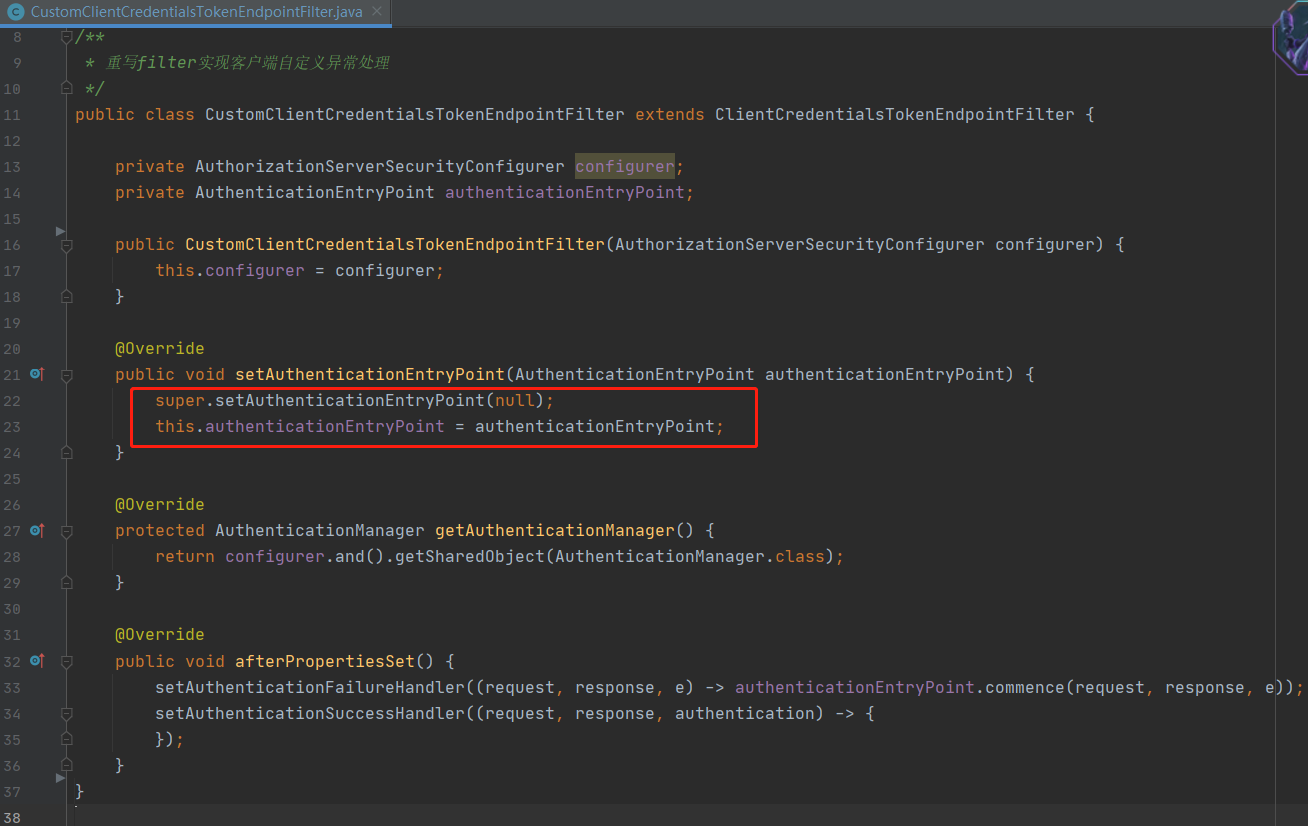
重写ClientCredentialsTokenEndpointFilter替换AuthenticationEntryPoint

认证服务器配置添加自定义过滤器

- 结果验证
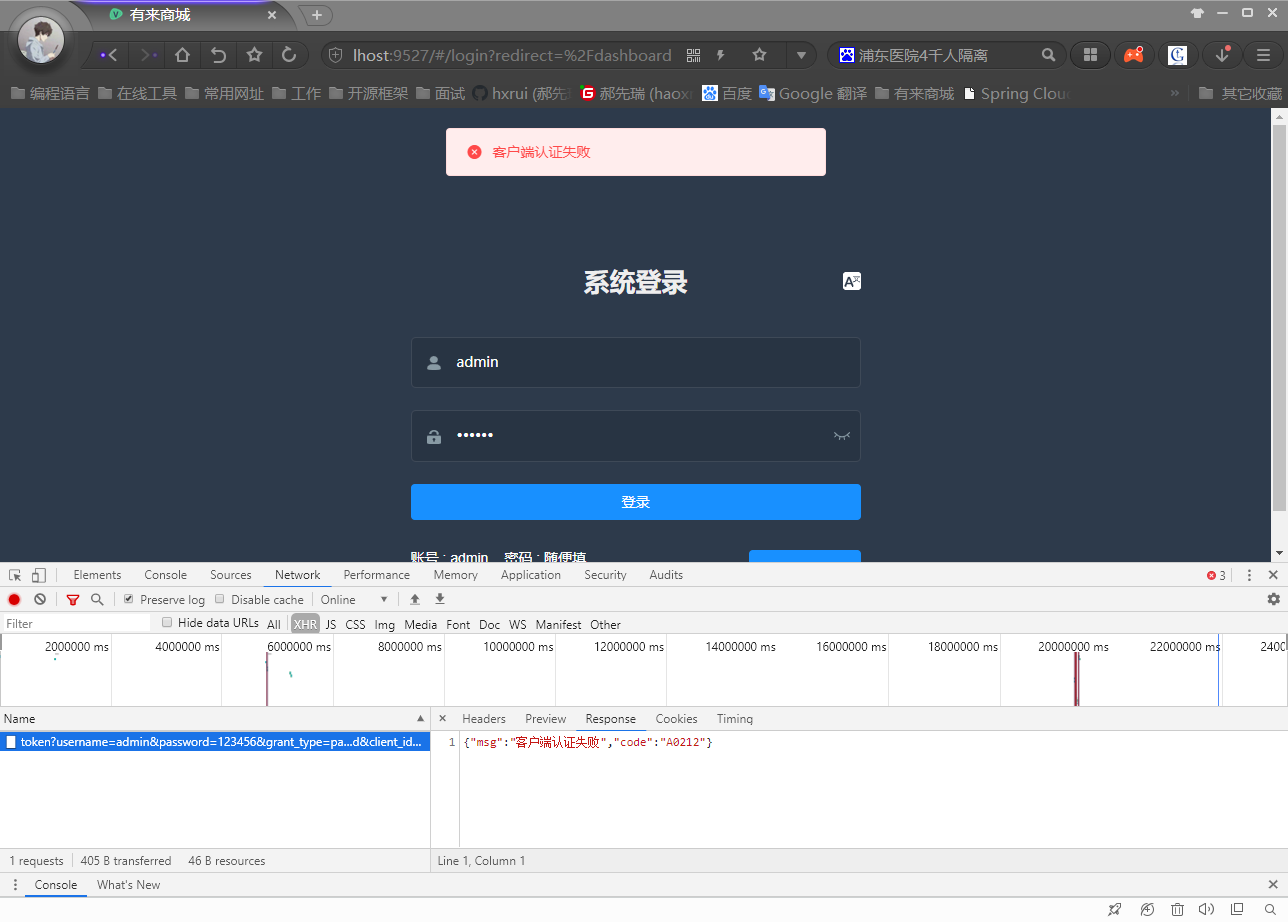
验证成功,已按照自定义异常格式返回

四. 总结
至此,认证服务器的自定义异常处理已全部处理完毕,资源服务器异常处理说明在这篇文章 Spring Cloud实战 | 第六篇:Spring Cloud Gateway+Spring Security OAuth2+JWT实现微服务统一认证授权,这就宣告 youlai-mall 的统一认证授权模块基本达到完善的一个标准, 后面继续回到业务功能的开发,所以觉得对你有帮助的给个关注(持续更新)或者给个star,灰常感谢! 最重要的如果你真的对这个项目有兴趣想一起开发学习的像文章开始说的那样请联系我哈~


