
热门标签
热门文章
- 1Web渗透信息收集进阶
- 2【python爬虫】aiohttp模块的异步协程代码模板_with open(name, mode='w') as f: f.write(await ren.
- 3Mybatis & Oracle 中用insert和foreach进行批量插入_oracle insert froeach value
- 4如何学习大模型?(非常详细)零基础入门到精通,收藏这一篇就够了_学习 大模型技术前提
- 5数据结构基本概念及算法与时间复杂度_数据结构的理解以及算法时间复杂度的认识。
- 6Tomcat8.5.43源码分析-(4)Tomcat启动过程探究 第二部分 Web应用加载_standardservice.connector.startfailed
- 7java中函数式编程apply的用法实例?
- 8Redis踩坑
- 9等保三级认证基本要求_等保三级,主机安全管理数量是多少
- 10细说 Visual Studio 预处理器宏_vs中的预编译宏是做什么的
当前位置: article > 正文
nginx设置用户密码以及限制电脑端访问_nginx限时电脑访问
作者:小丑西瓜9 | 2024-06-17 19:24:30
赞
踩
nginx限时电脑访问
1.官网
https://nginx.org/en/docs/http/ngx_http_auth_basic_module.html
- 1
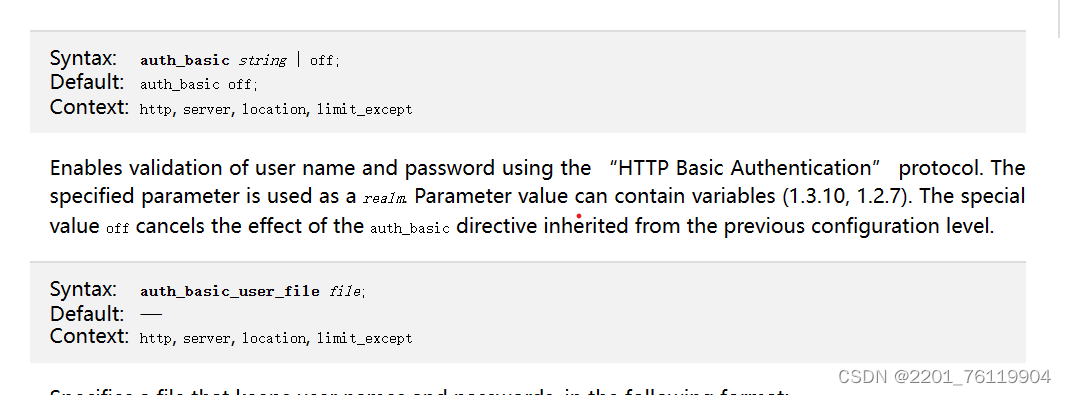
2.语法
3.创建密码
[root@localhost ~]# yum install httpd-tools -y
- 1
4.创建密码文件
完毕!
[root@localhost ~]# htpasswd -b -c /etc/nginx/auth-passwd xp xp666

-c 创建passwdfile ,如果passwdfile文件已经存在,那么他就会重新写入,并删除原有的内容
-b 命令行中一并输入用户和密码,而不是根据提示去输入用户密码 可以看见是明文,并不需要去交互
- 1
- 2
- 3
- 4
- 5
5.往配置文件中写入两行
server {
  listen 80;
  server_name 192.168.134.139;
  location / {
 auth_basic "please input your account password";
        auth_basic_user_file /etc/nginx/auth_passwd;
  root /www/xp;
  index index.html;
}
}

auto_bassic 是给用户看的提示
auto_basic_user_file 你的密码文件
- 1
- 2
- 3
- 4
- 5
- 6
- 7
- 8
- 9
- 10
- 11
- 12
- 13
6.重启nginx
[root@localhost ~]# systemctl restart nginx
- 1
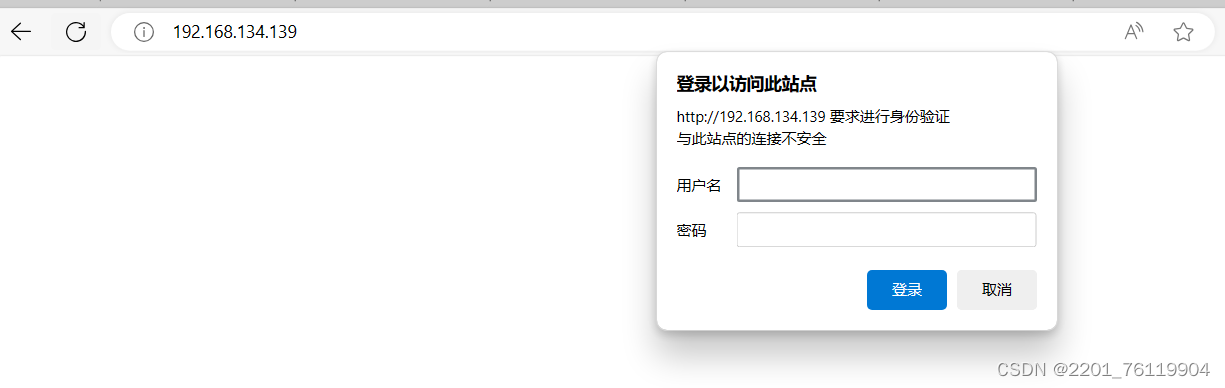
7.再次访问
8.删除用户和密码
$ htpasswd -D /usr/local/nginx/password username
# -D 删除指定的用户
- 1
- 2
9.修改用户和密码
$ htpasswd -D /usr/local/nginx/password username
$ htpasswd -b /usr/local/nginx/password username pass
# -D 删除指定的用户
# -b htpassswd命令行中一并输入用户名和密码而不是根据提示输入密码
# -p htpassswd命令不对密码进行进行加密,即明文密码
- 1
- 2
- 3
- 4
- 5
nginx限制win端访问
server {
    listen 80;
    server_name example.com;

    location / {
        if ($http_user_agent ~* (PC|Windows|Macintosh)) {
            return 403;
        }

        # 蜘蛛的用户dai理字符串,可以根据需要进行修改
        set $spider_user_agent "Googlebot";

        if ($http_user_agent ~* $spider_user_agent) {
            # 对蜘蛛开放的代码
            # 可以根据需要添加相应的重定向或dai理设置
        }
        else {
            # 普通用户的代码
            # 可以根据需要添加相应的重定向或dai理设置
        }
    }
}

- 1
- 2
- 3
- 4
- 5
- 6
- 7
- 8
- 9
- 10
- 11
- 12
- 13
- 14
- 15
- 16
- 17
- 18
- 19
- 20
- 21
- 22
声明:本文内容由网友自发贡献,不代表【wpsshop博客】立场,版权归原作者所有,本站不承担相应法律责任。如您发现有侵权的内容,请联系我们。转载请注明出处:https://www.wpsshop.cn/w/小丑西瓜9/article/detail/732481
推荐阅读
相关标签

