- 1使用TwoSampleMR进行两样本的孟德尔随机化研究
- 2Unity--PropertyAttribute和PropertyDrawer结合使用将string转为资源引用_unity inspector中路径显示为资源引用
- 32024 安装pytorch_安装pytorch1.0
- 4【uniapp小程序】—— APP项目云打包(安卓)_uniapp打包安卓
- 5【区块链之技术进阶】扒一扒某乎上面对于区块链的理解(二)
- 6全球各国大数据市场的发展现状
- 7STM32手写寄存器的方式实现点亮LED灯
- 8无人机三维实景模型的应用和发展_基于无人机航测的三维实景建模心得体会
- 9Spring MVC 快速入门之 入门基础_requestmapping作用于
- 10nodejs消息推送之ws_node推送ws
前后端分离项目 Vue3+SpringBoot 后台管理系统_vue3 springboot 管理系统模板
赞
踩

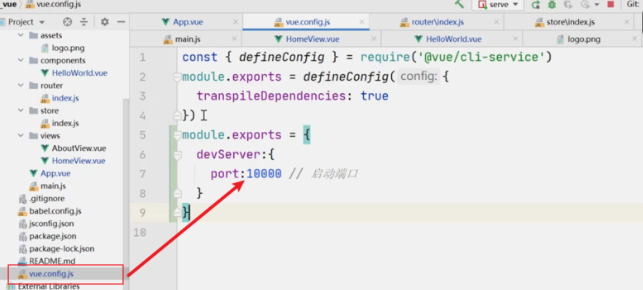
更改端口号
Element-Plus 组件库-Vue3
安装组件
npm install element-plus --save搭建界面

引入全局组件
引入 Element-UI 组件库

- import App from './App.vue'
- import router from './router'
- import {createApp} from 'vue'
- import store from './store'
- import '@/assets/css/global.css'
- //ElementUI-Plus完整导入
- import ElementPlus from 'element-plus'
- import 'element-plus/dist/index.css'
- createApp(App).use(store).use(router).use(ElementPlus).mount('#app')
搭建后台管理-基本布局
注意:在 Idea 中,设置 CSS 样式,使用双斜杠//注解会报错
请使用/**/注释
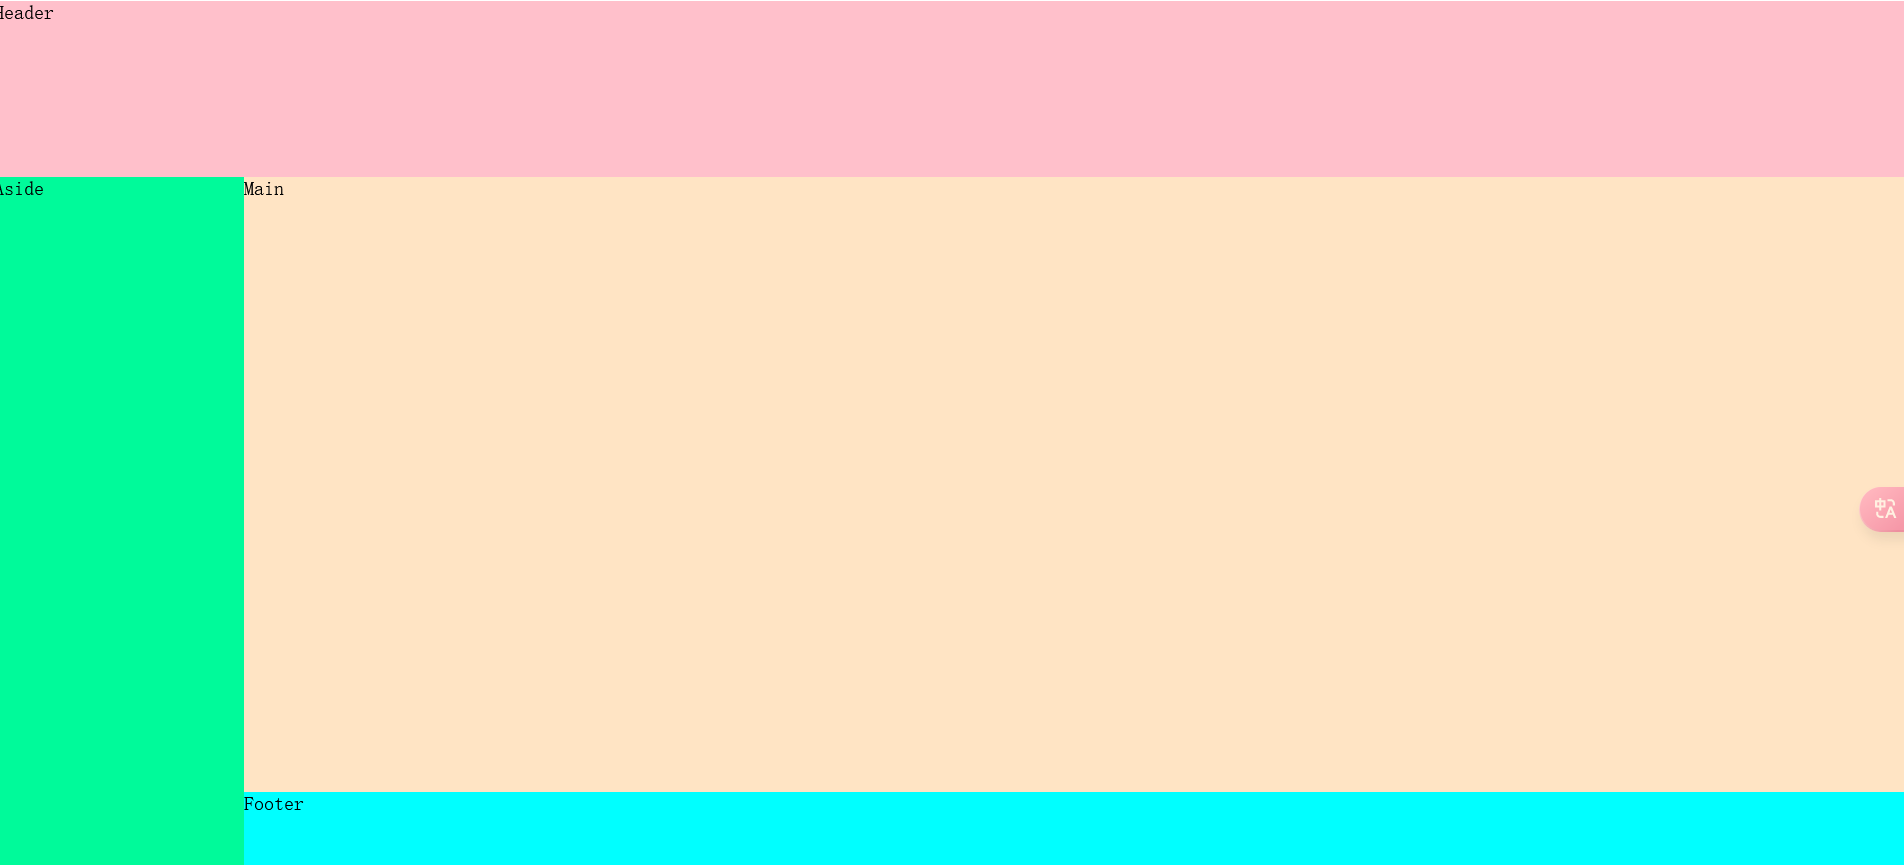
- <template>
- <div class="common-layout">
-
- <el-container>
- <!--头部区域Header-->
- <el-header>Header</el-header>
- <el-container>
- <!--左边:侧边栏区域Aside-->
- <el-aside width="200px">Aside</el-aside>
- <el-container>
- <!--右边:主体区域:主体Main+底部Footer-->
- <el-main>Main</el-main>
- <el-footer>Footer</el-footer>
- </el-container>
- </el-container>
- </el-container>
- </div>
- </template>
-
- <script lang="ts" setup>
- import {defineComponent} from 'vue';
- import HelloWorld from '@/components/HelloWorld.vue'; // @ is an alias to /src
- </script>
- <style lang="css" scoped>
- /*重置布局的内外边距*/
- .el-header,
- .el-aside,
- .el-main,
- .el-footer {
- margin: 0;
- padding: 0;
- box-sizing: border-box;
- }
-
- /*固定整个页面,防止上下滚动*/
- .common-layout {
- width: 100%;
- height: 100%;
- position: fixed;
- }
-
- /*头部样式Header:高度占页面的20%*/
- .el-header {
- width: 100%;
- height: 20vh;
- background-color: pink;
- }
-
- /*侧边栏左侧:Aside:宽度200px,高度占页面的80%*/
- .el-aside {
- width: 200px;
- height: 80vh;
- background-color: mediumspringgreen;
- }
-
- /*主体右侧:main*/
- .el-main {
- /*宽度占满,默认不需要给*/
- /*高度Height =Header头部-底部Footer*/
- height: 70vh;
- background-color: bisque;
- }
-
- /*底部Footer*/
- .el-footer {
- height: 10vh;
- background-color: aqua;
- }
- </style>

后端 Java(添加家居博客)
使用 Maven 创建项目+JDK8
SpringBoot整合Mybatis-plus及用法_springboot mybatis plus-CSDN博客
SpringBoot整合Mybatis-plus及用法_springboot mybatis plus-CSDN博客
引入依赖
- <!--导入springboot父工程-规定写法-->
- <parent>
- <artifactId>spring-boot-starter-parent</artifactId>
- <groupId>org.springframework.boot</groupId>
- <version>2.5.3</version>
- </parent>
- <dependencies>
- <!--引入web starter-->
- <dependency>
- <groupId>org.springframework.boot</groupId>
- <artifactId>spring-boot-starter-web</artifactId>
- </dependency>
-
- <!--引入mysql驱动: 这里老师使用版本仲裁 8.0.26-->
- <dependency>
- <groupId>mysql</groupId>
- <artifactId>mysql-connector-java</artifactId>
- </dependency>
-
-
- <!--引入配置处理器 -->
- <dependency>
- <groupId>org.springframework.boot</groupId>
- <artifactId>spring-boot-configuration-processor</artifactId>
- </dependency>
-
- <!--引入lombok-->
- <dependency>
- <groupId>org.projectlombok</groupId>
- <artifactId>lombok</artifactId>
- </dependency>
-
- <!--引入test starter-->
- <dependency>
- <groupId>org.springframework.boot</groupId>
- <artifactId>spring-boot-starter-test</artifactId>
- </dependency>
-
- <!--引入druid依赖-->
- <dependency>
- <groupId>com.alibaba</groupId>
- <artifactId>druid</artifactId>
- <version>1.1.17</version>
- </dependency>
-
- <!--引入mybatis-plus starter-->
- <!-- https://mvnrepository.com/artifact/com.baomidou/mybatis-plus-boot-starter -->
- <dependency>
- <groupId>com.baomidou</groupId>
- <artifactId>mybatis-plus-boot-starter</artifactId>
- <version>3.4.3</version>
- </dependency>
-
-
- <!--引入hibernate-validator - 支持了JSR303的数据校验
- 老师提醒: 如果小伙伴没有提示6.1.0.Final
- 请手动填写
- -->
- <dependency>
- <groupId>org.hibernate</groupId>
- <artifactId>hibernate-validator</artifactId>
- <version>6.1.0.Final</version>
- </dependency>
- </dependencies>

新建 application.yml
- server:
- port: 10100 # 配置启动端口号
-
-
-
- spring: #springboot的配置
- datasource: #定义数据源
- #127.0.0.1为本机测试的ip,3306是mysql的端口号。serverTimezone是定义时区,照抄就好,mysql高版本需要定义这些东西
- #useSSL也是某些高版本mysql需要问有没有用SSL连接
- url: jdbc:mysql://127.0.0.1:3306/furns_ssm?serverTimezone=GMT%2B8&useSSL=FALSE
- username: root #数据库用户名,root为管理员
- password: abc123 #该数据库用户的密码
- # 使用druid数据源
- type: com.alibaba.druid.pool.DruidDataSource
-
- # mybatis-plus相关配置
- mybatis-plus:
- # xml扫描,多个目录用逗号或者分号分隔(告诉 Mapper 所对应的 XML 文件位置)
- mapper-locations: classpath:mapper/*.xml
- # 以下配置均有默认值,可以不设置
- global-config:
- db-config:
- #主键类型 AUTO:"数据库ID自增" INPUT:"用户输入ID",ID_WORKER:"全局唯一ID (数字类型唯一ID)", UUID:"全局唯一ID UUID";
- id-type: auto
- #字段策略 IGNORED:"忽略判断" NOT_NULL:"非 NULL 判断") NOT_EMPTY:"非空判断"
- field-strategy: NOT_EMPTY
- #数据库类型
- db-type: MYSQL
- configuration:
- # 是否开启自动驼峰命名规则映射:从数据库列名到Java属性驼峰命名的类似映射
- map-underscore-to-camel-case: true
- # 如果查询结果中包含空值的列,则 MyBatis 在映射的时候,不会映射这个字段
- call-setters-on-nulls: true
- # 这个配置会将执行的sql打印出来,在开发或测试的时候可以用
- log-impl: org.apache.ibatis.logging.stdout.StdOutImpl

新建 JavaBean 对象
- package com.wwf.entity;
-
- import com.baomidou.mybatisplus.annotation.TableField;
- import com.baomidou.mybatisplus.annotation.TableName;
- import lombok.AllArgsConstructor;
- import lombok.Data;
- import lombok.NoArgsConstructor;
-
- import java.math.BigDecimal;
-
- /**
- * @author 卒迹
- * @version 1.0
- */
- @Data
- @NoArgsConstructor
- @AllArgsConstructor
- @TableName("furn")
- public class Furn {
- private Integer id;
- private String name;
- private String maker;
- private BigDecimal price;
- private Integer sales;
- private Integer stock;
- @TableField(value = "img_path")
- private String imgPath;
- }

新建启动类 MainApplication
并启动测试-查看 MyBatis-Plus 是否成功加载

- package com.wwf;
-
- import javafx.beans.property.SetPropertyBase;
- import org.mybatis.spring.annotation.MapperScan;
- import org.springframework.boot.SpringApplication;
- import org.springframework.boot.autoconfigure.SpringBootApplication;
-
- /**
- * @author 卒迹
- * @version 1.0
- */
- //指定包扫描路径(Service/Controller...)
- @SpringBootApplication(scanBasePackages = {"com.wwf"})
- //指定Mapping包扫描路径
- @MapperScan(basePackages = {"com.wwf.dao"})
- public class MainApplication {
- public static void main(String[] args) {
- //启动SpringBoot
- SpringApplication.run(MainApplication.class, args);
- }
- }

新建 DAO/Mapper 接口(持久层)
- package com.wwf.dao;
-
- import com.baomidou.mybatisplus.core.mapper.BaseMapper;
- import com.wwf.entity.Furn;
- import org.apache.ibatis.annotations.Mapper;
-
- /**
- * @author 卒迹
- * @version 1.0
- */
- @Mapper
- public interface FurnMapper extends BaseMapper<Furn> {
- // 新建测试类进行测试-内部封装了简单的CRUD
- }
新建测试类-MapperTest
Src 文件夹下-新建 test 文件夹以及 resource 文件夹
注意:test 文件夹下的包路径要与 java 的源代码路径要一致

- package com.wwf.dao;
-
- import com.wwf.dao.FurnMapper;
- import com.wwf.entity.Furn;
- import org.junit.jupiter.api.Test;
- import org.springframework.boot.test.context.SpringBootTest;
-
- import javax.annotation.Resource;
-
- /**
- * @author 卒迹
- * @version 1.0
- */
- @SpringBootTest
- public class MapperTest {
- // 测试实现了Mapper接口的代理对象的方法CURD
- @Resource
- private FurnMapper furnMapper;
-
- @Test
- public void queryByFurnID() {
- System.out.println("furnMapper=" + furnMapper.getClass());
- Furn furn = furnMapper.selectById(1);
- System.out.println(furn);
- }
- }

测试-成功如图

新建 Service 接口(业务层)
- package com.wwf.service;
-
- import com.baomidou.mybatisplus.extension.service.IService;
- import com.wwf.entity.Furn;
-
- /**
- * @author 卒迹
- * @version 1.0
- */
-
- public interface FurnService extends IService<Furn> {
- }
新建实现类 ServiceImpl
- package com.wwf.service.impl;
-
- import com.baomidou.mybatisplus.extension.service.impl.ServiceImpl;
- import com.wwf.dao.FurnMapper;
- import com.wwf.entity.Furn;
- import com.wwf.service.FurnService;
- import org.springframework.stereotype.Service;
-
- /**
- * @author 卒迹
- * @version 1.0
- */
- @Service
- public class FurnServiceImpl extends ServiceImpl<FurnMapper, Furn>
- implements FurnService {
- }

测试实现类
- package com.wwf.service;
-
- import com.wwf.entity.Furn;
- import org.junit.jupiter.api.Test;
- import org.springframework.boot.test.context.SpringBootTest;
- import org.springframework.stereotype.Service;
-
- import javax.annotation.Resource;
-
- /**
- * @author 卒迹
- * @version 1.0
- */
- @SpringBootTest
- public class FurnServiceImplTest {
- @Resource
- private FurnService furnService;
-
- @Test
- public void queryFurnByID() {
- //通过id,查询返回对象
- Furn furn = furnService.getById(1);
- System.out.println(furn);
- }
- }

测试-成功如图

Controller(控制层)
后端(查找家居)
1.查询所有的数据
2.根据条件进行查询
家居名 或 厂家 或 供应商
实现思路:如果搜索框为空,则查询所有
否则根据条件进行查询
3.增删改完成后,重新查询家居消息,完成实时刷新
- /**
- * @author 卒迹
- * @version 1.0
- */
- // 注解:@RestController=@ResponseBody+ @Controller
- @RestController
- public class FurnController {
- // 调用业务层Service的方法
- @Resource
- private FurnService furnService;
-
-
- // 这里让ResultResponse继承BizException
- // 就可以返回它的父类
- @GetMapping("/getAllFurn")
- public BizException getAllFurn() {
- // 查询所有家居
- List<Furn> list = furnService.list();
- // 判断当前集合是否为空
- if (!list.isEmpty()) {
- // 返回请求成功的提示信息,并将该所有家居信息返回
- return ResultResponse.success(list);
- } else {
- //抛出异常,并自定义JSON数据
- // errorCode:-1 errorMessage:家居列表为空
- return new BizException("-1", "家居列表为空");
- }
- }
-
- }

前端查找家居
- //保存表格的数据: 每一行是一个对象
- let tableData = reactive(<any>[]);
- //查询所有家居-Axios
- function getAllFurn() {
- // api/addFurn
- request.get("/api/getAllFurn").then((res: any) => {
-
- //console.log("res=", res.data.result)
- // 这里根据后端返回的状态码进行判断,并且是数组
- if (res.data.code == 2000 && Array.isArray(res.data.result)) {
- //先清空列表中的数据,防止重复查询
- tableData.length = 0;
- //得到该家居数组
- const furnList = res.data.result;
- //遍历该数组-得到的家居数组
- for (const item of furnList) {
- tableData.push(item)
- }
- //提示Message
- ElMessage({
- message: '查询成功.',
- type: 'success',
- })
-
- } else if (res.data.errorCode == -1) {
- ElMessage({
- message: res.data.errorMsg,//根据后端-返回的错误提示信息进行显示
- type: 'error',
- })
- }
- })
- }
- //发送Axios请求-查询家居信息
- onMounted(()=>{
- getAllFurn();
- })

添加家居(后端)
如果在添加过程中,发生了异常,如提交的数据格式不对,
则直接走全局异常处理器
后台直接将该异常进行了捕获

而且不会添加数据成功,并向客户端返回 1 条自定义异常 JSON 数据

- package com.wwf.controller;
-
- import com.alibaba.fastjson.JSON;
- import com.wwf.entity.Furn;
- import com.wwf.exception.BizException;
- import com.wwf.exception.ResultResponse;
- import com.wwf.service.FurnService;
- import org.junit.jupiter.api.Test;
- import org.springframework.stereotype.Controller;
- import org.springframework.web.bind.annotation.*;
-
- import javax.annotation.Resource;
- import javax.websocket.server.PathParam;
- import java.awt.print.Book;
- import java.math.BigDecimal;
-
- /**
- * @author 卒迹
- * @version 1.0
- */
- // 注解:@RestController=@ResponseBody+ @Controller
- @RestController
- public class FurnController {
- // 调用业务层Service的方法
- @Resource
- private FurnService furnService;
-
- @PostMapping("/addFurn")
- public ResultResponse addFurn(@RequestBody Furn furn) {
- if (furn.getImgPath() == null) {
- // 设置保存的默认图片
- furn.setImgPath("assets/images/product-image/1.jpg");
- }
- boolean isSave = furnService.save(furn);
- if (isSave) {// 添加成功
- // 这里返回自定义请求响应数据-给到浏览器JSON格式
- // throw new BizException("200", "添加成功!");
- return ResultResponse.success();
-
- } else {// 添加失败
- // throw new BizException("-1", "添加失败!");
- return ResultResponse.error("-1","添加失败");
- }
-
- }
-
- // 对象→JSON
- @Test
- public void objcetParseJson() {
- // JavaBean → Json
- Furn furn = new Furn(null, "小白", "小浣熊", new BigDecimal(150.00), 99, 99, "assets/images/product-image/1.jpg");
-
- String furnJSON = JSON.toJSONString(furn);
- System.out.println(furnJSON);
- }
-
- }

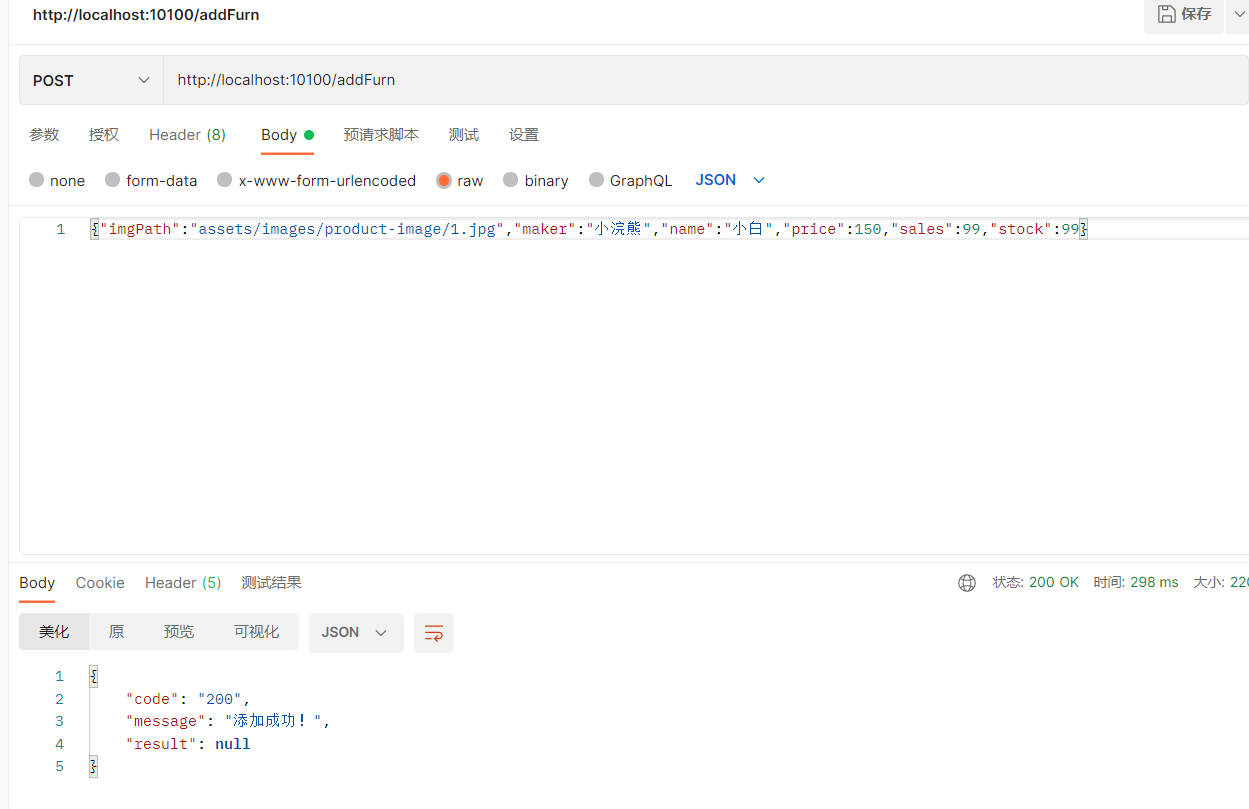
使用 PostMan 进行测试
提交 JSON 格式的数据
添加 数据到数据库 成功后-返回自定义 JSON 格式的数据
查看数据库
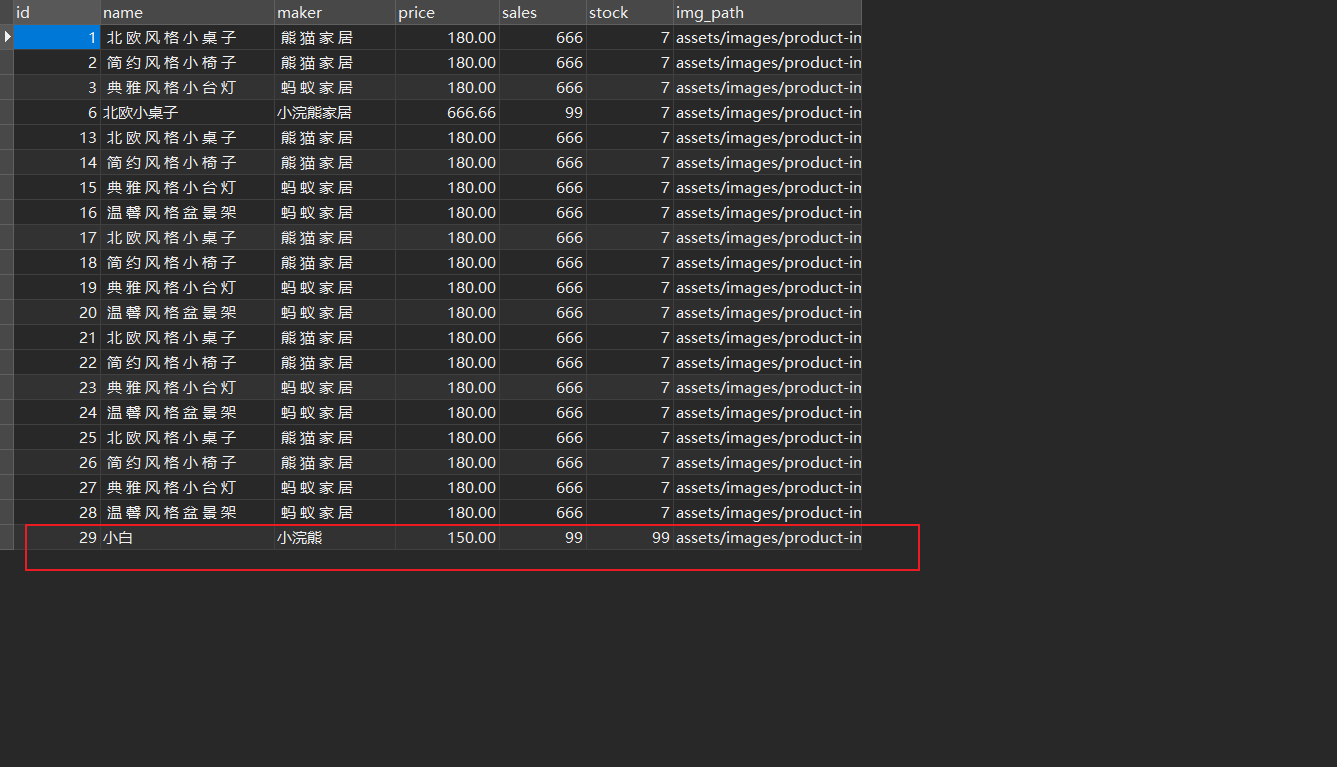
前端(添加家居)
指定发送 JSON 格式的数据给到前端
提交表单 form
前端-弹出框 Dialog+表单 Form
- <template>
- <el-button type="primary" plain @click="dialogFormVisible = true">
- 新增家居
- </el-button>
-
-
- <el-dialog v-model="dialogFormVisible" title="添加家居" width="500">
- <el-form :model="form">
- <el-form-item label="家居名" :label-width="formLabelWidth">
- <el-input v-model="form.name" autocomplete="off"/>
- </el-form-item>
- <el-form-item label="厂商" :label-width="formLabelWidth">
- <el-input v-model="form.name" autocomplete="off"/>
- </el-form-item>
- <el-form-item label="价格" :label-width="formLabelWidth">
- <el-input v-model="form.name" autocomplete="off"/>
- </el-form-item>
- <el-form-item label="销量" :label-width="formLabelWidth">
- <el-input v-model="form.name" autocomplete="off"/>
- </el-form-item>
- <el-form-item label="库存" :label-width="formLabelWidth">
- <el-input v-model="form.name" autocomplete="off"/>
- </el-form-item>
- </el-form>
- <template #footer>
- <div class="dialog-footer">
-
- <el-button type="primary" @click="dialogFormVisible = false">
- 提交
- </el-button>
- <el-button @click="dialogFormVisible = false">取消</el-button>
- </div>
- </template>
- </el-dialog>
- </template>
-
- <script lang="ts" setup>
- import {reactive, ref} from 'vue'
-
- //控制表单:显示true/隐藏false
- const dialogFormVisible = ref(false)
- const formLabelWidth = '140px'
-
- const form = reactive({
- name: '',
- region: '',
- date1: '',
- date2: '',
- delivery: false,
- type: [],
- resource: '',
- desc: '',
- })
-
-
- </script>

新增 reuqest.js-路径 Src/utils/request.ts
- import axios from 'axios' // 通过 axios 创建对象
- const request = axios.create({
- timeout: 5000
- })
- // request 拦截器
- // 1. 可以对请求做一些处理
- // 2. 比如统一加 token,Content-Type 等
- request.interceptors.request.use(config => {
- //提交的是JSON格式的数据
- config.headers['Content-Type'] = 'application/json;charset=utf-8';
- return config
- }, error => {
- return Promise.reject(error)
- });
- //导出
- export default request

解决跨域问题

- const {defineConfig} = require('@vue/cli-service')
- module.exports = defineConfig({
- transpileDependencies: true,
- devServer: {
- port: 8080, //设置vue项目本地默认端口, 选填
- proxy: { //设置代理,必须填
- '/api': { //设置拦截器 拦截器格式 斜杠+拦截器名字,名字可以自己定
- target: 'http://域名:端口/Java项目名称', // 代 理 的 目 标 地 址 , 就 是 /api 代 替http: //localhost:10000/
- changeOrigin: true, //是否设置同源,输入是的
- pathRewrite: { //路径重写
- '/api': '' //选择忽略拦截器里面的单词
- }
- }
- }
- }
- })
-


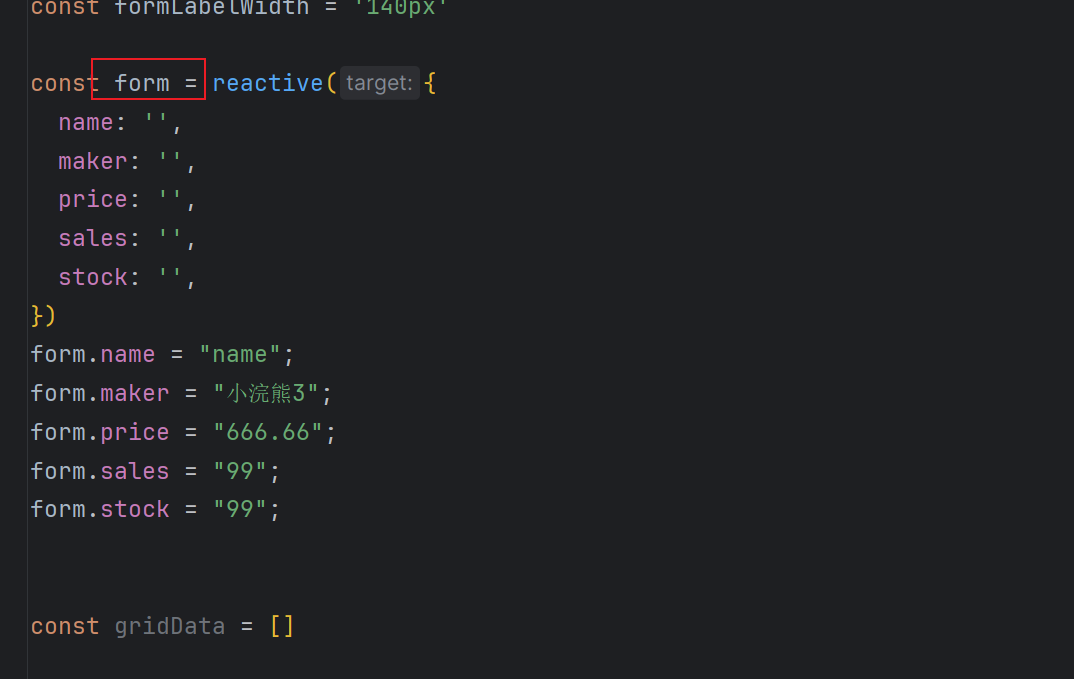
当点击按钮新增用户后,触发 add 方法,进行 Axios 请求
- //导入request.js
- import request from "@/utils/request";
-
- //发送Axios请求-绑定点击事件
- function add() {
- request.post("/api/save", form).then(res => {
- console.log(res)
- //发送Axios请求
- dialogFormVisible.value = false;//提交后,隐藏弹窗
- })
-
- }
- /*新增家居-Axios请求*/
- //导入request.js
- import request from "@/assets/uitls/request";
- import {ElMessage} from "element-plus";
-
- //发送Axios请求-绑定点击事件
- function add() {
- // api/addFurn
- request.post("/api/addFurn", form).then((res: any) => {
- console.log("res=", res.data.code)
- // 判断当前状态码是否等2000,这里根据后端返回的状态码进行判断
- if (res.data.code == 2000) {
- //提示Message
- ElMessage({
- message: '添加成功.',
- type: 'success',
- })
- //添加成功后,重新查询
- getAllFurn();
- //服务器内部发送了错误
- } else if (res.data.code == 5000) {
- ElMessage({
- message: '添加失败.',
- type: 'error',
- })
- }
- //发送Axios请求
- dialogFormVisible.value = false;//提交后,隐藏表单弹窗
- })
- }

后端(修改家居-根据 id)
- // 修改家居
- @PutMapping("/updateFurn")
- public BizException updateFurn(@RequestBody Furn furn) {
- // System.out.println(furn);
- boolean affect = furnService.updateById(furn);
- if (affect) {// 修改成功
- return ResultResponse.success();
- } else {
- return new BizException("-1", "修改失败");
- }
- }
前端(修改家居)
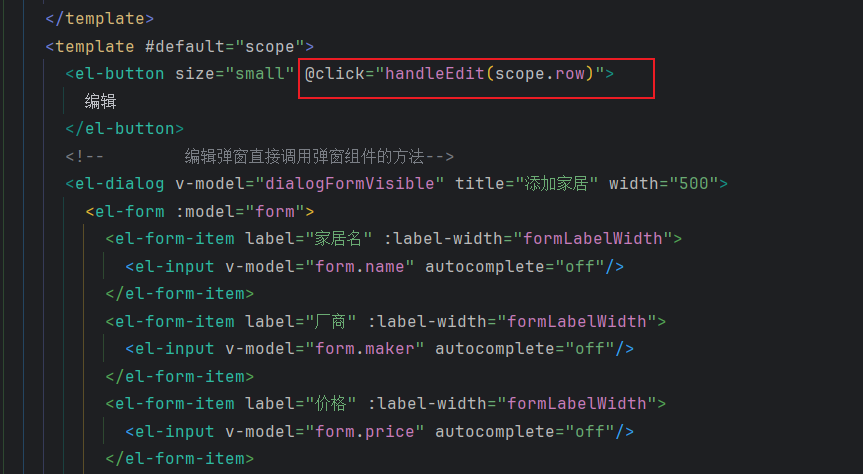
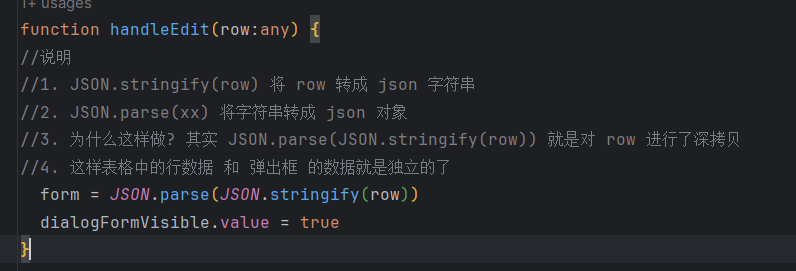
点击编辑按钮,得到当前行的信息
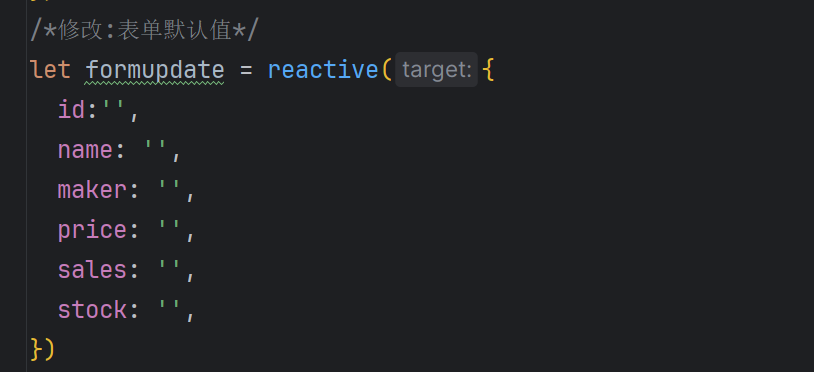
- /*点击修改:确定后,触发该方法*/
- function update() {
- //如果该id,存在则发起修改的请求
- if(formupdate.id){
- // api/addFurn
- request.put("/api/updateFurn", formupdate).then((res: any) => {
- //修改成功后,查询查询家居-刷新页面
- if(res.data.code==2000){
- ElMessage({
- message: '修改成功.',
- type: 'success',
- })
- //刷新页面-重新查询家居信息
- getAllFurn();
- }
- if(res.data.errorCode==-1){
- ElMessage({
- message: res.data.errorMessage,
- type: 'error',
- })
- }
-
- dialogFormVisible2.value = false;//提交后,隐藏弹窗
- })
- }
-
- }

后端删除家居(根据 id)
@PathVariable与@PathParam区别 - 掘金
- // 删除家居
- @DeleteMapping("/deleteFurn/{id}")
- public BizException deleteFurn(@PathVariable("id") Integer id) {
- //先测试id
- // System.out.println("id="+id);
- boolean isDelete = furnService.removeById(id);
- if (isDelete) {
- return ResultResponse.success();
- } else {
- throw new BizException("-1", "删除失败");
- }
- }
前端删除家居(根据 id)
当用户点击,删除按钮后,提示用户是否需要删除
1.当点击删除按钮后触发 open 函数,
将当前所在行 row 的家居信息当作实参传递

2.当点击按钮后,控制台打印该 row 的值

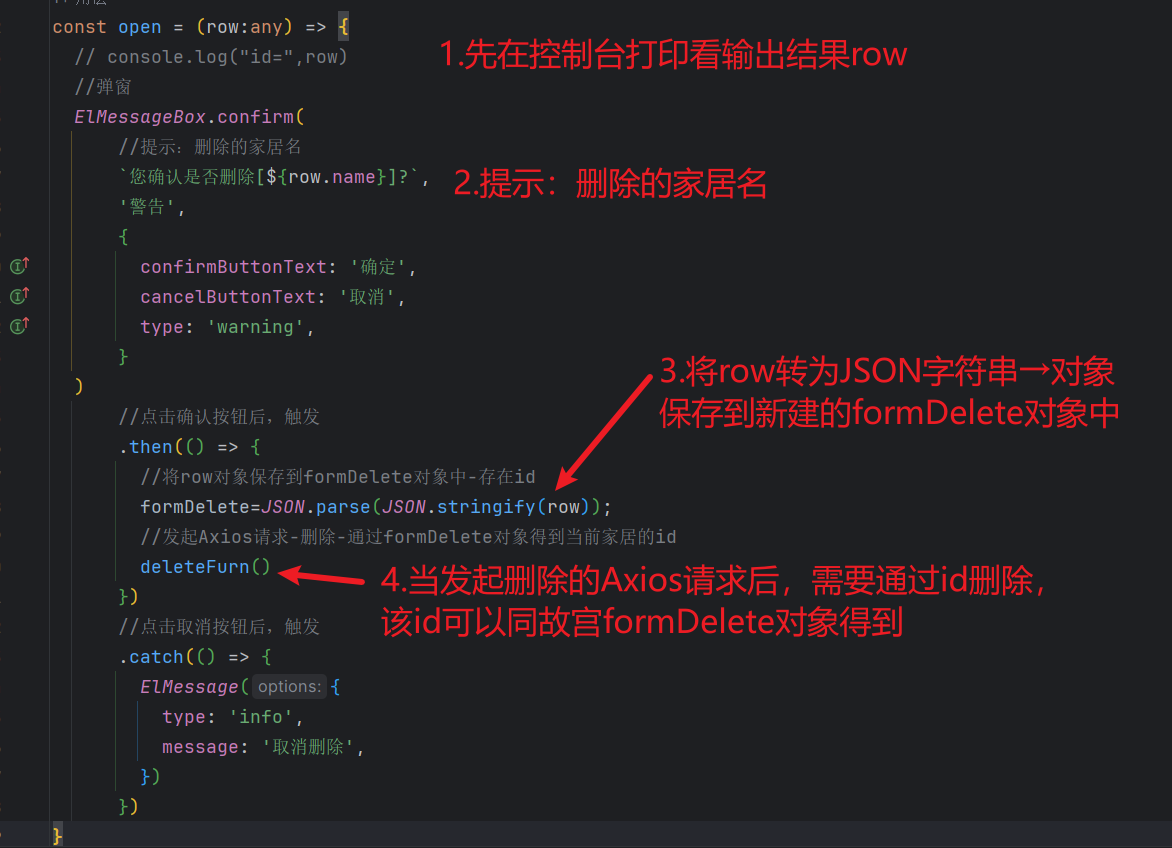
formDelete 对象

deleteFurn 方法-
注意删除成功,调用查询家居,重新刷新页面
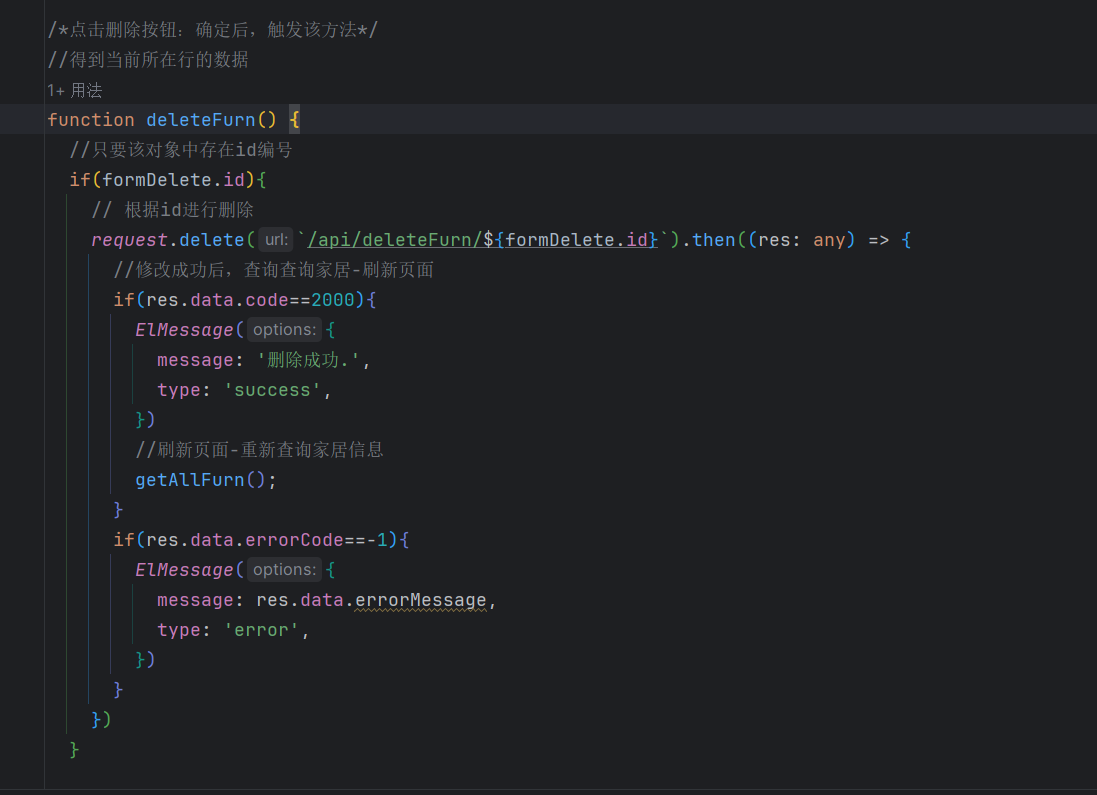
消息弹框组件
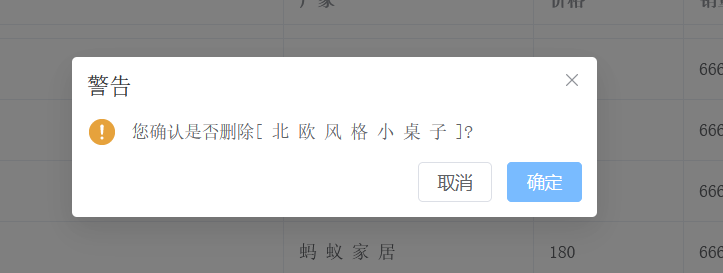
MessageBox 消息弹框 | Element Plus
- <el-button plain type="danger" @click="open"
- >删除
- </el-button
- >
- /*删除按钮*/
- import { ElMessageBox } from 'element-plus'
-
- const open = () => {
- //弹窗
- ElMessageBox.confirm(
- '您确认是否删除?',
- '警告',
- {
- confirmButtonText: '确定',
- cancelButtonText: '取消',
- type: 'warning',
- }
- )
- //点击确认按钮后,触发
- .then(() => {
-
- })
- //点击取消按钮后,触发
- .catch(() => {
- ElMessage({
- type: 'info',
- message: '取消删除',
- })
- })
- }

前端-搜索指定家居
1.点击按钮,得到搜索框的内容
搜索不允许有空格
如果输入了内容,或者输入的内容为不为空.等等.....
才进行查询

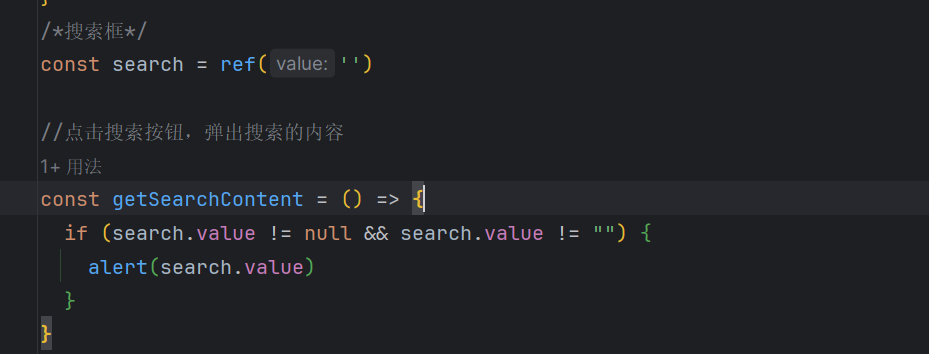
2.将该内容发送给后台
- //点击搜索按钮,弹出搜索的内容
- const getSearchContent = () => {
- //搜索的内容不为空
- if (search.value != null && search.value != "") {
- //发起Axios请求-查询指定家居
- queryAppointFurn();
- }
- }
- //Axios查询家居方法
- const queryAppointFurn=()=>{
- // 根据id进行删除
- request.get(`/api/queryAppointFurn/${search.value}`).then((res: any) => {
- //修改成功后,查询查询家居-刷新页面
- if (res.data.code == 2000) {
- ElMessage({
- message: '查询成功.',
- type: 'success',
- })
- //将tableData数组清空-将查询的内容重新覆盖
- tableData.length=0;
- //得到查询的家居信息[数组]
- const furnList = res.data.result;
- //遍历该家居对象,将当前家居信息逐个添加到tableData数组中
- for (const furn of furnList) {
- tableData.push(furn)
- }
- }
- if (res.data.code == -1) {
- //将tableData数组清空-将查询的内容重新覆盖
- tableData.length=0;
- console.log("res",res)
- ElMessage({
- message: res.data.localizedMessage,
- type: 'error',
- })
- }
- })
- }

后端-搜索指定家居
根据家居名查询,如果没有找到在通过厂商字段maker字段进行查询
1.测试访问地址,查看是否能够得到前端发送的数据
2.根据该数据,进行查询,打印查询的结果
根据家居名或者厂商进行查询
- //访问地址:http://localhost:10100/queryAppointFurn/小白
- @GetMapping("/queryAppointFurn/{name}")
- //这里是通过set方法反射赋值setName
- public BizException queryAppointFurn(@PathVariable("name") String furnName) {
-
- // System.out.println(furnName);
- //1.根据家居名Name字段-进行查询
- QueryWrapper<Furn> furnQueryWrapper = new QueryWrapper<>();
- //查询该家居名name的所有家居的信息
- furnQueryWrapper.lambda().eq(Furn::getName, furnName);
- List<Furn> furnList = furnService.list(furnQueryWrapper);
- if (!furnList.isEmpty()) {//结果不为空,则返回该家居名的家居信息
- //将结果返回给浏览器JSON
- return ResultResponse.success(furnList);
-
- } else if (furnList.isEmpty()) {//如果为空,根据厂商maker字段-进行查询
- //注意这里使用或者or
- furnQueryWrapper.lambda().or().eq(Furn::getMaker, furnName);
- furnList = furnService.list(furnQueryWrapper);
- if(!furnList.isEmpty()){
- return ResultResponse.success(furnList);
- }
- }
- //都没有找到
- throw new BizException("-1","查询结果为空");
-
- }

分页显示-前端
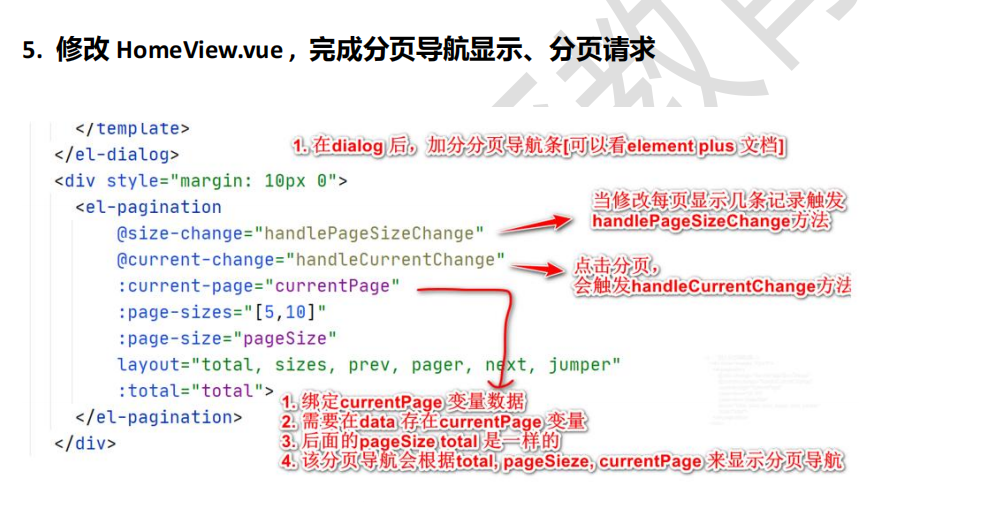
需要将全部查询接口-修改为分页查询接口进行访问
将查询所有家居的方法,修改成调用分页查询的方法

- <!-- 分页组件-->
- <el-pagination
- v-model:current-page="currentPage4"
- v-model:page-size="pageSize4"
- :page-sizes="[5,10]"
- :small="small"
- :disabled="disabled"
- :background="background"
- layout="total, sizes, prev, pager, next, jumper"
- :total="total"
- @size-change="handleSizeChange"
- @current-change="handleCurrentChange"
- />
- /*底部分页导航*/
- // 当前所在页
- const currentPage4 = ref(1)
- // 默认:每页显示多少条记录
- const pageSize4 = ref(5)
- // 一共有多少条记录
- const total = ref(0)
- const small = ref(false)
- const background = ref(false)
- const disabled = ref(false)
-
- const handleSizeChange = (val: number) => {
- console.log(`${val} items per page`)
- console.log("当前需修改每页显示几条记录触发")
- //每页显示多少条记录
- pageSize4.value=val;
- queryByPage();//分页显示
-
- }
- const handleCurrentChange = (val: number) => {
- console.log("点击分页触发")
- console.log(`current page: ${val}`)
- currentPage4.value=val;
- queryByPage();//分页显示
- }
- /*分页查询*/
- const queryByPage=()=>{
- // 根据id进行删除
- request.get(`/api/furnsByPage`,{
- params:{
- // pageNum pageSize 与后台请求的参数一致
- pageNum:currentPage4.value,
- pageSize:pageSize4.value
- }
- }).then((res: any) => {
- //修改成功后,查询查询家居-刷新页面
- if (res.data.code == 2000) {
- console.log(res.data)
- ElMessage({
- message: '查询成功.',
- type: 'success',
- })
- //显示一共有多少条记录total
- total.value=res.data.result.total
- //将tableData数组清空-将查询的内容重新覆盖
- tableData.length=0;
- //得到查询的家居信息[数组]
- const furnList = res.data.result.records;
- //遍历该家居对象,将当前家居信息逐个添加到tableData数组中
- //这一步是为了能渲染数据
- for (const furn of furnList) {
- tableData.push(furn)
- }
- }
- if (res.data.code == -1) {
- //将tableData数组清空-将之前查询的内容清空
- tableData.length=0;
- //清空查询的记录数
- total.value = 0//将之前查询的记录数,清空
- console.log("res",res)
- ElMessage({
- message: res.data.localizedMessage,
- type: 'error',
- })
- }
- })
- }

分页显示-后端


- /**
- * mybatis-plus 分页插件,引入参考 mybatis-plus 官网
- */
- @Configuration
- public class MybatisPlusConfig {
- /**
- * 分页插件
- */
- @Bean
- public MybatisPlusInterceptor mybatisPlusInterceptor() {
- MybatisPlusInterceptor interceptor = new MybatisPlusInterceptor();
- /**
- * DbType.MYSQL: 这里根据你的实际情况来指定是什么 DbTye*/
- interceptor.addInnerInterceptor
- (new PaginationInnerInterceptor(DbType.MYSQL));
- return interceptor;
- }
- }


- /**
- * 分页查询
- * @param pageNum 默认显示第 1 页
- * @param pageSize 默认每页显示 5 条记录*/
- @ResponseBody
- @RequestMapping("/furnsByPage")
- public BizException listFurnsByPage(@RequestParam(defaultValue = "1") Integer pageNum,
- @RequestParam(defaultValue = "5") Integer pageSize) {
- Page<Furn> furnPage = furnService.page(new Page<>(pageNum, pageSize));
- return ResultResponse.success(furnPage);
- }
3. 为 方 便 观 察 SQL, 配 置 MyBatis-Plus 日 志 输 出 ,
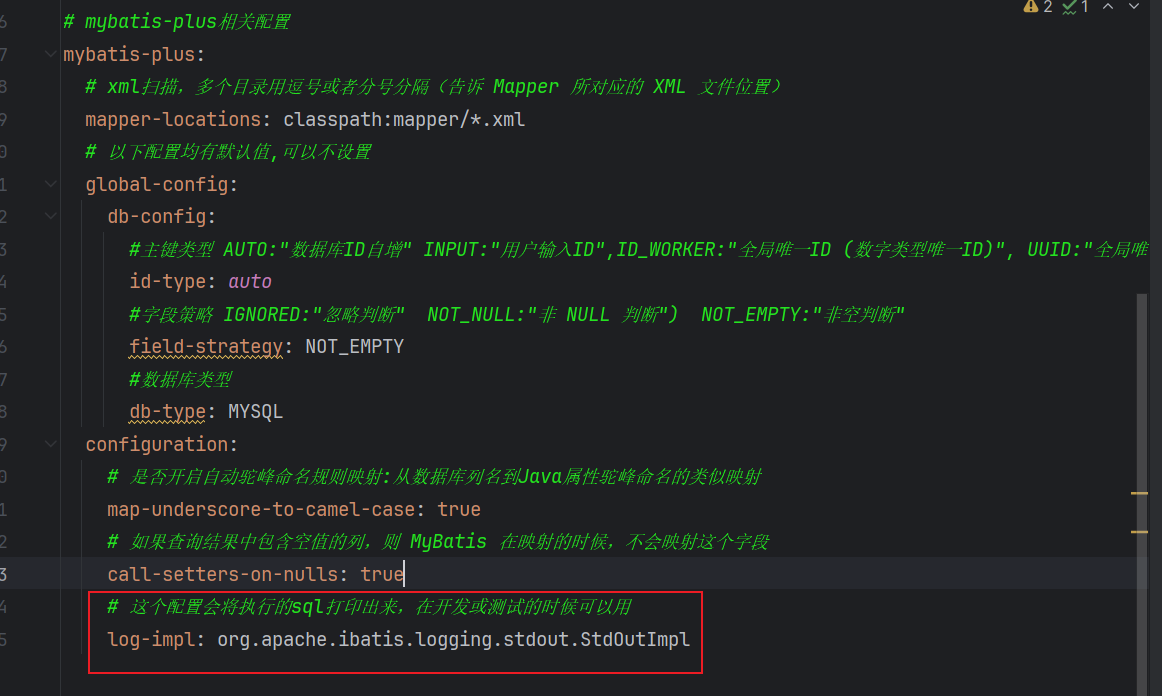
4. 使 用 Postman 进 行 测 试 , 看 看 分 页 查 询 是 否 OK , 浏 览 器
http://localhost:10100/furnsByPage
分页显示-带检索条件
后端
将之前全局带条件queryAppointFurn
修改该的接口代码,
- /** 带检索条件的查询
- * @param furnName:
- * @return BizException
- * @author "卒迹"
- * @description TODO
- * @date 20:56
- */
- //访问地址:http://localhost:10100/queryAppointFurn?name=小白
- @GetMapping("/queryAppointFurn")
- //这里是通过set方法反射赋值setName
- // 默认不传pageNum pageSize 则按默认值分页
- public BizException queryAppointFurn(@RequestParam(defaultValue = "1") Integer pageNum,
- @RequestParam(defaultValue = "5") Integer pageSize,
- @RequestParam("name") String furnName) {
-
- // System.out.println(furnName);
- //1.根据家居名Name字段-进行查询
- QueryWrapper<Furn> furnQueryWrapper = new QueryWrapper<>();
- //查询该家居名name的所有家居的信息
- furnQueryWrapper.lambda().eq(Furn::getName, furnName);
- //并且分页显示
- Page<Furn> page =
- furnService.page(new Page<>(pageNum, pageSize), furnQueryWrapper);
- //测试得到的数据
- // System.out.println("page="+page);
-
- if (!page.getRecords().isEmpty()) {//结果不为空,则返回该家居名的家居信息
- //将结果返回给浏览器JSON
- return ResultResponse.success(page);
-
- } else if (page.getRecords().isEmpty()) {//如果为空,根据厂商maker字段-进行查询
- //注意这里使用或者or
- furnQueryWrapper.lambda().or().eq(Furn::getMaker, furnName);
- page =
- furnService.page(new Page<>(pageNum, pageSize), furnQueryWrapper);
- if(!page.getRecords().isEmpty()){
- return ResultResponse.success(page);
- }
- }
- //都没有找到
- throw new BizException("-1","查询结果为空");
-
- }

使用 PostMan 进行测试

前端
http://localhost:10100/queryAppointFurn?name=小白
根据接口文档-来进行发起 Axios

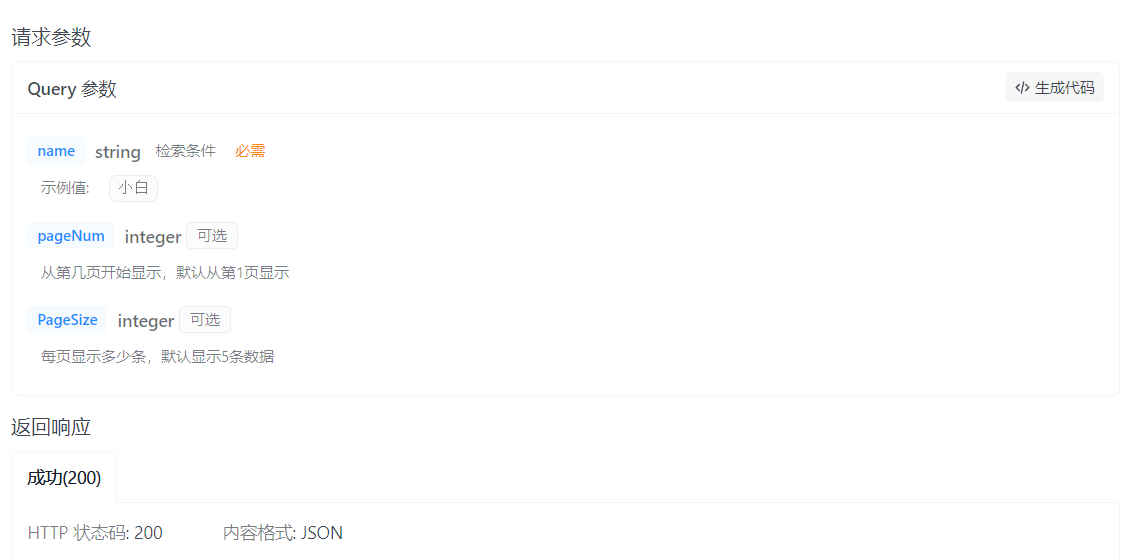
将之前的检索条件查询-增加分页查询的功能
- export interface pageAppointRequest {
- /**
- * 检索条件
- */
- name: any;
- /**
- * 从第几页开始显示,默认从第1页显示
- */
- pageNum?: number;
- /**
- * 每页显示多少条,默认显示5条数据
- */
- PageSize?: number;
-
- [property: string]: any;
- }
-
-
- /*pageAppointRequest 规范了传输的数据类型格式*/
- const queryAppointFurn: pageAppointRequest = () => {
- // 根据id进行删除
- request.get(`/api/queryAppointFurn`, {
- params: {
- name: search.value,
- pageNum: currentPage4.value,
- pageSize: pageSize4.value
- },
-
- }).then((res: any) => {
- //修改成功后,查询查询家居-刷新页面
- if (res.data.code == 2000) {
- ElMessage({
- message: '查询成功.',
- type: 'success',
- })
- //显示一共有多少条查询记录total
- total.value = res.data.result.total
- //将tableData数组清空-将查询的内容重新覆盖
- tableData.length = 0;
- //得到查询的家居信息[数组]
- const furnList = res.data.result.records;
- //遍历该家居对象,将当前家居信息逐个添加到tableData数组中
- for (const furn of furnList) {
- tableData.push(furn)
- }
- }//没有查询到
- if (res.data.code == -1) {
- //将tableData数组清空-将查询的内容重新覆盖
- tableData.length = 0;
- //显示一共有多少条查询记录total
- total.value = 0//将之前查询的记录数,清空
- console.log("res", res)
- ElMessage({
- message: res.data.localizedMessage,
- type: 'error',
- })
- }
- })
- }

解决:点击分页按钮后,不按检索内容进行分页
handlerSiezChange/handleCurrnetChange 方法
在点击分页按钮后触发

表单校验(前端)

- rules: {
- name: [
- {required: true, message: '请输入称家居名', trigger: 'blur'}
- ],maker: [
- {required: true, message: '请输入称制造商', trigger: 'blur'}
- ],price: [
- {required: true, message: '请输入价格', trigger: 'blur'}, {pattern: /^(([1-9]\d*)|(0))(\.\d+)?$/, message: '请输入数字', trigger: 'blur'}
- ],sales: [
- {required: true, message: '请输入销量', trigger: 'blur'}, {pattern: /^(([1-9]\d*)|(0))$/, message: '请输入数字', trigger: 'blur'}
- ],stock: [
- {required: true, message: '请输入库存', trigger: 'blur'}, {pattern: /^(([1-9]\d*)|(0))$/, message: '请输入数字', trigger: 'blur'}
- ]
- }
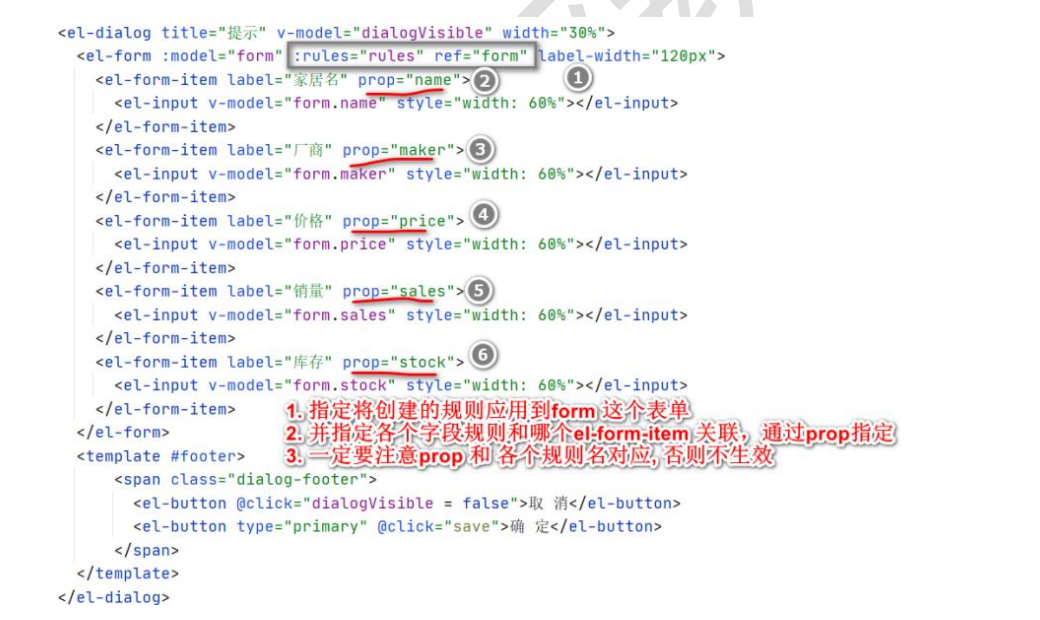
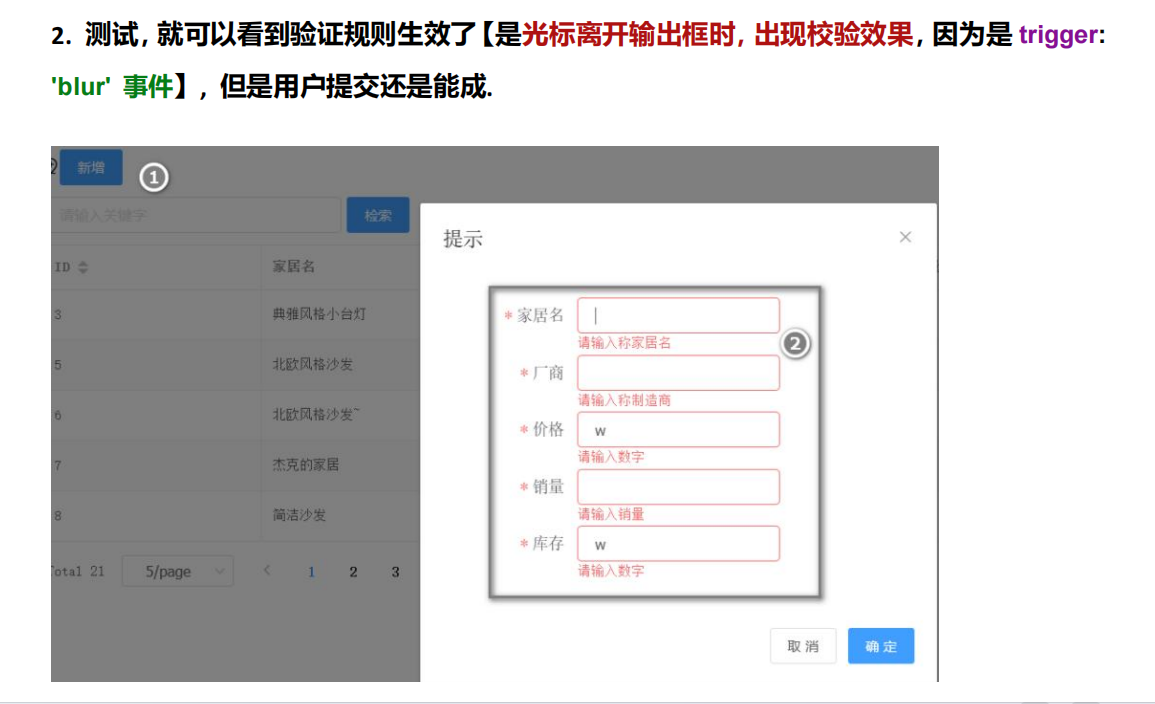
表格校验(后端)
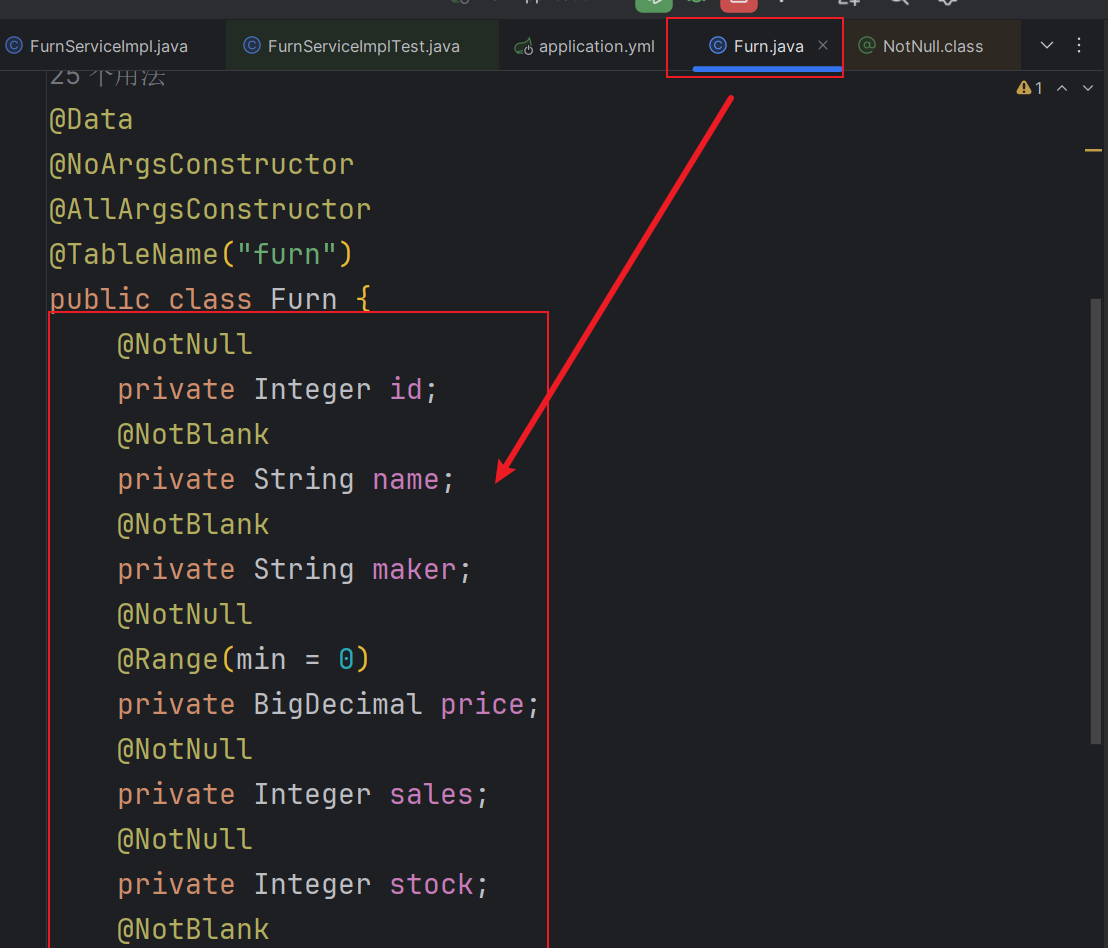
NotNull: 基本数据类型
NotEmpty: 数组或者集合
NotBlank: 字符串 String
常用的校验注解之 @NotNull、@NotBlank、@NotEmpty 的区别-CSDN博客
@NotEmpty、@NotBlank、@NotNull的区别_notblank和notempty-CSDN博客
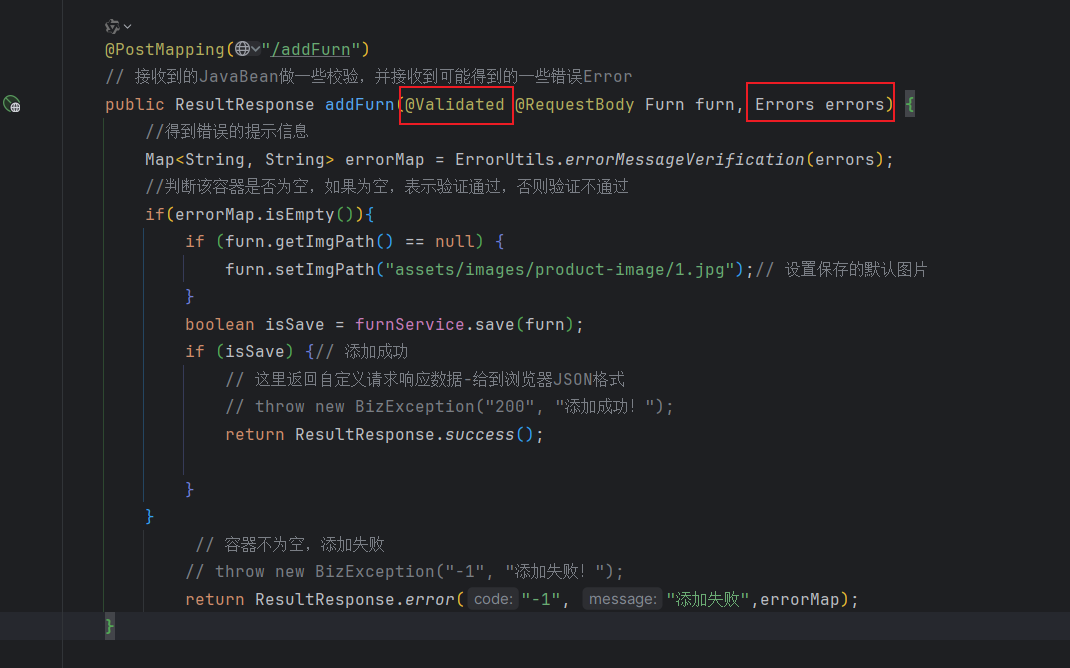
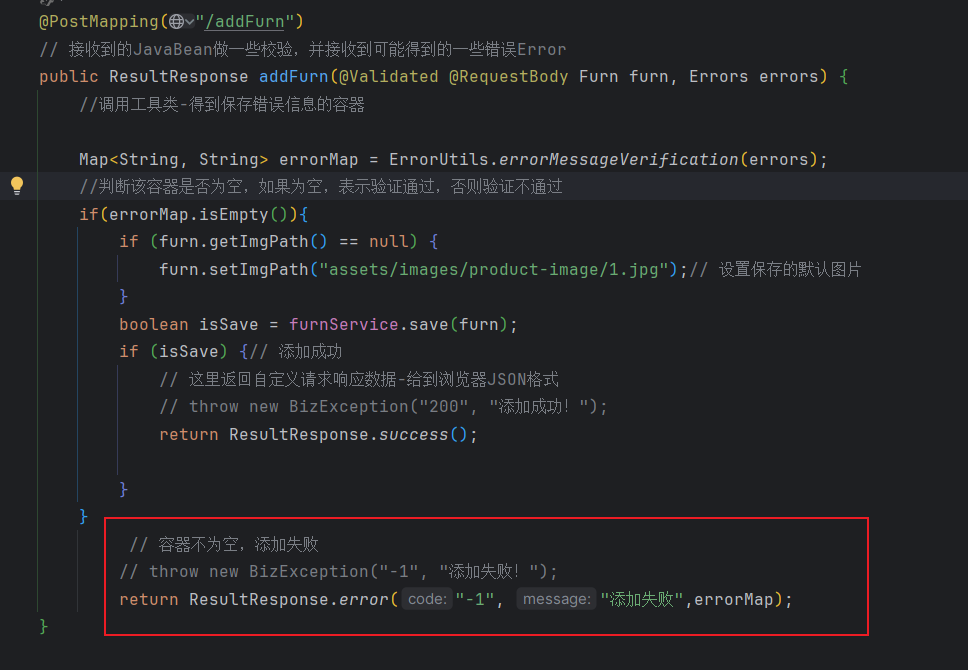
简单做了非空校验
- /**
- * @author 卒迹
- * @version 1.0
- */
- public class ErrorUtils {
-
- /**
- * 错误信息验证 如果返回的容器为空,则表示验证通过,否则验证不通过
- *
- * @param errors:
- * @return Map<String, String>
- * @author "卒迹"
- * @description TODO
- * @date 1:53
- */
- public static Map<String, String> errorMessageVerification(Errors errors) {
- // 定义1个保存错误信息的容器:key:字段名 value:错误提示信息
- ConcurrentHashMap<String, String> map = new ConcurrentHashMap<>();
- List<FieldError> fieldErrors = errors.getFieldErrors();// 得到所有的错误信息的字段
- for (FieldError fieldError : fieldErrors) {// 遍历该容器
- String field = fieldError.getField();// 字段
- String defaultMessage = fieldError.getDefaultMessage();// 错误默认提示信息
- map.put(field, defaultMessage);// 将字段与错误信息保存到容器中
- }
- return map;///返回该容器
- }
-
- /**
- * 用于判断校验是否成功
- *
- * @param errors:
- * @return boolean
- * @author "卒迹"
- * @description TODO
- * @date 2:05
- */
- public static boolean isEmptyErrorMessage(Errors errors) {
- // 判断得到的容器是否为空,如果为空,则校验成功,否则校验失败
- Map<String, String> map = errorMessageVerification(errors);
- if (map.isEmpty()) {
- return true;
- }
- return false;
- }
- }

调用该工具类,返回保存错误信息的容器
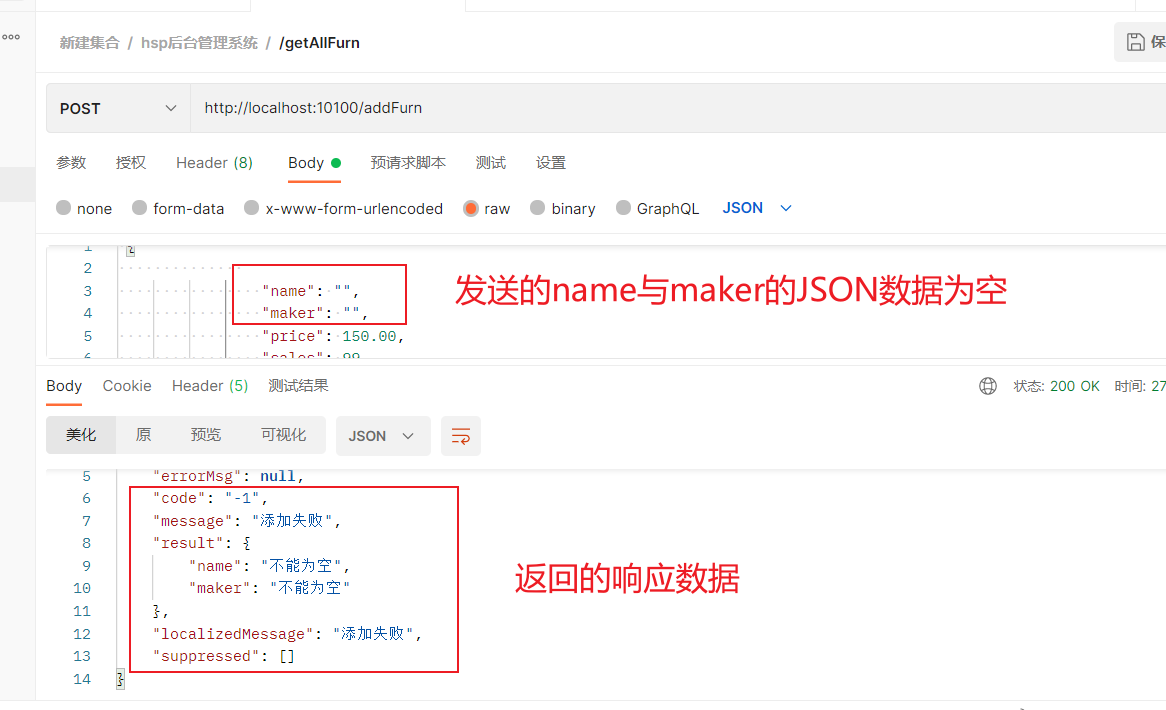
使用 PostMan 进行验证
