- 1numpy 学习 第2篇:ndarray 基础操作
- 2.NET 调整图片尺寸(Resize)各种方法_skiasharp imagesharp
- 3初试Vue之元素、属性赋值_vue 页面元素赋值
- 4Windows LTSC、LTSB、Server 安装 Microsoft Store 应用商店_windowsserver服务器安装微软商店
- 5kms不是盗版,不了解kms的管理员请看下微软官方链接,解决”运行microsoft windows非核心版本的计算机上”的问题(kms不等于盗版)_kms software protection
- 6Axure8.0学习笔记(七)——动态面板_动态面板备注
- 7【R语言学习笔记】探索ggplot的排列组合:线图(一)_p <- ggplot(rankmerge,aes(x = rank,y = prob,colour
- 8FlightLLM:大模型推理的性价比之选
- 9Base64转二进制文件流以及转File、图片转Base64、二进制流转Base64
- 10【无标题】学习Markdown
用 Python 撸一个 Web 服务器-第6章:完善 Todo List 应用_python 做网页to do list
赞
踩
这一章,我们来完成 todo 管理功能的剩余部分:新增、修改和删除功能。
新增 todo
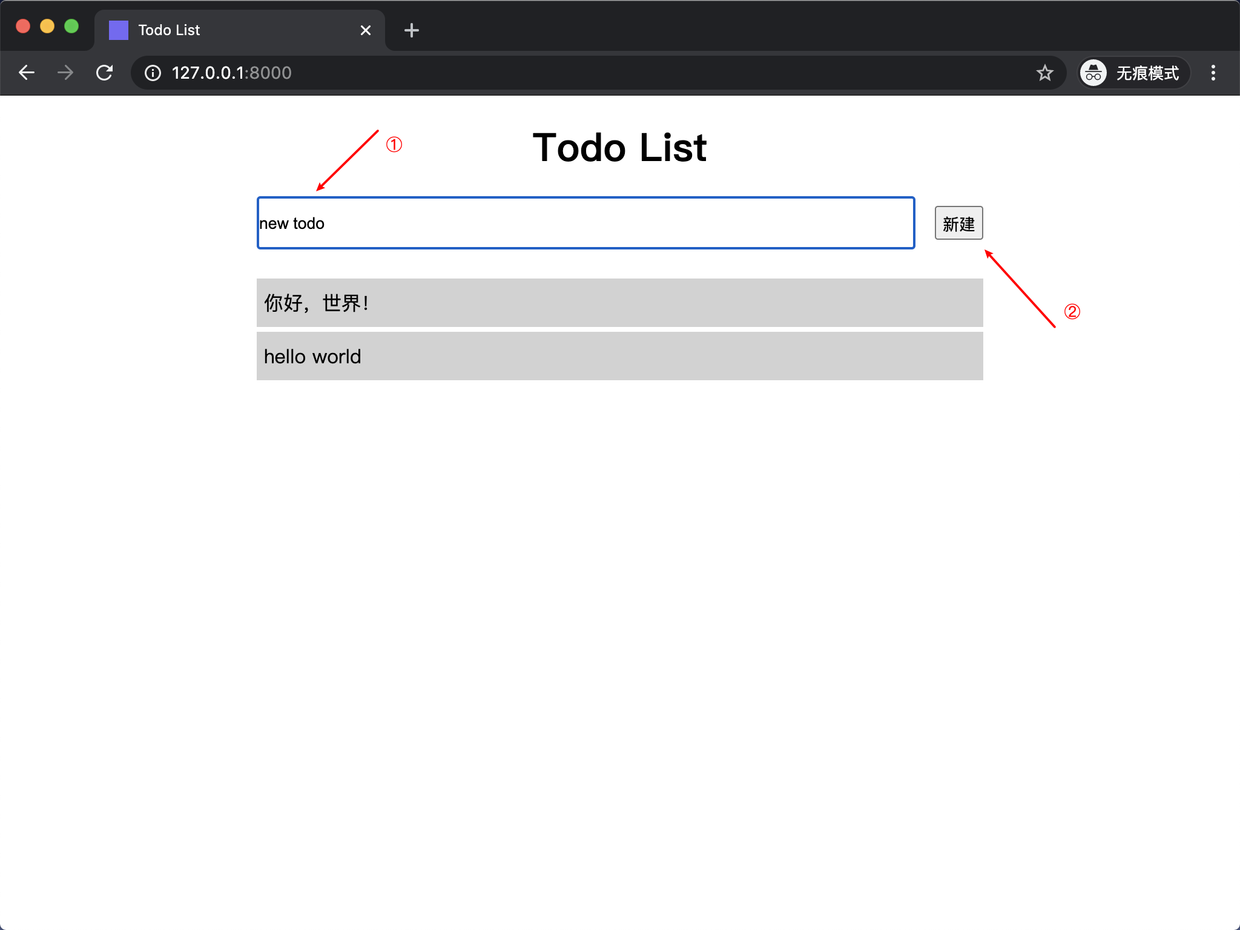
首先实现 Todo List 程序的新增功能。新增 todo 的逻辑如下:
- 在首页顶部的输入框中输入 todo 内容。
- 然后点击新建按钮。
- 将输入框中的 todo 内容通过
POST请求传递到服务器端。 - 服务器端解析请求中的 todo 内容并存储到文件。
- 重新返回到程序首页。
接下来对这些步骤进行具体实现。
首页 HTML 中添加新增 todo 的输入框和新建按钮:
<!-- todo_list/todo/templates/index.html -->

<!DOCTYPE html>
<html>
<head>
    <meta charset="UTF-8">
    <title>Todo List</title>
    <!-- 引入外部 CSS 样式 -->
    <link rel="stylesheet" href="/static/css/style.css">
</head>
<body>
<h1 class="container">Todo List</h1>
<div class="container">
    <ul>
        <li>
            <form class="new" action="/new" method="post">
                <input type="text" name="content">
                <button class="save">新建</button>
            </form>
        </li>
        <br>
        {% for todo in todo_list %}
            <li>
                <div>{{ todo.content }}</div>
            </li>
        {% endfor %}
    </ul>
</div>
</body>
</html>
- 1
- 2
- 3
- 4
- 5
- 6
- 7
- 8
- 9
- 10
- 11
- 12
- 13
- 14
- 15
- 16
- 17
- 18
- 19
- 20
- 21
- 22
- 23
- 24
- 25
- 26
- 27
- 28
- 29
- 30
代码中增加了一个 form 标签,用来新增 todo。请求路径地址为 /new,请求方法为 post。
将首页的 CSS 代码追加到 style.css 文件中:
/* todo_list/todo/static/css/style.css */

.container ul li:first-child {
    background-color: #ffffff;
    padding: 0;
}

.container button {
    width: 40px;
    height: 28px;
    padding: 4px;
    cursor: pointer;
}

.new {
    width: 100%;
    max-width: 600px;
    height: 40px;
    display: flex;
    justify-content: space-between;
    align-items: center;
}

form input {
    width: 90%;
    height: 100%;
}
- 1
- 2
- 3
- 4
- 5
- 6
- 7
- 8
- 9
- 10
- 11
- 12
- 13
- 14
- 15
- 16
- 17
- 18
- 19
- 20
- 21
- 22
- 23
- 24
- 25
- 26
- 27
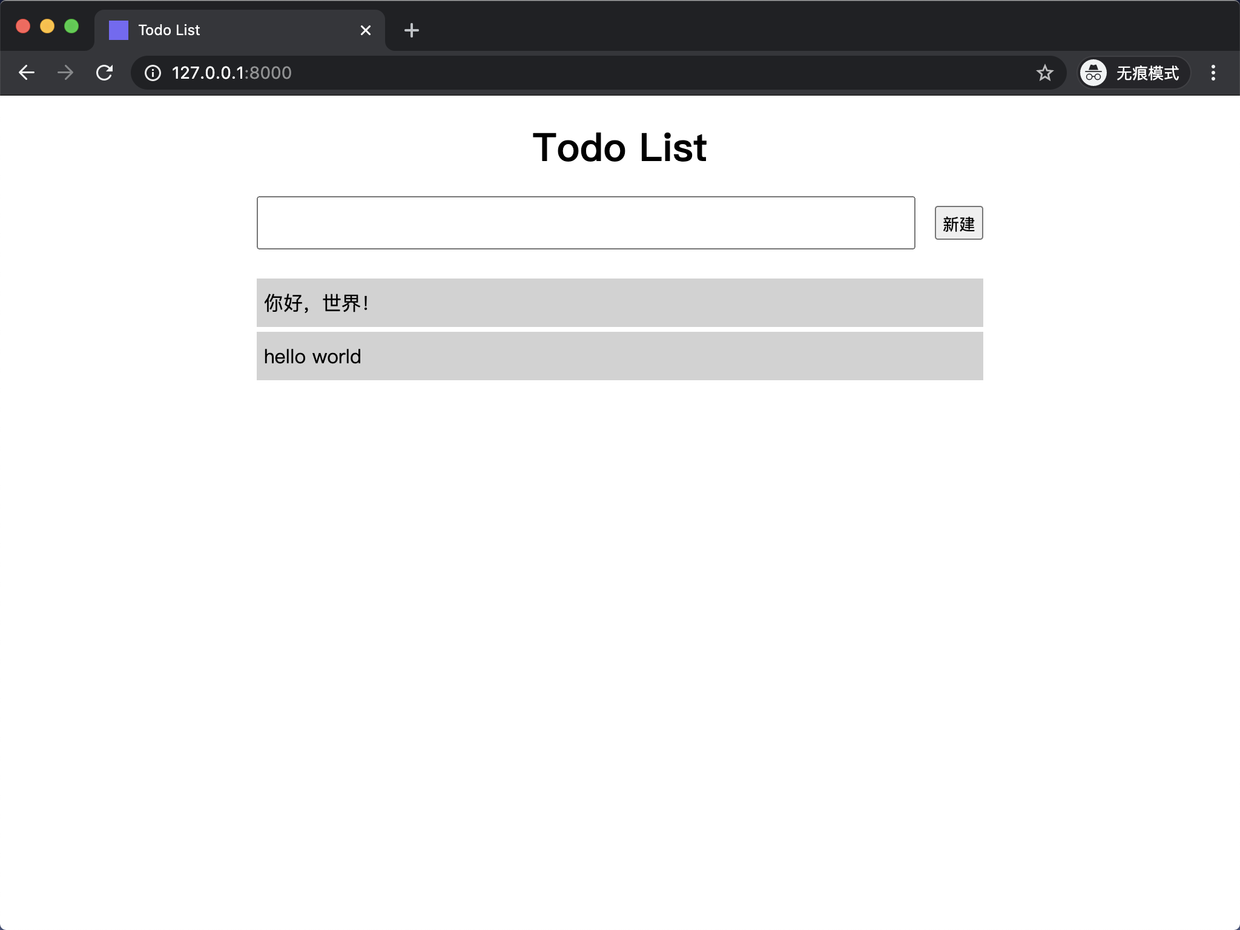
此时首页效果如下:
修改 Request 类,使其能够解析 GET、POST 请求中携带的参数:
# todo_list/todo/utils.py

from urllib.parse import unquote_plus

...

class Request(object):
    """请求类"""

    def __init__(self, request_message):
        method, path, headers, args, form = self.parse_data(request_message)
        self.method = method  # 请求方法 GET、POST
        self.path = path  # 请求路径 /index
        self.headers = headers  # 请求头 {'Host': '127.0.0.1:8000'}
        self.args = args  # 查询参数
        self.form = form  # 请求体

    def parse_data(self, data):
        """解析请求数据"""
        # 用请求报文中的第一个 '\r\n\r\n' 做分割,将得到请求头和请求体
        header, body = data.split('\r\n\r\n', 1)
        method, path, headers, args = self._parse_header(header)
        form = self._path_body(body)

        return method, path, headers, args, form

    def _parse_header(self, data):
        """解析请求头"""
        # 拆分请求行和请求首部
        request_line, request_header = data.split('\r\n', 1)

        # 请求行拆包 'GET /index HTTP/1.1' -> ['GET', '/index', 'HTTP/1.1']
        # 因为 HTTP 版本号没什么用,所以用一个下划线 _ 变量来接收
        method, path_query, _ = request_line.split()
        path, args = self._parse_path(path_query)

        # 解析请求首部所有的键值对,组装成字典
        headers = {}
        for header in request_header.split('\r\n'):
            k, v = header.split(': ', 1)
            headers[k] = v

        return method, path, headers, args

    @staticmethod
    def _parse_path(data):
        """解析请求路径、请求参数"""
        args = {}
        # 请求路径和 GET 请求参数格式: /index?edit=1&content=text
        if '?' not in data:
            path, query = data, ''
        else:
            path, query = data.split('?', 1)
            for q in query.split('&'):
                k, v = q.split('=', 1)
                args[k] = v
        return path, args

    @staticmethod
    def _path_body(data):
        """解析请求体"""
        form = {}
        if data:
            # POST 请求体参数格式: username=zhangsan&password=mima
            for b in data.split('&'):
                k, v = b.split('=', 1)
                # 前端页面中通过 form 表单提交过来的数据会被自动编码,使用 unquote_plus 来解码
                form[k] = unquote_plus(v)
        return form
- 1
- 2
- 3
- 4
- 5
- 6
- 7
- 8
- 9
- 10
- 11
- 12
- 13
- 14
- 15
- 16
- 17
- 18
- 19
- 20
- 21
- 22
- 23
- 24
- 25
- 26
- 27
- 28
- 29
- 30
- 31
- 32
- 33
- 34
- 35
- 36
- 37
- 38
- 39
- 40
- 41
- 42
- 43
- 44
- 45
- 46
- 47
- 48
- 49
- 50
- 51
- 52
- 53
- 54
- 55
- 56
- 57
- 58
- 59
- 60
- 61
- 62
- 63
- 64
- 65
- 66
- 67
- 68
- 69
为 Request 类新增了两个静态方法,_parse_path 方法用来拆分请求路径和请求参数。_path_body 用来提取请求体中的参数并转换为 dict。
在服务器端将新增的 todo 内存保存到文件后,程序需要重新回到首页。所以我们需要定义一个重定向函数:
# todo_list/todo/utils.py

...

def redirect(url, status=302):
    """重定向"""
    headers = {
        'Location': url,
    }
    body = ''
    return Response(body, headers=headers, status=status)
- 1
- 2
- 3
- 4
- 5
- 6
- 7
- 8
- 9
- 10
- 11
重定向原理大致如下:
浏览器收到服务端的响应,如果状态码为 3XX,则表示重定向,浏览器会解析出响应头中的 Location 首部字段的值,然后通过 GET 请求方式访问这个 URL 地址。
重定向状态码最常见的两个就是 301、302,301 代表永久重定向,302 代表临时重定向。我们项目适合使用临时重定向,所以 redirect 函数的 status 参数默认值为 302。
同时还需要修改 Response 响应类,使其能够处理 302 状态码:
# todo_list/todo/utils.py

class Response(object):
    """响应类"""

    # 根据状态码获取原因短语
    reason_phrase = {
        200: 'OK',
        302: 'FOUND',
        405: 'METHOD NOT ALLOWED',
    }

    ...
- 1
- 2
- 3
- 4
- 5
- 6
- 7
- 8
- 9
- 10
- 11
- 12
- 13
在模型层,给 Todo 模型类新增一个 save 实例方法用来保存 todo 对象到文件中:
# todo_list/todo/models.py

import os
import json

from todo.config import BASE_DIR


class Todo(object):
    """
    Todo 模型类
    """

    def __init__(self, **kwargs):
        self.id = kwargs.get('id')
        self.content = kwargs.get('content', '')

    @classmethod
    def _db_path(cls):
        """获取存储 todo 数据文件的绝对路径"""
        # 返回 'todo_list/todo/db/todo.json' 文件的绝对路径
        path = os.path.join(BASE_DIR, 'db/todo.json')
        return path

    @classmethod
    def _load_db(cls):
        """加载 JSON 文件中所有 todo 数据"""
        path = cls._db_path()
        with open(path, 'r', encoding='utf-8') as f:
            return json.load(f)

    @classmethod
    def _save_db(cls, data):
        """将 todo 数据保存到 JSON 文件"""
        path = cls._db_path()
        with open(path, 'w', encoding='utf-8') as f:
            json.dump(data, f, ensure_ascii=False, indent=4)

    @classmethod
    def all(cls, sort=False, reverse=False):
        """获取全部 todo"""
        # 这一步用来将所有从 JSON 文件中读取的 todo 数据转换为 Todo 实例化对象,方便后续操作
        todo_list = [cls(**todo_dict) for todo_dict in cls._load_db()]
        # 对数据按照 id 排序
        if sort:
            todo_list = sorted(todo_list, key=lambda x: x.id, reverse=reverse)
        return todo_list

    def save(self):
        """保存 todo"""
        # 查找出除 self 以外所有 todo
        # todo.__dict__ 是保存了所有实例属性的字典
        todo_list = [todo.__dict__ for todo in self.all(sort=True) if todo.id != self.id]

        # 自增 id
        if self.id is None:
            # 如果 todo_list 长度大于 0 说明不是第一条 todo,取最后一条 todo 的 id 加 1
            if len(todo_list) > 0:
                self.id = todo_list[-1]['id'] + 1
            # 否则说明是第一条 todo,id 为 1
            else:
                self.id = 1

        # 将当前 todo 追加到 todo_list
        todo_list.append(self.__dict__)
        # 将所有 todo 保存到文件
        self._save_db(todo_list)
- 1
- 2
- 3
- 4
- 5
- 6
- 7
- 8
- 9
- 10
- 11
- 12
- 13
- 14
- 15
- 16
- 17
- 18
- 19
- 20
- 21
- 22
- 23
- 24
- 25
- 26
- 27
- 28
- 29
- 30
- 31
- 32
- 33
- 34
- 35
- 36
- 37
- 38
- 39
- 40
- 41
- 42
- 43
- 44
- 45
- 46
- 47
- 48
- 49
- 50
- 51
- 52
- 53
- 54
- 55
- 56
- 57
- 58
- 59
- 60
- 61
- 62
- 63
- 64
- 65
- 66
- 67
在控制器层,编写一个 new 视图函数用来处理新增 todo 的业务逻辑:
# todo_list/todo/controllers.py

def new(request):
    """新建 todo 视图函数"""
    form = request.form
    print(f'form: {form}')

    content = form.get('content')
    # 这里判断前端传递过来的参数是否有内容,如果为空则说明不是一个有效的 todo,直接重定向到首页
    if content:
        todo = Todo(content=content)
        todo.save()
    return redirect('/index')
- 1
- 2
- 3
- 4
- 5
- 6
- 7
- 8
- 9
- 10
- 11
- 12
- 13
在 new 视图函数中判断如果前端传递过来的 todo 有效,就将其保存到文件,然后重定向到首页。
其实对于检查 todo 是否有效的逻辑前端也可以处理,只需要在输入 todo 的 input 标签加上 required 属性即可。这样当用户未输入任何内容就直接点击新建按钮时,浏览器会自动给出 请填写此字段。 的提示,在浏览器端做校验的好处是可以在请求未发送给后台服务器之前,由浏览器自动完成输入校验,这样能够减少发送请求的次数,避免无效的请求发送到服务器后台造成资源的浪费。
<form class="new" action="/new" method="post">
  <input type="text" name="content" required>
  <button class="save">新建</button>
</form>
- 1
- 2
- 3
- 4

现在就可以使用 Todo List 程序的新增功能来添加 todo 了:

修改 todo
修改 todo 的逻辑如下:
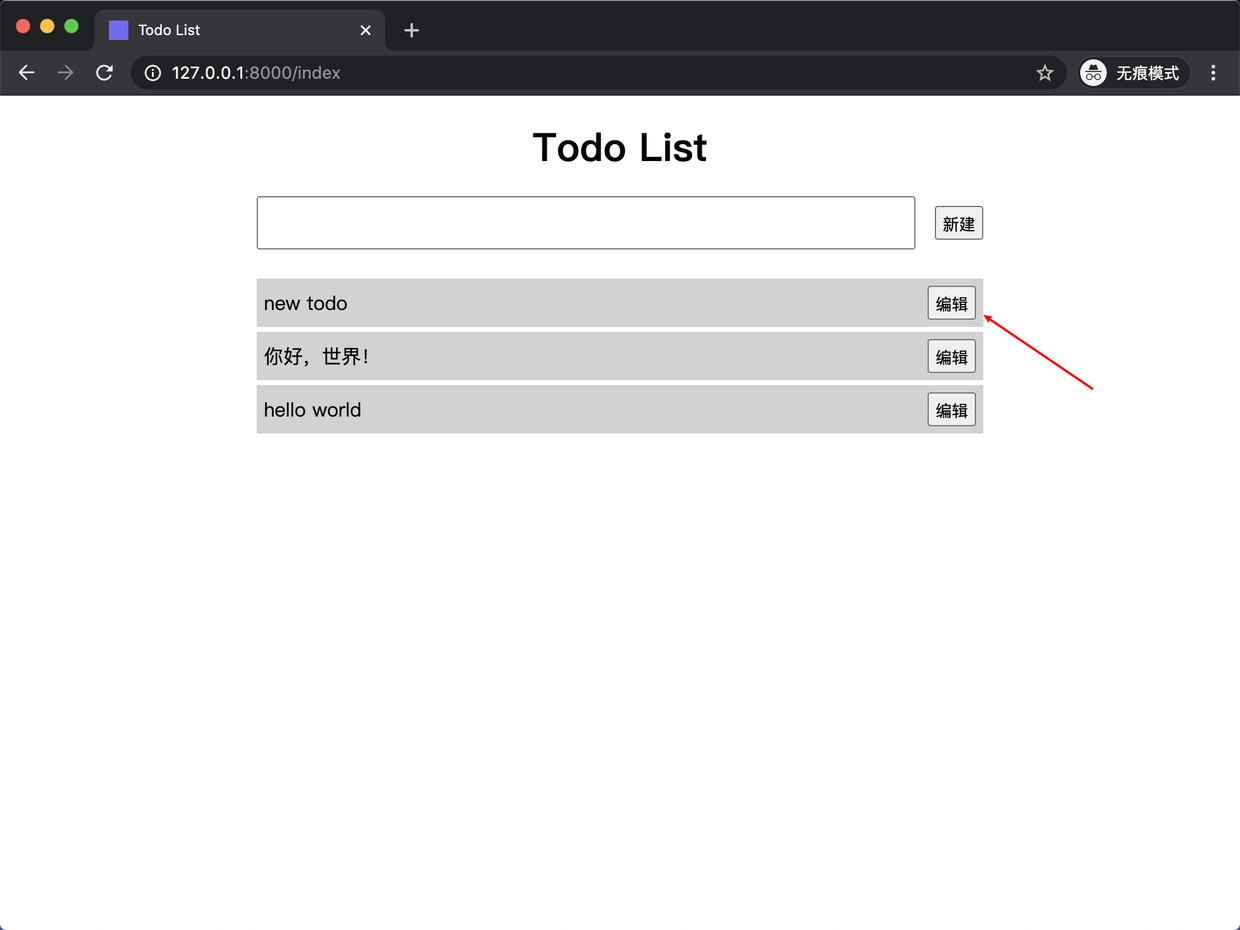
- 点击首页中想要修改的 todo 右侧的编辑按钮。
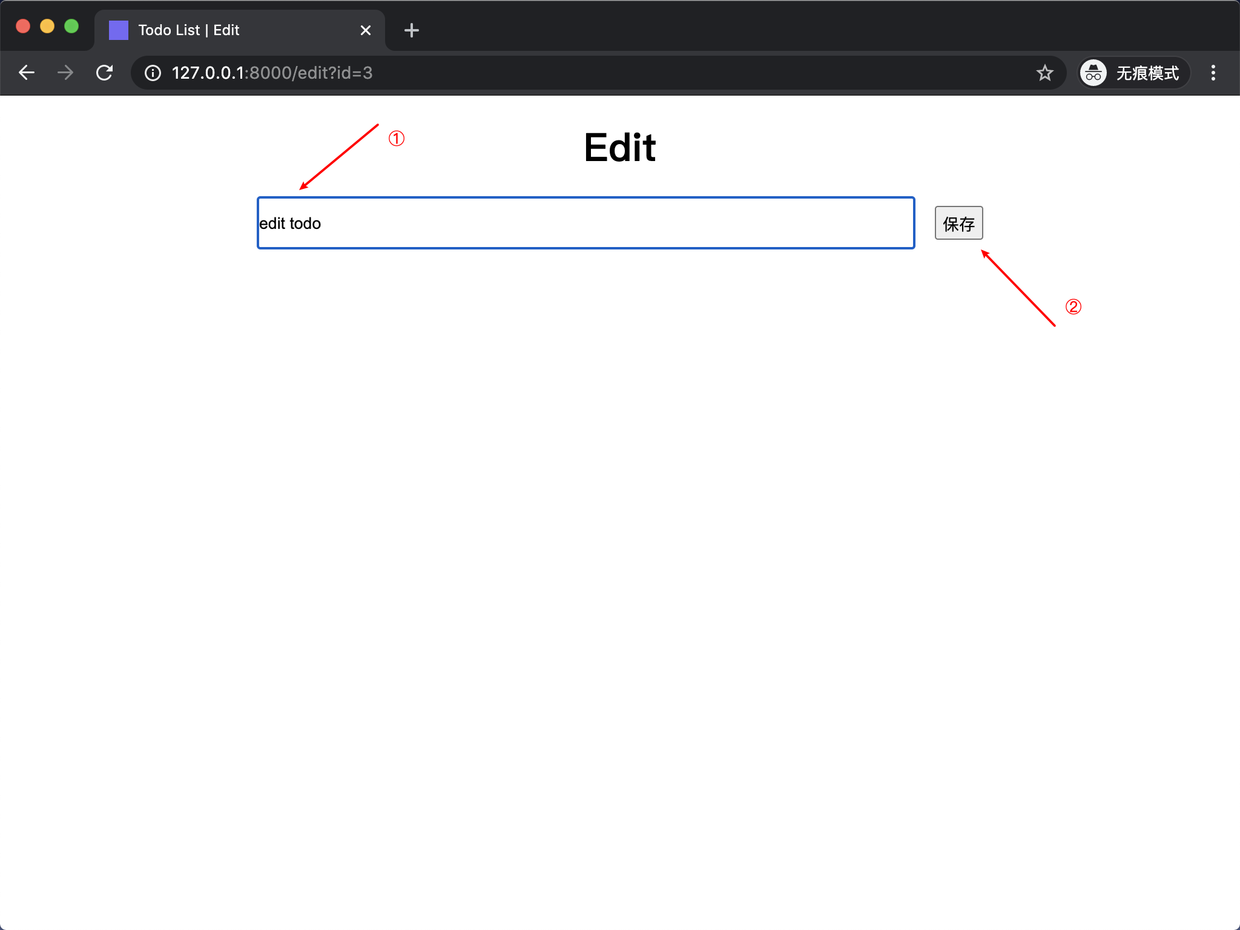
- 页面跳转到编辑页面。
- 修改这条 todo 内容,点击保存按钮。
- 将输入框中的 todo 内容通过
POST请求传递到服务器端。 - 服务器端将修改后的 todo 保存到文件。
- 重新返回到程序首页。
需要注意的是,修改 todo 依然采用了 POST 请求方式来提交数据。在前面介绍 HTTP 请求方法时,我提到过 HTTP 常见请求方法有四个:POST、DELETE、PUT、GET 分别对应增、删、改、查四个操作。如果采用 RESTful 风格来开发 Web API 最好完全遵照 HTTP 请求方法和操作的对应关系,以便开发出更加语义化的接口。这里为了简单起见,Todo List 程序只使用了 GET、POST 两种请求方式,除了获取数据时采用 GET 请求,新增、修改、删除操作都采用 POST 请求方式。
- todo 首页新增编辑按钮
编辑页面的 HTML 如下:
<!-- todo_list/todo/templates/edit.html -->

<!DOCTYPE html>
<html>
<head>
    <meta charset="UTF-8">
    <title>Todo List | Edit</title>
    <link rel="stylesheet" href="/static/css/style.css">
</head>
<body>
<h1 class="container">Edit</h1>
<div class="container">
    <form class="edit" action="/edit" method="post">
        <input type="hidden" name="id" value="{{ todo.id }}">
        <input type="text" name="content" value="{{ todo.content }}">
        <button>保存</button>
    </form>
</div>
</body>
</html>
- 1
- 2
- 3
- 4
- 5
- 6
- 7
- 8
- 9
- 10
- 11
- 12
- 13
- 14
- 15
- 16
- 17
- 18
- 19
- 20
将编辑页面的 CSS 代码追加到 style.css 文件中:
/* todo_list/todo/static/css/style.css */

.new, .edit {
    width: 100%;
    max-width: 600px;
    height: 40px;
    display: flex;
    justify-content: space-between;
    align-items: center;
}
- 1
- 2
- 3
- 4
- 5
- 6
- 7
- 8
- 9
- 10
在模型层,给 Todo 模型类新增两个查询 todo 的方法:
# todo_list/todo/models.py

class Todo(object):
    """
    Todo 模型类
    """

    ...

    @classmethod
    def find_by(cls, limit=-1, ensure_one=False, sort=False, reverse=False, **kwargs):
        """查询 todo"""
        result = []
        todo_list = [todo.__dict__ for todo in cls.all(sort=sort, reverse=reverse)]
        for todo in todo_list:
            # 根据关键字参数查询 todo
            for k, v in kwargs.items():
                if todo.get(k) != v:
                    break
            else:
                result.append(cls(**todo))

        # 查询给定条数的数据
        if 0 < limit < len(result):
            result = result[:limit]
        # 查询结果集中的第一条数据
        if ensure_one:
            result = result[0] if len(result) > 0 else None

        return result

    @classmethod
    def get(cls, id):
        """通过 id 查询 todo"""
        result = cls.find_by(id=id, ensure_one=True)
        return result
- 1
- 2
- 3
- 4
- 5
- 6
- 7
- 8
- 9
- 10
- 11
- 12
- 13
- 14
- 15
- 16
- 17
- 18
- 19
- 20
- 21
- 22
- 23
- 24
- 25
- 26
- 27
- 28
- 29
- 30
- 31
- 32
- 33
- 34
- 35
- 36
find_by 方法用来根据给定条件查询 todo,get 方法内部调用的还是 find_by 方法,只根据 id 来搜索,查询结果为单条数据,这两个方法均为类方法。
在控制器层,编写一个 edit 视图函数用来处理编辑 todo 的业务逻辑:
# todo_list/todo/controllers.py

def edit(request):
    """编辑 todo 视图函数"""
    # 处理 POST 请求
    if request.method == 'POST':
        form = request.form
        print(f'form: {form}')

        id = int(form.get('id', -1))
        content = form.get('content')

        if id != -1 and content:
            todo = Todo.get(id)
            if todo:
                todo.content = content
                todo.save()
        return redirect('/index')

    # 处理 GET 请求
    args = request.args
    print(f'args: {args}')

    id = int(args.get('id', -1))
    if id == -1:
        return redirect('/index')

    todo = Todo.get(id)
    if not todo:
        return redirect('/index')

    context = {
        'todo': todo,
    }
    return render_template('edit.html', **context)


routes = {
    ...
    '/edit': (edit, ['GET', 'POST']),
}
- 1
- 2
- 3
- 4
- 5
- 6
- 7
- 8
- 9
- 10
- 11
- 12
- 13
- 14
- 15
- 16
- 17
- 18
- 19
- 20
- 21
- 22
- 23
- 24
- 25
- 26
- 27
- 28
- 29
- 30
- 31
- 32
- 33
- 34
- 35
- 36
- 37
- 38
- 39
- 40
- 41
edit 视图函数跟之前编写的其他视图函数有些不同,它同时支持两种请求方法,GET 请求返回 HTML 页面,POST 请求用来处理修改 todo 的逻辑,并在修改完成后重定向到首页。
现在就可以使用 Todo List 程序的编辑功能来修改 todo 了:

删除 todo
删除 todo 的逻辑如下:
- 点击首页中想要删除的 todo 右侧的删除按钮。
- 将这条 todo 的
id通过POST请求传递到服务器端。 - 服务器端通过得到的
id查询并删除对应的 todo。 - 重新返回到程序首页。
首页 HTML 中添加删除按钮:
<!-- todo_list/todo/templates/index.html -->

<!DOCTYPE html>
<html>
<head>
    <meta charset="UTF-8">
    <title>Todo List</title>
    <!-- 引入外部 CSS 样式 -->
    <link rel="stylesheet" href="/static/css/style.css">
</head>
<body>
<h1 class="container">Todo List</h1>
<div class="container">
    <ul>
        <li>
            <form class="new" action="/new" method="post">
                <input type="text" name="content" required>
                <button class="save">新建</button>
            </form>
        </li>
        <br>
        {% for todo in todo_list %}
            <li>
                <div>{{ todo.content }}</div>
                <div>
                    <a href="/edit?id={{ todo.id }}">
                        <button>编辑</button>
                    </a>
                    <form class="delete" action="/delete" method="post">
                        <input type="hidden" name="id" value="{{ todo.id }}">
                        <button>删除</button>
                    </form>
                </div>
            </li>
        {% endfor %}
    </ul>
</div>
</body>
</html>
- 1
- 2
- 3
- 4
- 5
- 6
- 7
- 8
- 9
- 10
- 11
- 12
- 13
- 14
- 15
- 16
- 17
- 18
- 19
- 20
- 21
- 22
- 23
- 24
- 25
- 26
- 27
- 28
- 29
- 30
- 31
- 32
- 33
- 34
- 35
- 36
- 37
- 38
- 39
将删除按钮的 CSS 代码追加到 style.css 文件中:
/* todo_list/todo/static/css/style.css */

.delete {
    display: inline-block;
}
- 1
- 2
- 3
- 4
- 5
在模型层,给 Todo 模型类新增一个 delete 实例方法用来从文件中删除 todo 对象:
# todo_list/todo/models.py

class Todo(object):
    """
    Todo 模型类
    """

   ...

    def delete(self):
        """删除 todo"""
        todo_list = [todo.__dict__ for todo in self.all() if todo.id != self.id]
        self._save_db(todo_list)
- 1
- 2
- 3
- 4
- 5
- 6
- 7
- 8
- 9
- 10
- 11
- 12
- 13
在控制器层,编写一个 delete 视图函数用来处理删除 todo 的业务逻辑:
# todo_list/todo/controllers.py

def delete(request):
    """删除 todo 视图函数"""
    form = request.form
    print(f'form: {form}')

    id = int(form.get('id', -1))
    if id != -1:
        todo = Todo.get(id)
        if todo:
            todo.delete()
    return redirect('/index')


routes = {
    ...
    '/delete': (delete, ['POST']),
}
- 1
- 2
- 3
- 4
- 5
- 6
- 7
- 8
- 9
- 10
- 11
- 12
- 13
- 14
- 15
- 16
- 17
- 18
- 19
现在就可以使用 Todo List 程序的删除功能来删除 todo 了:
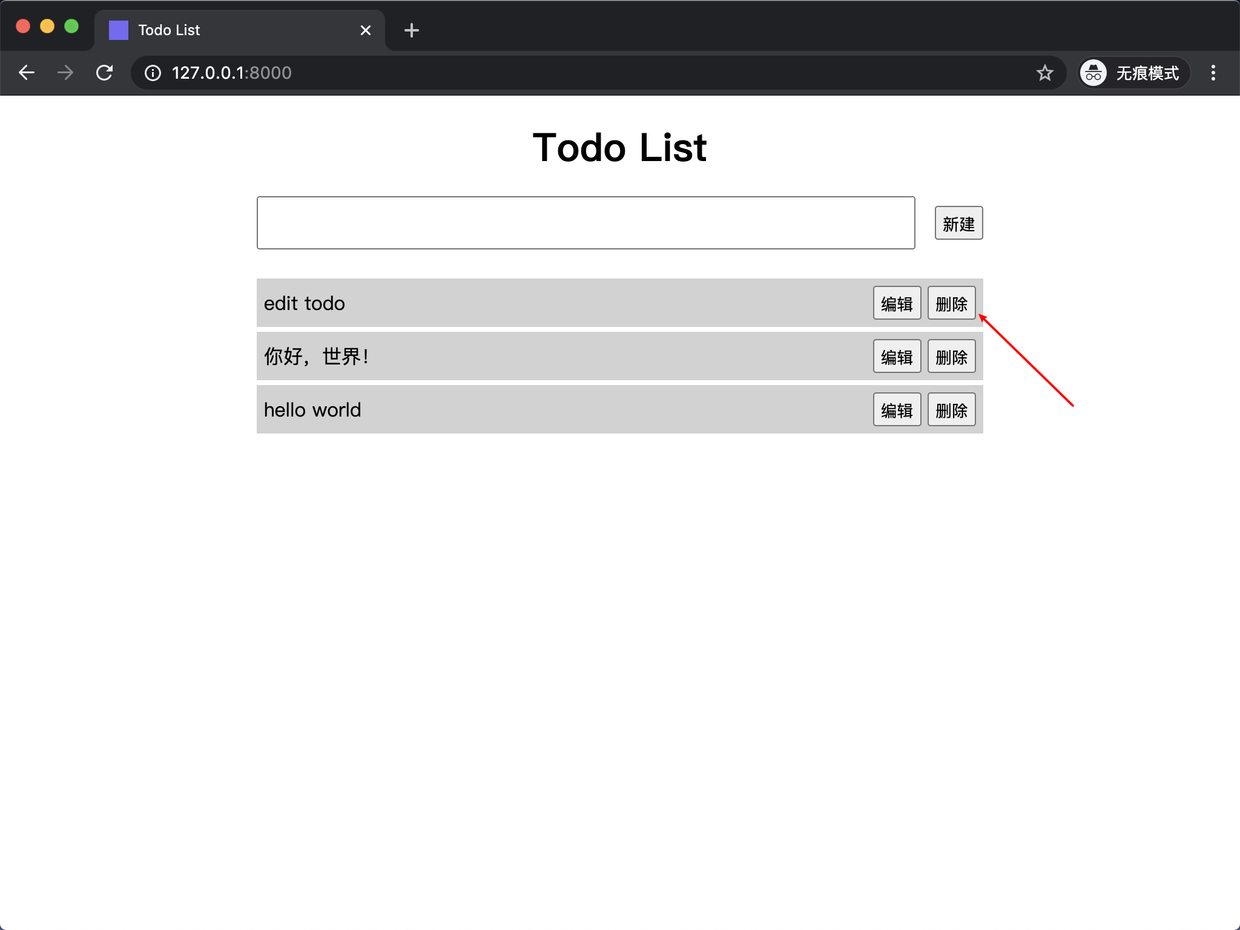

至此,todo 的管理部分代码编写完成。
本章源码:chapter6
联系我:
-
微信:jianghushinian


